Application Summary Report
Contents
Learn about the disposition of Interactive Voice Response (IVR) sessions.
Understanding the Application Summary Report
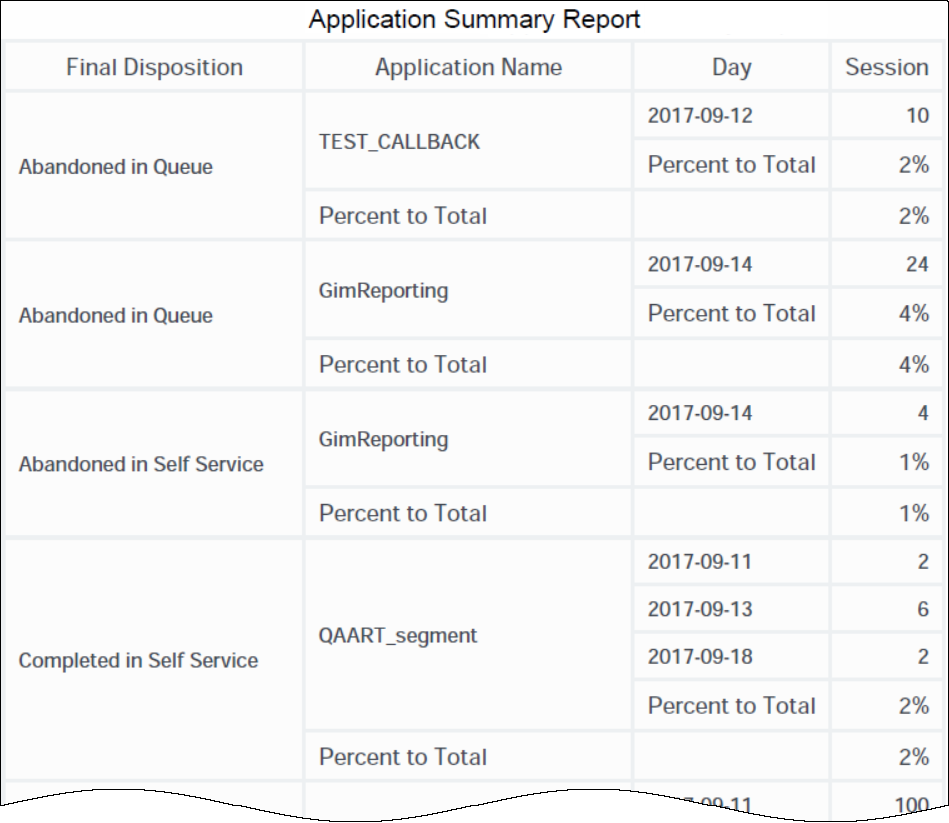
The (Designer folder) Application Summary Report provides detailed information about the origin of calls that traverse Designer applications, and the user-defined disposition of the calls. The report allows you view these results separately for each application, for time ranges that you specify.
To get a better idea of what this report looks like, view sample output from the report:
The following tables explain the prompts you can select when you generate the report, and the metrics and attributes that are represented in the report:
Prompts for the Application Summary Report
| Prompt | Description |
|---|---|
| Pre-set Date Filter | From the list, choose a time period on which to report, and move it to the Selected list. |
| Start Date | Choose the first day from which to gather data into the report. |
| End Date | Choose the last day from which to gather data into the report. |
| User Disposition | Filter the interactions included in the report based on whether the status when the caller exited the call flow was set by the agent (User Disposition) or by the system (Final Disposition). |
| Application | Choose the applications to include in the report. By default, the report includes all applications. If you add any applications to the Selected list, then only those applications are included. |
Attributes used in the Application Summary Report
| Attribute | Description |
|---|---|
| Application Name | This attribute enables data within the reporting interval to be organized by the name of the self-service and/or assisted-service Designer application. |
| Country | This attribute enables data within the reporting interval to be organized by the name of the country in which the caller is located. |
| DNIS | This attribute enables data within the reporting interval to be organized by the Dialed Number Identification Service (DNIS). |
| Day | This attribute enables data within the reporting interval to be organized by a particular day. |
| Final Disposition | This attribute enables data to be organized by the status assigned to a call when the caller exited the call flow (such as Abandoned in Self-service, Abandoned in Queue, Routed to Agent, System Error, Terminated, or Other). This status is set by the system. The report includes either Final Disposition or User Disposition, or neither, but not both. |
| User Disposition | This attribute enables data to be organized by the status assigned to a call when the caller exited the call flow. This status is set by the agent. The report includes either Final Disposition or User Disposition, or neither, but not both. |
| Language | This attribute enables data within the reporting interval to be organized by language. |
| Region | This attribute enables data within the reporting interval to be organized by the geographic classification of the call. The value is derived from the Region (such as North America LTAM, North America APC, or EMEA) defined in Designer. |
Metrics used in the Application Summary Report
| Metric | Description |
|---|---|
| Session | The total number of sessions attributed to User Disposition or Final Disposition. |
Special Note about User/Final Disposition
When you run this report, the selection you make at the User Disposition prompt determines which attribute (User Disposition or Final Disposition) is included in the report. If you save the report after running it, the selection you made at the User Disposition prompt is remembered by CX Insights, and the corresponding attribute always appears in the report when you run it on all future occasions, and the other attribute is excluded from the report. However, if you run the report and save it, the 'missing' attribute is not gone forever, and you can easily restore it as follows:
- Open and run the report, and click Report Home > Design, to access Design Mode
- Whichever attribute (User Disposition or Final Disposition) is present in the report grid, drag it out of the report grid into the Report Objects list.
- From the All Objects list, open the Public Objects\Prompts\Designer folder, and drag the User Disposition prompt to the report grid.
- Save the report. The next time you run the report, the original report behavior is restored.
To avoid this situation, Genesys recommends that, when saving any report, you save it with a new name in either the Custom or My Reports folder, as discussed in Customizing Reports.

