Applications
Contents
- 1 Application types
- 2 Creating a new application
- 3 Viewing application properties
- 4 Edit the application name, description, or tags
- 5 Change the status of an application stream
- 6 Viewing application history
- 7 Clone an application
- 8 Manage Builds
- 9 Manage Phone Numbers
- 10 Manage Mail Boxes
- 11 Manage Open Media endpoints
- 12 Manage Chat Endpoints
- 13 Manage Digital Endpoints
- 14 Disconnect Phone Numbers and Chat Endpoint
- 15 Enabling Your Application
- 16 Viewing the application summary
- 17 Application settings
Create new applications and make changes to existing ones.
From the Applications page, you can create new applications and manage existing ones.
Application types
Designer has three primary application types:
Default
These applications support Interactive Voice Response (IVR) and voice call routing. They also support chat if the omnichannel option is enabled in the application settings.Digital
This application type supports digital interactions only, such as email and open media (no voice calls).
Callback
This application type is used for setting up outbound callbacks (voice calls only). Digital interactions are not supported. For more information about using Callback with Designer, see Provisioning Callback in Designer in the Callback Administrator's Guide.
Creating a new application
To create a new application, click Add Application.
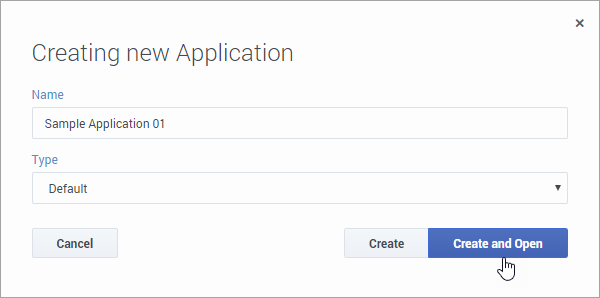
Enter a Name for the application and select the Type of application you want to create.
Click Create to save it and go back to the Applications page. Or, click Create and Open to save the application and open it for editing. To learn more about how to build applications using the blocks in Designer, see Using the blocks.
Viewing application properties
From the Applications list, click an empty spot in an application's row to display its properties on the right-hand side (if you click the application name, it will open for viewing or editing):
Edit the application name, description, or tags
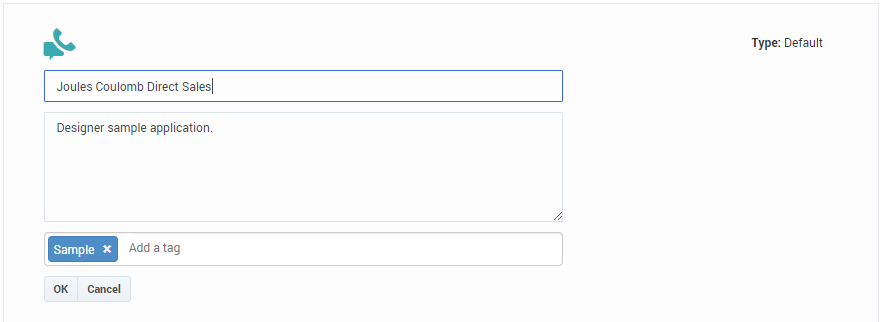
Click the pencil icon to open the editing view.
From the editing view, you can change the application name, description, or manage the tags associated with the application.
Change the status of an application stream
Use the sliders to change the status of an application stream to enabled or disabled.
To enable:
To disable:
Viewing application history
Click ![]() Application History to see a list of historical events for the application, such as each time it was viewed, edited, or published. You can then drill-down into each event to review its audit details. For more information, see History View.
Application History to see a list of historical events for the application, such as each time it was viewed, edited, or published. You can then drill-down into each event to review its audit details. For more information, see History View.
Clone an application
Click ![]() Clone application to create a new application that is an exact copy of the selected application. Save the clone with a unique name and then manage it like any other application. This can be useful when you want to use the same structure as the selected application, but need to specify different settings or resources.
Clone application to create a new application that is an exact copy of the selected application. Save the clone with a unique name and then manage it like any other application. This can be useful when you want to use the same structure as the selected application, but need to specify different settings or resources.
Manage Builds
Click ![]() Manage Builds to manage the application builds that are available for the application.
Manage Builds to manage the application builds that are available for the application.
All builds are initially enabled by default. To disable a build, deselect it.
To view the application flow for a build, click the View Build icon under the Actions column. This displays the application flow as it existed when the build was generated (in read-only mode).
To delete a build, you must first disable it. This reveals a trash icon under the Actions column that you can click to delete the build.
For more information about builds, see Application builds.Manage Phone Numbers
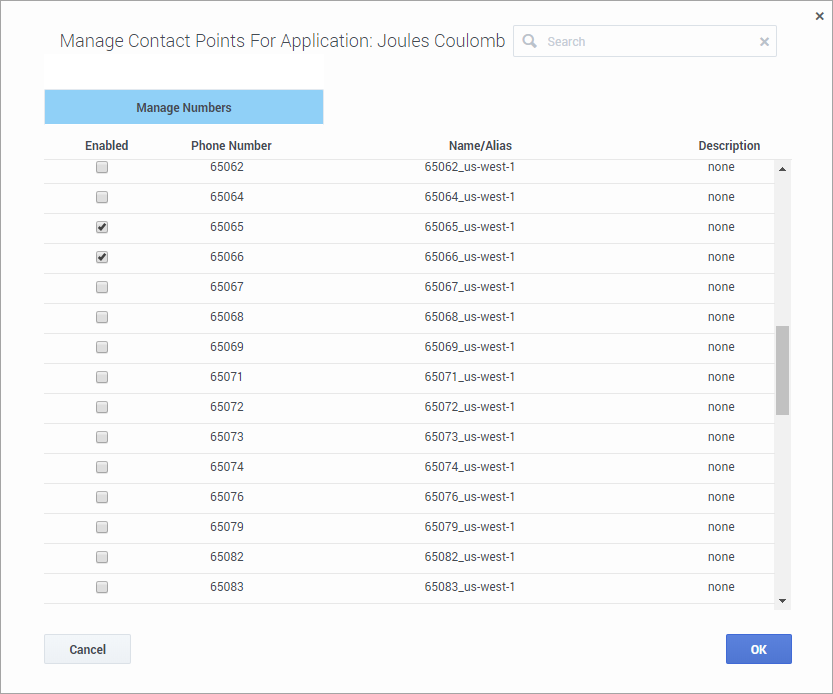
Click Manage in the Phone Number column to select and assign a phone number(s) to the application.
When assigning a phone number:
- You cannot assign a phone number to IVR type applications.
- You cannot assign a phone number to an application that has not been published at least once.
- You might see a warning symbol beside a phone number that is assigned to your application. This warning symbol can indicate:
- The phone number was not assigned in Designer.
- The application was updated but the changes were not published.
- This warning symbol indicates there could be a problem with the phone number; it does not indicate whether the phone number is functional.
Batch Assign
What if you have a large list of phone numbers that you want to assign to the application? With Batch Assign, you can copy and paste the phone numbers into a form and assign them in a single operation.
Here's how it works:
Click Batch Assign and add the numbers you want to assign to the input column. Note that the numbers must be on separate lines. Designer keeps track of the numbers you've added in the Recognized phone numbers column. 
When you are finished adding numbers, click Next (review).
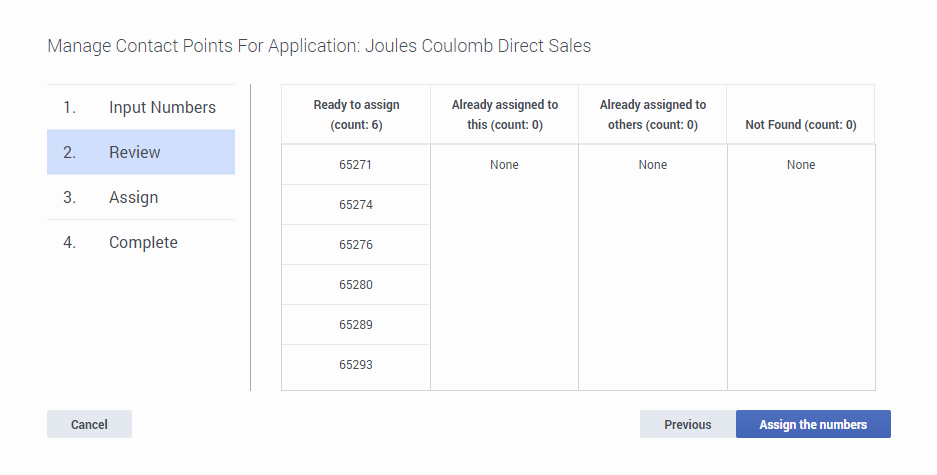
You can review the results to see the phone numbers that are ready to be assigned, are already assigned to this application (or another application), or were not found — maybe these were entered incorrectly or are not available for use.
If you need to make changes, click Previous. Otherwise, click Assign the numbers.
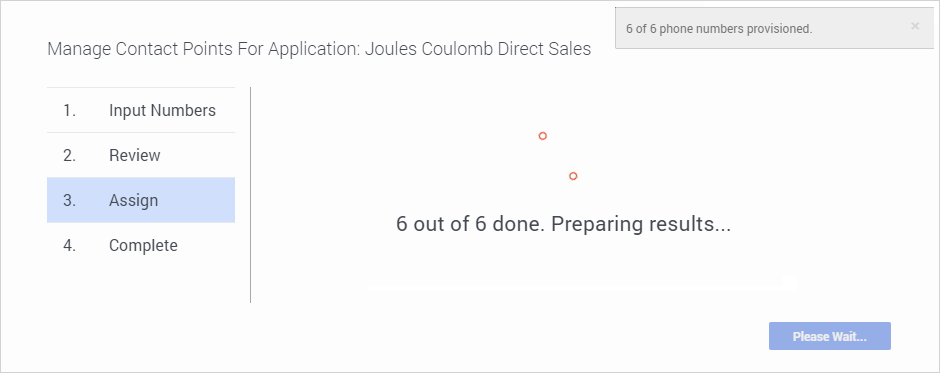
You can monitor the progress as Designer assigns the phone numbers to the application:
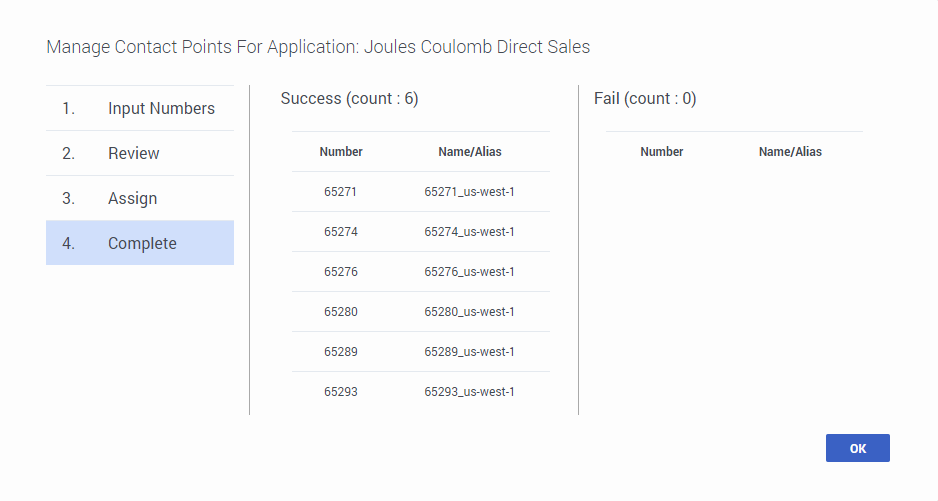
When the operation completes, Designer shows you which numbers were successfully assigned and which (if any) failed.
Click OK to close the window.
Transfer from Others
Use Transfer from Others to transfer multiple phone numbers to another application or to other stream of the current application. To show an example of how this works, let's transfer a phone number to another stream of an application.
We've clicked Manage Phone Numbers for the Joules Coulomb application and selected Transfer from Others:
We want to transfer a number to a stream of the current application, so we use the search bar to filter the application list for "Joules". We select it, and the stream tabs appear at the bottom.
We want to move a number from LIVE to DEV, so we select the LIVE tab.
There are two numbers assigned to that stream, but we only want to move one of them. We select the number we want to move and click Next (review).
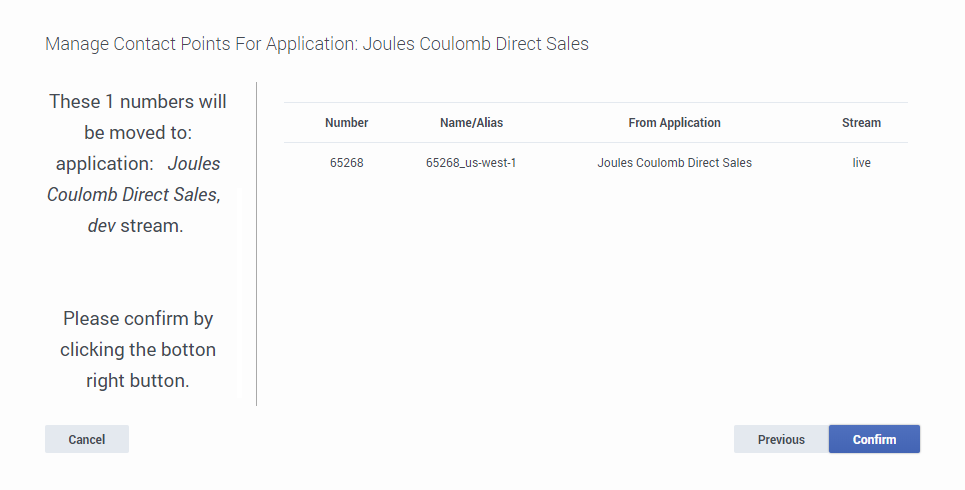
Review the transfer details:
If you need to make any changes, click Previous. If everything looks ok, click Confirm.
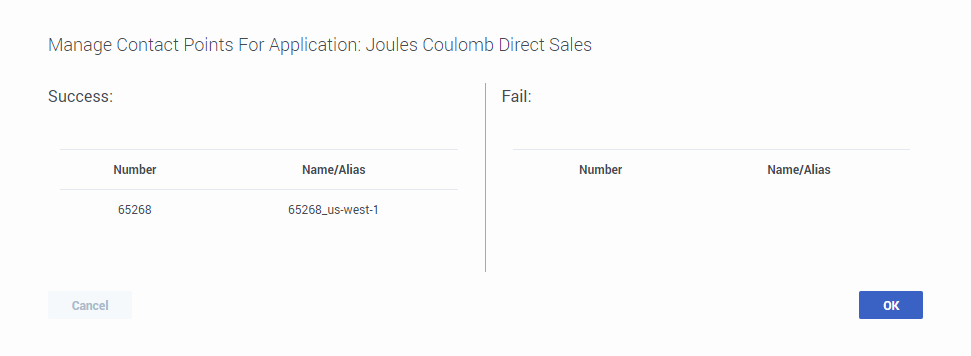
Designer shows you the progress of the transfer. When it is complete, the summary lists the numbers that were successfully transferred and also any that failed.
Click OK to close the transfer results window and return to the application properties.
Manage Mail Boxes
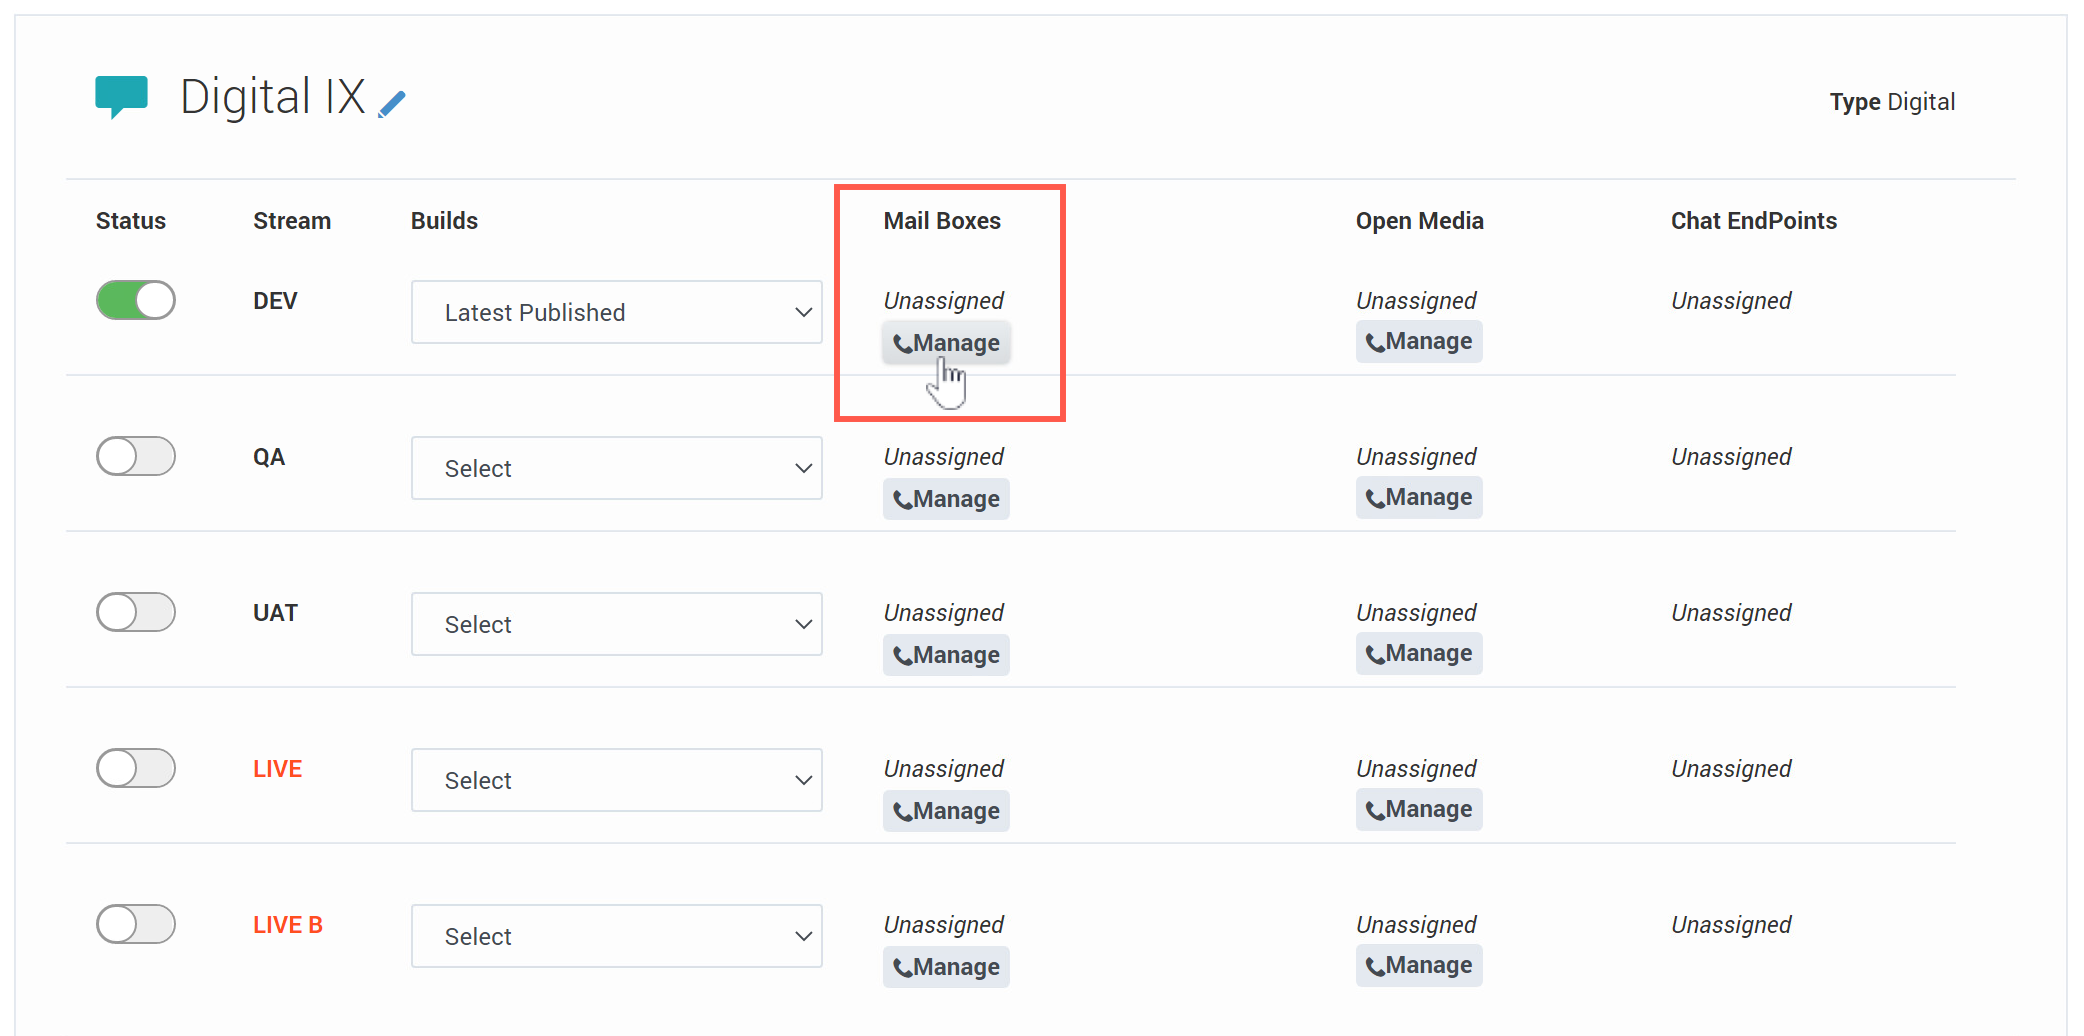
Click Manage in the Mail Boxes column to select and assign a mail box to the application.
- This option is available for Digital type applications only.
- The mail box is assigned only to the application stream for which it was selected.
- Mail Boxes are managed and configured in Agent Setup. For more information, contact your Genesys representative.
Manage Open Media endpoints
Click Manage under Open Media to select and assign an Open Media endpoint to the application.
When assigning an Open Media endpoint:
- This option is available for Digital type applications only.
- The endpoint is assigned only to the application stream for which it was selected.
- Open Media endpoints are managed and configured in Agent Setup. For more information, contact your Genesys representative.
Manage Chat Endpoints
Click ![]() Manage Chat Endpoints column to assign a chat endpoint to the application.
Manage Chat Endpoints column to assign a chat endpoint to the application.
When assigning a chat endpoint:
- You can only assign digital endpoints in Default type applications that are enabled for omni-channel support (see the digital tab in Application Settings).
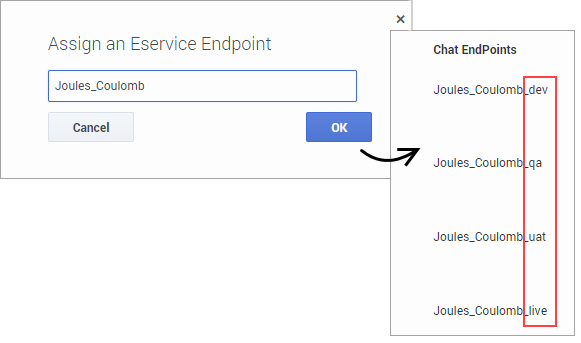
- Enter a name that is unique across all applications.
- The name should indicate the origination point of the chat (for example, sales_page or mortgage_division).
- Use alphanumeric characters only. Avoid using spaces or special characters (underscores are ok).
- The selected endpoint is assigned to each of the application streams, with a naming extension that corresponds to the stream. For example, <ChatEndpoint>_dev, <ChatEndpoint>_qa, and so on.
Manage Digital Endpoints
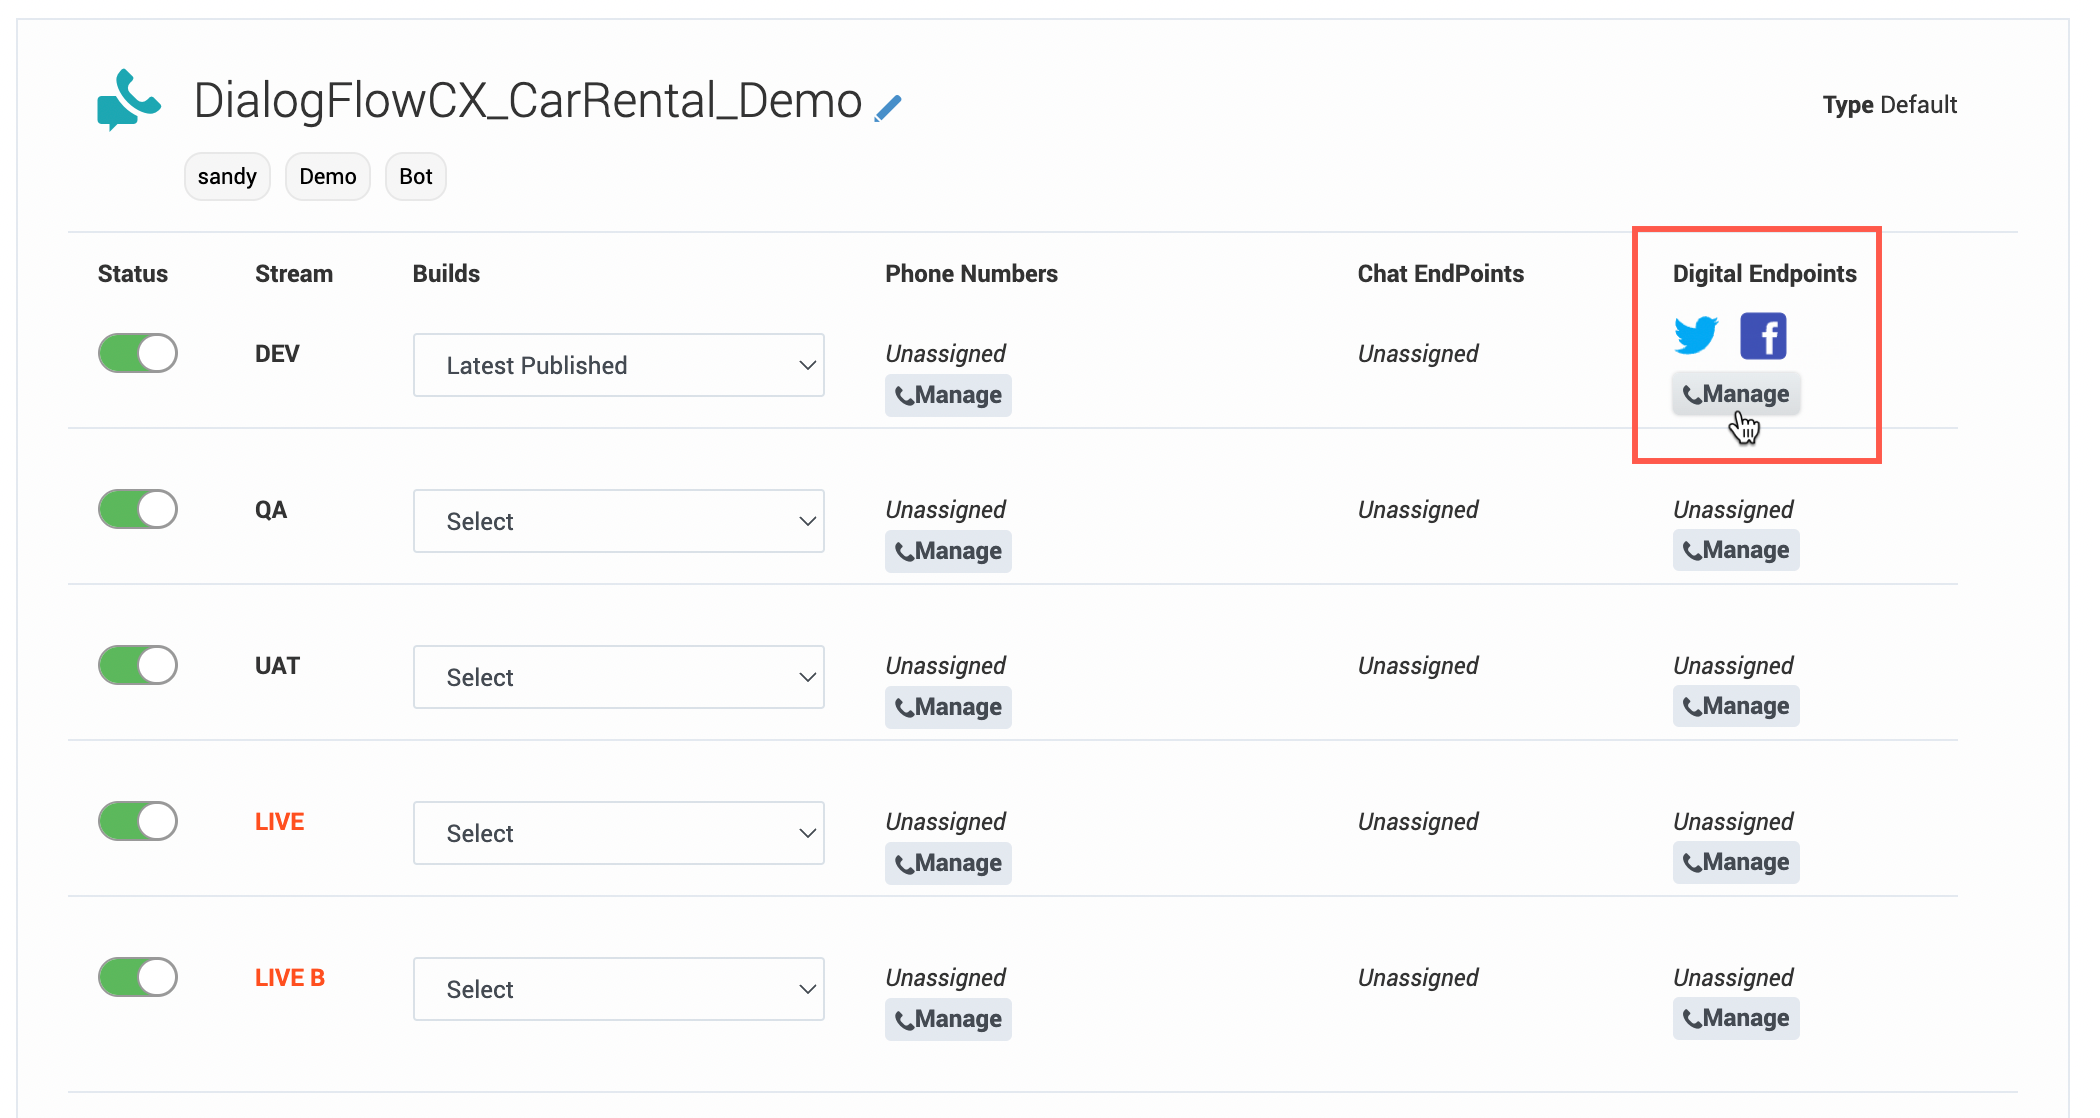
Click Manage in the Digital Endpoints column to select and assign a digital endpoint to an application stream. Digital endpoints include platforms such as Facebook, Twitter, SMS, and WhatsApp.
When assigning a digital endpoint:
- You can only assign digital endpoints in Default type applications that are enabled for omni-channel support (see the digital tab in Application Settings).
- The endpoint is assigned only to the application stream for which it was selected.
- Digital endpoints are managed and configured outside of Designer. For more information, contact your Genesys representative.
Disconnect Phone Numbers and Chat Endpoint
Click ![]() Disconnect Phone Numbers and Chat Endpoint to disconnect all phone numbers and the chat endpoint from the application (you might need to click More to see this option). Once disconnected, the phone numbers or endpoint can be assigned to other applications.
Disconnect Phone Numbers and Chat Endpoint to disconnect all phone numbers and the chat endpoint from the application (you might need to click More to see this option). Once disconnected, the phone numbers or endpoint can be assigned to other applications.
If you want to disconnect specific numbers from an application stream, click Manage under the Phone Numbers column for that stream to deselect the number(s) you want to disconnect
Enabling Your Application
After you have assigned a phone number to your application, you can enable it by clicking the switch icon in the Status column. The switch icon turns green when the application is enabled.
Viewing the application summary
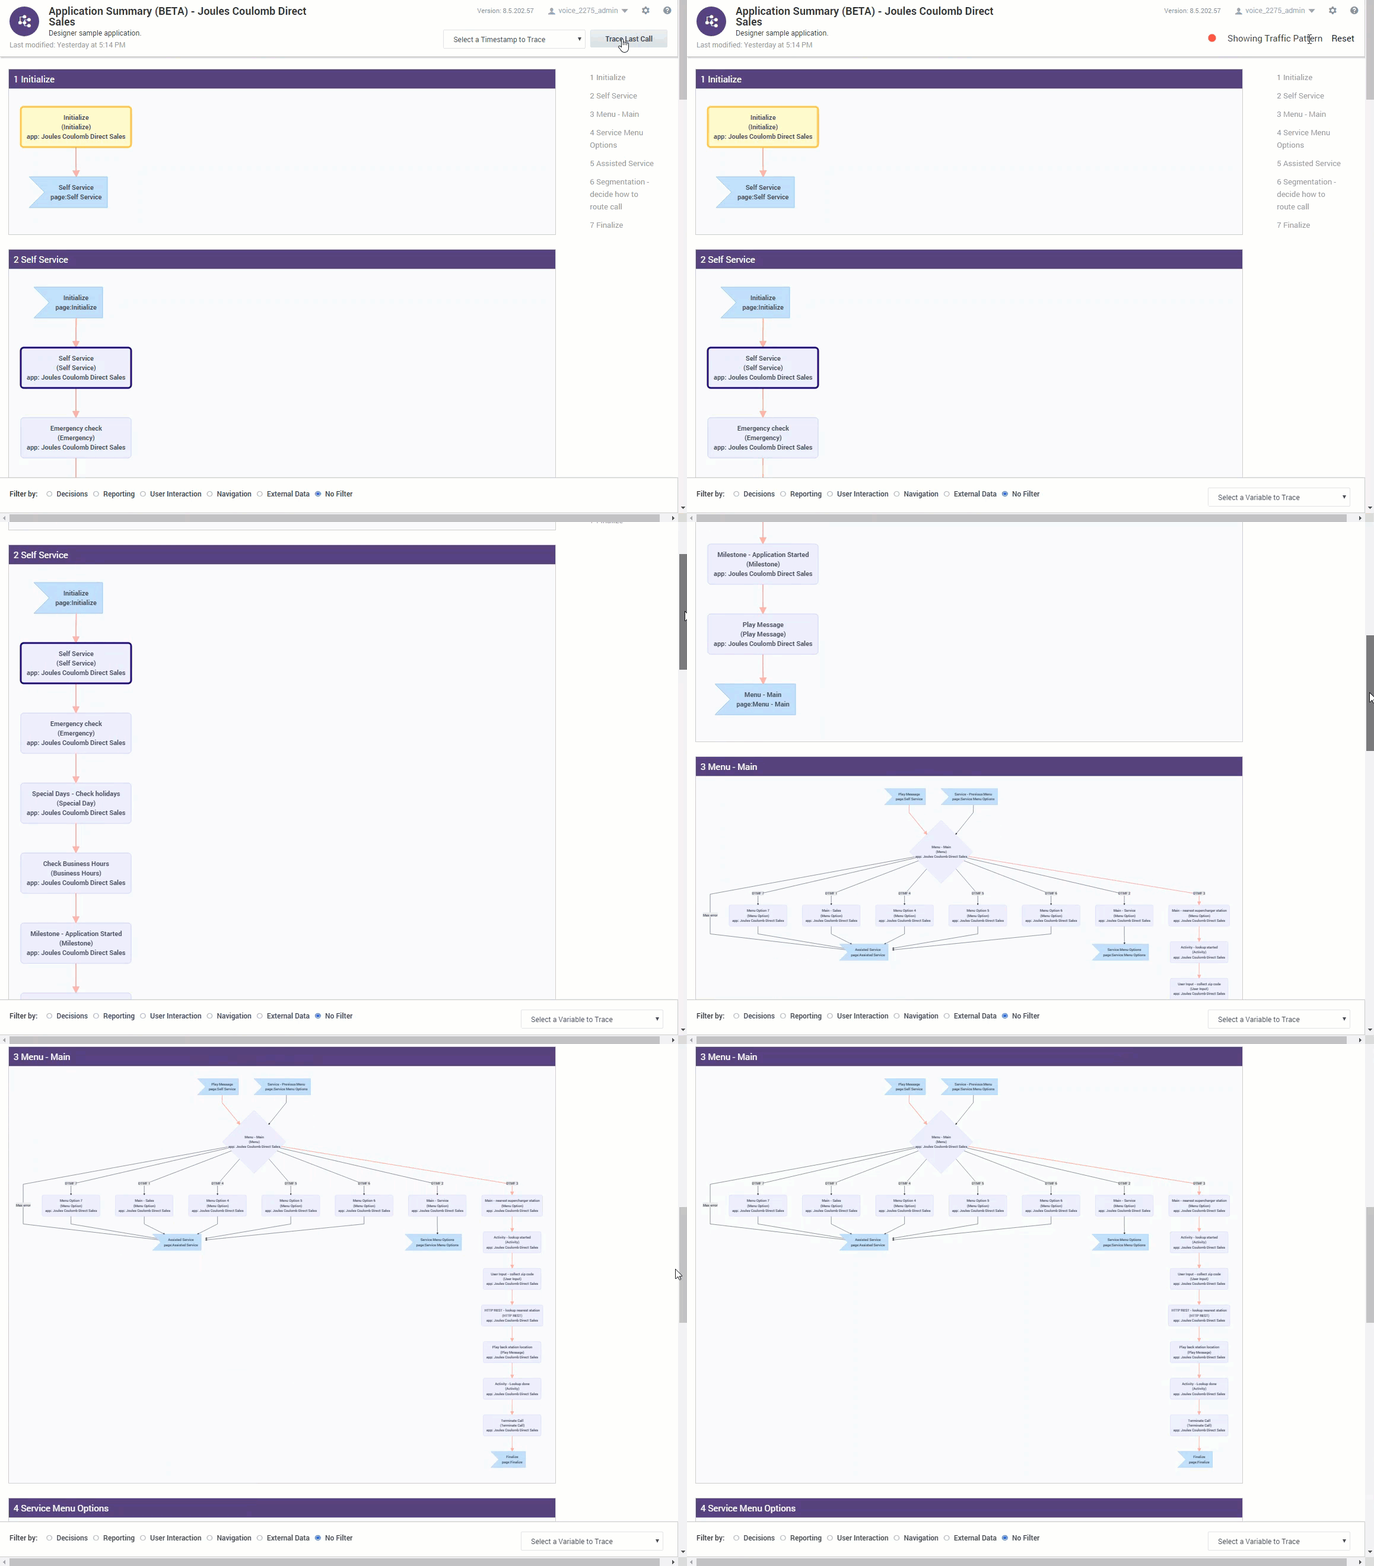
When an application is displayed the flow section, you can use Views > Summary to generate a visualization of the application.
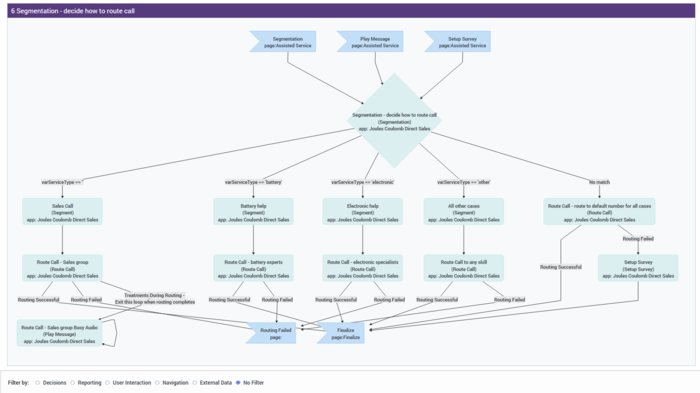
The resulting diagram is similar to a hierarchical flow-chart, with each node representing a block in the application flow:
The application summary view shows all the possible paths that an interaction can take through the application. The diagram is divided into sections for each application phase, and for nodes that need to be expanded into their own sections due to their size or complexity.
For example, this section shows a Segmentation node:
Filtering
Use the Filter by options to focus on specific details. You can choose to filter the diagram by Decisions, Reporting, User Interaction, Navigation, or External Data.
Select No Filter to clear any selected filtering options.
Session playback
You can use Select a Timestamp to Trace to select and display the path that a specific session took through the application, or click Trace Last Call to load the path of the last session that was processed.
The path that the session took is indicated by red flashing connecting lines and highlighted nodes:
Click Reset to clear the playback details for the selected session.
Application settings
To view and manage the settings for an application, see Application settings.

