Application resources
Contents
Learn about working with application resources in Designer.
Types of resources
From the Designer main navigation menu, you can access and manage a variety of resources that can be used in your applications, such as:
- Business Controls for setting up and manage your hours of business, holidays (and other special days), emergency flags, and data tables.
- Bot Registry for adding the bot resources you want to use in your applications.
- Speech Grammars for defining lists of phrases or options that a customer can provide as input to an application.
- Media Collections for managing voice recordings and other audio-related settings.
- Digital Resources for managing resources related to digital applications, such as standard responses and customized messages for chats.
- Shared Modules, which are smaller applications that you can use in other applications.
- Admin resources for managing resources available to users with Designer Administrator role privileges (if you are not assigned this role, you will not see this item in the navigation bar).
You can learn more about each resource on its respective page.
Search bar
Each resource page has a standard Search bar:
As you start to type in the Search box, Designer filters the resources list to display any matches. The search results are limited to the resources on the page you are searching from. For example, if you search from the Applications page, only the list of application resources are searched. On most resource pages, Designer also looks for search term matches in the properties of individual resources. However, there are some exceptions and limitations, as noted in the section below.
Search limitations
Designer does not search individual resources properties for search term matches when searching from the Data Tables, Applications, Shared Modules, or Media Resources pages.
- To search inside Data Tables, see Searching the data table.
- To search inside Applications or Shared Modules, see Search tools on the Using the blocks page.
Actions toolbar
Many of the resource pages in Designer have an Actions toolbar:
The action items on the toolbar will vary based on the resource page you are viewing. Depending on the functions available for that particular resource, you can do the following:
| Button | Description |
|---|---|
| Displays the history (or audit log) for a resource. For more information, see Resource history. | |
| Displays a list of the applications and modules that are using a particular media or message collection. | |
| Clones the resource. You'll need to assign the cloned resource a unique name. Note that a cloned resource does not inherit the history and published versions of the original resource. | |
| Displays the version history for a shared module. You can then choose to make a version public, or view a version (in read-only mode) as it appeared at a particular time. | |
| Exports the resource for use in another Designer workspace. When you export a resource, all versions of that resource are exported, including the unpublished version. If you are using a Safari browser when performing the export, the exported file is downloaded as unknown. The file is valid and can be imported successfully, but you can rename it to something more meaningful.
Important
The export & import feature is enabled only when you have the ability to move data between PEC tenants. If you do not have the ability to move data and want to do so, contact your Genesys representative. | |
| Imports the contents of a CSV file into a selected data table. For more information, see Import on the Data Tables page. | |
| Deletes all versions of the resource. However, note that published applications that were already using the resource (i.e. applications that had previously generated their code) are not affected. |
Using the Quick Filters
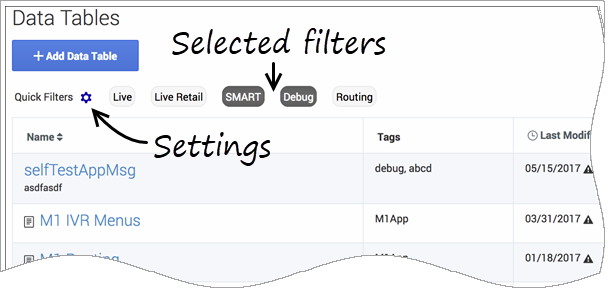
Quick Filters enable you to filter a list of resource items by selecting one or more filters that are associated with tags. The list then refreshes to show only those items that match the selected filters.
In this example, the SMART and Debug filters are selected so that only data tables with those tags are shown:
The filters display any item in the list that has the associated tag, even if there are other tags associated with that item. If you navigate to a new resource page (such as going from Data Tables to Business Hours), any selected filters are automatically applied to the new page.
You can use Quick Filters on the following resource pages:
- Special Days
- Business Hours
- Data Tables
- Applications
- Shared Modules
- Emergency Flags
- Media Resources
- Digital Resources.
The same filters appear on each resource page, and any filters that you create are visible to other Designer users.
Managing Quick Filters
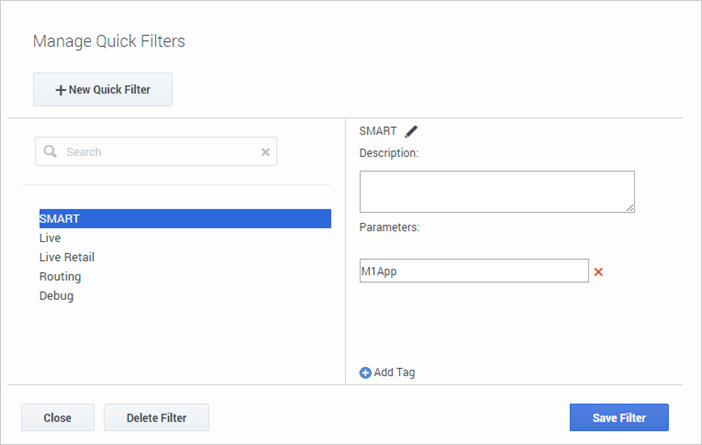
To add, modify, or delete quick filters, click the Settings icon to open the Manage Quick Filters window. To associate a filter with a specific tag, select it, and add the tag(s) under the Parameters section.
For example, to associate the SMART filter with the M1App tag:
Using the history view
The history view enables you to see a list of events for a resource that provide details about each time it was accessed or changed. You can see details such as the ID of the user who initiated the event and the new and previous values of any resource properties that were changed.
Resources that provide this option include Applications, Shared Modules, Announcements, Grammars, and Business Controls.
Watch this short video to learn more about viewing the history of applications and resources:
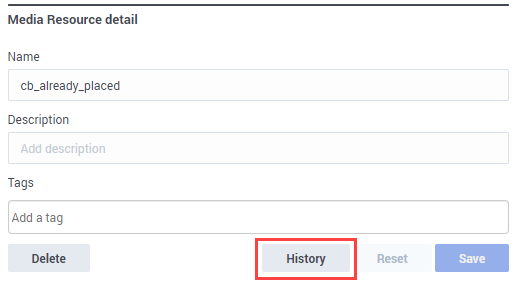
Depending on the resource you are viewing, there are a few different ways you can access the history view. You can select the History button from the resource properties:
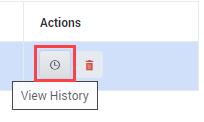
Or, if you are viewing a resources page, you can select a resource and click the History button on the Actions toolbar:
For applications, you can view the history by selecting that option from the application properties.
For example, here is the history view for an application: You can use the buttons on the history page to filter the results for a specific time period (for example, last 1W to see the results for previous week), or use the date fields to specify a custom date range (you can go back up to a maximum of one year from the current date). Results can be sorted or searched.
To download the results, click Export to generate and save the results as a CSV file.
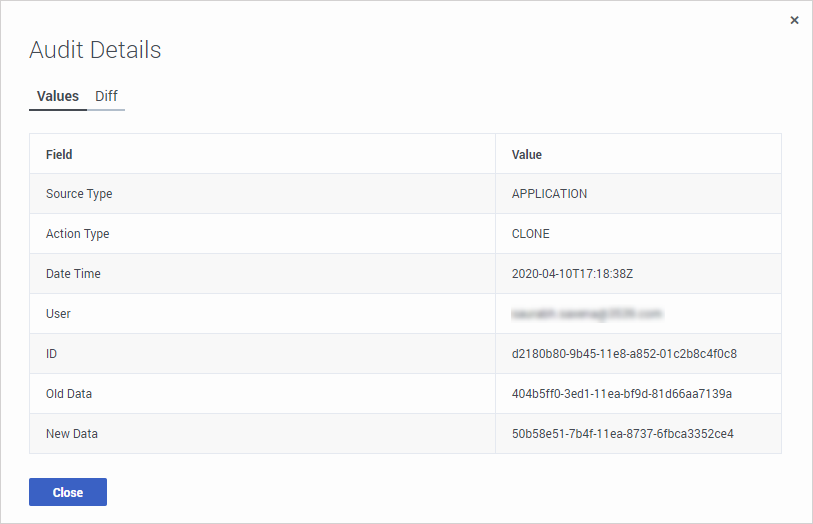
You can drill-down further into an historical event by double-clicking it. This displays the audit details for that particular event:
The Values tab displays information about the event, such as the resource type, the type of action taken, and the unique IDs of data relevant to the event.
If applicable, the Diff tab shows you information about the specific objects or properties that were impacted by that particular event. For some items, you can expand the item to display additional details:
Valid naming characters
When naming your resources, you can use the following characters (except where otherwise noted):
| Character or Symbol | Description | Exceptions |
|---|---|---|
A-Z
|
uppercase alphabetical | |
a-z
|
lowercase alphabetical | |
0-9
|
numeric | |
.
|
period (or dot) | |
:
|
colon | Not valid for bot resources. |
-
|
hyphen | |
_
|
underscore | |
@
|
"at" sign | Not valid for bot resources. |
!
|
exclamation mark | Not valid for bot resources. |
+
|
plus sign |
File size limitations
When managing resource files, note the following file size limitations. If your file exceeds these size limits, Designer is unable to complete the operation.
Uploads and imports
- Files for audio or speech grammar resources cannot exceed 10 MB.
- Imported applications or shared modules cannot exceed 10 MB.
- Imported audio collections cannot exceed 15 MB.
Downloads and exports
- Applications or shared modules exported from Designer cannot exceed 150 MB (with audio) or 50 MB (without audio).
- Exported audio collections cannot be larger than 100 MB.
My file is too large – what can I do?
If your file exceeds the size limit, you can try the following options to decrease the file size:
- For importing zip files that contain multiple (bulk) audio files, split the file into multiple smaller zip files and upload each file separately.
- For audio or speech grammar files, try compressing the files before uploading.
- For DAR files that are too large to import, try reducing the file size by deleting large binaries or files that are not needed.


