Route Digital Block
Use this block to route digital interactions to agents based on various routing criteria.
You can use the Route Digital block in the Assisted Service phase to route digital interactions to an agent based on various criteria, such as Skills and Agent Groups. This block is available for Digital application types.
You can sequentially place multiple Route Digital blocks with different settings, so that if routing fails in one block, your application proceeds to the next block. When a Route Digital block successfully routes the interaction to an agent, the application moves to the Finalize phase, ignoring any subsequent blocks in the Assisted Service phase.
Routing Tab
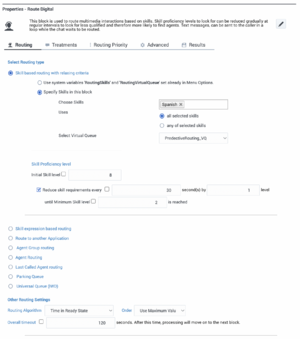
Select Routing type
Choose between the following routing options:
Skill based routing with relaxing criteria
Routes the interaction to an agent that has the required skills. If selected, you can choose from the following options:
- Use system variables RoutingSkills and RoutingVirtualQueue set already in Menu Options - Use system variables that were set in a Menu Option block.
- Specify Skills in this block - Specify one or more skills and a Virtual Queue to use to route this interaction. If you specified more than one skill, you can choose whether the routing engine considers any or all of the selected skills.
- Skill Proficiency level - Enter the initial and minimum skill levels. The interaction is routed to an agent that has a skill level equal to or higher to the values provided. If you enable Reduce skill requirements every, you can have the skill level decremented by a certain amount every x number of seconds, until the minimum skill level is reached. This option allows you to expand the group of agents that can receive this interaction if other agents are busy.
Skill expression based routing
Enter a skill expression in the Skill Expression tab, or click the drop-down menu to select a variable that specifies a skill expression.
Route to another Application
Route the interaction to the interaction queue of the selected destination application.
Agent Group routing
Route the interaction to an Agent Group.
Agent routing
Route the interaction to agents by using a variable that holds the ID of an agent at runtime. You must use the following format: agentid@optional_statserver.A. Example: 1001@StatServer.A.
Last Called Agent Routing
Select this option to route the interaction to the last agent that was helping the customer. If you select this option, you must also select the Enable Customer Profile option in the Contextual Data tab of the Application Settings.
Parking Queue
If a digital interaction arrives when the business is closed, send the interaction to a parking queue until the business is open. If selected, you can then specify a variable that tells Designer how long the interaction is to be parked (for example, the variable that holds the number of minutes until the business is open). When regular business hours resume, the interaction is retrieved and processed.
Universal Queue (IWD)
Select this option to send interactions to the Universal Queue in Intelligent Workload Distribution (iWD) Workload Manager.
Other Routing Settings
Routing Algorithm
Select which algorithm is used to choose an agent when more than one agent is available. (For more information about the routing algorithms, see Statistic Types on the Statistic block page.)
Overall timeout
Enter the maximum time (in seconds) to wait for an agent to be available before moving to the next block. Optionally, you can enable the check box to specify a variable.
Example:
Treatments tab
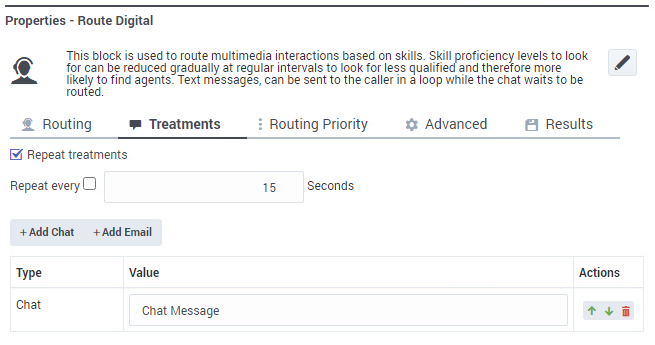
Use this tab to specify a busy treatment to execute while waiting for an agent to become available. For example, the busy treatment can be a Chat message that you can set to repeat at regular intervals.
From this tab you can:
- Select Repeat treatments to repeat the treatment at regular intervals. You can then specify the interval time (in seconds) or select a variable that holds this value.
- Click Add Chat to add a chat treatment.
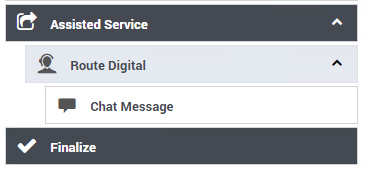
When you select a treatment, the corresponding block is automatically added to the application flow below the Route Digital block. For example, if you add a chat treatment, a Chat Message block is added:
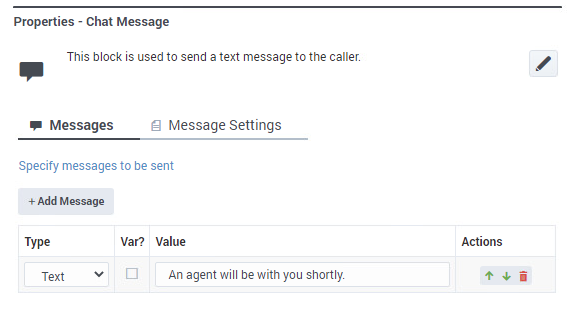
You can then configure the block properties to set the desired treatment:
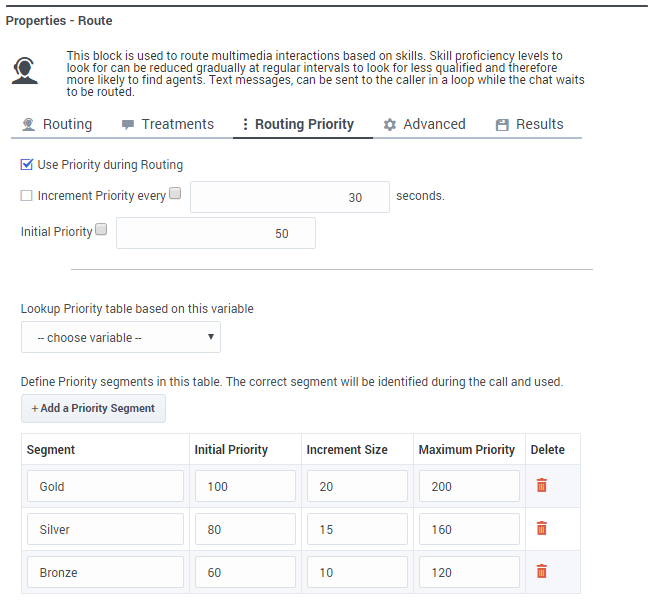
Routing Priority tab
Use Priority during Routing
Enable this check box to use priority-based routing, which prioritizes your interactions depending on your business requirements.
To prioritize interactions, you must segment interactions and assign the name of that segment to a variable. You must select this variable in the Lookup Priority table based on this variable drop-down menu.
You can customize this table with your own segment definitions to fit your business needs. If the specific segment is not found, then the value specified for Initial priority is used. Enter a value in Increment size to increase the priority of an interaction that remains in a queue over time. The priority increment is defined for each segment, but a default increment is configurable with the Increment Size property.
Increment Priority every ___ seconds
Enable this check box to specify the time interval between priority increments. If you enable the other check box beside the field, you can select a variable that specifies the overall Routing Timeout and Priority Increment Interval properties.
Limit Priority to
If the Increment Priority every ___ seconds option is enabled, you can use this option to set a maximum priority value. For example, if the initial priority is 50, you can use this option to not let the priority value increase beyond 100.
If you enable the other check box beside the field, you can select a variable for this option.
Example
Advanced tab
Targeting
Clear targets from queue if this block times out
Enable this check box to specify whether the pending request for a target should be kept active or not after exiting this block on timeout. When the request is kept active (check box is disabled), an agent may be selected after the block times out if, for example, an agent with the matching criteria is ready after the block was exited.
Early exit from this block if no agents are logged in
Enable this check box to exit the block if no agents are logged in for the selected routing target (such as Agent or Agent Group, skill expression based, or skill based routing with relaxing criteria).
Threshold Expression
This option enables you to use an ECMAScript (or JavaScript) expression to further refine a routing threshold for the specified target(s). Threshold expressions for the Route Digital block can be used for the following routing types:
- Skill
- Skill Expression
- Agent Group
- Agent
- Last Called Agent
Threshold expressions can contain variables or reference queue-specific values, such as when used with the following functions:
- sdata(target, statistic) - This function applies additional routing criteria based on a statistic. You can use it to specify a target and a predefined statistic, such as StatPositionInQueue, StatCallsWaiting, or StatCallsCompleted. For example, this expression would route an interaction to a particular Agent Group when there are more than two agents ready and available:
sdata(Group2.GA, StatAgentsAvailable)>2
- You can also combine multiple sdata functions using a pipe (
|) as an OR operator or an ampersand (&) as an AND operator. For example:sdata(VQ_1@.Q,StatServiceFactor)>30 & sdata(VQ_2@.Q,StatServiceFactor)>40
For a list of common statistic types used by Designer, see Statistic Types. Note that when adding a statistic to your expressions, you must use the Stat prefix, such as StatTimeInReadyState, StatAgentsAvailable, StatEstimatedWaitingTime, and so on.
- callage() - This function returns the age of an interaction in seconds. You can use it when building an expression that specifies a time-based routing condition, such as routing an interaction if it is older than 60 seconds:
callage()>60
Remember that strings must be enclosed in single quotes. For more information about using ECMAScript in Designer, see ECMAScript Expressions.
- For expressions that reference a variable, the callage function is treated as a string. Therefore, you must enclose the function and its operator in single quotes (e.g. 'callage() < ' + variable).
- For routing types that have multiple targets (such as Agent Group or Agent), the script defined in Threshold Expression applies to all targets.
Route only to local agents
If you have selected Skill based routing with relaxing criteria or Skill expression based routing, you can enable this option. When enabled, the interaction is routed to a local agent who matches the target skill.
Here's a way you could do that:
- Set up the Route Digital block with Route only to local agents enabled, a short Overall timeout property value, and Clear targets from queue if this block times out deselected.
- Then, set up any Route Digital blocks that are further down the application flow with Route only to local agents not selected.
You can watch this video to see a short demonstration of how to set this up. (The video demonstrates this using a Route Call block, but the steps are the same.)
You might also want to modify skill relaxing settings to run faster on routing blocks that target local agents.
Extensions section
Use this section to add an extension as a key-value pair to this block.
Use JSON format
This option allows certain special characters to be used in extensions, such as full stops (.), single quotes ('), double-quotes ("), and At signs (@).
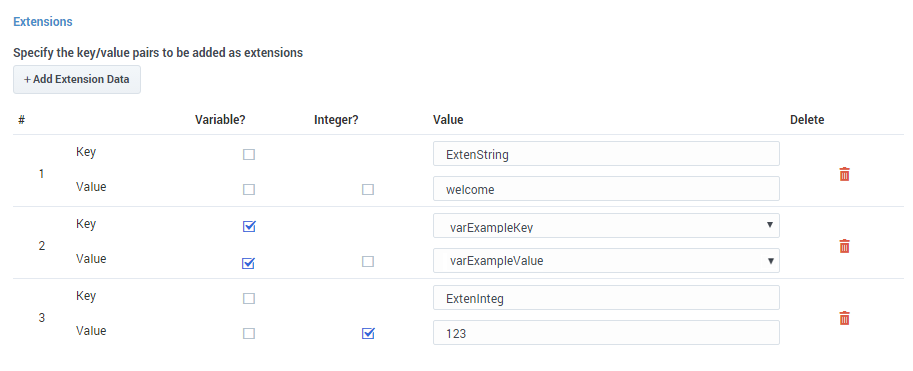
Add Extension Data
Click Add Extension Data to add an extension. The value type can be a string or integer.
If you want to use a variable for the Key or Value, select the Variable checkbox and then select a variable from the drop-down menu. If the Value is an integer, select the Integer checkbox.
You do not need to enclose extension values in quotes. However, if the quote is part of the value, you must escape the quote character by using a preceding backslash (\). For example:
- Incorrect: Joe's Pizza
- Correct: Joe\'s Pizza
If you add an extension, make sure to define the Key and Value settings. Otherwise, Designer displays an error.
This example shows a few different ways that you can add key-value pairs as extensions:
Post processing application section
In the Post processing application section, you can specify the digital application (queue) that will be used for post-processing logic. This application will be executed after the agent marks the chat as done.
Post-processing logic may include, for example, HTTP REST or Send Chat Transcript blocks.
Results tab
Select a variable in the Store selected agent ID in this variable drop-down menu to keep track in a specific variable the ID of the agent selected as a result of this Route Digital block execution. The SelectedAgent system variable is transparently assigned this same agent ID value.
You can also select a variable in the Store the outcome of the Route block in this variable drop-down menu to store the result of this Route Digital block execution.

