Bot Block
Contents
Use the Bot block to add a chatbot to your application.
About bots in Designer
Bots are software applications that leverage natural language processing and natural language understanding to recognize input and respond to customers in a way that resembles a conversation with a live agent. They can determine what a customer wants to do based on natural language input and then proceed with collecting the information required to fulfill the request or intent.
If you have a bot configured with a supported bot services provider, such as Google DialogFlow ES or CX, Amazon Lex, or Genesys Dialog Engine, you can add it to the Designer Bot Registry. You can then use a Bot block to integrate the bot service with a Designer application.
The Bot block typically collects input from the customer, sends it to the external bot service, and waits for a response. This response may trigger completion of the Bot block (i.e. success or error) or it may trigger another turn of playing back a prompt to the customer and collecting additional input, which is again sent to the external bot service. These turns are handled internally in the Bot block and there is no need for the application developer to add more blocks to handle these.
Watch the video to learn more about using bots in Designer applications.- Support for Google Dialogflow CX bots is currently only available for Designer Private Edition deployments.
- Barge-in and DTMF options are not currently supported for Google Dialogflow CX voicebots. Attempting to use these options with Google Dialogflow CX voicebots can cause unexpected results.
Using this block
The Bot block is located in the User interaction section of the palette. Add it to the Self Service phase of a Default application when you want to use a bot in your application. If the application is enabled for omni-channel, the same bot can service both voice and chat customers.
You can use multiple bots in an application. Simply add a Bot block for each bot you want to use.
Intents and Slots tab
Configure Bot details
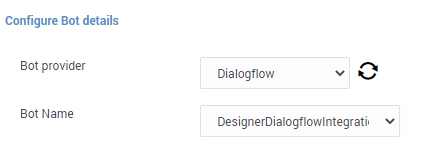
Specify the Bot provider and Name:
Once selected, Designer can automatically populate the block properties with intents and slots for the specified bot resource. Intent child blocks are hidden by default, but you can view these by clearing the Do not use intent child blocks checkbox:
The intents that you enable (see Configure intents) are then added as intent child blocks.
Configure intents
- You can skip the settings in the Configure intents section as these are not applicable to Dialogflow CX bots.
- Intent child blocks (or any other type of nested or child blocks) are not supported for Dialogflow CX bots, even if they are shown by Designer. The Error Handler block, however, is supported and should be used to handle errors. All other exits from the Bot block will proceed directly to the next block.
An intent is something that the customer wants to accomplish, such as booking a trip or making a reservation. These are defined in the bot and the bot is set up to collect the information it needs to fulfill these intents, typically referred to as slots. Slots (also known as entities) provide additional context to the intent.
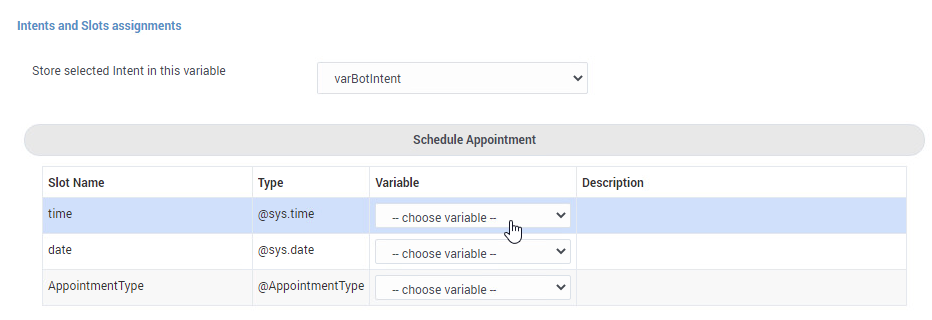
For example, let's say a bot detects that a customer wants to schedule an appointment. It now has the intent, but it also needs to know other details about the customer's request, such as the time, date, and the type of appointment. These are the slots, which the bot uses to determine the questions it needs to ask in order to collect the information needed to fulfill the customer's intent.
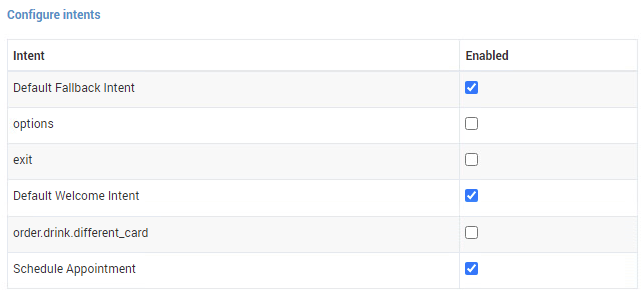
Select the intents you want to enable for the bot:
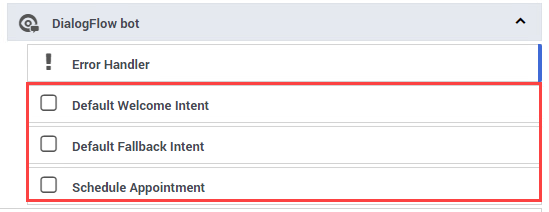
For each intent that you enable, Designer automatically creates a corresponding Bot Option child intent block in the application flow.
Once the external bot tells the Designer application it has identified an intent, Designer executes that specific intent's child block and any child blocks below that intent block (remember that intent child blocks are not supported for Dialogflow CX, even if they are shown by Designer). This works best for a small number of intents and is not recommended for bots that have more than 10 intents. Instead, for bots with larger numbers of intents, use a Segmentation block immediately following the Bot block to process specific intents and execute fulfillment (for more information, see Adding logic for handling intents).
Intents and Slots assignment
- You can skip the settings in the Intents and Slots assignment section as these are not applicable to Dialogflow CX bots.
Select a variable to send context to the Bot Session
This option enables you to pass an initial slot (or entity) value to a Lex or, Dialogflow ES or CX bot. This can be useful when an attribute is known before the interaction starts, such as the customer's name, phone number, or email address. With this slot already filled, the bot won't need to prompt the customer to provide this information if the Bot block sends it to the external bot.
To use this option, you'll need to set up a variable that contains a JavaScript object that defines the value you want to pass to the bot. Then, select this variable from the dropdown. This also requires some configuration with your bot service provider, as you'll need to define an input context (or session attribute) for the slot and assign it a default value that corresponds to the JavaScript object. We've included an example that shows how to do this with a Dialogflow bot, but you can refer to the documentation from your bot service provider for additional information.
Example (Dialogflow ES)
For a quick example of how this works, let's set this up with a Dialogflow ES bot. First, we'll go to the Intents section of the bot and add a new Context. In this example, we've created an intent called Intent with context and added an input context to it, called ExampleContext.
Then, for the slot that we want to pass an initial value to, we need to set a default value for an attribute of the context. To do this, we'll go to the Action and parameters section and add the details for the slot we want to fill with an initial value. In this case, we'll add details for the phone number attribute.
To assign the default value, we'll hover on the right-side of the row to reveal the additional options menu and click it to open the Default value setting:
Now we can set the default value to match the name of the context and the attribute we want to fill:
In Designer, we'll create a user-defined variable called varInput. For its value, we'll add a JavaScript object called ExampleContext that passes an initial value of 1234567 to the phone-number attribute.
{
  'ExampleContext':{
    'attributes': {
      'phone-number': '1234567'
    }
  },
  'lifetime': 1
}In the Bot block, we can then select this variable as the context to pass to the bot:
Another example of how you could use this option is to pass an initial message to the bot to start a chat conversation. In the JavaScript Object, add a field called content that contains the message you want to send (e.g. "I want to book a hotel room."):
{
  'ExampleContext':{
    'attributes': {
      'phone-number': '1234567'
    }
  },
  'content': 'I want to book a hotel room.',
  'lifetime': 1
}Invoking a Dialogflow ES bot with events
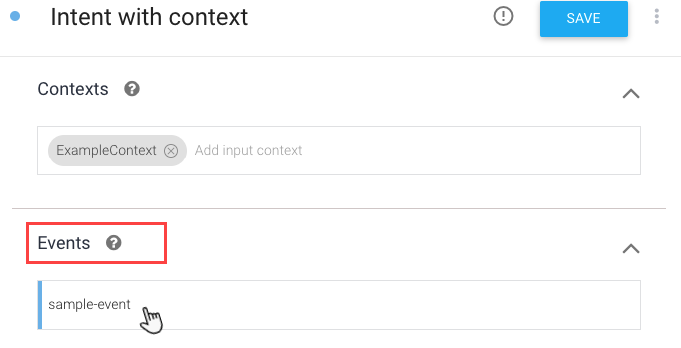
You can use an Event to initiate a bot interaction with a Dialogflow ES bot without requiring the customer to provide any input. The context is still passed normally when invoking the bot with an event. To invoke the bot with an event, go to your Dialogflow bot settings and set the Event field of the context object to the name of the event you want to invoke. For example, we'll add an event called sample-event to an intent:
This is what the JavaScript Object looks like for the above example:
{
  'ExampleContext':{
    'attributes': {
      'phone-number': '1234567'
    }
  },
  'event': 'sample-event',
  'lifetime': 1
}
If you set both an event and an initial message in the JavaScript Object, the bot ignores the initial message and uses the event.
Invoking a Dialogflow CX bot with events
You can also use an Event to initiate a bot interaction with a Dialogflow CX bot without requiring the customer to provide any input. The context is still passed normally when invoking the bot with an event. The functionality is similar to that of Dialogflow ES bots, but the structure of the JSON object has additional fields and certain naming conventions must also be observed (noted below).
Example:
{
  'parameters':{
    'attributes': {
      'phone-number': '1234567'
    }
  },
  'content': 'I want to book a hotel.',
  'lifetime': 1
}
Context fields for Dialogflow CX bots
You can use the JSON object to pass the following properties to the Dialogflow CX bot:
| JSON Object Property | Capability | Description |
|---|---|---|
| parameters.attributes object | Passes known context to the bot. | Each property of this object is sent to the external bot, which enables it to pre-fill certain slots with these values. Note: This property must be named parameters. |
| event | Invokes an intent directly in the external bot. | This skips the first input collection and allows the bot to process attributes that are passed to it directly without having to rely on customer input. |
| content | A string that contains an initial message. | This passes the string as the first input to the bot as if it was collected from the customer. |
| webhookHeaders | A JSON object that is passed from the CX bot to Designer and then passed back to the bot from Designer. | These values can be used by the bot fulfillment code to call an external API, query a database, etc. |
| webhookPayload | A JSON object that is passed from the CX bot to Designer and then passed back to the bot from Designer. | These values can be used by the bot fulfillment code to call an external API, query a database, etc. |
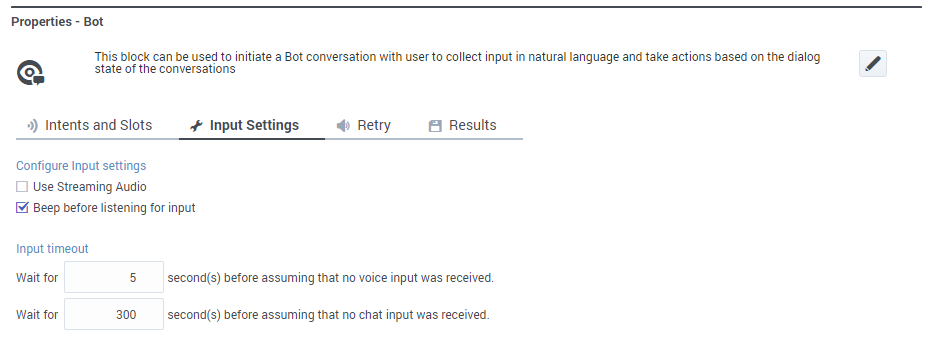
Input Settings tab
Retry tab
Retry handling in the Bot block works a bit differently than it does in other blocks with retry settings, such as Menu or User Input. Bot services typically have their own retry behavior already built-in. For example, the bot automatically asks the customer to repeat a response that it didn't understand. Rather than handling retries based on a single question and a single response (as in Menu or User Input blocks), the Retry settings on the Bot block are based on the conversation taking place between the bot and customer. This conversation can consist of several questions and responses, all encapsulated within one Bot block.
You can use the settings on this tab to set up the Bot block to control retry handling (see below) or trigger an event that allows the external bot service to control all retry handling (see Send No Input Event to Bot).
Use application-wide retry
Select this option if you want to use the retry settings that are specified on the Global Retry tab in the Application Settings.
Allow retries
Select this option to specify retry rules for this block. When enabled, you can set the following options:
Number of No Input retries allowed
Select the number of retries to allow for each question and response sequence that occurs in the conversation between the bot service and the customer.
For each retry, you can specify whether a prompt is played by clicking the corresponding section beneath this field. For example, if you allow two no-input retries and you want to play a prompt after the first retry, select the No Input #1 line and add a prompt. Enable the Play original menu prompt after this retry prompt check box to repeat the menu prompts for the customer.
Number of No Match retries allowed
Most bots will follow-up with the customer if they don't understand the input that's been provided. For example, the bot will simply ask the customer to repeat the information until it successfully captures the response. As this type of handling is typically built-into the bot by the bot services provider, you may not need to specify this setting in the Bot block.
After Final No Input
Add the prompt to play after the maximum number of permitted No Input retries is reached. As this block is in the Self Service phase, you can also specify a target destination for the application to jump to, such as another block in the Self Service phase or to the Assisted Service or Finalize phase of the application.
After Final No Match
Add the prompt to play after the maximum number of permitted No Match retries is reached. As this block is in the Self Service phase, you can also specify a target destination for the application to jump to, such as another block in the Self Service phase or to the Assisted Service or Finalize phase of the application.
Send No Input Event to Bot
(This option is supported for Dialogflow ES bots only.)
If the external bot service is handling retry behavior, you can select this option to send a No Input event to the bot service.
In this scenario, all retry handling is performed by the external bot service. The Bot block sends the specified Event Name to the external bot, which then customizes the retry behavior for each conversational turn.
Results tab
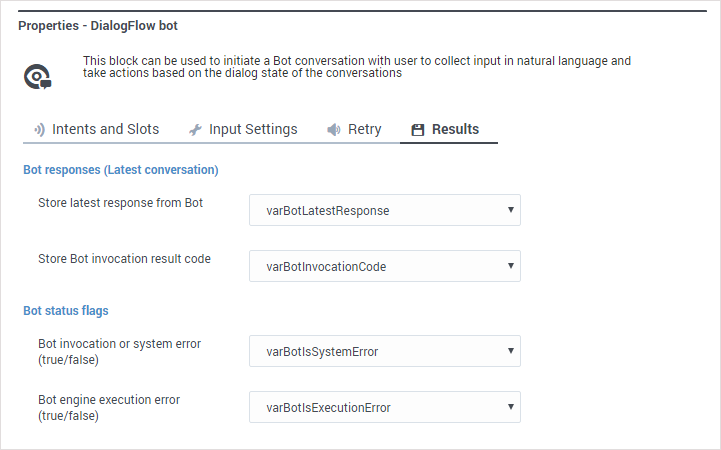
Specify the variables that will hold various results data, as returned to the Bot block from the bot services provider. Each variable is described in more detail below.
Bot responses
Store latest response from bot
This variable stores details about the latest conversation that the bot engine had with a customer. For example, the results for a Dialogflow bot used to book a ghost removal service might look like this (JSON formatted):
{
  "status": {
    "code": 0,
    "message": null
  },
  "data": {
    "botName": "MySampleServiceBookingBot",
    "botAlias": null,
    "sessionId": "ABC123",
    "state": "SUCCESS",
    "intent": "Book a Ghostbuster",
    "intentScore": 1,
    "slots": {
      "neighbourhoods": "Queens",
      "location": "backyard",
      "date": "2020-01-11T12:00:00-05:00",
      "ghost": "Zuul the Gatekeeper"
    },
    "slotsData": null,
    "inputTranscript": "today",
    "message": "",
    "attributes": {},
    "error": null,
    "recognitionConfidence": null,
    "stability": null
  }
}
In the example above, some of the details that were returned include:
botName– name of the bot that was invoked.sessionID– unique ID assigned to the session.state– indicates SUCCESS if everything worked.intent– the intent that was detected (i.e. what the customer wanted to do).slots– the details that the bot collected from the customer to fill the associated slots (or entities) for the intent.inputTranscript– the utterance (voice or chat input) that the bot received from the customer.
Store bot invocation result code
This variable stores the HTTP status code received from the bot when it was last invoked by the application. For example, a result code of 200 (OK) indicates that the bot was successfully invoked.
Other result codes, such as 401 (Unauthorized) or 403 (Forbidden), can indicate there was a problem reaching the bot service.
Bot status flags
Bot invocation or system error
If true, this indicates that Designer was not able to successfully reach or invoke the bot service. There could be an issue with the system, or you might need to check the credentials provided for your bot service in the Bot Registry. Otherwise, this returns false.
Bot engine execution error
If true, this indicates that Designer was able to communicate with the bot, but an error occurred while the bot engine was processing the request. For example, the bot returned an incorrect response and triggered the Error Handler block. Otherwise, this returns false.
Additional bot information
The variables in this section are applicable only to Dialogflow CX type bots. Dialogflow CX bots manage conversations differently than other types of bots. If you are using a Dialogflow CX bot, you can set these variables to capture additional details about the interaction.
These properties may be supported for other bot types in future versions of Designer.
Store all slots from the bot
This variable stores an object (JSON formatted) that contains all of the slots that were returned from the bot provider at the end of the last turn with the external bot. It does not contain intents. For example:
{
    "operation": "Purchase Item",
    "order_unit": "phone",
    "location": {
        "original": "main st",
        "street-address": "main st"
    },
    "operation_complete": false,
    "admin-area": null,
    "is_returning": true,
    "zip-code": null,
    "city": null,
    "is_logged_in": false,
    "cart": "Nest Thermostat, phone",
    "has_welcomed_user": true
}
Capture slots information with every intent
This variable captures slots organized by intents as these intents were identified in chronological order. Each intent captures slots as they were at the time the intent was identified. This give an additional perspective into the conversation with the bot. For example:
[
    {
        "intent": "Default Welcome Intent",
        "slots": {
            "has_welcomed_user": true
        }
    },
    {
        "intent": "retail.purchase_item_initiate",
        "slots": {
            "operation_complete": false,
            "operation": "Purchase Item",
            "has_welcomed_user": true,
            "is_returning": true
        }
    },
    {
        "intent": "small_talk.confirmation.proceed_as_guest",
        "slots": {
            "has_welcomed_user": true,
            "operation_complete": false,
            "is_returning": true,
            "is_logged_in": false,
            "operation": "Purchase Item"
        }

    }
]
Store the reason the interaction ended
If the bot conversation is successful (it does not error out), this variable stores information about how the bot session ended. There are two possible result values:
- END_INTERACTION – the session ended normally.
- LIVE_AGENT_HANDOFF – the customer should be transferred to a live agent and the application should try to move to Assisted Service. This must be handled by the application logic. There is no in-built behavior that would start Assisted service once this result is returned by the external bot.
If the bot does not return a SUCCESS state (for example, the bot experienced an error), this variable is not updated.
Viewing the results data
You can view the results data in Designer Analytics by going to the Session Detail Records dashboard. In the All Events panel, find the application instance you want to check and then filter or search for the data you want to view.
For example:
Adding logic for handling intents
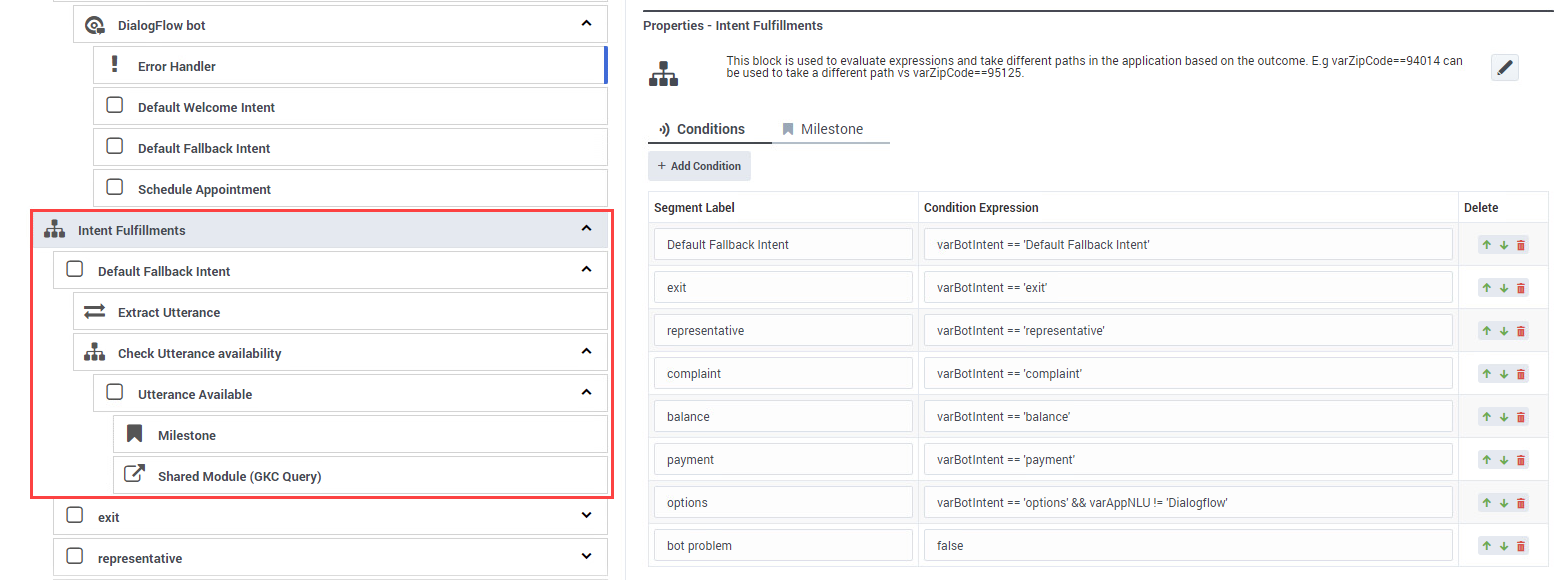
To specify additional logic for handling intents, Genesys recommends using a Segmentation block to define different pathways for the application to take when certain intents are detected.
In this example, a segmentation block is configured as Intent Fulfillments, with conditions added based on intents:
For each intent added as a condition, Designer creates a corresponding Segment block in the application flow. You can then build additional logic for an intent by placing child blocks under these Segment blocks. For example, you might want to call a Shared Module that fulfills that intent.
For more information about setting up segmentation blocks and condition expressions, see the Segmentation block page.

