|
|
| Line 7: |
Line 7: |
| | |appname=Designer | | |appname=Designer |
| | |overviewtext={{NoteFormat| | | |overviewtext={{NoteFormat| |
| − | * These topics apply to the latest release of Designer (i.e. '''Designer 9'''). If you are running an earlier version (i.e. Designer 8.x), visit [https://docs.genesys.com/Documentation/DES/current/Help/Welcome Genesys Designer Help (8.x)] to view the topics for that version.
| + | These topics apply to the latest release of Designer (i.e. '''Designer 9'''). If you are running an earlier version (i.e. Designer 8.x), visit [https://docs.genesys.com/Documentation/DES/current/Help/Welcome Genesys Designer Help (8.x)] to view the topics for that version. |}} |
| − | * Not all features and functionality described here might be applicable to your deployment. Contact your Genesys representative if you have any questions about the features that are available in your version of the software.
| |
| − | * If you are new to Designer 9 after running an 8.x version, some things have changed. Review the {{Link-SomewhereInThisVersion|manual=Designer|topic=GetStarted|anchor=migration|display text=migration notes}} section for important details about working in Designer 9.|}}
| |
| | | | |
| | Designer is a web-based tool for developing self-service (IVR) and assisted service (routing) applications that run on the Genesys Engage cloud platform. It is an omnichannel solution, enabling you to craft applications that handle voice, chat, and email interactions. | | Designer is a web-based tool for developing self-service (IVR) and assisted service (routing) applications that run on the Genesys Engage cloud platform. It is an omnichannel solution, enabling you to craft applications that handle voice, chat, and email interactions. |
| Line 24: |
Line 22: |
| | | | |
| | [[File:des_blocks.png]] | | [[File:des_blocks.png]] |
| − | |requirements====Supported browsers=== | + | |requirements====Important!=== |
| | + | Some of the features and functionality described in these topics might not be applicable to all deployments. Contact your Genesys representative if you have any questions about what is available in your version of Designer. |
| | + | |
| | + | ===Supported browsers=== |
| | Unless otherwise noted, Designer supports the latest versions of the following browsers: | | Unless otherwise noted, Designer supports the latest versions of the following browsers: |
| | | | |
| Line 32: |
Line 33: |
| | *Apple Safari | | *Apple Safari |
| | | | |
| − | Internet Explorer (all versions) is not supported. | + | '''Not supported:''' Internet Explorer (all versions) |
| | {{AnchorDiv|note}} | | {{AnchorDiv|note}} |
| | {{NoteFormat|For Google Chrome, Designer supports the ''n''-1 version of the browser, i.e. the version prior to the latest release.|}} | | {{NoteFormat|For Google Chrome, Designer supports the ''n''-1 version of the browser, i.e. the version prior to the latest release.|}} |
| Line 40: |
Line 41: |
| | | | |
| | ===Third-party cookies=== | | ===Third-party cookies=== |
| − | Some features in Designer require the use of third-party cookies. Browsers must allow third-party cookies to be stored for Designer to work properly.
| + | Certain features in Designer require the use of third-party cookies. Browsers must allow third-party cookies to be stored for Designer to work properly. |
| | |logintype=No | | |logintype=No |
| | |abouttext=Watch this video to see an overview of the Designer user interface: | | |abouttext=Watch this video to see an overview of the Designer user interface: |
| Line 76: |
Line 77: |
| | |uitext=Provides all available {{Link-SomewhereInThisManual|topic=Blocks|anchor=top|display text=blocks}} that you can use in your application, sorted by functional grouping. | | |uitext=Provides all available {{Link-SomewhereInThisManual|topic=Blocks|anchor=top|display text=blocks}} that you can use in your application, sorted by functional grouping. |
| | |uifullwidth=No | | |uifullwidth=No |
| | + | }}{{UITab |
| | + | |uiheading=Actions toolbar |
| | + | |uialignment=Horizontal |
| | + | |uiimage=des_actions_toolbar.png |
| | + | |uigif=No |
| | + | |uianchor=actions |
| | + | |uitext=Many of the {{Link-SomewhereInThisVersion|manual=Designer|topic=Resources|display text=resource pages}} in Designer have an '''Actions''' toolbar. The action items on the toolbar will vary based on the resource page you are viewing. For more information, see {{Link-SomewhereInThisVersion|manual=Designer|topic=Resources|anchor=actions|display text=Actions toolbar}}. |
| | }}{{UITab | | }}{{UITab |
| | |uiheading=Application flow | | |uiheading=Application flow |
| Line 100: |
Line 108: |
| | |uiheading=Quick filters | | |uiheading=Quick filters |
| | |uialignment=Horizontal | | |uialignment=Horizontal |
| − | |uiimage=des_ui_quick_filters_01.png | + | |uiimage=des_ui_quick_filters.png |
| − | |uigif=No
| |
| − | |uitext=This toolbar enables you to filter a list of resource items by selecting one or more filters that are associated with tags. The list then refreshes to show only those items that match the selected filters.
| |
| − | | |
| − | In this example, the '''SMART''' and '''Debug''' filters are selected so that only data tables with those tags are shown.
| |
| − | | |
| − | Note that the filters will display any item in the list that has the associated tag, even if there are other tags associated with that item. If you navigate to a new resource page (such as going from '''Data Tables''' to '''Business Hours'''), any selected filters are automatically applied to the new page.
| |
| − | | |
| − | To add, modify, or delete quick filters, click the '''Settings''' icon to open the '''Manage Quick Filters''' window. To associate a filter with a specific tag, select it, and add the tag(s) under the '''Parameters''' section.
| |
| − | |uifullwidth=Yes
| |
| − | |uitextwide=In the above example, the '''SMART''' filter was associated with the "M1App" tag, as follows:
| |
| − | | |
| − | [[file:des_ui_quick_filters_manage.png|500px]]
| |
| − | | |
| − | The '''Quick Filters''' toolbar appears on the following resource pages: {{Link-SomewhereInThisManual|topic=SpecialDays|anchor=top|display text=Special Days}}, {{Link-SomewhereInThisManual|topic=DesBusinessHours|anchor=top|display text=Business Hours}}, {{Link-SomewhereInThisManual|topic=DataTables|anchor=top|display text=Data Tables}}, {{Link-SomewhereInThisManual|topic=ApplicationsBar|anchor=top|display text=Applications}}, {{Link-SomewhereInThisManual|topic=SharedModulesBar|anchor=top|display text=Shared Modules}}, {{Link-SomewhereInThisManual|topic=EmergencyFlags|anchor=top|display text=Emergency Flags}}, {{Link-SomewhereInThisManual|topic=MediaResources|anchor=top|display text=Media Resources}}, and {{Link-SomewhereInThisManual|topic=DigitalResourcesBar|anchor=top|display text=Digital Resources}}. The same filters appear on each page, and any filters that you create are visible to other Designer users.
| |
| − | | |
| − | {{NoteFormat|Tags are a useful tool for keeping resources organized. For consistency, Genesys recommends that you define and use a similar set of tags across your various resource types.|2}}
| |
| − | }}{{UITab
| |
| − | |uiheading=Actions toolbar
| |
| − | |uialignment=Vertical
| |
| | |uigif=No | | |uigif=No |
| − | |uianchor=actions
| + | |uitext=This toolbar enables you to filter a list of resource items by selecting one or more filters that are associated with tags. The list then refreshes to show only those items that match the selected filters. For more information, see {{Link-SomewhereInThisVersion|manual=Designer|topic=Resources|anchor=quickfilters|display text=Using the Quick Filters}}. |
| − | |uitext=Many of the resource pages in Designer have an '''Actions''' toolbar: | |
| − | | |
| − | [[File:des_actions_toolbar.png]]
| |
| − | | |
| − | The action items on the toolbar will vary based on the resource page you are viewing. Depending on the functions available for that particular resource, you can do the following:
| |
| − | {{{!}} class="wikitable"
| |
| − | {{!}}+
| |
| − | !Button
| |
| − | !Description
| |
| − | {{!}}-
| |
| − | {{!}}[[File:des_actions_toolbar_history_icon.png]]
| |
| − | {{!}}Displays the history (or audit log) for a resource. For more information, see {{Link-SomewhereInThisVersion|manual=Designer|topic=GetStarted|anchor=history|display text=Viewing the history of a resource}}.
| |
| − | {{!}}-
| |
| − | {{!}}[[File:des_actions_toolbar_list_icon.png]]
| |
| − | {{!}}Displays a list of the applications and modules that are using a particular media or message collection.
| |
| − | {{!}}-
| |
| − | {{!}}[[File:des_actions_toolbar_clone_icon.png]]
| |
| − | {{!}}Clones the resource. You'll need to assign the cloned resource a unique name. Note that a cloned resource does not inherit the history and published versions of the original resource.
| |
| − | {{!}}-
| |
| − | {{!}}[[File:des_actions_toolbar_version_icon.png]]
| |
| − | {{!}}Displays the version history for a shared module. You can then choose to make a version '''public''', or view a version (in read-only mode) as it appeared at a particular time.
| |
| − | {{!}}-
| |
| − | {{!}}[[File:des_actions_toolbar_export_icon.png]]
| |
| − | {{!}}Exports the resource for use in another Designer workspace. When you export a resource, all versions of that resource are exported, including the unpublished version. If you are using a Safari browser when performing the export, the exported file is downloaded as ''unknown''. The file is valid and can be imported successfully, but you can rename it to something more meaningful.
| |
| − | {{!}}-
| |
| − | {{!}}[[File:des_actions_toolbar_import_icon.png]]
| |
| − | {{!}}Imports the contents of a CSV file into a selected data table. For more information, see {{Link-SomewhereInThisVersion|manual=Designer|topic=DataTables|anchor=imp|display text=Import}} on the '''Data Tables''' page.
| |
| − | {{!}}-
| |
| − | {{!}}[[File:des_actions_toolbar_trash_icon.png]]
| |
| − | {{!}}Deletes '''all versions''' of the resource. However, note that published applications that were already using the resource (i.e. applications that had previously generated their code) are not affected.
| |
| − | {{!}}}
| |
| − | {{AnchorDiv|history}}
| |
| − | ====Viewing the history of a resource====
| |
| − | The history view shows you a list of each time the resource was viewed, edited, or published, the user who made the change, and the new and previous value of any properties that were changed. | |
| − | | |
| − | You can use the buttons on the page to view the results for a specific time period (for example, '''last 1W''' to see the results for previous week), or use the date fields to specify a custom date range. Results can be sorted or searched and you can use the '''Export''' button to export the results as a CSV file.
| |
| − | | |
| − | You can drill-down further into each results item by double-clicking it. This opens an audit window that displays additional details for that particular event.
| |
| − | <!--
| |
| − | ====List media/message collection consumers====
| |
| − | Use the '''List media/message collection consumers''' button ([[File:des_actions_toolbar_list_icon.png]]) to see information about the applications and modules that are using a particular media or message collection.
| |
| − | | |
| − | ====Clone====
| |
| − | Use the '''Clone''' button ([[File:des_actions_toolbar_clone_icon.png]]) to make a copy of the resource. You'll need to assign the cloned resource a unique name. A cloned resource does not inherit the history and published versions of the original resource.
| |
| − | | |
| − | ====List module versions====
| |
| − | Use the '''List module versions''' button ([[File:des_actions_toolbar_version_icon.png]]) to view the version history for a shared module. You can then choose to make a version '''public''', or view a version (in read-only mode) as it appeared at a particular time.
| |
| − | | |
| − | ====Export====
| |
| − | Use the '''Export''' button ([[File:des_actions_toolbar_export_icon.png]]) to export the resource for use in another Designer workspace. When you export a resource, all versions of that resource are exported, including the unpublished version. If you are using a Safari browser when performing the export, the exported file is downloaded as ''unknown''. The file is valid and can be imported successfully, but you can rename it to something more meaningful.
| |
| − | | |
| − | ====Import (Data Tables page only)====
| |
| − | Use the '''Import''' button ([[File:des_actions_toolbar_import_icon.png]]) to import the contents of a CSV file into the selected data table. For more information, see {{Link-SomewhereInThisVersion|manual=Designer|topic=DataTables|anchor=imp|display text=Import}} on the '''Data Tables''' page.
| |
| − | | |
| − | ====Delete====
| |
| − | Click '''Delete''' ([[File:des_actions_toolbar_trash_icon.png]]) to delete '''all versions''' of the resource. However, note that published applications that were already using the resource (i.e. applications that had previously generated their code) are not affected. -->
| |
| | }} | | }} |
| | |AppSection={{AppSection | | |AppSection={{AppSection |
| − | |appSectionHeading=Where next? | + | |appSectionHeading=Next steps |
| − | |appSectionAlignment=Vertical
| |
| − | |appSectionGif=No
| |
| − | |appSectionAnchor=Where
| |
| − | |appSectionText=But before you start building applications, you should learn about some of the key concepts. The following topics provide an overview of things you should know when working with Designer:
| |
| − | | |
| − | *{{Link-SomewhereInThisManual|topic=Features|anchor=top|display text=Features and capabilities}}
| |
| − | *{{Link-SomewhereInThisManual|topic=Security|anchor=top|display text=Designer roles and permissions}}
| |
| − | *{{Link-SomewhereInThisManual|topic=Variables|anchor=top|display text=Managing variables}}
| |
| − | *{{Link-SomewhereInThisManual|topic=AppStruc|anchor=top|display text=Understanding the application workflow}}
| |
| − | *{{Link-SomewhereInThisManual|topic=SavePublish|anchor=top|display text=Saving and publishing your application}}
| |
| − | }}{{AppSection
| |
| − | |appSectionHeading=Migration notes
| |
| | |appSectionAlignment=Vertical | | |appSectionAlignment=Vertical |
| | |appSectionGif=No | | |appSectionGif=No |
| − | |appSectionAnchor=migration | + | |appSectionAnchor=next |
| − | |appSectionText=If you are new to Designer 9 after working in a previous version (i.e. Designer 8.x), there are some changes you should be aware of when working in Designer 9: | + | |appSectionText=The next step is to learn about some key Designer features and concepts. Use the following page as a starting point to find out more: |
| − | | |
| − | *Designer now uses a new application workflow based on builds and streams. You can learn more about this new type of workflow on the {{Link-SomewhereInThisVersion|manual=Designer|topic=AppStruc}} page. To gain familiarity, you can clone an existing application and experiment with making changes, generating builds, and assigning the builds to streams. When you are comfortable with the workflow, you can start to adopt it with your original applications.
| |
| − | | |
| − | *If you make any changes to a Business Control, Audio Resource, or Speech Grammar resource, those changes now take effect immediately if the resource is being referenced by the LIVE production build. However, if you make a change to a data table, you must {{Link-SomewhereInThisVersion|manual=Designer|topic=DataTables|anchor=publish|display text=publish the data table}} for the changes to take effect in any builds that are referencing it.
| |
| − | | |
| − | *In previous versions of Designer, any changes made to an application took effect immediately after the application was published. In Designer 9, you must generate a new build and assign it to the LIVE stream for the changes to take effect.
| |
| | | | |
| − | *Some permissions have changed. Refer to {{Link-SomewhereInThisVersion|manual=Designer|topic=Security}} for a list of Designer roles and their associated permissions. | + | *{{Link-SomewhereInThisManual|topic=Features|anchor=top|display text=Quick links}} |
| | }} | | }} |
| | }} | | }} |
Learn how to get started with Designer.
Important
These topics apply to the latest release of Designer (i.e.
Designer 9). If you are running an earlier version (i.e. Designer 8.x), visit
Genesys Designer Help (8.x) to view the topics for that version.
Designer is a web-based tool for developing self-service (IVR) and assisted service (routing) applications that run on the Genesys Engage cloud platform. It is an omnichannel solution, enabling you to craft applications that handle voice, chat, and email interactions.
This video shows a quick overview of Designer and demonstrates a few of its latest features:
Designer provides easy-to-use, highly functional blocks that enable common tasks in a simple and straightforward manner. For example, there are blocks for building menus, playing messages, setting up decision points, routing interactions to agents, and offering surveys.
To build an application, you simply drag blocks from the Palette and drop them into the Application Flow, which is divided into phases and represents the application structure.
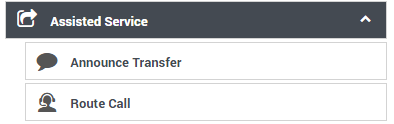
For example, you might use the following blocks in the Assisted Service phase, in which an agent helps a customer. The first block controls the announcement to the caller that they are being transferred, and the second block controls the routing function to an agent:
Before you start
Important!
Some of the features and functionality described in these topics might not be applicable to all deployments. Contact your Genesys representative if you have any questions about what is available in your version of Designer.
Supported browsers
Unless otherwise noted, Designer supports the latest versions of the following browsers:
- Mozilla Firefox
- Google Chrome (see Important, below)
- Microsoft Edge
- Apple Safari
Not supported: Internet Explorer (all versions)
Important
For Google Chrome, Designer supports the
n-1 version of the browser, i.e. the version prior to the latest release.
Minimum display resolution
The minimum display resolution supported by Designer is 1920 x 1080.
Third-party cookies
Certain features in Designer require the use of third-party cookies. Browsers must allow third-party cookies to be stored for Designer to work properly.
Access the application[edit source]
Once your Genesys Multicloud CX environment is up and running and you've checked that you meet the necessary requirements, log in to your Genesys Portal to access Designer. Click the Designer icon and enter your username and password.
Walk through the application
Watch this video to see an overview of the Designer user interface:
The various elements within the interface are described below.
Navigation bar
Workspace toolbar
Provides buttons for common actions. Click your user name to log off. Click the settings icon to view or modify the global Caching settings for certain resources and to toggle certain Features. Click the Help icon to access the Designer Help.
Application toolbar
Provides buttons for common actions. Click Settings to set global settings for your application. Click Save Flow to save and validate your application, or click Publish to save and validate your application and prepare it for use by routing engines. Click Build to create and manage the builds associated with the application.
Palette
Provides all available blocks that you can use in your application, sorted by functional grouping.
Actions toolbar
Many of the resource pages in Designer have an Actions toolbar. The action items on the toolbar will vary based on the resource page you are viewing. For more information, see Actions toolbar.
Application flow
Provides the main area to build your application by adding blocks vertically. (See Using the blocks for more information.)
Help pane
Displays help information for the selected block.
Block properties
Displays all properties exposed by a block and provides assistance to set them:
Quick filters
This toolbar enables you to filter a list of resource items by selecting one or more filters that are associated with tags. The list then refreshes to show only those items that match the selected filters. For more information, see Using the Quick Filters.
Next steps
The next step is to learn about some key Designer features and concepts. Use the following page as a starting point to find out more:


