Difference between revisions of "DES/Current/Designer/BotRegistry"
(Published) |
|||
| (18 intermediate revisions by 4 users not shown) | |||
| Line 3: | Line 3: | ||
|DisplayName=Bot Registry | |DisplayName=Bot Registry | ||
|TocName=Bot Registry | |TocName=Bot Registry | ||
| − | |Context= | + | |Context=Learn how to add external bot services to the '''Designer Bot Registry''' so you can use them in your applications. |
| + | |Dimension=bots | ||
|ComingSoon=No | |ComingSoon=No | ||
| − | |Platform=GenesysEngage- | + | |Platform=GenesysEngage-cloud |
|Role=Administrator | |Role=Administrator | ||
|Application=Designer | |Application=Designer | ||
|Section={{Section | |Section={{Section | ||
| + | |anchor=about | ||
|alignment=Vertical | |alignment=Vertical | ||
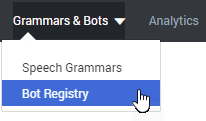
| − | |structuredtext=Designer | + | |structuredtext=You can access the Designer '''Bot Registry''' from the '''Grammars & Bots''' menu. |
| − | + | [[File:Des bot registry menu.png]] | |
| + | |Status=No | ||
| + | }}{{Section | ||
| + | |sectionHeading=Before you start | ||
| + | |anchor=prereq | ||
| + | |alignment=Vertical | ||
| + | |structuredtext=The Bot Registry does not enable you to create bots. Rather, it stores information about bots that you've configured with a {{Link-SomewhereInThisVersion|manual=Designer|topic=BotRegistry|anchor=SupportedBots|display text=supported bot service provider}}. | ||
| + | |||
| + | Before you can add a bot resource to the registry, you'll need to set it up with your bot service provider. During registration, you might need to provide certain account details, such as URLs, user IDs, or passwords that Designer requires to access the bot. If you are not sure where to get the information required to register the bot, check with your bot service provider. | ||
| + | |||
| + | After you've {{Link-SomewhereInThisVersion|manual=Designer|topic=BotRegistry|anchor=addbot|display text=added a bot}} to the registry, you can start using it by adding a {{Link-SomewhereInThisVersion|manual=Designer|topic=BotBlock|display text=Bot Block}} to your application. | ||
| + | {{AnchorDiv|SupportedBots}} | ||
| + | ===Supported bot service providers=== | ||
| + | {{NoteFormat|Some bot services may not be available in all deployments. Check with your Genesys representative to confirm which bot services are supported in your environment.|}} | ||
| − | + | Designer currently supports the following bot types: | |
| − | + | *Google Dialogflow CX (can be enabled upon request) | |
| + | *Google Dialogflow ES | ||
| + | *Amazon Lex | ||
|Status=No | |Status=No | ||
}}{{Section | }}{{Section | ||
| − | |sectionHeading=Adding a | + | |sectionHeading=Adding a bot resource to the registry |
|anchor=addbot | |anchor=addbot | ||
| + | |alignment=Horizontal | ||
| + | |Media=Video | ||
| + | |image=440114334 | ||
| + | |AltText=Adding a bot resource to the Designer Bot Registry | ||
| + | |structuredtext=Click '''Add Bot Definition''' and enter the details for your bot. You can then test your bot's connection and save it to the registry. Watch the video to see a quick demonstration of how to add a bot resource to Designer. | ||
| + | |||
| + | For more information about adding specific bot types, see: | ||
| + | |||
| + | *{{Link-SomewhereInThisVersion|manual=Designer|topic=BotRegistry|anchor=add-cx|display text=Adding a Google Dialogflow CX bot}} | ||
| + | *{{Link-SomewhereInThisVersion|manual=Designer|topic=BotRegistry|anchor=add-es|display text=Adding a Google Dialogflow ES bot}} | ||
| + | *{{Link-SomewhereInThisVersion|manual=Designer|topic=BotRegistry|anchor=add-lex|display text=Adding an Amazon Lex bot}} | ||
| + | |Status=No | ||
| + | }}{{Section | ||
| + | |sectionHeading=Adding a Google Dialogflow CX bot to the registry | ||
| + | |anchor=add-cx | ||
|alignment=Vertical | |alignment=Vertical | ||
| − | |structuredtext=Click '''Add Bot Definition''' | + | |structuredtext=For Google '''Dialogflow''' '''CX''' bots, you can import a JSON file that contains the settings for your bot resource. You can export this file from your Dialogflow CX account page. If you need help doing this, refer to the Dialogflow documentation. |
| + | |||
| + | Click '''Add Bot Definition''' and enter a '''Name''' for the bot (check {{Link-SomewhereInThisVersion|manual=Designer|topic=Resources|anchor=validchar|display text=valid naming characters}} for a list of approved characters you can use when naming a bot resource). For the '''Type''', select '''Dialogflow CX''' from the list of supported bot services. | ||
| + | |||
| + | [[File:Des add dialogflow cx bot.png]] | ||
| − | + | Click '''Choose file''' to select the JSON file that contains the setting for your bot and click '''Open'''. Designer imports the settings for your bot and displays the bot properties. You must also manually enter the following details for your Dialogflow CX bot service to work with Designer: | |
| − | For Dialogflow bots, you can import a JSON file that contains all of the required settings for your bot resource. | + | *'''Location''' - the geographical location (i.e. region ID) of your CX bot agent. Examples: us-east1, europe-west1, asia-south1. |
| + | *'''Agent ID''' - the agent ID of your CX bot. | ||
| + | *'''Environment ID''' (Optional) If you have created different versions and environments in your bot settings, you can use this field to enter the ID of an environment that corresponds to a specific version of the flow. You can find this ID in the bot settings (under '''Manage''' > '''Testing & Deployment''' > '''Environments''') by checking the URL of the selected environment:<br />[[File:Des bot registry dialogflow cx envid.png]]<br />If left blank, Designer uses the latest version of the draft agent that is deployed to the default environment. | ||
| + | |||
| + | <!--====Analyze Sentiment==== | ||
| + | If you want the bot service to perform a sentiment analysis when detecting intents, select the '''Analyze Sentiment''' option. The bot service will then attempt to determine the overall attitude of the customer providing the input (i.e. positive, negative, or neutral). --> | ||
| + | |||
| + | Here is an example of the properties for a Dialogflow CX bot: | ||
| + | [[File:Des add dialogflow cx bot properties.png|alt=Example of the properties for a Dialogflow CX bot.|none|thumb|Example of the properties for a Dialogflow CX bot. Click for larger view.]] | ||
| + | |||
| + | |||
| + | After you've entered the required settings, click '''Test Connection''' to check if Designer can communicate with it. If the test fails, check your bot details and try again. When you are finished, click '''Save''' to add it to the registry. You can now use the bot in your applications by adding a {{Link-SomewhereInThisVersion|manual=Designer|topic=BotBlock|display text=Bot Block}} to your application. | ||
| + | |Status=No | ||
| + | }}{{Section | ||
| + | |sectionHeading=Adding a Google Dialogflow ES bot to the registry | ||
| + | |anchor=add-es | ||
| + | |alignment=Vertical | ||
| + | |structuredtext=For Google '''Dialogflow''' '''ES''' bots, you can import a JSON file that contains all of the required settings for your bot resource. You can export this file from your Dialogflow account page. If you need help doing this, refer to the Dialogflow documentation. | ||
| + | |||
| + | Click '''Add Bot Definition''' and enter a '''Name''' for the bot (check {{Link-SomewhereInThisVersion|manual=Designer|topic=Resources|anchor=validchar|display text=valid naming characters}} for a list of approved characters you can use when naming a bot resource). For the '''Type''', select '''Dialogflow'''. | ||
[[File:Des_add_dialogflow_bot.png]] | [[File:Des_add_dialogflow_bot.png]] | ||
| − | + | Click '''Choose file''' to select the JSON file that contains the setting for your bot and click '''Open'''. Designer imports the settings for your bot and displays the bot properties. | |
| + | |||
| + | ====Wait Conversation End==== | ||
| + | You can also select an optional setting called '''Wait Conversation End'''. When enabled, the {{Link-SomewhereInThisVersion|manual=Designer|topic=BotBlock}} recognizes intents that are marked as end-of-conversation intents in the bot. | ||
| + | |||
| + | Here is an example of the properties for a Dialogflow ES bot: | ||
| + | [[File:Des_bot_registry_dialogflow_ex.png|alt=Example of the settings for a Dialogflow ES bot.|none|thumb|Example of the settings for a Dialogflow ES bot. Click for larger view.]] | ||
| + | |||
| + | |||
| + | After you've entered the settings, click '''Test Connection''' to check if Designer can communicate with it. If the test fails, check your bot details and try again. When you are finished, click '''Save''' to add it to the registry. You can now use the bot in your applications by adding a {{Link-SomewhereInThisVersion|manual=Designer|topic=BotBlock|display text=Bot Block}} to your application. | ||
| + | |Status=No | ||
| + | }}{{Section | ||
| + | |sectionHeading=Adding an Amazon Lex bot to the registry | ||
| + | |anchor=add-lex | ||
| + | |alignment=Vertical | ||
| + | |structuredtext=Click '''Add Bot Definition''' and enter a '''Name''' for the bot (check {{Link-SomewhereInThisVersion|manual=Designer|topic=Resources|anchor=validchar|display text=valid naming characters}} for a list of approved characters you can use when naming a bot resource). For the '''Type''', select '''LEX''' and click '''Submit'''. | ||
| + | |||
| + | For Amazon Lex bots, you'll need to provide the following details: | ||
| + | |||
| + | *'''Bot Name''' – The name of the bot in Lex. | ||
| + | *'''Bot Alias''' – The name of the alias that the bot was published to. (An ''alias'' points to a specific version of your Lex bot.) | ||
| + | *'''Region''' – The region the bot is located in. This corresponds to the region indicated in your Amazon Web Services (AWS) console (e.g. us-east-1, us-west-2). | ||
| + | *'''Access Key ID''' and '''Secret Access Key''' – These credentials are created and managed from AWS Identity and Access Management (IAM) and require the appropriate permissions to interact with Lex. | ||
| + | |||
| + | Here is an example of the settings for a LEX bot: | ||
| − | [[File: | + | [[File:Des_bot_registry_lex_ex.png|alt=Example of the settings for a LEX bot.|none|thumb|Example of the settings for a LEX bot. Click for larger view.]] |
| − | |||
| − | After | + | After you've entered the required settings, click '''Test Connection''' to check if Designer can communicate with it. If the test fails, check your bot details and try again. When you are finished, click '''Save''' to add it to the registry. You can now use the bot in your applications by adding a {{Link-SomewhereInThisVersion|manual=Designer|topic=BotBlock|display text=Bot Block}} to your application. |
|Status=No | |Status=No | ||
}} | }} | ||
}} | }} | ||
Latest revision as of 14:00, August 25, 2022
Contents
Learn how to add external bot services to the Designer Bot Registry so you can use them in your applications.
Before you start
The Bot Registry does not enable you to create bots. Rather, it stores information about bots that you've configured with a supported bot service provider.
Before you can add a bot resource to the registry, you'll need to set it up with your bot service provider. During registration, you might need to provide certain account details, such as URLs, user IDs, or passwords that Designer requires to access the bot. If you are not sure where to get the information required to register the bot, check with your bot service provider.
After you've added a bot to the registry, you can start using it by adding a Bot Block to your application.
Supported bot service providers
Designer currently supports the following bot types:
- Google Dialogflow CX (can be enabled upon request)
- Google Dialogflow ES
- Amazon Lex
Adding a bot resource to the registry
Click Add Bot Definition and enter the details for your bot. You can then test your bot's connection and save it to the registry. Watch the video to see a quick demonstration of how to add a bot resource to Designer.
For more information about adding specific bot types, see:
Adding a Google Dialogflow CX bot to the registry
For Google Dialogflow CX bots, you can import a JSON file that contains the settings for your bot resource. You can export this file from your Dialogflow CX account page. If you need help doing this, refer to the Dialogflow documentation.
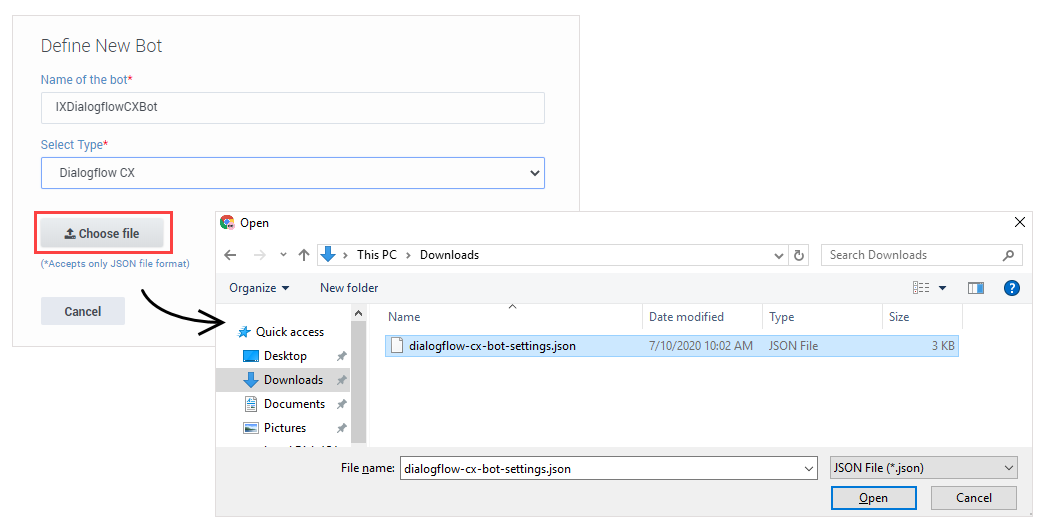
Click Add Bot Definition and enter a Name for the bot (check valid naming characters for a list of approved characters you can use when naming a bot resource). For the Type, select Dialogflow CX from the list of supported bot services.
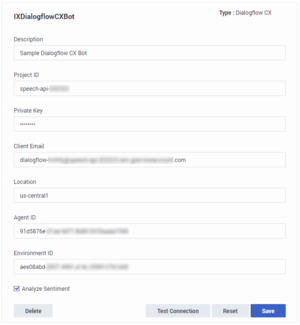
Click Choose file to select the JSON file that contains the setting for your bot and click Open. Designer imports the settings for your bot and displays the bot properties. You must also manually enter the following details for your Dialogflow CX bot service to work with Designer:
- Location - the geographical location (i.e. region ID) of your CX bot agent. Examples: us-east1, europe-west1, asia-south1.
- Agent ID - the agent ID of your CX bot.
- Environment ID (Optional) If you have created different versions and environments in your bot settings, you can use this field to enter the ID of an environment that corresponds to a specific version of the flow. You can find this ID in the bot settings (under Manage > Testing & Deployment > Environments) by checking the URL of the selected environment:

If left blank, Designer uses the latest version of the draft agent that is deployed to the default environment.
Here is an example of the properties for a Dialogflow CX bot:
After you've entered the required settings, click Test Connection to check if Designer can communicate with it. If the test fails, check your bot details and try again. When you are finished, click Save to add it to the registry. You can now use the bot in your applications by adding a Bot Block to your application.
Adding a Google Dialogflow ES bot to the registry
For Google Dialogflow ES bots, you can import a JSON file that contains all of the required settings for your bot resource. You can export this file from your Dialogflow account page. If you need help doing this, refer to the Dialogflow documentation.
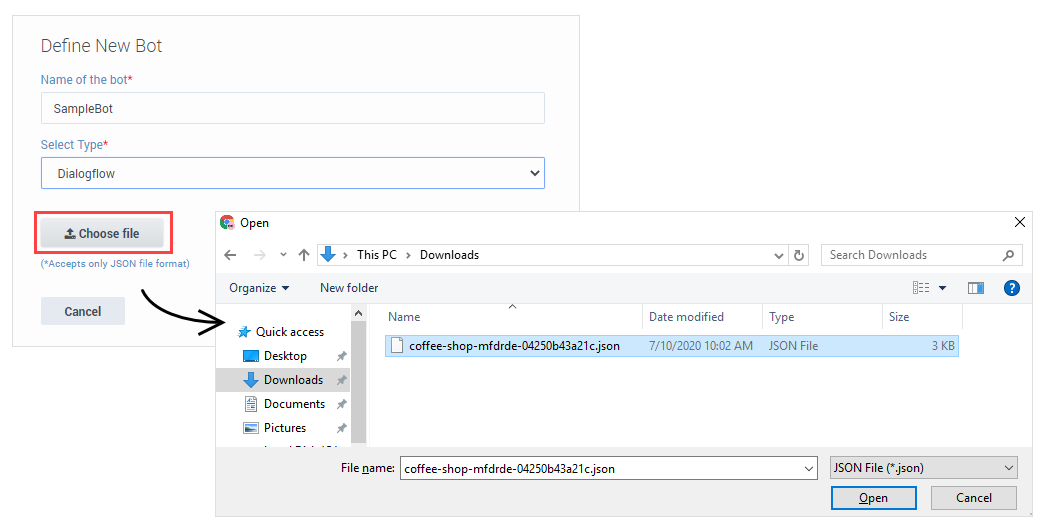
Click Add Bot Definition and enter a Name for the bot (check valid naming characters for a list of approved characters you can use when naming a bot resource). For the Type, select Dialogflow.
Click Choose file to select the JSON file that contains the setting for your bot and click Open. Designer imports the settings for your bot and displays the bot properties.
Wait Conversation End
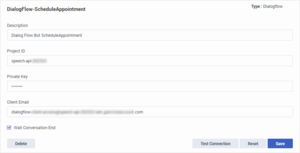
You can also select an optional setting called Wait Conversation End. When enabled, the Bot Block recognizes intents that are marked as end-of-conversation intents in the bot.
Here is an example of the properties for a Dialogflow ES bot:
After you've entered the settings, click Test Connection to check if Designer can communicate with it. If the test fails, check your bot details and try again. When you are finished, click Save to add it to the registry. You can now use the bot in your applications by adding a Bot Block to your application.
Adding an Amazon Lex bot to the registry
Click Add Bot Definition and enter a Name for the bot (check valid naming characters for a list of approved characters you can use when naming a bot resource). For the Type, select LEX and click Submit.
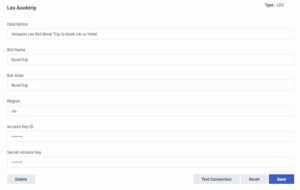
For Amazon Lex bots, you'll need to provide the following details:
- Bot Name – The name of the bot in Lex.
- Bot Alias – The name of the alias that the bot was published to. (An alias points to a specific version of your Lex bot.)
- Region – The region the bot is located in. This corresponds to the region indicated in your Amazon Web Services (AWS) console (e.g. us-east-1, us-west-2).
- Access Key ID and Secret Access Key – These credentials are created and managed from AWS Identity and Access Management (IAM) and require the appropriate permissions to interact with Lex.
Here is an example of the settings for a LEX bot:
After you've entered the required settings, click Test Connection to check if Designer can communicate with it. If the test fails, check your bot details and try again. When you are finished, click Save to add it to the registry. You can now use the bot in your applications by adding a Bot Block to your application.

