Difference between revisions of "DES/Current/Designer/HTTPREST"
m (Text replacement - "\|Platforms?=([^\|]*)PureEngage([\|]*)" to "|Platform=$1GenesysEngage-onpremises$2") |
m (Text replacement - "\|Platform=([^\|]*)GenesysEngage-onpremises([\|]*)" to "|Platform=$1GenesysEngage-cloud$2") |
||
| Line 5: | Line 5: | ||
|Context=Use this block to access an external system using a RESTful API over HTTP. | |Context=Use this block to access an external system using a RESTful API over HTTP. | ||
|ComingSoon=No | |ComingSoon=No | ||
| − | |Platform=GenesysEngage- | + | |Platform=GenesysEngage-cloud |
|Role=Administrator | |Role=Administrator | ||
|Application=Designer | |Application=Designer | ||
Revision as of 02:33, July 25, 2020
Contents
Use this block to access an external system using a RESTful API over HTTP.
You can use the HTTP REST block for accessing external systems using a RESTful API, over HTTP. You can read or write to these web services, although routing applications typically read from web services.
You can read or write to any external system that houses and exposes data through a REST web service. This could be a generic web service, such as one that returns the weather forecast for a specific location, or one that converts a monetary value from one currency to another. Or this could be a company's internal web service that fetches a customer's account details and billing history from the company's internal databases.
This block can be used in all four phases of the application.
- Check that the RESTful API you are accessing will return data in the format that you expect. While most web services typically return JSON data, there are some that may not. You may want to use an external tool to test the RESTful API outside of Designer to ensure it behaves the way you expect, before attempting to access it within your application.
- If the request timeout period is reached and no response is received from the REST web service, the output variables have a value of undefined.
Service Details tab
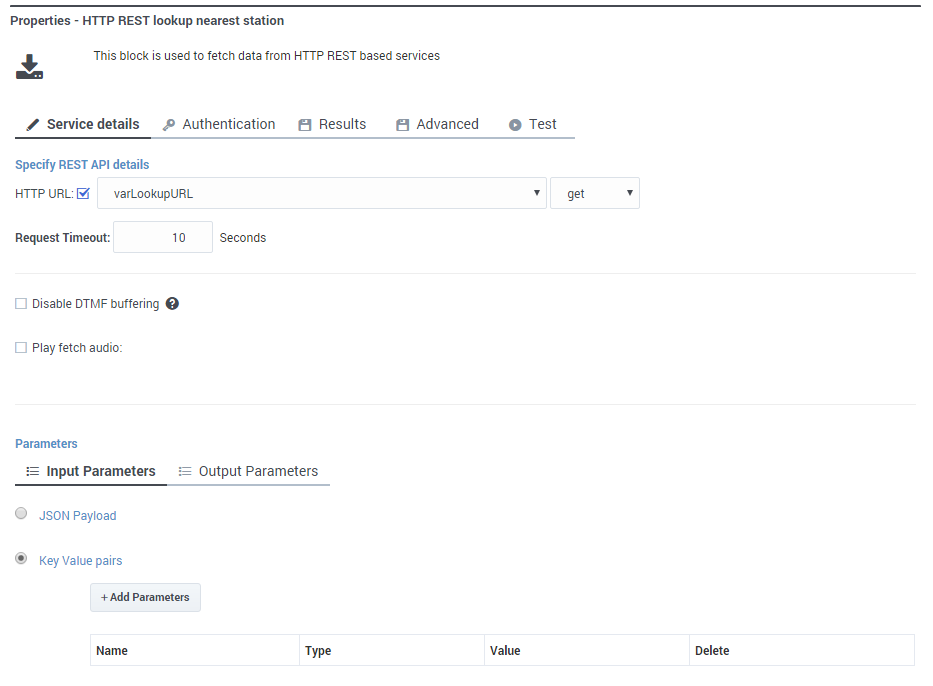
Enter the URL of the RESTful web service in the HTTP URL field. Enable the check box to use a variable, or disable the check box to use a string.
In the drop-down menu beside the HTTP URL field, select the HTTP method to access the web service: get, post, put, or delete.
If you are using post or put as the HTTP method, select an Encoding Type. (Otherwise, you will not see this option.)
In the Request Timeout field, enter the time, in seconds, that the application waits for a response from the web service before moving on to the next block.
If you want to post the results of a recording captured by the Record Utterance block to the specified URL, you can specify the variable that holds a recorded file in the Upload Record Utterance field. (This option is only supported in the Self Service phase, as the recording file captured by the Record Utterance block is no longer available after the Self Service phase.)
Select Disable DTMF buffering if you want to prevent any DTMF inputs made during fetch audio playback from being buffered and carried forward into subsequent User Input or Menu blocks.
Select Play fetch audio if you want to specify an audio resource to play to the caller while the data is fetched.
- Enable the check box beside the Play fetch audio check box to specify a variable.
- In the Play fetch audio minimum for field, you can enter the minimum length of time to play the audio, even if the document arrives in the meantime.
- In the Start fetch audio after field, you can enter a period of time to wait before audio is played.
Input Parameters
In the Input Parameters tab, specify the inputs to the web service. You can choose either:
- JSON Payload — Send a JSON value from a variable as an input to the web service. This option is applicable only for put and post methods.
- Key Value pairs — Click Add Parameters and enter the Name of the parameter expected by the web service, and the Value to pass to the input. You can toggle the Value between a string and a variable.
Output Parameters
In the Output Parameters tab, click Add Parameters to specify how and where to store the results of the web service call. The Variable Name is the application variable in which to store the data, and the JSON Expression is the key in which you expect the result to be in the response object.
See the code sample and table below for an example:
{
	"thing": {
		"otherthing": "abc"
	},
	"arrayofthings": [
		"thing1", "thing2"
	]
}| JSON Expression | Result |
|---|---|
| thing.otherthing | abc |
| arrayofthings[1] | thing2 |
Authentication tab
Enable the Enable Basic Authentication check box to use HTTP basic authentication as part of the web service request. When enabled, the User Name and Password fields are displayed. Optionally, click the check box to select a variable for either of these fields.
Results tab
Select a variable to store the outcome status (true or false) of the HTTP fetch.
You can also select variables in which to store the data and headers of the HTTP response, and the HTTP error code if the operation failed.
You must also select an action to take if the fetch operation is not successful. You can choose to "Continue with normal processing" or "Execute error handler blocks".
If you select "Execute error handler blocks", an Error Handler child block appears under the HTTP REST block.
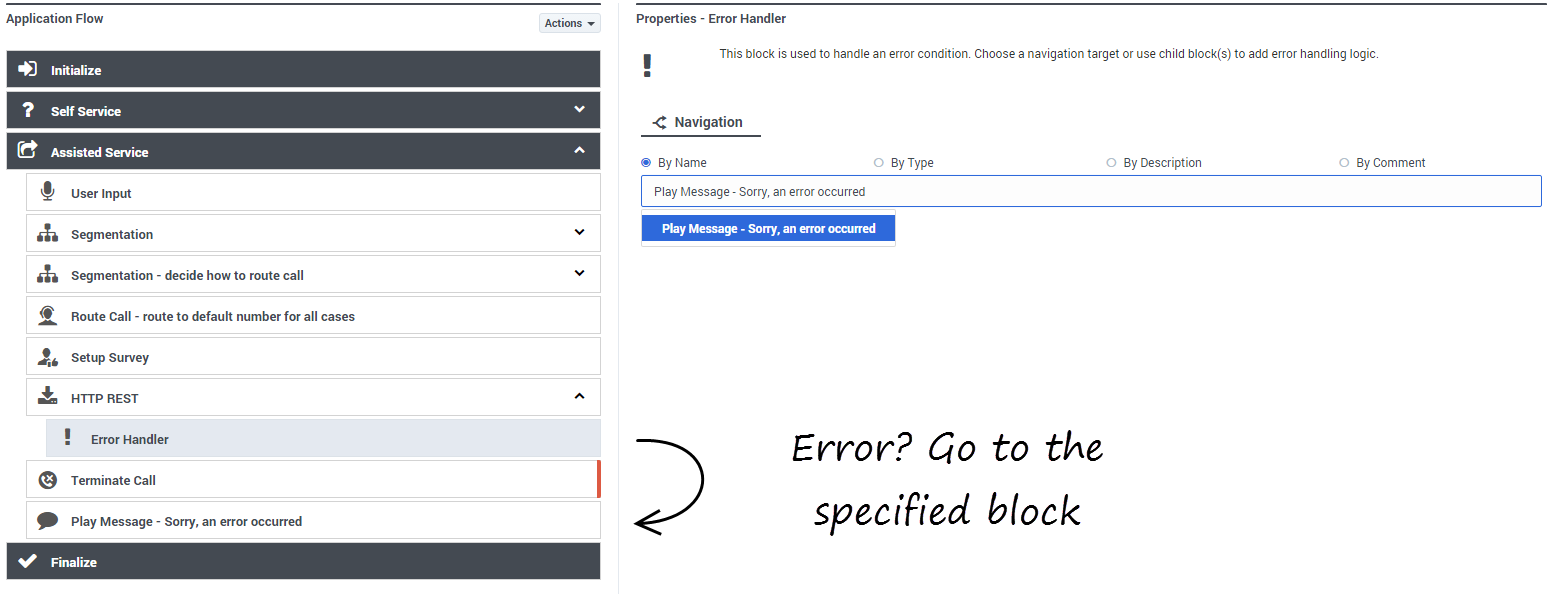
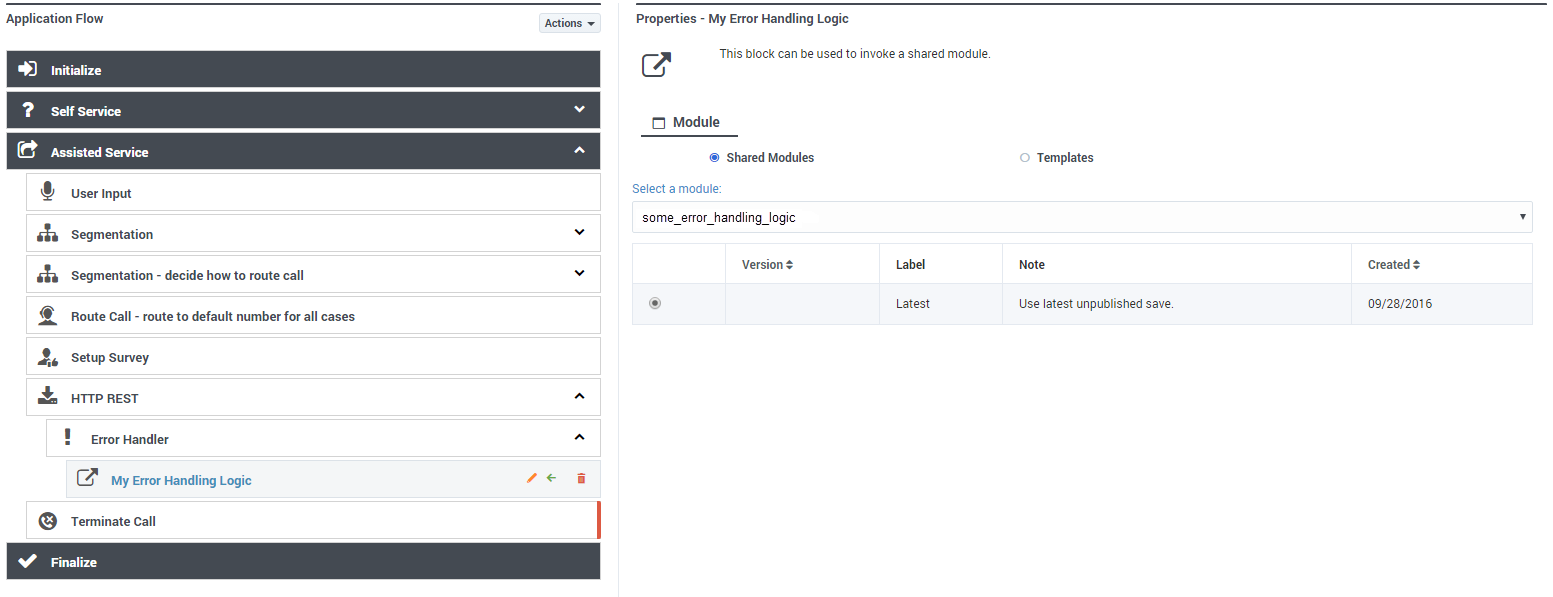
Use the Error Handler block to send the application to another target block that you select from the Navigation tab, or add child blocks that will perform the actual error handling.
In this example, the Navigation tab is used to specify a target block. If there is an error, the application will go to the Play Message block and play an error message:
In this example, a child block is used to invoke a module that will perform the error handling:
- If you select a target block from the Navigation tab, then any child blocks you've added to the Error Handler parent block are ignored.
- Standard validation rules still apply — any child blocks that you add to the Error Handler block must be valid for the application phase in which they are being used.
Advanced tab
The Use Designer service to make this request check box is enabled by default. This allows the fetch request to use a HTTP proxy, which is typically required when sending requests to external resources.
Select Internal Genesys Service if the application is sending a fetch request to an internal Genesys service. This type of request does not go through a HTTP proxy.
Click Add Header if you want to use a custom HTTP header.
Test tab
The Test tab lets you test an API call from the block without making an actual test call.
Select the variables to be used as Input Parameters (make sure you specify them in the requested format, using single quotes for strings and "()" for JSON values) and any other variables to be used.
If the variables had a default value set in the Initialize phase, you can choose to keep those values or provide your own. The application will remember the values used the next time you open the application.
Click Send Test Request to run the test and generate the results.
Scenarios
If you want to:
- Play weather information for a customer for whom you have a profile and address:
- This scenario assumes that the weather API expects two input parameters (date and location) and provides its output in JSON format, under the key result. The corresponding input information is stored in two variables: currentdate and zipcode.
- Add the HTTP REST block to the Self Service portion of the application, in a position after you have retrieved the customer location.
- In the HTTP URL field, enter the URL of the weather web service (for example, http://sample.webservice.com/api/weather/).
- Select get as the HTTP method.
- In the Input Parameters tab, click Add Parameters twice.
- For the first parameter, use the following information:
- Name: date
- Type: variable
- Value: currentdate
- For the second parameter, use the following information:
- Name: location
- Type: variable
- Value: zipcode
- In the Output Parameters tab, click Add Parameters and use the following information:
- Variable Name: weather
- JSON Expression: result


