
Shifts
Create and manage shifts that define basic workday parameters.
Shifts are defined by workday parameters, such as time of day, duration, and days of the week.
Create, copy, edit, and delete shifts by clicking Policies > Shifts and selecting the appropriate business unit and site on the Objects pane.
Managing shifts
You can create new shifts or copy existing ones and rename them. However, WFM limits the number of shifts you can create when building schedules.
Creating shifts
To create a shift:
- Go to Policies > Shifts.
- In the Objects pane, select the Business Unit and then, the Site, in which you want to create the shift.
- Click New
 .
.
- The new shift appears on the Shifts pane. with the default name.
- Configure the shift properties.
Copying shifts
To copy an existing shift:
- Select a shift.
- Click Copy
 .
.
- The Copy Shift <shift_name> pane opens.
- In the Name field, enter a name for the shift.
- The Copy to the same Site check box is checked, by default.
- If you choose to uncheck the Copy to the same Site check box, select the BU and then, the Site, in which you want to create the shift ( see the figure below).
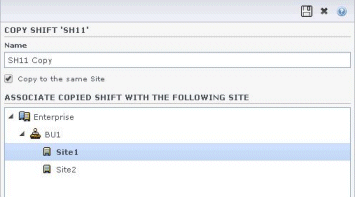
- Figure: Copy Shift
- Click Save Now
 .
.
- The new shift appears on the Shifts pane under the selected Site.
- Change the shift properties, if necessary.

Use the following panes to configure the new shift:
Editing shifts
To edit a shift:
- On the Shifts pane, select the shift you want to edit.
- Make the necessary changes in each pane.
- Click Save Now .
Deleting shifts
To delete a shift:
- On the Shifts pane, select the shift you want to delete.
- Click Delete
 .
.
Limitation on the number of shifts
The maximum number of shifts that can be configured when building schedules is 100 shifts.
Count all the agents configured for your schedule scenario, all their different contracts, and all the different shifts associated with those contracts. The total number of shifts cannot exceed 100. If it does, your build will fail, and WFM will display Error 43: Too many shifts: the maximum number is 100, but more than 100 were requested.
Solving the problem of too many shifts
Managers in a contact center might configure a very large number of shifts because they believe that multiple shifts are the only way to create fixed schedules. However, rotating patterns can accommodate many different types of schedules, including both fixed and flexible schedules, using very few shifts. For example, you could create weekly rotating patterns to configure a fixed schedule that uses just one shift. For more information see Rotating Patterns.
Shift properties
Define the shift's general settings. Open this pane when you select a shift in the Shifts pane.
Name field
The name for this shift. Use names, such as First Shift, Swing Shift, or Second Shift, that identify the shift type. The name must be unique within the site.
Time and duration
- Min. Paid Hours—The minimum number of hours defined for this shift, entered in hh:mm format. All contracts assigned to the shift must be available to work at least this number of hours. Valid values are
00:01to23:45. This value must be less than or equal to the Maximum Daily Paid Hours setting in the associated contract. Must include all paid breaks and meals. - Max. Paid Hours—The maximum number of hours defined for this shift, entered in
hh:mmformat. Valid values are00:01to23:45. This value must be greater than or equal to the Minimum Daily Paid Hours setting in the associated contract. Must include all paid breaks and meals. - Earliest Start Time—The earliest time that this shift can start. Some sites stagger shifts so that, for example, all third-shift agents arrive between 7:15 and 8:15. The earliest start time for this shift would then be 7:15.
- Latest End Time—The latest time that this shift can end. Shift agents can end their shift at staggered intervals that correspond to the stagger at the beginning of the shift. For example, a shift that starts between 7:15 and 8:15 can end between 3:15 and 4:15. The latest end time for this shift would then be 4:15.
- Next Day—When this check box is checked, indicates that this shift can end during the next day.
- Start Step—If using staggered start times for various agents working a shift, the Start Step is the increment of time between possible shift start times. Scheduler uses this Start Step to configure agent schedules. The start step can be any number of minutes between 1-120.
Optional time settings
Use the following optional time settings to narrow the range of time during which the start or end of the shift can be scheduled. You can create a fixed start or end time for the shift. For example, to set a fixed start time, set the Latest Start Time field to the same time as the Earliest Start Time field. The total shift duration then remains flexible.- Latest Start Time—The latest time that this shift can start. Some sites stagger shifts so that, for example, all third-shift agents arrive between 7:15 and 8:15. The latest start time for this shift would then be 8:15.
- Earliest End Time—The earliest time that this shift can end. Shift agents can end their shift at staggered intervals that correspond to the stagger at the beginning of the shift. For example, a shift that starts between 7:15 and 8:15 might end between 3:15 and 4:15. The earliest end time for this shift would then be 3:15.
Available days of the week
The days of the week for which this shift can be assigned by the scheduling algorithm. By default, all days are selected.
Distribution:
- Min.—The minimum number of occurrences of the shift for each agent whose contract is associated with the shift.
- Max.—The maximum number of occurrences of the shift for each agent whose contract is associated with the shift.
- Applies To—The period of time for which Scheduler should apply the distribution minimum and maximum.
- Disregard—Distribution properties are not applied.
- Every Week—The Min./Max. are considered on a weekly basis. Amounts entered should equal the numbers required for one week.
- Schedule Planning Period—Distribution properties are applied to the schedule planning period. Distribution amounts entered should equal the numbers required for the entire schedule planning period.
Days-off rule
The rules that can be defined for the days off that are associated with the shift:
- No Rule means there are no rules about days off.
- There are three possible day-off rules:
- Next day—If agents work this shift, they get the next day off.
- Previous day—If agents work this shift, they get the previous day off.
- Next day is not off—If agents work this shift, they cannot get the next day off.
Shift contracts
Open the Shifts > Contracts pane by clicking Contracts at the top of the Shift Properties pane.
Assigning contracts to shifts
To assign a contract to a shift:
- In the Shifts pane, select a shift.
- In the right-side pane, select Contracts.
- Click Assign a Contract to a Shift
 .
. - In the Use This State for Assignments drop-down list, select the appropriate state.
- Select one or more contracts from the list on the Contract Associations pane. You can assign multiple contracts to a single shift.
- Click Apply
 to move the selected contracts into the Contracts pane.
 - Click Save Now .
Removing contracts from shifts
To unassign or remove a contract from a shift:
- In the right-side pane, select Contracts.
- In the Contracts list, select the contract you want to remove.
- Click Remove Contract from Shift
 .
. - When the Confirmation dialog appears, click Yes.
Changing the contract's state
To change the state of an assigned contract:
- In the Contracts pane, use the State drop-down menu for the Contract you want to change and select Primary (default) or Secondary.
- Click Save Now .
- Assigned contracts appear only in the Contracts pane.
- To select multiple contracts, hold down SHIFT or CTRL and click each additional contract.
- Each assigned contract has a state: Primary or Secondary. The default state after being moved is Primary.