
Sites
Contents
This page provides links to topics that explain how to create and manage sites.
Sites can be equivalent to switches, which are defined in Genesys Configuration Manager and imported into WFM.
You can create sites in WFM that are unrelated to a switch. This is appropriate when switches do not correlate with your company's organization. For example, a single location could be divided into multiple entities to reflect divisions along business unit lines.
Go to Configuration > Organization and select Sites to complete the following tasks:
Site properties
When you create a site or select an existing one, the properties for that site are displayed in the Site Properties pane. At the top of this pane, you can view additional configuration settings for the site, by selecting Teams or Agents.
The fields in the Properties pane are:
- Name—Enter a name for a new site or edit the existing one. The name must be unique in the WFM environment.
- Associated Switch—A read-only field that shows the switch associated with the site as configured in Genesys Administrator.
- Maximum Number of Seats—The maximum number of seats in the center. This places a limit on the number of agents that Workforce Manager can schedule at any given time. Some combinations of activity sets and task sequences might conflict with this constraint. In cases of conflict, Scheduler gives priority to the activity set.
- Time Zone—The default time zone. To change it, select the desired time zone from the drop-down list.
- Business Unit—The business unit, with which the site is associated.
- Alarm Threshold—The number of minutes before or after a schedule state group is scheduled to occur before an agent is considered severely non-adherent. Can be set to any integer between 0-1440 (24 hours). The default value is 5 minutes.
- Allow auto-approval of schedule trades—Check this box to enable auto-approval of this trade type. Clear it to require manual approval of all agent schedule trades.
- Allow Agents to create Shared Transport—Check this box to enable agents on this site to create and modify shared transport groups.
- Paid Breaks are mandatory—Check this box to make paid breaks mandatory during scheduling. By default, the check box is cleared. (See Tip below.)
- Suppress Break-related warnings while scheduling—Check this box to suppress break-related warnings during scheduling. By default, the check box is cleared. (See Tip below.)
The following check boxes exist while you are creating a new site. After the site is saved these check boxes are no longer visible:
- Generate default Schedule State Groups and Exception Types—Check this box to enable WFM to create default schedule state groups and exception types.
- Associate existing exceptions with site—Check this box to enable WFM to verify that none of the newly created exception types for the site's BU have the same name as an existing exception type. If there is duplication, WFM adds a new site to its associated sites. If no duplication exists, a new exception type is created.
Managing sites
Manage the sites in your enterprise by using the following controls to create, edit, and delete sites in this pane:
 Search field—Enter the search criteria. For example, the name of a site.
 New—Click to add a new site.
 Delete—Click to delete an existing site.
 Copy—Click to copy the selected site.
 Help—Click to open a Help topic for the Sites pane.
Creating sites
To create a site:
- In the Configuration module, select Organization > Sites.
- In the Sites pane, click New .
- On the Properties pane, in the Name field, enter a name for the site.
The name must be unique in the WFM environment. - In the Maximum Number of Seats field, enter the maximum number of seats in this site.
- From the Time Zone drop-down list, select a time zone for the site.
- From the Business Units drop-down list, select the business unit, with which you want to associate this site.
- In the Alarm Threshold field, enter a value for the alarm.
- See Alarm Threshold, for information about this parameter.
- Check the Allow auto-approval of schedule trades if you want the agents in this site to have automatic approval for any schedule trade requests. If not, leave the check box empty.
- Check the Allow Agents to Create Shared Transport if you want the agents in this site to be able to make shared transport requests. If not, leave the check box empty.
- Check the Generate default Schedule State Groups and Exception Types if you want WFM to create default schedule state groups and exception types. If not, leave the check box empty.
- Check the Associate existing exceptions with site if you want WFM to verify that none of the newly created exception types for the site's BU have the same name as an existing exception type. If not, leave the check box empty.
- Click Save Now
 .
.
For help with configuration of your new site, see Site properties.
Copying sites
To create a new site by copying an existing one:
- In the Sites pane, select a site and click Copy .
- In the Properties pane, rename the new site and configure the properties, if required.
Although some of the configuration settings transfer from the original to the copy, you must do the rest of the configuration as described in Site properties and Associating agents with sites.
Editing sites
To configure a site or edit its configuration:
- In the Sites pane, select it.
- Enter the appropriate settings as described in Site properties.
- Settings on the Agents pane are described in Associating agents with sites.
Deleting sites
To delete a site:
- In the Sites pane, select the site you want to delete.
- Select Delete .
- When the Confirmation dialog opens, click Yes to continue or No to retain the selected site and its properties.
Associating teams with sites
Associate teams with an existing site or with a newly created site to facilitate work activities, by selecting Teams at the top of the Properties pane.
Teams controls
The Teams pane has the following controls:
- Save Now—Click to save the configuration in the Teams pane.
 Create Team—Click to create a new team within the site.
 Delete Team—Click to delete the selected team from the site.
- Help—Click to open a Help topic for the Teams pane.
You can sort the Team list, by clicking the Team Name column header.
When you create a new team, the Team Properties pane opens. Agents who are associated with the selected team appear in the Team Properties pane.
When you click Add Agent to Team (![]() ), agents appear in the Available Agents pane and can be filtered by Last Name, First Name, or Employee ID. By default, all agents to which you have access appear in this pane. You can edit the team name, add or remove agents from the team, and remove agents from the site
), agents appear in the Available Agents pane and can be filtered by Last Name, First Name, or Employee ID. By default, all agents to which you have access appear in this pane. You can edit the team name, add or remove agents from the team, and remove agents from the site
Team Properties controls
The Team Properties pane has the following controls:
- Save Now—Click to save the configuration in the Team Properties pane.
 Close—Click to close the Team Properties pane.
- Help—Click to open a Help topic for the Team Properties pane.
- Name field—Enter a name for the team.
- Add Agent to Team—Click to add agents to the team.
- Remove Agent from Team—Click to remove agents from the team.
 Remove Agent from Site—Click to remove agents from the site.
When you add agents to a team, the Available Agents pane opens. See the Available Agents controls. You can filter this list to display only agents from certain business unit(s) or the entire enterprise, and to include unassigned agents in the enterprise or business unit. See Agent Filter.
To sort agents in the Available Agents pane, click any one of the column headers.
Adding and removing agents from teams
To add an agent to a team:
- In the Teams pane, click Add Agents to Team .
- The Available Agents pane opens.
- Select an agent from the list and click Apply
 .
.
- Use CRTL or SHIFT to select several agents at a time.
- After you have finished assigning agents, click Close in the Available Agents pane.
To remove an agent from a team:
- In the Teams pane, select the agent you want to remove. (Use CNTRL or SHIFT to select several agents at a time.)
- Click Remove Agent from Team .
Associating agents with sites
Associate agents with an existing site or with a newly created site to facilitate management, by selecting Agents at the top of the Properties pane.
Agents controls
The Agents pane has the following controls:
- Save Now—Click to save the configuration in the Agents pane.
- Search By radio buttons—Select one of three radio button to find an agent in the list: Last Name, First Name, Employee ID.
- Search field—Enter the search criteria. For example, the agents first name.
- Add Agent to Site—Click to add agents to the site.
- Remove Agent from Site—Click to remove agents from the site.
- Help—Click to open a Help topic for the Agents pane.
Agents who are associated with that site appear in the Available Agents pane and can be filtered. By default, all agents to which you have access appear in this pane.
Available Agents controls
The Available Agents pane has the following controls:
- Apply—Click to assign an agent to a site.
- Close—Click to close the Available Agents pane.
- Help—Click to open a Help topic for the Available Agents pane.
- Search By radio buttons—Select one of three radio buttons to find an agent in the list: Last Name, First Name, Employee ID.
- Search field—Enter the search criteria. For example, the agents first name.
 Filter—Click to filter the list of available agents, by opening the Agent Filter pane.
- Filter this list to display only agents from certain business unit(s) or the entire enterprise, and to include unassigned agents in the enterprise or business unit. See the figure below.
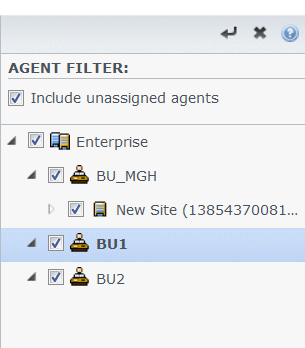
Figure: Agents Pane—Filtering
Sorting agents in lists
To sort agents in either the Agents or Available Agents pane, click the header of the column in which you want to sort the agents.
Adding and removing agents from a site
To add an agent to a site:
- In the Agents pane, click Add Agent to Site .
- The Available Agents pane opens.
- Select an agent from the list and click Apply . (Use the CTRL or SHIFT keys to select several agents at a time.)
- After you have finished assigning agents, click Close in the Available Agents pane.
To remove an agent from a site:
- In the Agents pane, select the agent you want to remove. (Use the CTRL or SHIFT keys to select several agents at a time.)
- Click Remove Agent from Site .
Site configuration
You must have the Access backend configuration security right to view the Sites > Configuration pane.
Use the Configuration pane and the parameters described below to configure the Data Aggregator (DA) setup for the site.
- Data Aggregator—Select the Data Aggregator instance for this site. If the application selected is not validated by Genesys Configuration Server or if no application is selected, WFM uses the default value <none>.
 Restart Data Aggregator icon—Click to restart DA. (WFM Web prompts you to save any outstanding changes before restarting.)
- Stat Server—A read only field, containing the name of Stat Server Application that is specified in the selected Data Aggregator Application's connection properties. If there is no selected DA, or if the DA Application or Stat Server ID is invalid, this field is empty.
- Tenant—Enter the name of the tenant. The default value is Environment.
- Tenant Password—Enter the tenant password that was set in Genesys Administrator. If not set in Genesys Administrator, the password is blank. This value does not display in plain text.
- Time Profile—From the drop-down list, select a time profile. This list is populated with data from Stat Server Application's Options\TimeProfiles section. The default value is <none>.
- Switch Used for Statistics—Select the switch that will be used for handling statistics. The default value is <none>.
- Associated Switch—Select the switch that is associated with the site that will be used to synchronize Genesys configuration objects.
- Unassign Agents in case Genesys login is deleted check box—Enter a check mark in this box if you want WFM to automatically unassign from this site, any agent whose login is deleted from this site.
- Assign agents if logins are for this Site only check box—Enter a check mark in this box if you want WFM to automatically assign to this site, any agent whose login is only valid for this site.
- Dedicated WFM Server—Select the WFM Server instance that will be used for forecasting, scheduling, trading, and performance and adherence measurements. Some additional configuration might be required to assign the dedicated WFM Server. Ask your Genesys Professional Services representative to assist you with this.