Difference between revisions of "ATC/Current/AdminGuide/Build attributes"
From Genesys Documentation
Harleyvibes (talk | contribs) (Published) |
Harleyvibes (talk | contribs) (Published) |
||
| Line 26: | Line 26: | ||
#Select or specify the value. | #Select or specify the value. | ||
#Click the checkmark to save your attribute. | #Click the checkmark to save your attribute. | ||
| − | #To add another attribute, click '''add | + | #To add another attribute, click '''add next attribute'''. |
|Status=No | |Status=No | ||
}}{{Section | }}{{Section | ||
| Line 43: | Line 43: | ||
|Media=Image | |Media=Image | ||
|image=DeleteCondition.png | |image=DeleteCondition.png | ||
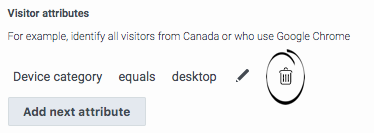
| − | |structuredtext=When you choose to delete | + | |structuredtext=When you choose to delete an attribute, {{MINTYDOCSPRODUCT}} deletes it immediately. |
|Status=No | |Status=No | ||
}} | }} | ||
}} | }} | ||
Revision as of 10:41, October 13, 2020
This topic is part of the manual Genesys Predictive Engagement Administrator's Guide for version Current of Genesys Predictive Engagement.
Learn how to build the logic that identifies which users belong to specific segments, which users achieve specific outcomes, and when to trigger action maps.
Where you build attributes
You build attributes to specify when:
Add an attribute
- Click Add first attribute (when adding initial attribute) or Add next attribute (when adding subsequent attributes).
- Select the attribute.
- Select the operator.
- Select or specify the value.
- Click the checkmark to save your attribute.
- To add another attribute, click add next attribute.
Edit an attribute
Delete an attribute
Comments or questions about this documentation? Contact us for support!


