Case and toast data
Contents
Case Data specifies the information to be displayed to agents when a call, chat, or other interaction is transferred to them.
Toast Data specifies the information to be displayed to agents when they directly receive a call, chat, or other interaction.
Case Data
On the Case Data page, you can specify the information to be displayed to agents when a call, chat, or other interaction is transferred to them.
Creating a sharable Case Data business attribute
Case data can be used as sharable business attributes for agents, agent groups, and the global contact center. To view an article about how to create sharable business attributes, see Business attributes.
- To view an example of Case Data in Agent Workspace, see Interaction history views in Agent Workspace Agent's Guide.
- In the table of configured Case Data, in addition to selecting and adding Case Data, you can also filter items using the Quick Filter field, and Delete Case Data.
Selecting Case Data
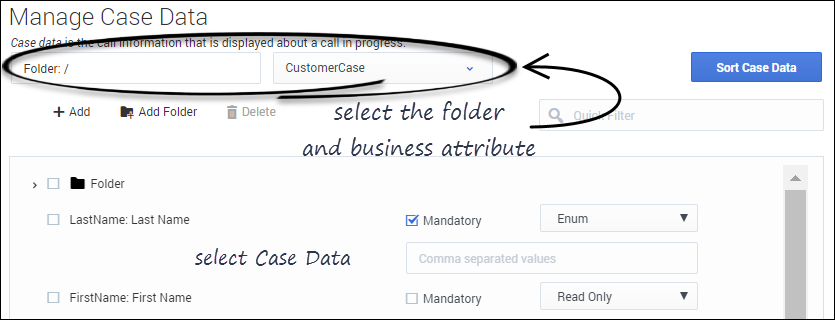
- Select a business attribute:
- Select the folder you want to view from the Folder drop-down list box.
- Click the second drop-down list box and select the business attribute for the Disposition.
You can consider a business attribute to be the container that holds a list of Dispositions that have a common theme.
- Select a Case Data from the list.
Adding Case Data
Select the folder you want to view from the Folder drop-down list box.
- Click the second drop-down list box and select the business attribute into which you want to add the Case Data.
- Click Add.
- Specify a name and display name.
- Select Mandatory to specify that the case data is mandatory.
- Enable the Read Only option if you do not want the agent to be able to update the data. Or, select a data validation type, such as Boolean, String, Integer, or Enum which allows the agent to edit the data. If the case data is mandatory, the Read Only option is disabled.
- Click Add Folder; or
- To add a subfolder, click the Folder drop-down list box, select a folder, and then click the Add folder icon.
Toast Data
On the Toast Data page, you can specify the information to be displayed to the agent when they receive a call, chat, or other interaction.
Creating a sharable Toast business attribute
Toast Data can be used as sharable business attributes for agents, agents groups, and the global contact center. To view an article about how to create sharable business attributes, see Business attributes.
- To view an example of Toast Data in Agent Workspace, see Interaction history views in Agent Workspace Agent's Guide.
- In the table of configured Toast Data, in addition to selecting and adding Toast Data, you can also filter items using the Quick Filter field, and Delete Toast Data.
Selecting Toast Data
- Select a business attribute:
- Select the folder you want to view from the Folder drop-down list box.
- Click the second drop-down list box and select the business attribute for the Disposition.
You can consider a business attribute to be the container that holds a list of Dispositions that have a common theme.
- Select a Toast Data from the list.
Adding Toast Data
Select the folder you want to view from the Folder drop-down list box.
- Click the second drop-down list box and select the business attribute into which you want to add the Toast Data.
- Click Add.
- Specify a name and display name.
- Click Add Folder; or
- To add a subfolder, click the Folder drop-down list box, select a folder, and then click the Add folder icon.


