Interaction history views
Contents
Workspace lets you search for and look at the interactions that you and your coworkers have worked on in the past. You can view information about the interactions, including notes and case data. You can also open and process (forward or mark Done) some interactions.
- Due to continual changes to Agent Workspace, screen shots in this manual might show interface elements that are not yet available for this product or might not accurately reflect what you can access in the product when you use it.
- Some Agent Workspace features are available only for Genesys Multicloud CX users.
- Some Agent Workspace features are available only for Genesys Engage on-premises users.
Contact and Interaction histories are available in these Workspace views:
- My History: The interactions that you have handled.
- Contact History: Interactions with a contact you have selected from either:
- The Contact Directory
- The History view of the current voice, chat, email, or workitem interaction.
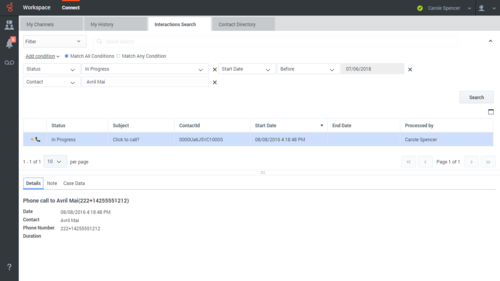
- Interaction Search: The Interaction Search view lets you search the entire interaction database for all media types, with all contacts, and handled by any agent.
Use one of these two search types to find the interaction that you are looking for:
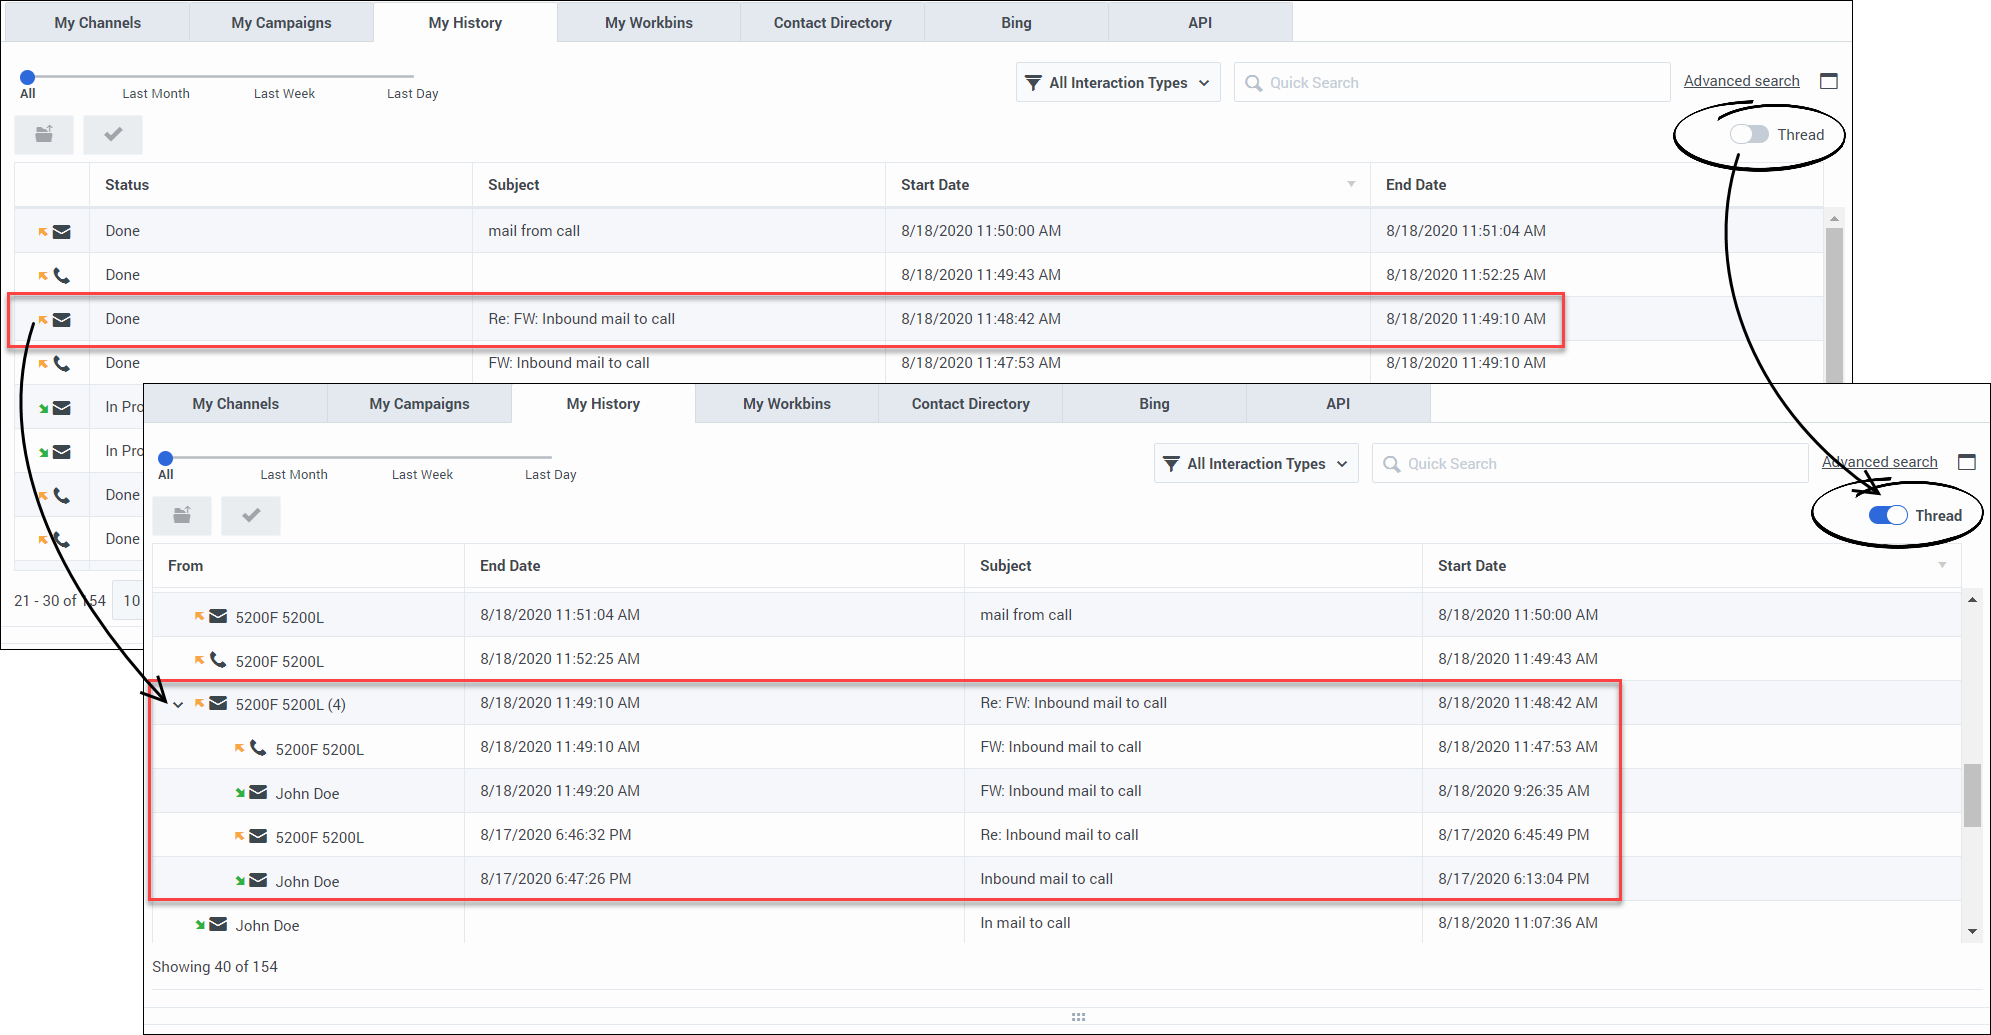
Use the threaded view to review all the interactions related to a single conversation.
Viewing Search Results
The search results are displayed in the interactions search results grid view. The search result table is sortable. To sort the interactions table, click a column head.
Workspace returns a maximum of 100 interactions. If you do not find the interaction you are searching for, you might have to refine your search criteria further.
Navigating the Search Results Table
After you click the magnifying glass in the Quick Search or Search in Advanced Search field, Workspace looks through the interaction database to find interactions that meet the conditions that you specified.
All the interactions that are found are displayed for you in the Search Results table.
What can I do with an Interaction when I find it?
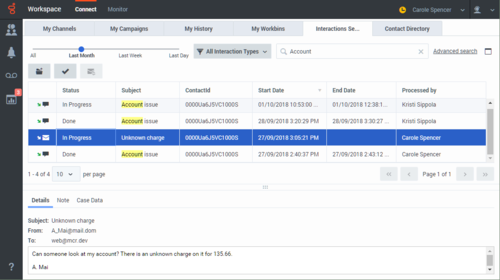
Click an interaction in the Search Results table to view more information in the Details, Case Data, and Note tabs.
When you find the voice, chat, email, or workitem interaction you are searching for, select it to view the details and other information.
Select an interaction to view details and perform actions on it. Some of these actions might be available for selected interactions depending on your user permissions and the state of the interaction:
- Click Open (
 ) to open the selected interaction for editing or handling.
 - Click Mark Done (
 ) to Mark Done the selected in-progress interactions such as an email or a workitem.
 - Click Re-send (
 ) to re-send the selected interaction to the contact.
 - Click Forward (
 ) to open an email interaction and forward it inline to an external resource.
 - Click Print (
 ) to Print the selected email interaction.
Why can't I open some email interactions?
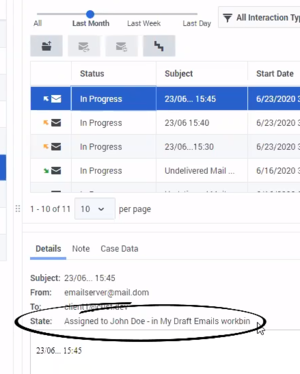
Sometimes when you find an interaction in the Contact Directory History tab or the Interaction Search view and select it, you cannot open it or forward it. This can happen for many reasons. The interaction might be in progress by another agent, the interaction might be marked Done, it might be in the Workbin of another agent, or it might be in Routing. When you select an email, in the Details tab, look for the State field, it contains information about who is processing the interaction and where it is currently stored, for example in a Workbin or a Queue. Your administrator controls whether or not you can open interactions from the History.
Interaction types
The following are examples of some of the icons you might encounter in the different History views, depending on what channels you are permitted to use.
 — Answered incoming call
 — Answered outgoing call
 — Unanswered outgoing call
 — Answered incoming chat (Chat includes the following private messaging channels: chat, sms, WhatsApp, Facebook Messenger, and Twitter Direct Message)
 — Incoming email
 — Outgoing email
 — Incoming workitem (Workitems include various media types such as PDF, Microsoft Word, fax, proprietary document types, and the Facebook Public and Twitter Public channels)
 — Workitem
Pages
The table displays results in pages if many interactions are found. If multiple pages are returned in the search results, page through the list of search results by doing any of the following:
- Click Go to the Next Page (
 )
) - Click Go to the Previous Page (
 )
) - Click Go to First Page (
 )
) - Click Go to Last Page (
 )
)
Specify the number of items that are displayed on each page by using the per page drop-down list.
Details, Notes, and Case Data
The Details, Note, and Case Data tabs display information for any interaction that you select in the Search Results table.
- Details: displays interaction specific information. For example, if you have selected an email interaction, the Subject, From, To, State, and body of the email interactions are displayed.
- Note: enables you to view notes written by the agents who handled the interaction.
- Case Data: enables you to view the Case Data/case information and other attached data for the selected interaction.
Use the Show Details Panel/Hide Details Panel button (![]() ) to change the display of the Details panel.
) to change the display of the Details panel.
Click-to-Dial and Click-to-Search
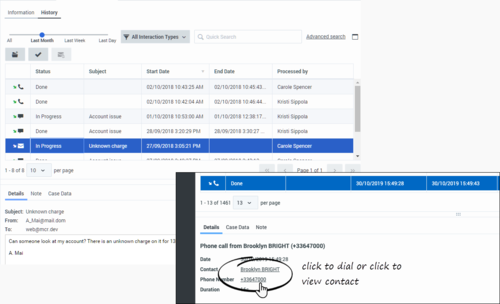
- If your account is enabled to use the Click-to-Dial feature in the Details tab the contact's phone number will be displayed in underlined link text. Click the link to call the contact.
- If your account is enabled to use the Click-to-Search feature in the Details tab the contact's name will be displayed in underlined link text. Click the link to view the contact information in the Contact Directory.
Why are some numbers masked out?
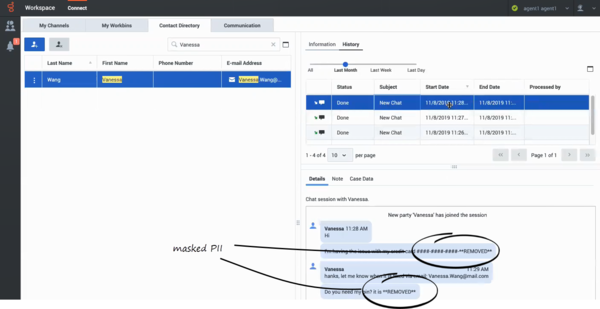
Occasionally, a contact enters their credit card number, personal email address, or other Personally Identifiable Information (PII) into the chat. This is a potential security risk for the contact. In some environments, Agent Workspace detects and masks PII to keep contact information private. This figure shows you some of the ways that PII is masked in the chat transcript in the History.
How can I find the interactions I've worked on?
The My History view enables you to view and manage your previous interactions with a contact.
Click the My History tab to display the My History view in the main view.
The Chronology slider lets you review all of your interaction history, or just those from the last day, week, or month.
The My History view Interaction Type button enables you to refine your results by displaying only those interaction types that you select.
My History: Quick Search
The Quick Search field enables you to enter keywords or a phrase to search for in the contact's interactions, such as the subject of an email or chat, the body of a chat transcript, a customer name, or other text that your administrator allows you to access.
My History: Advanced Search
The Advanced Search feature enables you to choose conditions to search only within the limits that you define.
What if the contact information is anonymous?
In some call centers, voice interactions are anonymous to protect contact Personally Identifiable Information (PII). If you do not assign a contact to an anonymous call, the call is not stored in the contact database and so is not available in any History view. In some contact centers, a routing strategy is used to assign a contact ID to an anonymous contact. In this case the call is available in the My History view; however, if you select a call from an anonymous caller, the contact name and phone number are displayed as Anonymous in the Details tab. You cannot call an anonymous contact.
How do I explore the history of a contact?
The Contact History view lets you access and manage previous interactions with a contact you have selected from the Contact Directory or from the History view of the current voice, chat, email, or workitem interaction.
Use the Contact History view to do the following:
- Find interactions for the current contact or the currently selected contact.
- View information about the selected interaction.
- Manage the selected interaction,
The Chronology slider lets you review all of the contact's interaction history, or just those from the last day, week, or month.
The Contact History view Interaction Type button enables you to refine your results by displaying only those interaction types that you select.
Contact History: Quick Search
The Quick Search field enables you to enter keywords or a phrase to search for in the contact's interactions, such as the subject of an email or chat, the body of a chat transcript, a customer name, or other text that your administrator allows you to access.
Contact History: Advanced Search
The Advanced Search feature enables you to choose conditions to search only within the limits that you define.
How do I find any interaction?
Sometimes you must find an interaction that someone else at your contact center worked on, or maybe you worked on it, but you can't remember who the contact was or when you worked on it. You might be a team lead or supervisor who is looking for interactions related to a specific topic or was processed by a specific agent or agents.
The Interaction Search view lets you search the entire interaction database for all media types, with all contacts, and handled by any agent.
Click the Interaction Search tab to display the Interaction Search view in the main view.
The Chronology slider lets you review all of your interaction history, or just those from the last day, week, or month.
The Interaction Search view Interaction Type button enables you to refine your results by displaying only those interaction types that you select.
Interaction Search: Quick Search
The Quick Search field enables you to enter keywords or a phrase to search for in the contact's interactions, such as the subject of an email or chat, the body of a chat transcript, a customer name, or other text that your administrator allows you to access. A video for using the Interaction Search view Quick Search is available in the section below.
Interaction Search: Advanced Search
The Advanced Search feature enables you to choose conditions to search only within the limits that you define. A video for using the Interaction Search view Advanced Search is available below the next section.
Using Quick Search
The Quick Search field enables you to enter up to 10 keywords or a phrase to search for in the interaction database, such as the subject of an email or chat, the body of a chat transcript, a customer name, or other text that your administrator allows you to access.
Searches of customer information like name and address, and of interaction information like subject or body text are 'starts-with' searches, meaning that each of the fields that you are allowed to search for words or strings, are searched for words that start with the keywords that you enter in the Quick Search field.
Searches of information that has been customized by your administrator are 'equals' searches, meaning that the search looks for exact matches with what you enter. Ask your administrator about custom information.
Text search is:
- Not case sensitive. TEXT, Text, text, and teXt are all treated as the same word.
- Searchable as either a group of individual words or as sentences.
- Put a group of words in double quotes to search for a specific sentence. Searching for "Find me" returns all interactions that contain the exact match for the phrase 'Find me'.
- Otherwise, each word is treated as a separate search condition. Searching for Find me returns all interactions that contain one word that starts with Find and one word that starts with me.
Use the Interaction Type menu to access only interactions of a certain type, like voice, email, or chat. Perhaps that interaction you are looking for was handled through a chat. To access only chat interactions, select Show chat interactions from this menu.
When you find the interaction you are searching for, select it to view the details and other information in the Details, Notes, and Case Data tabs.
Use the Show Details Panel/Hide Details Panel button (![]() ) to change the display of the Details panel.
) to change the display of the Details panel.
Using Advanced Search
The Interaction Search Advanced Search feature lets you choose a set of conditions that you want to use to limit the search to only those interactions in the interaction database that match the conditions you specify.
Click ![]() next to the Quick Search field to open the Advanced Search view.
next to the Quick Search field to open the Advanced Search view.
Your administrator decides what conditions you are allowed to search on, so your Interaction Search view might not exactly match the screen shots and video.
For the Add Condition menu, your administrator might have set up groups of conditions which appear as submenus. This makes it easier for you to find the condition you want to use.
This is what the Advanced Search view looks like:
Use the controls described here to set up your search, then click Search to find the interactions that match the conditions that you specify.
When you find the interaction you are searching for, select it to view the details and other information.
Interaction Type
Use the Interaction Type menu to access only interactions of a certain type, like voice, email, or chat. Perhaps that interaction you are looking for was handled through a chat. To access only chat interactions, select Show chat interactions from this menu.
Add Condition
Use the Add Condition menu to add search criteria to the Advanced Search view. When you make a selection from this menu a new condition entry is added above the Search button. Add as many conditions as you need. The view scrolls if necessary.
To remove a condition, click the X next to the entry.
Each condition entry that you add lets you refine your search. For example, you might limit your search to interactions that have a status of "In Progress". You might know approximately when the interaction was handled. The Start Date and End Date conditions let you limit the search to interaction handled before, on, between, or after a certain date.
For some conditions, you might have to enter text instead of selecting criteria from a menu or choosing a date.
Text search is:
- Not case sensitive. TEXT, Text, text, and teXt are all treated as the same word.
- Searchable as either a group of individual words or as sentences.
- Put a group of words in double quotes to search for a specific sentence. Searching for "Find me" returns all interactions that contain the exact match for the phrase 'Find me'.
- Otherwise, each word is treated as a separate search condition. Searching for Find me returns all interactions that contain one word that starts with Find and one word that starts with me.
For some conditions, you might have to search the contact database or search for someone in your contact center, such as other agents who processed the interaction you are looking for. For searches of contacts and internal targets, the Team Communicator opens when you click in fields such as Processed By.
Match All/Any Conditions
Use the Match All Conditions option to limit the search to only those interactions that meet All of the conditions that you specify.
Use the Match Any Conditions option to find the interactions that meet at least one of the search conditions that you specify.
Threaded conversations
The Interaction History views, such as My History and Contact History, by default display a table of interactions that are sorted by one of the table column headings. For example, click the Subject heading to sort the interactions alphabetically by the subject of the interaction.
Agent Workspace enables you to handle interactions on different channels, such as Voice and Chat. Your administrator assigns Channels to you. Sometimes you handle multiple interactions with a single contact using more than one channel. For example, you start with a Chat interaction, call the contact's home phone, then follow up with an email. These multiple interactions are all a part of a conversation you are having with a contact.In some environments, the Agent Workspace conversation threading feature is enabled. The threading feature enables you to view all interactions that are part of the same conversation (or thread). If threading is enabled in your environment, the ![]() toggle button is displayed.
toggle button is displayed.
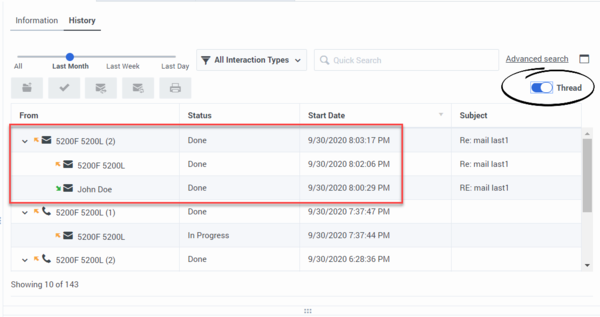
To change the interaction history view from a flat table to a thread view, click ![]() . All related interactions are displayed in reverse chronological order, grouped below the latest interaction in the conversation. In the threaded view, you can sort conversations by Start Date. As you scroll down in the threaded view, the next set of conversations loads. Note: Pagination is not available for the threaded view.
. All related interactions are displayed in reverse chronological order, grouped below the latest interaction in the conversation. In the threaded view, you can sort conversations by Start Date. As you scroll down in the threaded view, the next set of conversations loads. Note: Pagination is not available for the threaded view.
The From column is always displayed in the threaded view, even if it is not set up to display in the table view.
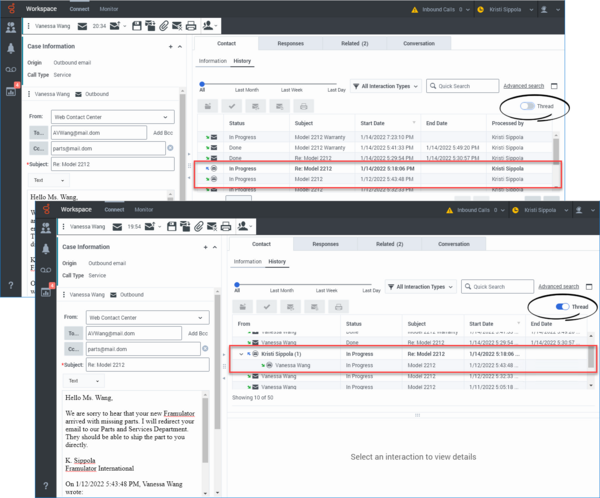
The threaded view is also available in the Contact History view in interactions and in the Contact Directory.
Thread view in the History view of an interaction
In the Contact tab of an email interaction, when the related email feature is enabled, the current interaction is displayed in bold face and the email icon is enclosed in a ring. The icons for email interactions from the same contact that are related to the currently active interaction are also enclosed by rings.

