Schedule Callback
Contents
You can schedule a callback interaction for your contact from the current interaction of any interaction type.
Overview: Scheduling a Callback
While you are handling an interaction, your contact might request a callback to follow up on the interaction or their customer case. Whether you are handling a call, a chat, an email, or a workitem (open media) interaction, Agent Workspace enables you to schedule a callback with the contact. Callbacks can be created no matter the state of the interaction. The Callback feature enables you to specify the date and time of the callback and to add a comment.
- This feature might not be enabled in your environment.
- This feature is not supported for Outbound campaign calls. Outbound campaigns have a specific callback feature built in.
Create a callback
If this feature is enabled in your environment, the Schedule a Callback button (![]() ) is displayed in the interaction toolbar.
) is displayed in the interaction toolbar.
To create a callback, click Schedule a Callback (![]() ). The New Callback Schedule window is displayed.
). The New Callback Schedule window is displayed.
After you have created a callback, the Modify or cancel a Callback button (![]() ) is displayed in the interaction toolbar. To display the Edit Callback window, click this button . Use this window to modify the callback settings or to cancel the callback.
) is displayed in the interaction toolbar. To display the Edit Callback window, click this button . Use this window to modify the callback settings or to cancel the callback.

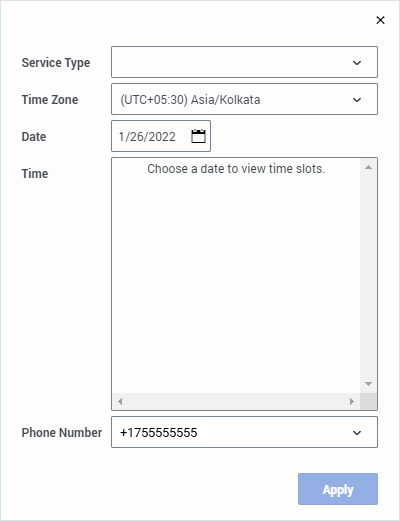
Many of the fields of the New Callback Schedule window are already populated for you. Make sure that every field is correct before you click Apply to create the callback. Information, such as the contact ID, are included in the callback when available.
You can choose the callback number from an existing list of numbers for the contact or add a different one yourself.
The callback is associated with the parent interaction in the Contact History.
When the callback is created successfully, notifications are displayed in the browser window.
New Callback Schedule window
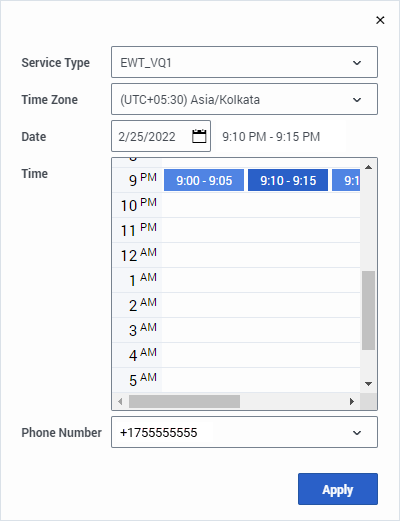
The New Callback Schedule window enables you to choose the date and time of the callback and specify the callback phone number. By default, the date is set to the current day unless this setting is overridden in your organization. The date might also be blank.
There are two possible features that enable you to specify the time of the callback. By default, a timeslot grid widget is displayed. The timeslot grid widget contains timeslots from which you can choose the time of the callback. In environments where the Agent Workspace accessibility features are enabled, a menu is displayed instead.
Available timeslots are displayed once a date is specified in the Date field.
After you select a timeslot, the selected time is displayed next to the Date field.
After you have completed all the selections in the New Callback Schedule window, click Apply to create the callback.
Here is an explanation of the fields in the New Callback Schedule window:Service Type
Your administrator or supervisor tells you which Service Type selection to make. This field relates to how business data is set up in your organization. The value in this field is a combination of virtual queue name and associated key-value pairs. This selection ensures that the callback is created in the correct business area. This field might be populated with a service type by default.
Time Zone
By default, the time zone set on your computer or device is set in this menu. You can choose a different time zone, such as the time zone of the contact or the time zone of your organization. The time zone selected relates to the timeslots in the Time field.
If the time zone of your computer or device cannot be determined, then UTC -12:00 is displayed. Contact your supervisor or IT personnel if you are unsure about what time zone to use.
Date
Agent Workspace uses a calendar-style date picker to enable you to enter the date of the callback. By default in most organizations, the current date is displayed. You can also enter a date manually rather than choosing one from the calendar date picker. You cannot enter past dates; if you do, the field reverts to the nearest future date on which callback timeslots are available.
Time
Agent Workspace has two options for choosing a timeslot for the Time field. By default, the timeslot grid widget is displayed showing the available timeslots for the date specified in the Date field. In some environments, a menu is displayed instead.
The grid divides the day into hours and displays the available timeslots in each hour at which callbacks can be scheduled.
If you hover your mouse pointer over a timeslot, a tooltip displays that informs you of both the timeslot duration and the number of callbacks that can be scheduled for that timeslot.
To book a callback at the specified time, click a timeslot. If your environment uses the menu, the available timeslots are displayed as selectable options in the menu with the number of callbacks available for each timeslot. After you select a timeslot, the selected time is displayed next to the Date field.
Phone Number
If a contact is assigned for the parent interaction, the default phone number for the contact is displayed. To select a different phone number from the list of available phone numbers, click the Phone Number menu, or enter a phone number manually.
Apply button
The Apply button is initially unavailable until you have filled in all the required fields to schedule the callback. Click Apply to create the callback.
Modify or cancel a callback
After you have created or modified a callback, the Modify or cancel a Callback button (![]() ) is displayed in the interaction toolbar. To display the Edit Callback window, click this button. Use this window to modify the callback settings or to cancel the callback.
) is displayed in the interaction toolbar. To display the Edit Callback window, click this button. Use this window to modify the callback settings or to cancel the callback.
Use the menus and the time slot picker to modify any of the settings for the callback, then click Update to save the changes to the callback.
To cancel the callback, click Cancel Callback.
When the callback is modified successfully, notifications are displayed in the browser window.


