Team Communicator
Contents
The Team Communicator is a feature that lets you find someone in your company's directory (an internal target) or someone from outside your company (like a contact) who has their information stored in the contact directory.
How do I start a call or an email message?
To start a voice call or an email interaction, just click in the Team Communicator and start typing information about who you want to call or email.
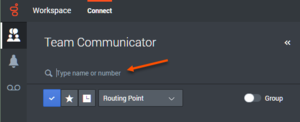
To immediately start a call or email message with a target, enter a name, part of a name, a phone number, or an email address into the Team Communicator Quick Search (Type name or number) field. Your administrator might set up your system to restrict whom you can search for.
Watch video: Finding a contact
Your contact might have an issue that you need support to resolve. Use the Team Communicator to start a voice call with the person in your company or outside your company who can help you.
The Team Communicator is part of the Main View, and it is also available in the following views Interaction windows (for transfer, conference, and consultation actions):
To begin your search, type a name or number in the Team Communicator Quick Search (Type name or number) field. When you click in the field, the Team Communicator toolbar is displayed. The toolbar enables you to search All, your Favorite, Corporate Favorite, or Recent contacts and internal targets. It also enables you to filter by contact or internal-target type and to group or ungroup your search results.
In the Main View
How do I use the Team Communicator in the Main View?
The Main View contains the Team Communicator Quick Search (Type name or number) field. The Quick Search field is a universal-lookup tool. The tool can search both the contact database and the internal-target directory. Your system administrator might have configured it to provide universal contact lookup or just to provide internal-target lookup.
Starting a call or email
When you select Team Communicator, a toolbar is displayed. To begin your search, enter a name, telephone number, or other keywords in the field. As you type, the Team Communicator suggests known agents, contacts, and other resources.
Click the name of the person that you want to contact from the results list.
You can still start an interaction with someone who is not in your company database by typing in the full telephone number or email address and then clicking the Call or Email button.
The toolbar enables you to filter your search results of contacts and internal targets by types of calls or contacts:
- To search all contacts, click Search all (
 ).
). - To search your favorites, click Show and search my favorites (
 ).
). - To search recent contacts, click Show and search recent (
 ).
).
It also enables you to filter by contact or internal-target type, and to group or ungroup (![]() ) your search results by category or type.
) your search results by category or type.
Your system might be set up to alert you about missed calls.
To open the Team Communicator, click in the Team Communicator text field. If you have a missed call, the Show and search recent (![]() ) button has a red flag next to it displaying the number of missed calls. To see the list of missed calls, click the button. A small downward pointing outlined arrow icon is displayed beside the number of the party who called you. If you hover your mouse pointer over the contact entry, a tooltip displays the missed call information, including date, time, and known contact details.
) button has a red flag next to it displaying the number of missed calls. To see the list of missed calls, click the button. A small downward pointing outlined arrow icon is displayed beside the number of the party who called you. If you hover your mouse pointer over the contact entry, a tooltip displays the missed call information, including date, time, and known contact details.
In the Team Communicator, a contact who has called recently has one of three small arrows displayed beside the contact's name.
- Answered Inbound Call: A solid downward pointing arrow indicates an answered call (
 ).
). - Answered Outbound Call: An upward pointing arrow indicates an outbound call to the contact (
 ).
). - Missed Inbound Call: An outlined downward pointing arrow indicates a missed call (
 ).
).
To get details about the call, whether answered, missed, or outbound, hover your mouse pointer over the contact name or number.
The Recent button red flag disappears if you have viewed your recent calls and missed calls. It also disappears if you have called back all of your missed calls, when you close the Team Communicator, or if you switch the filter to All contacts or Favorite contacts.
Calling and Emailing
You use the Team Communicator to make a new voice call or email interaction.
Starting a new interaction
To start a new interaction (external or internal interaction), use the Team Communicator to find and select a target or contact. Enter the name of an internal target (agent, skill, agent group, or Routing Point) or a contact name, telephone number, or email address in the universal-lookup field.
As you type, Workspace Web Edition searches the internal target and contact databases and lists potential contacts and internal targets.
From the list, you can:
- Select the kind of interaction you want to start, voice or outbound email.
You can use the Controls in Team Communicator to do the following:
- Filter and sort the list of search results.
- Perform actions on a selected contact for calling.
Watch video: Starting a new email
Watch video: Making a new voice call
Filter/Sort Your Results
Filtering and Sorting the List of Search Results
The Team Communicator search is a keyword search that checks each field of the contact database for the word or words (name, telephone number, or other criteria) you provide in the search field. Each field of the database is searched by using a “starts-with” search for the keywords you provide.
Results are returned in a list that is sorted according to the scoring rules. Usually, you can refine the search results by using the filtering features of the list view. For example, you can filter your search results so that only agents or queues are displayed.
Result types might include the following:
- All types
- Agent
- Agent Group
- Routing Point
- Skill
- Contact
- Interaction Queue
- Queue
- External/third-party (such as Microsoft Teams members in your organization)
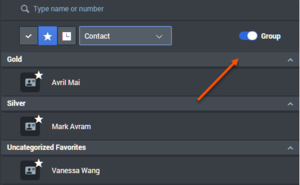
To arrange the search results by category, select the Group slider (![]() ). You can collapse categories by selecting the arrow displayed beside the name of the category.
). You can collapse categories by selecting the arrow displayed beside the name of the category.
Below the Quick Search field are four controls you can use to list previous contacts quickly.
From left to right, the buttons are the following:
- Search All (
 ): Select from all matching internal targets and contacts. Does not affect the sort order.
 - Show and Search my Favorites (
 ): Click to show only contacts/internal targets that are Corporate Favorites or that you have flagged as favorites. Sort is by category or type.
 - Show and Search my Recent Contacts/Targets
 : Select from the last 1 to 10 contacts/internal targets you have directly dialed, emailed, or monitored. Sort is by date.
 - Filter by Type list: Select the type to search, including Agent, Contact, Routing Point, Skill, Interaction Queue, Queue, and Agent Group.
- Sorting by Category/Sorting by Type (
 ): Select to sort by category or type.
Using Favorites
How do I use Personal and Corporate Favorites?
A favorite is someone with whom you interact frequently.
The Workspace Team Communicator enables you to select contacts and internal targets (like other agents, your supervisors (team leads), or call routing) as your personal favorites. Personal favorites are useful if you have a supervisor that you must contact regularly for help about specific types of customer issues or a routing point to which you must regularly direct certain types of inquiries.
Remove a contact or target from the list of favorites when you no longer need to find them quickly.
Your administrator might also have chosen specific targets as corporate favorites for you. In Team Communicator, corporate favorites are marked by a locked star icon (![]() ). The lock means you may not remove them from the list of favorites. Your administrator might designate corporate favorites for you that change based on your role in the company or by the contact with whom you are currently interacting.
). The lock means you may not remove them from the list of favorites. Your administrator might designate corporate favorites for you that change based on your role in the company or by the contact with whom you are currently interacting.
The favorites that you choose are marked by a white star (![]() ).
).
Choosing personal favorites
To help you to find contacts and internal targets quickly, use the Action Menu in the Team Communicator next to the name of the contact or target. Follow these steps:
- Find the internal target or contact in the Team Communicator.

- Hover your mouse pointer over the name of the internal target or contact that you want to add to your favorites, and select Add to Favorites.
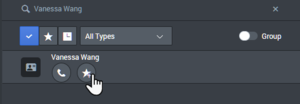
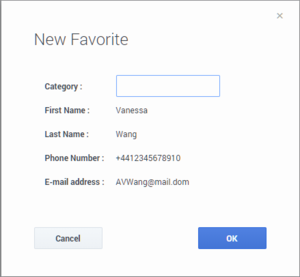
- If you want, use the Category list to define a new category for your favorite, or select from a list of existing categories.
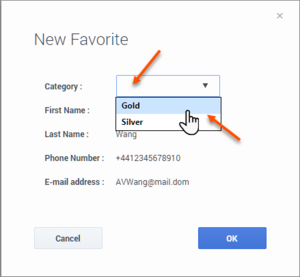
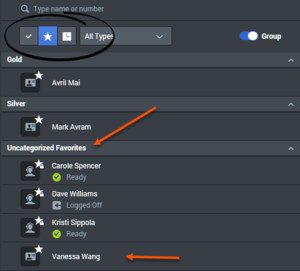
- To add the internal target or contact as a favorite, click OK. If you did not choose a category, and you choose to view favorites by category in the Team Communicator, the new favorite is listed in the Uncategorized Favorites category.
- If you want, use the Category list to define a new category for your favorite, or select from a list of existing categories.
Viewing and managing your favorites
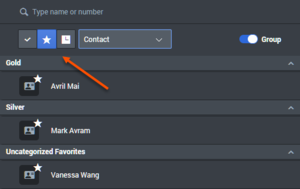
When you want to see the complete list of your personal and corporate favorites, click in the Team Communicator search field, then click the Favorites filter button.
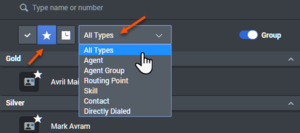
Use the Type filter list to change the types of contacts and targets are listed in the Team Communicator. You can view just agents, contacts, agent groups, routing points, or skills, or you can view all types of targets.
Use the Sorting by Category button to arrange the list of favorites into their designated categories. Any favorites that have not been assigned to a category are listed in the Uncategorized Favorites category.
A favorite that you created by directly dialing a contact is displayed only in Favorite search and in your list of recent calls if you previously called the person. If you do not apply the Favorites filter to your search, only the following object types are searched: Agent, Contact, Routing Point, Skill, Interaction Queue, Queue, and Agent Group.
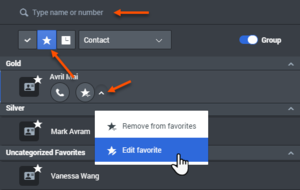
You can edit a favorite to add, remove, or change a category. To display and use the Edit Favorite dialog box, select Action Menu next to the Favorites button (![]() ).
).
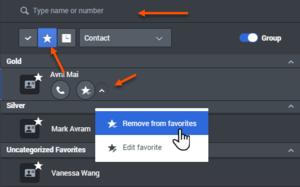
You can remove an internal target or a contact from your list of favorites by selecting Remove from Favorites (![]() ) from the Action Menu.
) from the Action Menu.
Editing the category of a personal favorite
When you want to add, remove, or change the category that you have assigned to a favorite contact or other target, you can use the Team Communicator to edit the category.
First, use Team Communicator to find the favorite either by entering the name in the search field and by clicking the Favorites button (![]() ). Next, open the Action Menu next to the name of the contact or other target and select the Edit favorite option.
). Next, open the Action Menu next to the name of the contact or other target and select the Edit favorite option.
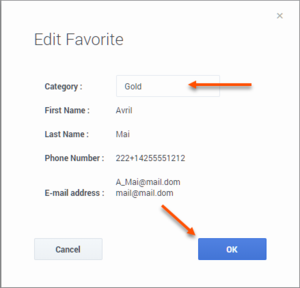
The Edit Favorite dialog box is displayed. Change to the category by editing the content of the Category field. You can modify the category, delete the category, or change the category.
Click OK when you have finished to save the modification.
Removing a personal favorite
When you no longer want a contact or other target that you have added as a favorite to be on your list of favorites, you can use the Team Communicator to remove the favorite.
First, use Team Communicator to find the favorite either by entering the name in the search field and by clicking the Favorites button (![]() ). Next, open the Action Menu next to the name of the contact or other target and select the Remove favorite option.
). Next, open the Action Menu next to the name of the contact or other target and select the Remove favorite option.
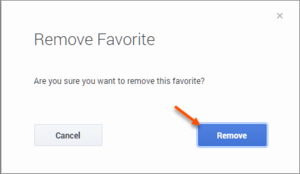
A confirmation dialog box is displayed when you choose Remove favorite. Click Yes if you are sure that you want to remove this contact or target from your list of personal favorites. Click No to keep the contact or target on your list of personal favorites.
- You cannot edit or remove corporate favorites. Your administrator controls these favorites.
- If you added a target as a personal favorite, then your administrator adds this same target as a corporate favorite, that target is designated as a corporate favorite in the flat view, and as both a Personal Favorite and Corporate Favorite in the categorized view.
Interaction Queue name versus alias
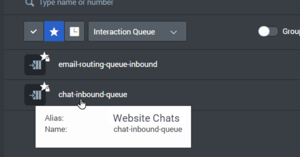
Some contact center environments have aliases (display names) for Interaction Queues in Team Communicator. In these environments, the administrator specifies whether the Interaction Queue alias or the actual Interaction Queue name is displayed.
If you are looking for an Interaction Queue by name, but only the alias is displayed, view the Interaction Queue name by hovering your mouse pointer over the name of the Interaction Queue. The mouse pointer tooltip displays both the alias and the Interaction Queue name. If only one name is displayed in the tooltip, then both the alias and the Interaction Queue name are the same.
You can search for an Interaction Queue by alias when your environment is set up to display the alias display name. If your environment is set up to display the actual Interaction Queue name, you must search by the actual Interaction Queue name.

