Getting started
Contents
- 1 Logging Out (Exit) from Agent Workspace
- 2 How do I choose my language when I log in?
- 3 Single Sign-On environments
- 4 Remote and virtual desktop environments
- 5 Browser-specific notifications and issues
- 6 Log in, log out, log on, log off, and exit, what's the difference?
- 7 How do I change my password?
- 8 Handling a system disconnection
- 9 Change your status to Ready
- 10 Table of status icons
- 11 What happens if not all channels are available when I log in?
- 12 Setting your status to Not Ready with a Reason
- 13 Handle an inbound call
- 14 What kinds of customer interactions can I receive?
- 15 How do I accept an incoming interaction?
- 16 Why do I have unclosed interactions?
- 17 How do I set a disposition code?
- 18 How do I add a note to an interaction?
- 19 How do I work with case information?
- 20 Where can I find answers to common contact questions or problems?
- 21 What next?
- 22 Top 5 topics
Logging in and getting ready to take call and handle Genesys Digital channels.
Due to continual changes to Agent Workspace, screenshots in these articles might show interface elements that are not yet available for this product or might not accurately reflect what is displayed in the product when you use it.
To log in to Agent Workspace from the Cloud, click Agent Workspace in the Genesys Portal.
To log in to Agent Workspace from the Genesys Multicloud CX, go to the linked article that describes how to Log in to Genesys Multicloud CX and access Agent Workspace.
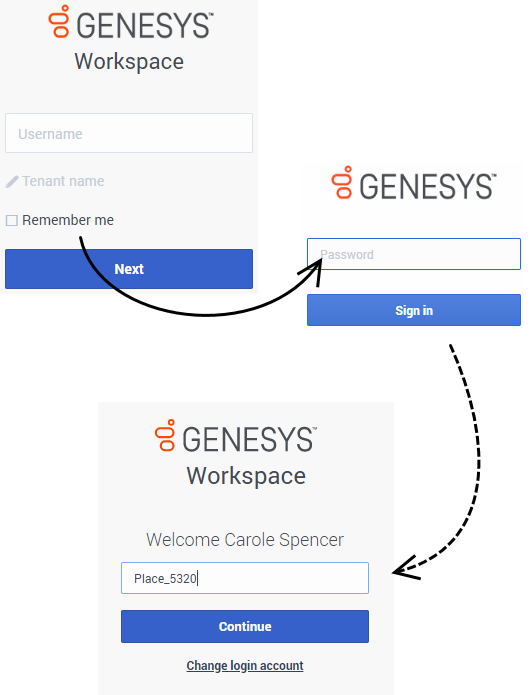
Select the Remember Me check box to save your user name and tenant information for the next time you log in on the same browser. This information is populated in these fields.
- You enter your password on a different login screen. Don't enter it in the Tenant field.
- Clicking Change login account takes you back to the main log in window.
- Agent Workspace has a security feature that might be set up for your account that logs you out if you stop using Agent Workspace or your computer for a while. Agent Workspace first displays a message to warn you that you are going to be logged out. If Agent Workspace logs you out, just log back in again when you are ready to start using Agent Workspace.
You may log in only to a single Agent Workspace session at a time. You must log out of one session before logging into a new session.
Logging Out (Exit) from Agent Workspace
To log out (Exit) of Agent Workspace, you must use the Exit option from the Agent Menu. You cannot log out if you have active calls or Digital interactions.
In some environments, after you exit you might encounter one or more links, one to log in again, and one to switch login accounts. Click the appropriate link to begin a new session. If you do not receive these links, just log in as usual.How do I choose my language when I log in?
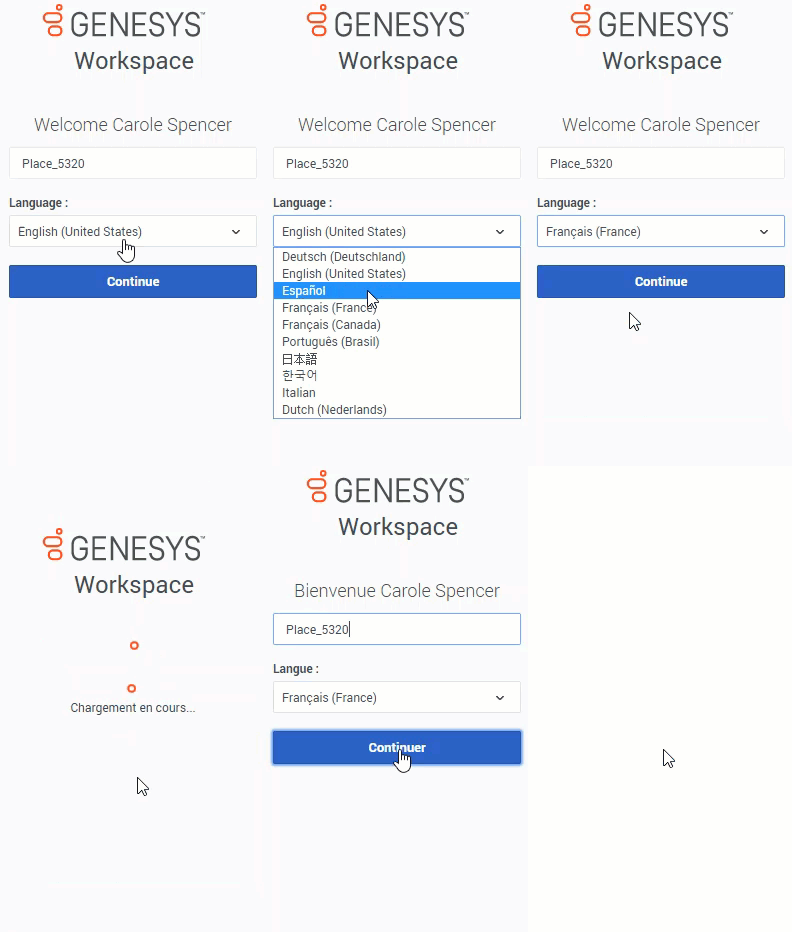
Your account might be configured to enable you to change the display language of Agent Workspace.
If it is, after entering your user name and password, a third login step is added that lets you choose your preferred language from the Language list. Your administrator determines which languages are available to you in this list. Choose your language, then click Continue.Single Sign-On environments
You might work in an environment that uses single sign-on (SSO) identity authentication. If you do, your login experience is a little different. After entering your user name in the application login window, you will be taken to your company's authentication provider where you will enter your user name and password. After that, you will not have to log in again until your authentication expires which is typically every 8 hours.
Using single sign-on means that once you log in to one application, you do not have to log in to any other applications that are also set up for single sign-on.
In some single sign-on environments, you only have to provide your user name to log in as you are already authenticated.
Logging out in single sign-on environments
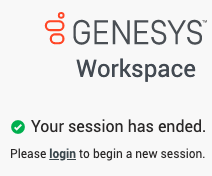
If your company uses single sign-on, after you click Exit the Workspace window informs you that your session has ended. Click the Login link to start a new session.
Remote and virtual desktop environments
You might work in an environment that uses Virtual Desktop Infrastructure (VDI, sometimes called vmware) to run Workspace. This means that when you start Workspace, it is displayed on your desktop, but it is not actually running on your workstation, it is running on a remote computer.
In VDI environments, your administrator installed the Genesys Softphone on your workstation before you logged in, or, you were instructed to install it by clicking an installation hyperlink in an email or other document.
When you start your workstation, the Genesys Softphone automatically starts and the Genesys Softphone icon is displayed in your system tray (notification area). Until you log in to Workspace, this icon is in the waiting state: ![]() . After you start Workspace and the Genesys Softphone is connected, the Genesys Softphone icon is in the active state:
. After you start Workspace and the Genesys Softphone is connected, the Genesys Softphone icon is in the active state: ![]() .
.
Browser-specific notifications and issues
Some browsers require specific actions to ensure that you receive notifications from Agent Workspace and the Genesys system. For detailed information about allowing notifications for your browser, review the documentation specific to the browser and version that you are using. The following are some guidelines:
- Chrome: When you log in , you might receive a browser notification asking whether to allow or deny notifications from the Agent Workspace URL. Click Allow.
- Firefox up to v71: When you log in , you might receive a browser notification asking whether to show notifications from the Agent Workspace URL. Click Show for this session or Always show.
- Firefox v72 and higher: When you log in, you might have to click the Notifications icon in the address bar to display the dialog that enables you to allow notifications. You are not prompted to do this by the browser.
- Edge: When you log in, you might receive a browser notification at the bottom of the window asking whether to show notifications from the Agent Workspace URL. Click Yes.
Log in, log out, log on, log off, and exit, what's the difference?
You log in and log out of the Agent Workspace application. Logging in means starting the application in your browser and identifying yourself to the system so that you become authorized to receive interactions and use the various features that are enabled for you.
Typically, you log in to Agent Workspace at the beginning of your shift and log out (Exit) at the end of your shift. To log out of Workspace, you must use the Exit option from the Agent Menu. You won't be able to log out if you have any active calls or interactions.
You log on to and log off of channels in Agent Workspace. Channels include voice, email, chat, and so on. Channels are the media that you use to interact with contacts. When you log in to Agent Workspace, you are usually logged on to all the channels assigned to you, and when you log out (exit) of Agent Workspace, you are logged off from all the assigned channels. In some environments, you might be logged off from one or more channels when you log in because the channel is out of service or your administrator has set up your account to be logged on to specific channels only.
Use the My Channels tab to log on or log off one or more channels. Logging off of all your channels does not log you out of Agent Workspace. You must exit the application to log out.
You can log on or log off all your assigned channels by using the Global Status menu.
How do I change my password?
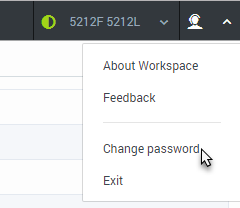
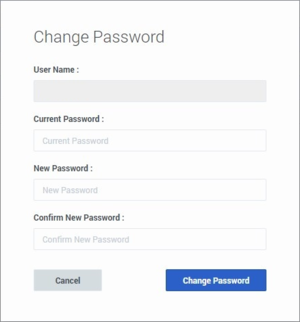
It is a good idea to change your password regularly for security purposes. Your account might be set up to enable you to change your password yourself. If this feature is available to you, the Change password option is displayed in the Agent menu.
When you select this option, the Change Password dialog box is displayed. To change your password, perform the following steps:
- Verify your user name. This field is not editable.
- Enter your current password.
- Enter your new password. Your company has specific password rules. If your new password does not follow those rules, you receive warning messages.
- Re-enter your new password to ensure that you did not make any mistakes in the New Password field.
- Click Change Password. If you did not make any errors, your new password replaces your old password. The next time you log in, make sure you use your new password.
Handling a system disconnection
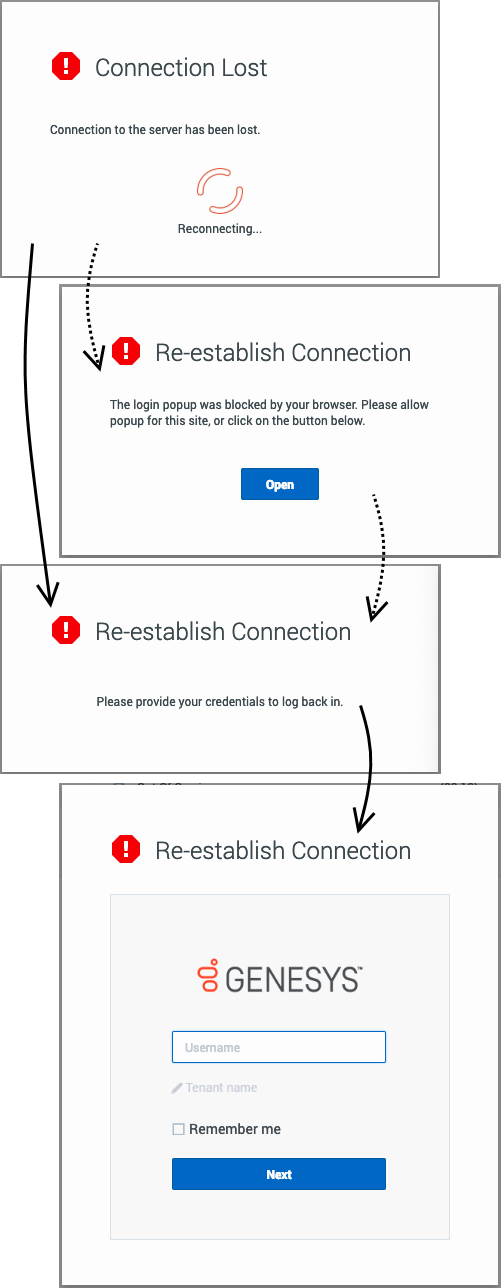
Workspace is designed to handle system disconnections. If the server that directs interactions to you becomes disabled or disconnected for some reason Workspace automatically tries to connect you to a backup server so that you can keep serving your customers with minimal interruption. If a connection loss occurs, you are instantly informed by the Connection Lost message. Workspace immediately tries to reconnect you.
If Workspace cannot reconnect you, you must log in to the backup server when the Re-establish Connection log in window is displayed. Log in just like you do when you first log in at the start of your shift.
If you have pop-ups blocked in your browser, you might receive a message asking you to enable pop-ups to display the log in window. You might be able to click the Open button in the Re-establish Connection window to open the log in window.
If the backup server is not available, the Host Not Available message is displayed. Click Refresh to refresh your browser and log in to your company's system when the server become available again.
What if the system is down when I log in?
For agents who are voice-only, if the system is down when you try to log in you receive the Connection Lost message right away. If Workspace is unable to connect immediately to the backup server, the Connection Failed window is displayed requesting that you log in again. You might have to keep trying until Workspace is able to connect to the server or the backup server.
Browser notifications
If the system becomes disconnected while your browser is minimized, blocked by another application, or if the Agent Workspace tab is not the active tab, Agent Workspace sends you browser notifications to alert you to make the Agent Workspace browser or tab active so that you can view the disconnection message and follow the instructions to reconnect.
To ensure that your browser is set up to enable you to see browser notifications, refer to this FAQ: Browser specific notifications and issues.
Change your status to Ready
To receive calls, you must be in a Ready status (indicated by a green check mark beside your name).
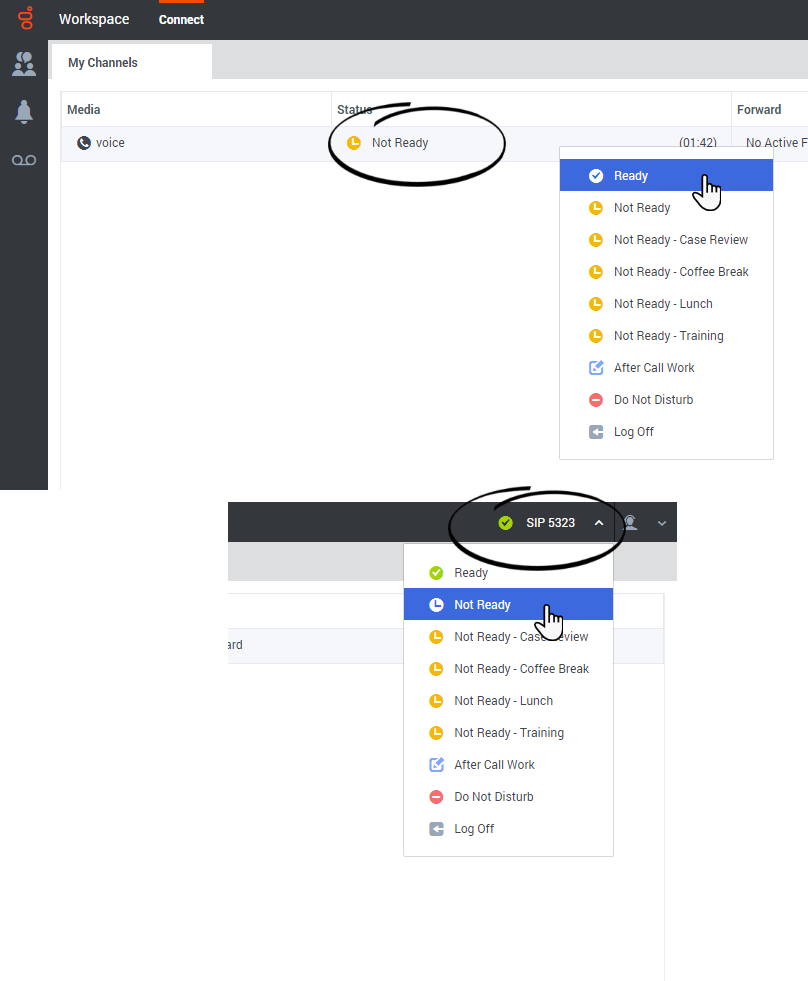
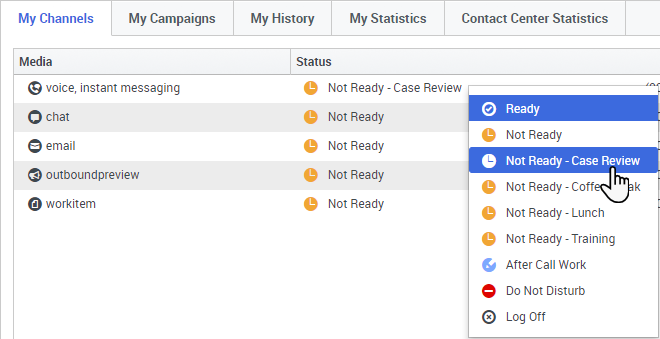
If you must change your status, click the Global Status menu and select Ready, or go to My Channels and toggle the voice channel or one or more of your Genesys Digital channels to Ready.
Watch the video for a short demonstration of changing your status. Note: This video shows Agent Workspace in an environment that has many different media channels available, such voice, chat, and email. Don't worry if not all these channels are available in your environment.
In some environments, the system might reserve an agent to handle an inbound call. If you are reserved for a call, you cannot set the voice channel to Not Ready, Do Not Disturb, After Call Work, or Logged Off status, cannot make another voice call, and cannot exit from Workspace. If you are reserved for a call and if you attempt to perform one of the actions above, a message is displayed informing you to wait. The message includes a timer so that you know how long you must wait before you are no longer reserved. Workspace notifies you when you are no longer reserved.
Table of status icons
Here is a table showing the status icons that you might encounter while using Agent Workspace.
| Agent Workspace icon | Agent Workspace status |
|---|---|
| State unknown | |
| Logged out | |
| Ready/Ready with Action Code | |
| Partially Ready | |
| Not Ready/Not Ready with Action Code | |
| (Not Ready) After Call Work | |
| Do Not Disturb (DND) | |
| Out of Service |
What happens if not all channels are available when I log in?
Sometimes when you log in, one or more of the channels that you are assigned might not be available.
If one or more channels are not available when you log in, a warning message is displayed at the bottom of the Workspace window.
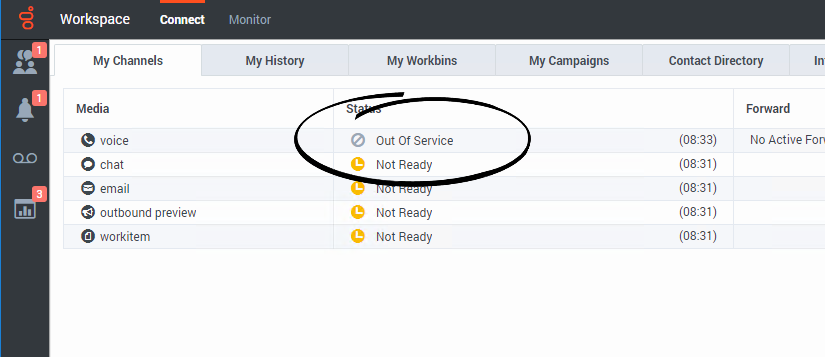
When this happens, you can still log in, but when you examine your My Channels tab, you will notice that one or more channels have the Out Of Service status. When a channel is out of service, you cannot log on or off on that channel and you cannot set your status.
When the channel becomes available again, a message is displayed at the bottom of the Workspace window. You can use the My Channels tab to change your status on that channel.Setting your status to Not Ready with a Reason
Handle an inbound call
Make sure that your phone device is connected and ready.
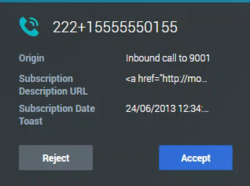
When a call arrives, you receive a pop-up notification. You might also hear a sound to alert you that a call has arrived.
Click Accept to connect the call. If you Reject the call, or ignore the pop-up, it goes to the next available agent.
Watch the video for a short demonstration of how to handle a voice call. Note: some of the features shown in this video might not be available in your contact center.
Detailed call handling information can be found here.To get you started, here are some common call handling features:
- Click Hold (
 ) to place your caller on hold.
 - Click Resume (
 ) to retrieve a call that is on hold.
 - Click Transfer (
 ) to transfer a call to someone else in your organization.
 - Click End (
 ) to hang up a call.
 - Click Done (
 ) to complete a call (Mark Done).
After the call is complete, you might enter an After Call Work state, during which you can complete any tasks related to the call. For example, you could add a note or select a disposition code.
What kinds of customer interactions can I receive?
Depending on your assignment, you might receive interactions through the Voice or Digital channels, such as Chat or Email channels, directly from customers or by way of a consultation, conference, or transfer.
For a list of channels that Agent Workspace supports, refer to Channels and the Channels tab.
Some contact centers are set up to always direct interactions from the same customers to the same agents. If your assignment is set up this way, then you are able to assist certain customers whenever they call.
How do I accept an incoming interaction?
New calls, chats, emails, workitems, and other interaction types arrive at your workstation in a pop-up interaction notification. Usually you can decide whether to accept or reject the interaction by clicking Accept or Reject, or, if you take no action at all, it will eventually time-out and go to the next available agent.
Your account might be configured for auto-answer. This means you can't choose to reject an interaction. When the interaction is directed to you, it opens automatically on your desktop.
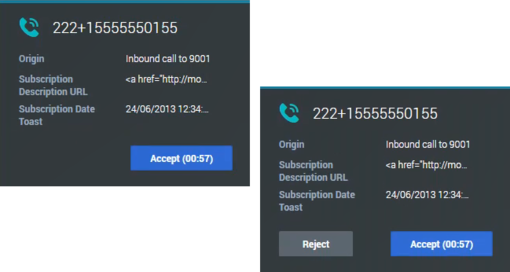
However, some accounts that are configured for auto-answer might have a timer on the Accept button. This gives you the opportunity to review the Case Information in the interaction notification before the interaction is auto-answered. You can click Accept before the timer counts down if you are ready to accept the interaction. You might also encounter a Reject button on a timed auto-accept interaction that permits you to reject the interaction before it is auto-accepted.
Many browsers, such as Google Chrome, Mozilla Firefox, and Microsoft Edge, also display notices to you about interactions and other events. You can manage these notifications through the settings in the browser. Refer to the help for the browser you are using if you want to control browser notifications.
Why do I have unclosed interactions?
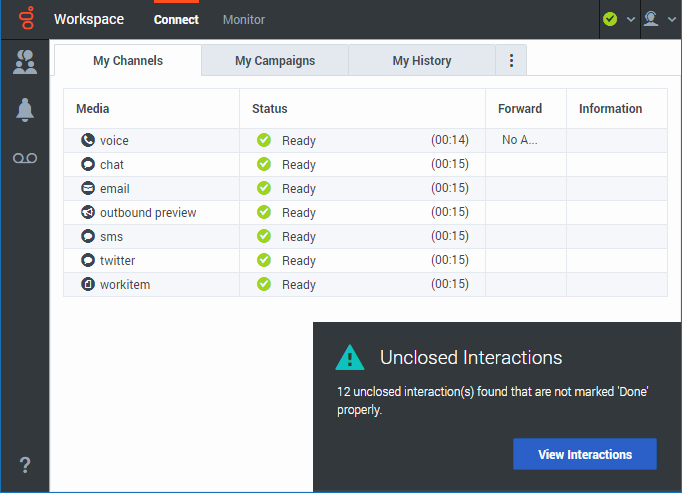
In rare situations, you might see the Unclosed interactions notification. This notification is displayed when you log in and you have multiple interactions that were not marked as Done from your previous session. Close the unclosed interactions before you start working on new interactions. Click View interactions.
When the notification closes, the first unclosed interaction displays in the interaction view. The Done (![]() ) button is available to close the interaction. Next to the Done button is a plus sign followed by a number. This is the number of unclosed interactions for you to review and close.
) button is available to close the interaction. Next to the Done button is a plus sign followed by a number. This is the number of unclosed interactions for you to review and close.
As you close the unclosed interactions, this number goes down until you have no more interactions to review and close.
How do I set a disposition code?
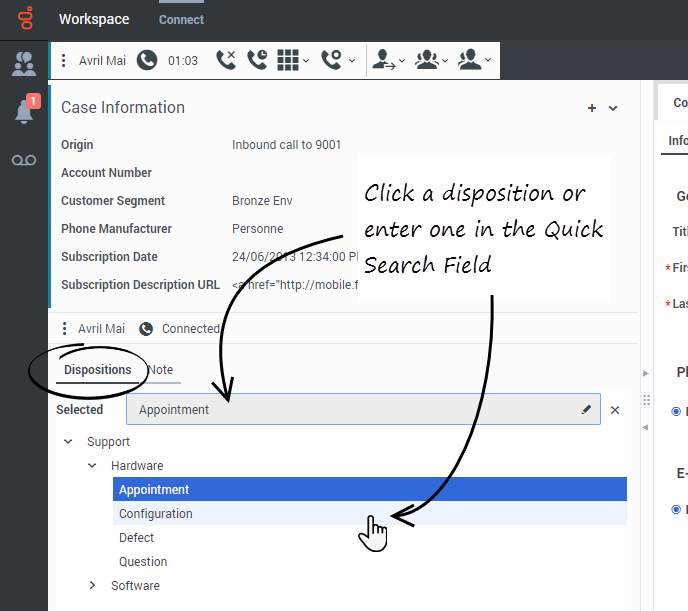
You can assign one disposition code to an ongoing or terminated interaction to characterize the outcome of the interaction.
The Disposition Code view is a tab in the Interaction view. It contains a list of choices that you can click to specify the outcome of the interaction. A search field is available to search among the disposition codes.
The Disposition Codes are organized within grouping folders, which cannot be selected as dispositions. These grouping folders do not correspond to business attributes, as they are only textual information.
Select a disposition for the interaction. Once a disposition is selected, the disposition list is hidden and the selected disposition appears in a textbox located at the top of the listing. You can't edit a disposition but you can select a new one.
The complete path to the disposition is available as a tooltip of the disposition name.
Depending on your system configuration:
- You might have to set a disposition code before you click Mark Done.
- You might be able to click Mark Done without a disposition code.
- The Disposition Code view might not be displayed.
How do I add a note to an interaction?
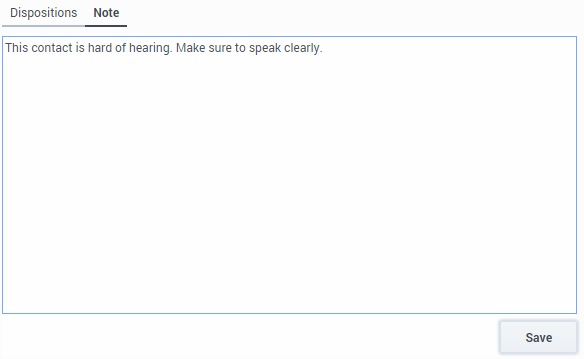
The note is a feature that enables you to enter comments about the current interaction or about a selected interaction. You can view the note in most channels as well as the Contact History view.
How do I work with case information?
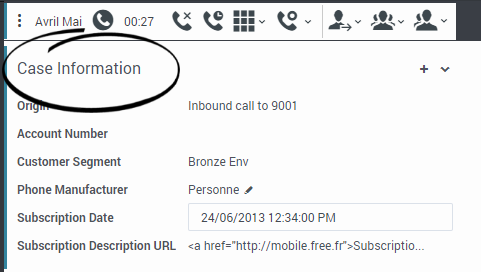
The case information view (also called attached data) provides information about an interaction — for example, an account number or type of service. The Case Information view is part of the Interaction view and the History tab of the Contact Directory.
The following are examples of the type of critical information that the Case Information view provides about the active interaction:
- Contact name
- Contact type
- Call type
- Account information
- Subject
Other types of information are also possible. These are fields set up by your organization's administrators that are important to your business or organization.
Some case information might be displayed as the title of the webpage, an anchor, or a link. If the link is active, it is displayed as blue text.
Editing Case Data or Adding Missing Fields
Your account might be set up to enable you to edit one or more entries in the Case Information view. Any field that can be edited displays a Pencil icon when you place your mouse pointer over it.
Click the field to edit the content. Press the Enter key or click away from the field to commit your change.
Editable fields might have text fields in which you can enter text or numbers, check boxes, calendars, or lists. Some lists might contain a set of folders and entries from which you select a specific entry.
To add a missing field, click Add Field (+), then select the missing field from the list.
To remove a field, click Remove Field (X).
Warning messages
To ensure the information that you enter into a field is formatted correctly, Agent Workspace checks each Case Information field. It also checks to ensure that you have provided all the mandatory data before you can mark the interaction as Done. The information is also checked when you perform an action that transfers ownership of the interaction, such as transfer to another agent or move the interaction to a workbin.
If you have missing Case Information or incorrect information, a warning message is displayed. You have the choice to either discard your changes or proceed with the action. If you cancel your action, you can correct the entry. If the entry is mandatory, you must set the correct value before you can close the interaction.
Where can I find answers to common contact questions or problems?
First, try the standard responses, your own contact history, and any customized knowledge repositories your contact center uses. If none of those options work, you can start a consultation with one of your team members.

