Internal interactions
Contents
- 1 How do I contact people in my company?
- 2 What's the difference between a consultation and a conference?
- 3 How do I start a consultation?
- 4 How do I start a conference?
- 5 How do I transfer an interaction to another team member?
- 6 How do I call an Agent Group?
- 7 How do I call an external party using Microsoft Teams or other service?
- 8 How do I contact another agent through a Routing Point or Queue?
- 9 How do I read my notifications?
- 10 Voicemail
- 11 What next?
- 12 Top 5 topics
Internal interactions are communications between you and other people inside your company, such as call and chat consultations, call, chat, and email transfers, and also messages to you from your system or administrators. Internal interactions also include call and chat conferences that involve you, another internal party, and a contact.
How do I contact people in my company?
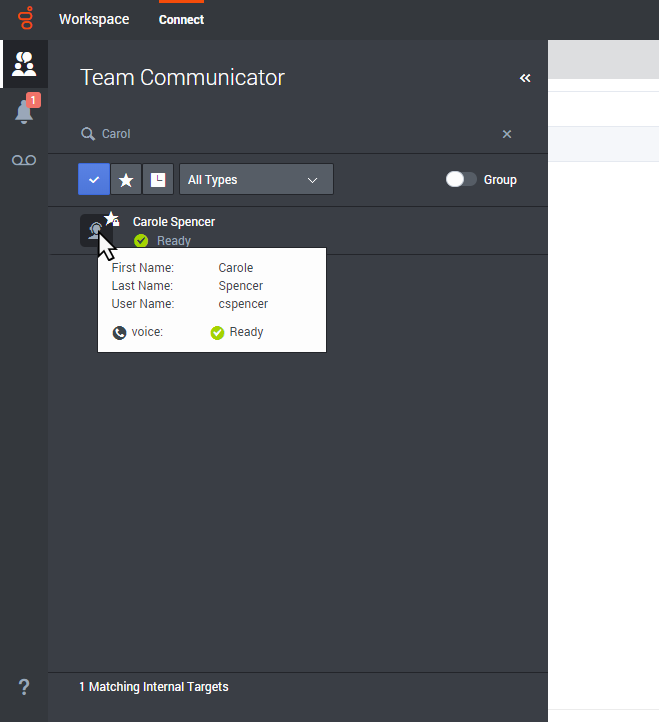
The Team Communicator tool lets you search through your company directory for an agent, team lead, agent group, external targets (Including Microsoft Teams members), or other targets that you want to call, consult with, or transfer to.
Type in the name of the person that you want to call, then hover your mouse pointer over their name in the list of search results. A pop-up is displayed that lets you know whether that person is ready to take a call, is on a break, is busy, or is logged off.
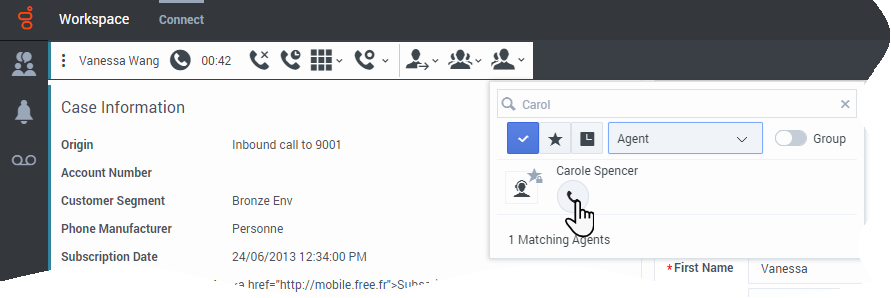
If the person is available, use the action menu to call them. If not, try a different channel or try again later.What's the difference between a consultation and a conference?
Both activities involve getting help from an agent or supervisor. Consultations let you communicate with a team member privately while handling an interaction. Conferences let someone else from your contact center join the chat or phone call with your contact. If you want to perform a warm transfer or a two-step transfer, click Consult to talk to the consultation target and then click Transfer to transfer the call.
How do I start a consultation?
A consultation lets you discuss an active call with another team member. It's different from a conference because the customer is not connected to the session. If you want to perform a warm transfer or a two-step transfer, click Consult (![]() ) to talk to the consultation target and then click Transfer (
) to talk to the consultation target and then click Transfer (![]() ) to transfer the call.
) to transfer the call.
Some things to keep in mind:
- Either party can end the consultation, but ending the consultation does not end your interaction with the customer.
- If you end the session with the customer, the consultation remains active.
- Consultations are private — the customer can't see or hear your discussions.
- The team member can access the case and contact information.
If you are on a call and start a voice consultation, the original call is put on hold while you consult with your selected team member.
- Click the Resume Call (
 ) to resume the original call (also allows you to toggle between the two calls).
 - Click the End button (
 ) to end the consultation and resume the original call from hold.
Prior to a conference or transfer, you can consult with your team member by selecting Consult in the toolbar. After the consultation request is sent, the initial call is put on hold.
While in a consultation, you can also complete a conference or transfer between your team member and your customer. To do this, select Instant Call Transfer (![]() ) or Instant Call Conference (
) or Instant Call Conference (![]() ), and select the same button beside the wanted team member's name.
), and select the same button beside the wanted team member's name.
WebRTC environments
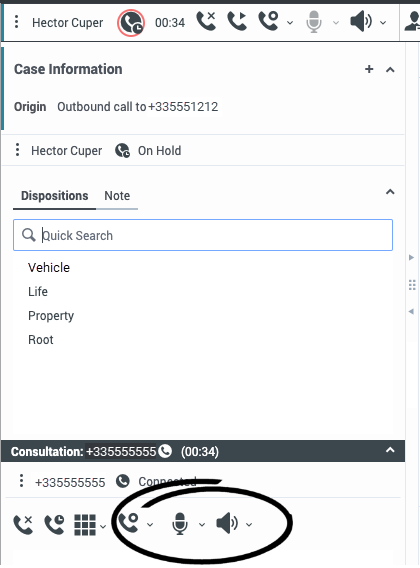
If your organization uses WebRTC to enable you to make and receive external and internal voice calls, your account might be set up to enable you to mute and unmute the voice channel on a consultation call.
How do I start a conference?
Starting a conference allows you to add another person to your current call. It's different from a consultation because the customer is also connected to the session.
Click the Instant Conference button (![]() ) to start a conference when handling a voice call.
) to start a conference when handling a voice call.
Some things to keep in mind:
- You can always consult with a team member before adding them to a conference.
- In a voice conference, the person you added can choose to release the call. This disconnects them from the conference, but your call with the customer continues.
- If you disconnect from the call but the person you added to the conference is still connected, the call continues without you. Your system might be set up to end the conference after you disconnect if the person that you added is not part of your company.
- Everyone connected to the conference can see or hear what the other parties are discussing, unless you remove or selectively mute a participant.
- To remove a party from a conference, select the Party Action menu on the Voice Interaction view and select Drop from conference.
- A team member can select Leave to drop from the conference.
How do I transfer an interaction to another team member?
You can transfer a call to another team member, including Microsoft Teams members, instantly, or you can consult with them first. For example, you could put the current call on hold while you talk to another team member to find out whether they accept the transfer.
Click the Instant Transfer button (![]() ) to transfer a voice call.
) to transfer a voice call.
Some things to keep in mind:
- Case information might be visible to you, the transfer recipient, or your administrator.
- If your transfer request is not accepted, you must manually take your contact off hold.
- If there are no agents available, you might have to wait to transfer the call. (When transferring to an agent group, the agent availability information might be 10–30 seconds behind, so you might have to wait to transfer if there are no agents showing as available.)
How do I call an Agent Group?
In some contact centers, agents are assigned to specific groups. For example, some agents in a company might speak different languages, have particular product expertise, or have a higher level of security clearance. These are all specialties that might be associated with an agent's group.
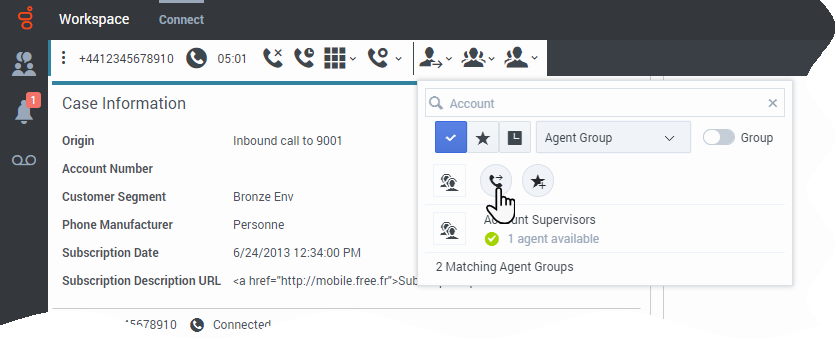
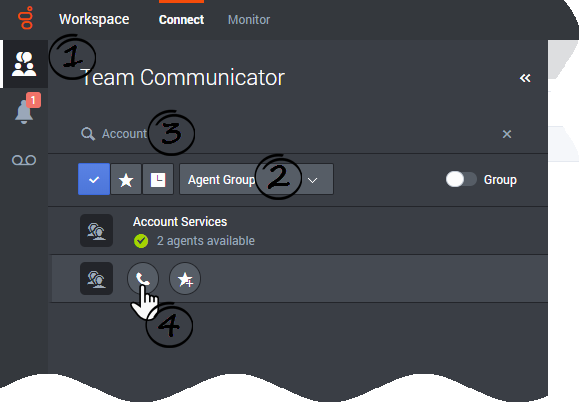
If your administrator has enabled this capability, perform the following steps to call an agent group:
- Open Team Communicator.
- Select Agent Group from the Filter by type menu.
- Enter the name of the agent group instead of the name of an agent when looking for a team member in the search field.
- In the search results, click the Action Menu list next to the name of the agent group that you want to call.
Sometimes, no one in the agent group is available to take the call. If your administrator has set up Agent Workspace to display the number of available agents in the agent group, then a message is displayed underneath the group name indicating how many agents are available. If there are no agents available, you might have to wait to make the call.
How do I call an external party using Microsoft Teams or other service?
In some organizations, agents may contact people in their organization who are outside the Genesys contact center by connecting through an external or third-party application, such as Microsoft Teams.
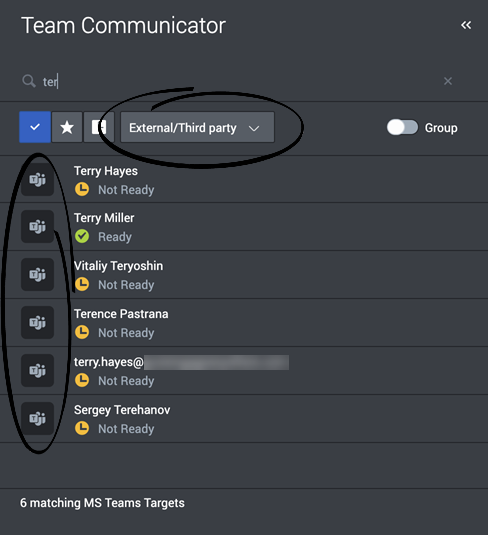
If your administrator has enabled this capability, perform the following steps to call an external target:
- Open Team Communicator.
- Select External/Third-party from the Filter by type menu. Note: The name of this filter might be customized in your environment to the name of the third-party service, such as Microsoft Teams. If you select the All Types filter instead, external/third-party targets can be distinguished from agents or other contact center resources by service-specific icons next to their names; for example, Microsoft Teams:
- Enter the name of the person when looking for a team member in the search field.
- In the search results, click the Call button next to the name of the person that you want to call.
Transfer, consultation, and conference call flows
When you are handling a call with your contact, call flow is a little different when you include an external party through a service, such as Microsoft Teams. Because the external party is not a Genesys agent using Agent Workspace, once you instant-transfer or two-step transfer (by a consultation or conference calls) the call to the external party, the call is no longer managed by Genesys, so the interaction ends and must be marked as Done.
Transfer
Watch this video to learn how to transfer your active voice call to an external party:
- Click Transfer.
- When Team Communicator opens, use the Type filter to view only External/Third Party targets.
- To find the target, enter their information, such as name, user name, or phone number, into the search field.
- Check to see if the target is available. Agent Workspace displays Ready when the target is available to take a call.
- To transfer the call, in Team Communicator, click the Transfer button next to the target's name.
- The call is transferred to the target and your interaction ends.
- Click Done.
- The call rings on the target's workstation. When the target answers their external service remote phone, the call is connected in the service.
Consult
Watch this video to learn how to consult with an external party while you are handling a voice call with a contact:
- Click Consult.
- When Team Communicator opens, use the Type filter to view only External/Third Party targets.
- To find the target, enter their information, such as name, user name, or phone number, into the search field.
- Check to see if the target is available. Agent Workspace displays Ready when the target is available to take a call.
- To call, in Team Communicator, click the Consult button next to the target's name.
- Your external service remote phone rings and a call from the target is displayed on your workstation.
- When the target answers their external service remote phone, the call is connected in both the service and Agent Workspace. The call displays as a Consult Voice interaction in the Voice interaction with your contact.
- Use the Agent Workspace controls to handle the call.
- Your contact is put on hold while you talk to the external party.
- To talk to the contact, click Resume. The external party is put on hold.
- Use the consultation call controls to resume and end the call with the external party.
Conference (and two-step transfer)
Watch this video to learn how to start a conference call with an external party while you are handling a voice call with a contact:
- Click Conference.
- When Team Communicator opens, use the Type filter to view only External/Third Party targets.
- To find the target, enter their information, such as name, user name, or phone number, into the search field.
- Check to see if the target is available. Agent Workspace displays Ready when the target is available to take a call.
- To start a conference call, in Team Communicator, click the Conference button next to the target name.
- A new call notification is displayed on the target's workstation.
- When the target answers, the target is connected to your call.
- The conference target is displayed in the interaction party area. You, your contact, and the conference target can all hear each other.
- The target can hang up or you can use the Party Action menu to remove either party from the call.
- Click End to end the call. The contact and the conference target must also hang up for the call to end for all parties.
- Click Done to mark the interaction as done.
Receiving a call from an external party service
To receive a call from an external party who is one of your team members on a third-party service such as Microsoft Teams, set your status to Ready on the Voice channel.
When a team member calls you, a notification is displayed in both Agent Workspace and the third-party service. There is no Accept button on the Agent Workspace notification. To answer the call, use the third-party service.
When you answer the call, a voice interaction is created in Agent Workspace. Use the Agent Workspace controls to handle the call.
How do I contact another agent through a Routing Point or Queue?
In some contact centers, calls are handled through a Routing Point, Interaction Queue, or Queue. Instead of transferring, conferencing, or consulting directly with another agent or to a member of an agent group, your environment might be set up to enable you to direct an interaction to another agent through a Routing Point, Interaction Queue, or Queue.
If your administrator has enabled this capability, you can enter the name of the Routing Point, Interaction Queue, or Queue instead of the name of an agent or agent group when looking for a team member.
If your administrator has enabled this capability, perform the following steps to call an agent group:
- Open Team Communicator.
- Select Routing Point, Interaction Queue, or Queue from the Filter by type menu.
- Enter the name of the Routing Point, Interaction Queue, or Queue instead of the name of an agent or agent group when looking for a team member.
- Click the Action Menu list that is displayed next to the name of the Routing Point, Interaction Queue, or Queue that you want to target.
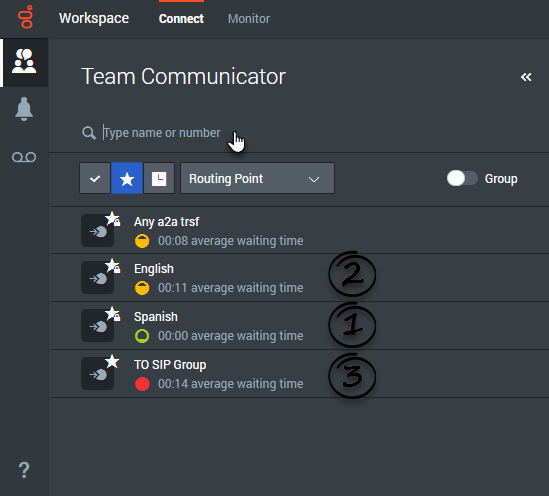
Next to the Routing Point or Queue name you might encounter different icons (1, 2, and 3 in the screenshot) that indicate how busy the Routing Point or Queue is. An icon might represent the Average Waiting Time on the target, the number of interactions currently being handled, or some other statistic. These icons help you decide which target to choose or to give you an indication of how long it is before your transfer, conference, or consultation is handled.
The following icons might be displayed next to the Routing Point or Queue in Team Communicator:
- Ready (
 ): This icon means that there are no issues with targeting the Routing Point or Queue. The number of interactions being handled is below the warning threshold.
 - Warning (
 ): This icon means that the Routing Point or Queue is in a Warning state. The number of interactions being handled is above the warning threshold but below the Error threshold.
 - Error (
 ): The Routing Point or Queue is in an Error state. The number of interactions being handled is above the error threshold so the Routing Point or Queue is above capacity.
How do I read my notifications?
Notifications
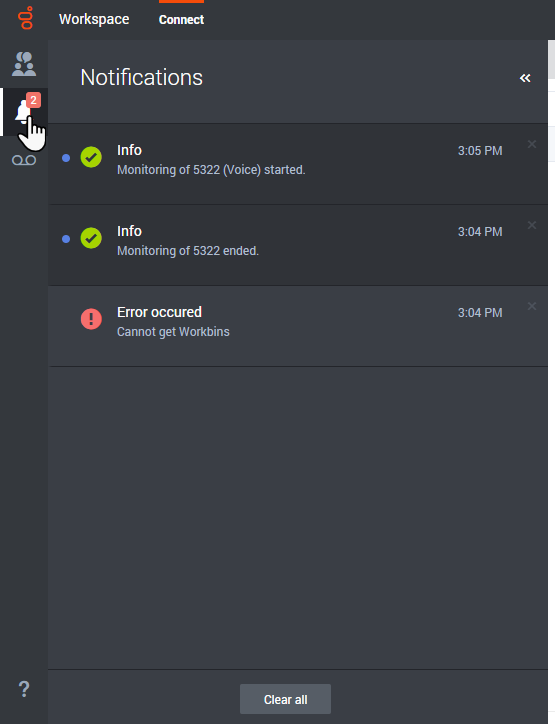
You might receive messages and notifications from the system or your administrator.
When a new notification arrives, a preview notification is displayed (you might also hear a sound/tone play).
Common notifications include:
- System-based messages (such as when a switch or channel is out of service)
- Voicemails
Voicemail
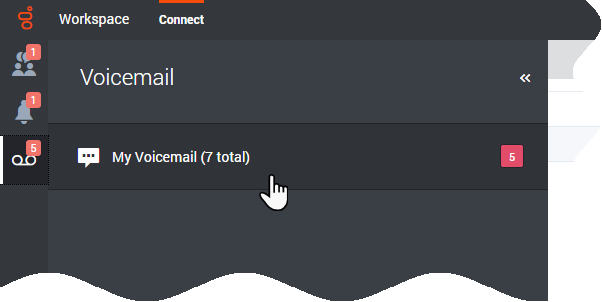
If Voicemail is available for you, the Voicemail button (![]() ) is displayed in the Side Bar toolbar. Clicking the button opens the Voicemail panel. The Voicemail panel contains a list of your voicemail and, if available, group voicemail boxes.
) is displayed in the Side Bar toolbar. Clicking the button opens the Voicemail panel. The Voicemail panel contains a list of your voicemail and, if available, group voicemail boxes.
If you have unheard voicemail messages waiting for you, an indicator is displayed next to the Voicemail button and also next to the mailbox. The indicator is a number in a red box: ![]() . The number tells you how many unheard messages you have. For screen reader users, when you put the focus on the Voicemail button this number is announced to you.
. The number tells you how many unheard messages you have. For screen reader users, when you put the focus on the Voicemail button this number is announced to you.
To access your voicemail box, navigate to the Side Bar toolbar, then click the Voicemail button (![]() ) to open the Voicemail panel.
) to open the Voicemail panel.
Navigate between mailboxes using the Up and Down arrows or click the voicemail box you want to open. The Home and End keys can be used to go to the first and last entries in the list of voicemail boxes.
To open a voicemail box, select a voicemail box then use the Tab key to highlight the Consult (![]() ) button or click it with your mouse. Use the spacebar, Enter key, or mouse to open the voicemail box. A new internal interaction is started. Use the numeric keypad to enter your authentication information. Use the Tab key or your mouse to access the controls when you play the voicemail message item.
) button or click it with your mouse. Use the spacebar, Enter key, or mouse to open the voicemail box. A new internal interaction is started. Use the numeric keypad to enter your authentication information. Use the Tab key or your mouse to access the controls when you play the voicemail message item.
In some environments, your account might be enabled to let you call personal and group voicemail boxes that do not contain any messages. In these environments empty mailboxes are displayed in the Voicemail panel. This feature enables you to call the mailbox to update the greeting message or listen to old voicemail messages stored in the mailbox.

