The Contact Directory and contact management
Contents
- 1 Managing Contacts
- 2 Where are my contacts?
- 3 How do I find a contact in the Contact Directory?
- 4 What actions can I take with a contact?
- 5 How do I add a contact?
- 6 How do I change a contact?
- 7 What if more than one contact is suggested for an interaction?
- 8 How do I work with an interaction with an unknown contact?
- 9 What next?
- 10 Top 5 topics
Contacts can be team members or customers. Information about contacts is stored in the Contact Directory. From the Contact Directory, you can call a contact, manage a contact's profile information (such as their name, phone number, email address), and review a contact's past interactions.
Managing Contacts
Use Agent Workspace to:
- Find contacts in your contact database.
- Call or email contacts in your contact database.
- Add and delete contacts.
- Edit contact information either while handing an interaction or in the contact database.
- Change the contact that is assigned to an interaction.
- Assign the correct contact to an interaction.
Where are my contacts?
There are a few different ways that you can access your contacts:
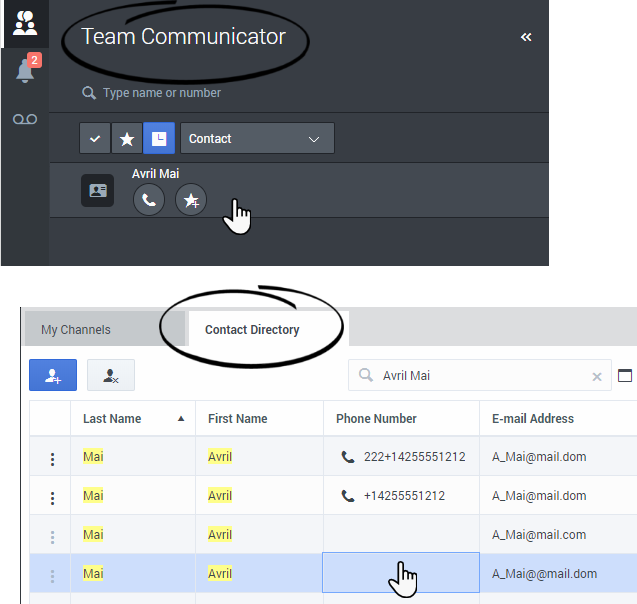
- Use the Team Communicator to quickly contact a team member, or a favorite or recent contact. This tool is accessed by clicking the Team Communicator (
 ) button. Type a name or number, click Favorites or Recent, then click the contact to call them.
 - Open the Contact Directory by selecting the Contact Directory tab in your workspace. It contains all available contacts, such as team members, customers, and any external contacts. Type the name, phone number, or email address of the contact. Click the phone icon to call the contact.
How do I find a contact in the Contact Directory?
The easiest way to find a contact is to use the Quick Search option.
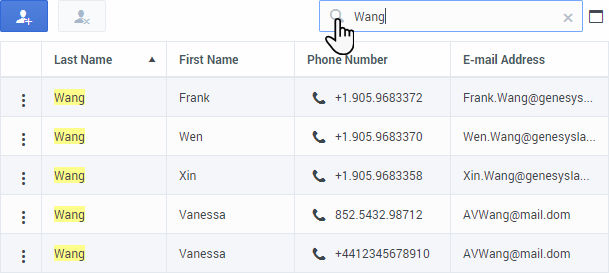
Start typing a name, phone number, or email address into the Quick Search field and the matching results are returned in the Contact grid.The Quick Search feature searches each field of the contact database for the phrase that you specify and displays a list of records where at least one record field contained the search phrase. Workspace performs a search that considers each field of the contact database (name, phone number, email address, or other criteria) as a phrase (as opposed to a tokenized list of words) and uses the search criteria that you provide as a phrase, not as a list of words.
Examples:
- Quick search using the phrase "John Pa" as the criteria in a quick search defined to apply to only the First Name and Last Name fields will match a contact where:
- First Name=John or Last Name=John
- and where:
- First Name = Paul or Last Name = Paul
- Quick search using the phrase "John Daly" as the criteria in a quick search defined to apply to only the First Name and Last Name will not match a contact where:
- First Name=John and Last Name=Doe
Results are returned in tabular form and sorted according to the default search field, such as Last Name.
The Grid view can be used to help to refine your search by sorting the results.
Click a column head in the Grid view to sort the list based on that criterion. Click a column head a second time to switch between ascending and descending sort order.
Watch the video to learn how you can search the directory and customize the results.
What actions can I take with a contact?
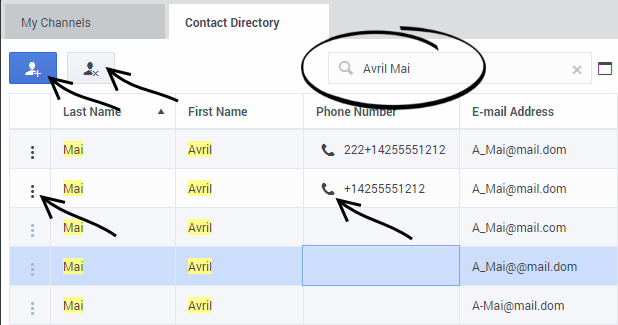
You can take the following actions in the Contact Directory:
- Find a contact by entering contact information in the Search field.
- Call the contact by clicking the Call button (phone icon).
- View and manage the profile Information of the selected contact.
- View the History of interactions with the selected contact.
- Click Create new contact (
 ) to add a new contact.
 - Click Delete contact (
 ) to delete the selected contact.
 - Use Actions for this contact (
 ) to perform other actions such as calling the contact (depends on your permissions).
How do I add a contact?
If you are working with a contact who is not in the Contacts Directory, you might be able to add them yourself.
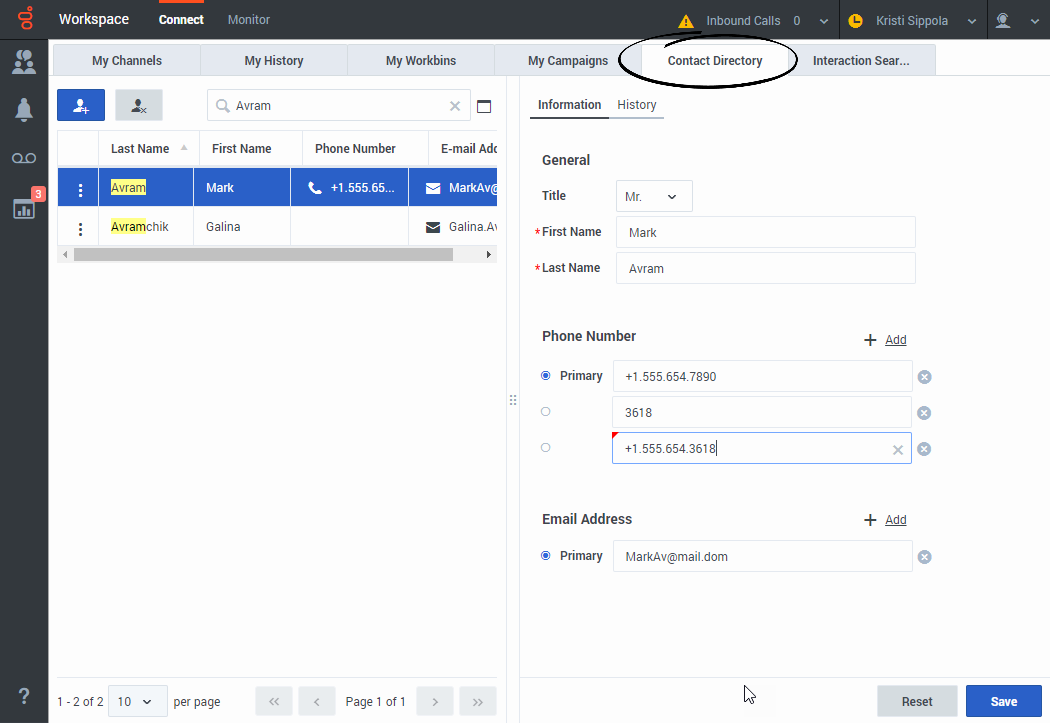
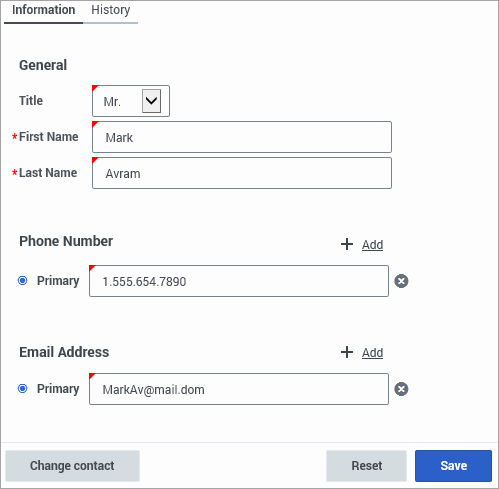
From the Contact Directory, click Create new contact (![]() ) to open the Contact Information tab.
) to open the Contact Information tab.
Add contact information to the fields in the view. Unsaved changes are highlighted by a red triangle.
Click Save to commit your updates to the Contact database.
To clear unsaved changes, click Reset.
You can add multiple phone numbers and email addresses for a new (or existing) contact, and specify a phone number or email address as the primary contact number or address.
You can clear one or more fields by clicking Remove this field (What if I try to add a contact that already exists in the database?
You might try to add (create) a contact that already exists in the Contact database. Workspace might be set up to check for potential duplicate contacts and warn you that the contact you are adding might already exist.
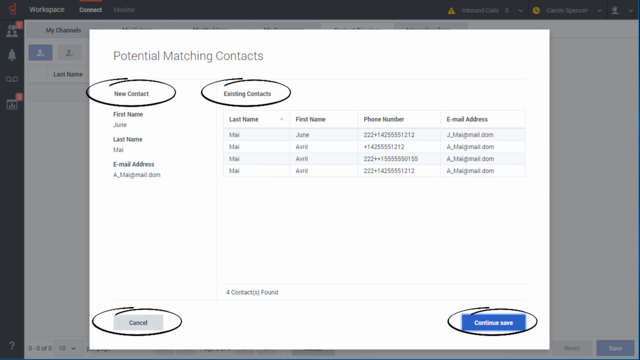
If this feature is set up, the Potential Matching Contacts view is displayed to let you compare the information that you entered for the contact your are trying to add with the contacts in the Contact database that might be a match.
If the contact already exists, click Cancel, then click Cancel again in the Contact Information tab to discard the information your entered.
If the contact you are trying to add does not match any of the contacts in the database, click Continue save to add the new contact to the Contact database.
How do I change a contact?
Sometimes the wrong contact is assigned to an interaction. Perhaps a known contact calls you from a phone that is not in the contact database causing a new contact to be created for a contact that already exists.
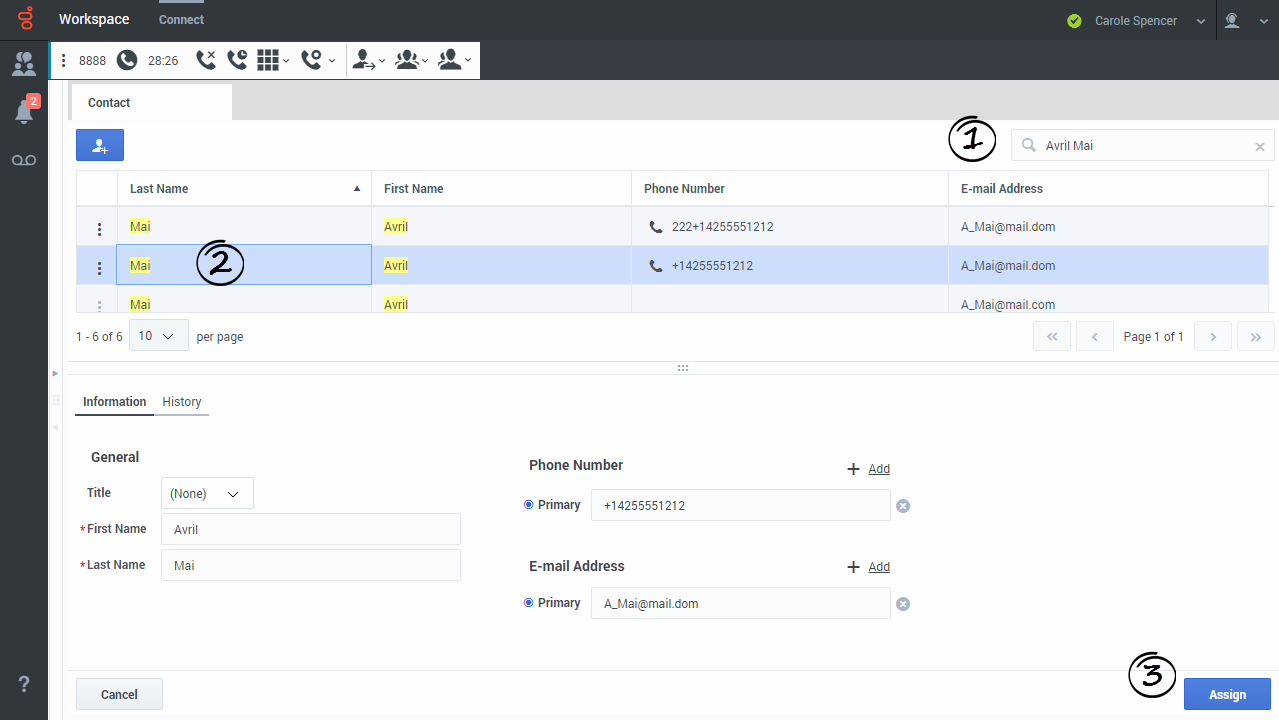
The Change Contact view enables you to assign a different contact for the current or selected interaction. To open this view, in the Information tab of the Contact view of the interaction, select Change Contact. The Contact Directory quick search is displayed.
Use the Quick Search to find the Contact to whom you want to assign the interaction.
- Enter the name of the contact.
- Select the contact in the results grid view.
- Click Assign.
Sometimes, your account might be set up to enable you to choose which contact to assign the interaction to form a list of suggested contacts that Agent Workspace finds in the Contact database.
What if more than one contact is suggested for an interaction?
Sometimes more than one person might match the phone number of a call you are receiving, the email address of the email or chat you are handling, or the contact name of a chat or workitem. When this happens, Agent Workspace might not know which contact to assign the interaction to.
Sometimes, by default, the first contact Agent Workspace finds in the Contact database is assigned automatically. If the wrong contact is assigned your account might be set up to enable you to change the contact to the correct one.
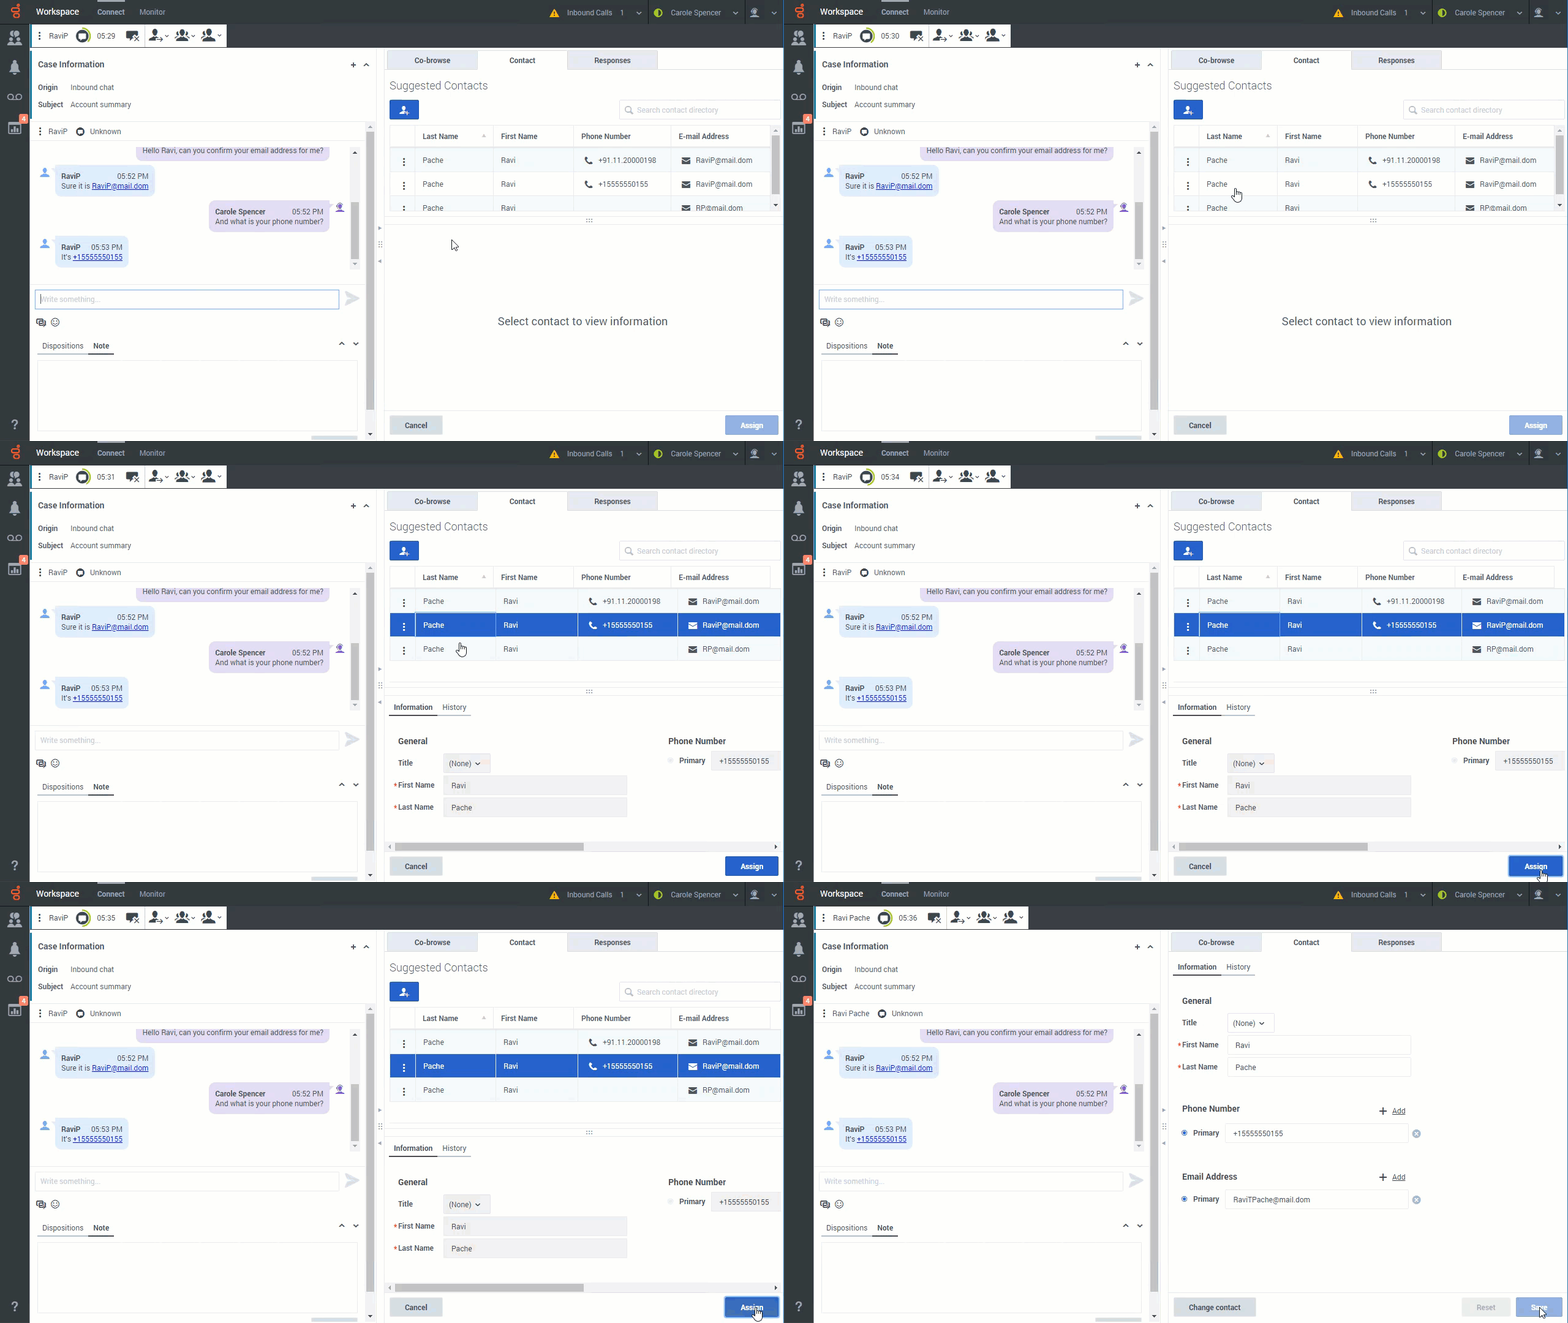
Sometimes, your account might be set up to enable you to choose which contact to assign the interaction to from a list of suggested contacts that Agent Workspace finds in the Contact database.
When this happens, a list of suggested contacts is displayed in the Contact tab of the interaction. (Refer to the video. You can click the video to make it bigger).In this view you can do the following:
- Select one of the contacts to view their Contact Information and Contact History.
- Select one of the contacts and click Assign to assign the selected contact to the interaction.
- Scroll through the list of suggested contacts.
- Search for a contact in the Contact Directory that is not in the list by typing a name, phone number, or email address in the Search contact directory field and assign the interaction to him or her. Clear the Search contact directory field and press Return or click the Close button in the search field to return to the Suggested Contacts view.
- Click Create new contact
 to create a new contact and assign the interaction to him or her.
 - Click Cancel to close the list of suggested contacts. To assign a contact to the interaction, you must click Change Contact to reopen the list of suggested contacts.
What if I try to create a contact that already exists in the database?
Agent Workspace can be set up in different ways by your administrator when it comes to contact creation. Contacts might be created for you when an interaction is directed to you. If the contact already exists in your company's contact database, the interaction might automatically be assigned to that contact. Sometimes the Genesys system is unable to assign a contact for a new interaction. This can happen for several reasons:
- The contact did not provide adequate identifying information.
- The contact is anonymous.
- There is more than one contact in the contact database that has matching contact information, such as a phone number, email address, or even first and last name.
Your account might be set up to let you create or change contacts or edit the information of a contact assigned to an interaction that you are handling. Your account might also be set up to let you create a new contact in the Contact Information tab of an interaction.
If your account is set up for this feature, when you try to create a contact for an interaction that you are handling and there is a potential match for one or more contacts already in the contact database, an alert displays, warning you that the contact might already exist.
How does this work?
When you handle a call or other interaction and the contact cannot be identified, the contact Information fields in the Information view of the Contact tab in the Interaction view are empty.
Enter as much contact information, such as first name, last name, phone number, email address, address, and so on as you can, then click Save.
If Agent Workspace finds potential matching contacts in the contact database, the new contact will not be saved. Instead, the Potential Matching Contacts view is displayed.
You have two choices:
- New Contact: The left side of the view shows you the information that you entered for the new contact. Click Create contact to add this information to the contact database and assign the interaction to the new contact.
- Existing Contacts: The right side displays a list of one or more contacts that are already in the contact database that might match the contact that you are trying to create. Review the list of potential matches. If you find the contact in the list, click their entry to select it. Click Assign contact to assign the interaction to the existing contact.
How do I work with an interaction with an unknown contact?
Your Genesys software administrator has the option to set up your contact center to handle interactions with contacts that are not already in your organization's contact database.
Your contact center might be set up to create new contacts automatically when someone calls in from an unknown phone number. In that case, all you have to do is update the contact information in the Contact tab of the interaction with the rest of the contact's information, such as name, email address, and so on.
Your contact center might be set up so that no new contact is created when someone calls in from an unknown phone number. In this scenario, you might be granted the ability to create a new contact and add him or her to the contact database manually. If this feature is enabled for you, follow these steps:
- Click Create new contact to open the contact Information view and create a new contact.
- Add the contact's information in the information fields. You can also add additional phone numbers and email addresses for the new contact, and specify a phone number or email address as the primary contact number or address.
- Click Save to save the contact's information to the contact database.
- If you decide not to save the new contact information, click Reset to reset and clear any unsaved information.

