Capacity rules
Contents
Define an agent’s ability to handle multiple interactions concurrently for different channels.
Capacity rules allow you to define an agent’s ability to handle multiple interactions concurrently for different channels. When the limits for a channel are reached, the agent stops receiving interactions for that channel.
When you create a capacity rule, you define rules for every enabled channel, except for workbins and outbound channels. For each channel, you first need to set the maximum number of interactions an agent can handle, and then you can optionally define rules that also set limits for that channel based on the number of interactions being handled on other channels.
| Example | Result |
|---|---|
|
You could define the following for an agent using a chat channel:
|
This rule means that the system will not route new chat interactions to an agent under the following conditions:
|
You could define the following for an agent using a chat channel:
|
This rule means that the system will not route new chat interactions to an agent under the following conditions:
|
You could define the following for an agent using a chat channel:
|
This rule means that the system will not route new chat interactions to an agent under the following conditions:
|
Create a capacity rule
To create a capacity rule:
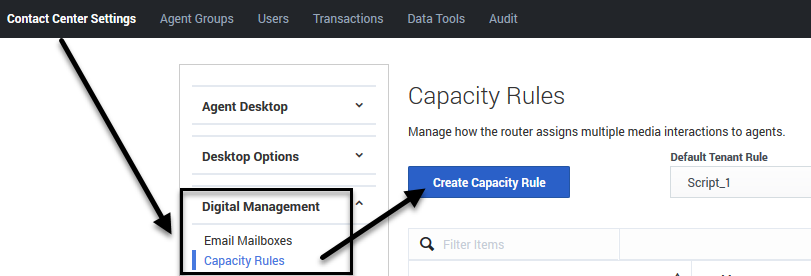
- Go to Contact Center Settings -> Digital Management -> Capacity Rules screen in Agent Setup.
- Click Create Capacity Rule.
Select media channels
On the Create a Capacity Rule screen, enter a name for the capacity rule and specify the rule folder.
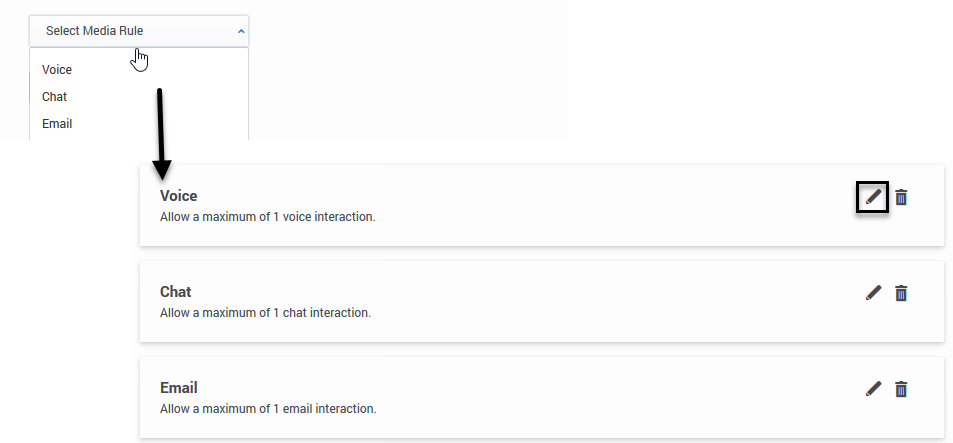
Next, from the Select Media Rule menu, select all channels that apply to your contact center.
When you select a channel, a default media rule for that channel appears onscreen. To open and edit the rule, click the pencil icon.Now, you'll create the media rules by specifying the following:
- the maximum allowable interactions an agent can handle for a media channel.
- (optional) add limit conditions for that channel, based on interactions being handled on other channels.
Define maximum number of interactions
To define the maximum allowable number of interactions an agent can handle for a media channel, click the pencil icon to open and edit the media rule for the respective channel.
Next, in the Allow a maximum of <channel> interactions section, simply enter an integer in the text box to define the maximum allowable number of agent can handle for that media channel.
You can click Done or continue on to define additional rules that depend on other channels.Specify limits that depend on other channels
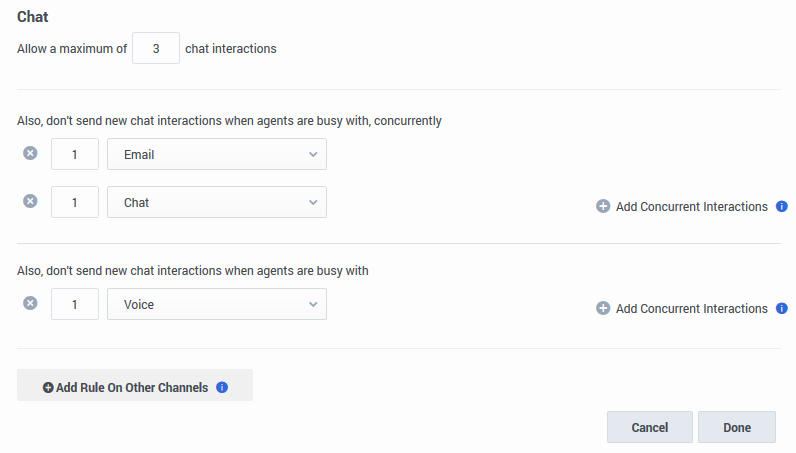
To specify rules that depend on the number of interactions of other channels being handled: Click Add Rule on Other Channels. Next, enter the number of interactions and select the channel that you want to depend on.
You can repeat and click Add Rule on Other Channels button to add more limit conditions on other channels.
Advanced, rarely used: Sometimes, you may need to define a more complex rule, that sets a limit based on interactions of several channels being handled at the same time by the agent. For that case, click Add concurrent Interactions to build composite rules.To illustrate how this works, let's look at the last example from above:
| Example | Instructions |
|---|---|
|
To enable:
|
Edit a capacity rule
To edit a capacity rule that has already been created, go to Contact Center Settings -> Digital Management -> Capacity Rules screen in Agent Setup. Locate the capacity rule from the menu and click the corresponding pencil icon. The Edit Capacity Rule window opens. Edit any or all of its properties.
Assign a default capacity rule
When you create a new capacity rule, it appears in the Default Tenant Rule menu on the main Contact Center Settings -> Digital Management -> Capacity Rules screen. Select any Capacity Rule from this menu to make it the default Capacity Rule for a tenant.
Assign a capacity rule to an agent
You can assign a capacity rule to a user in Agent Setup, as follows:
- From the Users tab, locate the user/agent or add a new one.
- From the Capacity Rules menu, find the capacity rule you want to apply.
You can also assign a capacity rule to a user in a CSV for XLS file that will be imported via Bulk Import:
- For CSV files - In the CapacityRule column, enter the capacity rule name.
- For XLS files - In the CapacityRule column, specify the capacity rule DBID.


