Settings
Contents
Learn how to view or change any of the following settings:
General
- Account Name - The name of the account.
- Caller ID - This is the number that will appear on customer’s Caller ID display. It should be a valid number that belongs to you or your contact center (in many locations, this is a legal requirement). You can override the Caller ID number when you create or edit a dialing profile.
- DAP name - The name of the Database Access Point (DAP) object.
- Format name - The name of the format applied to the Table Access object.
- Disposition Codes - The name of the configuration object (In the configuration database) that stores the disposition codes that CX Contact refers to when applying call treatments. Refer to the Retry Options page for more information.
Region
- Country Code - The country code associated with the account.
- Timezone - The default timezone associated with the contacts loaded from a list.
- Locale - The preferred language for the account.
- Reports Default Time Zone - The timezone used for reports.
Lists
- Default timezone - The timezone associated with the account.
- Default region - The default timezone associated with the contacts loaded from a list.
- Default timezone on error - If there is a system-level error when processing timezones, the timezone specified here becomes the default for the record.
- Max split lists - The maximum number of list partitions that can be created from a contact list using selection rules.
Security
- Minimum password length - The minimum length of a CX Contact password.
- Automatically sign out - The duration of inactivity before CX Contact automatically signs the user out.
- Use strict sign out - Enables/disables a forced sign out of the CX Contact UI every time the browser page is closed.
- Encryption -
- Enable/Disable Encryption - Enables/Disables all of the encryption controls.
- Secure all Contact Lists - Enables encryption for all Contact Lists. When enabled, you cannot enable/disable encryption for one specific Contact list.
- Secure all Suppression Lists - Enables encryption for all Suppression Lists. When enabled, you cannot enable/disable encryption for one specific Suppression list.
- Secure all Consent Lists - Enables encryption for all Consent Lists. When enabled, you cannot enable/disable encryption for one specific Consent list.
- Secure Outbound Analytics Reports - Enables encryption for all downloadable reports from Outbound Analytics.
- Public Keys - A list of User Public Keys that include:
- Type - The type of key.
- User ID - the user ID associated with the specific Public Key.
- Upload Date - The date and time at which the Public Key was uploaded into CX Contact.
- Algorithm - Displays the public key algorithm provided by the List Builder.
- Expiration Date - Displays the key expiration date for the public key or Never if the key never expires.
- Import - Enables you to import a user's public keys. When this option is selected an Import Public Key dialog is opened. In the Enter Public Key UserID field, enter the unique User ID, select the file that contains the Public Key that CX Contact should use for data encryption and click Import. CX Contact supports rsa3072 and rsa4096 Public Keys in plain text (ASCII Armor) format.
- Download CX Contact Public Key - Enables you to download a CX Contact Public key that should be used to encrypt data files before uploading them to CX Contact.
Pacing
- Target Abandon Rate - The target call abandonment rate. For example, if you specify 3%, the system adjusts the number of calls dialed to achieve the 3% goal. Call pacing may increase and decrease as the target rate fluctuates.
- Abandon Call Definition - The number of seconds used to determine whether a call is considered abandoned.
- Maximum Attempts per Minute (Voice, SMS, and Email) - The maximum allowable number of contact attempts per minute for Voice, SMS, and Email channels.
Session Profiles
With Session Profiles you can create, view, and edit user profile privileges for a Voice profile, SMS profile and/or an Email profile.
General
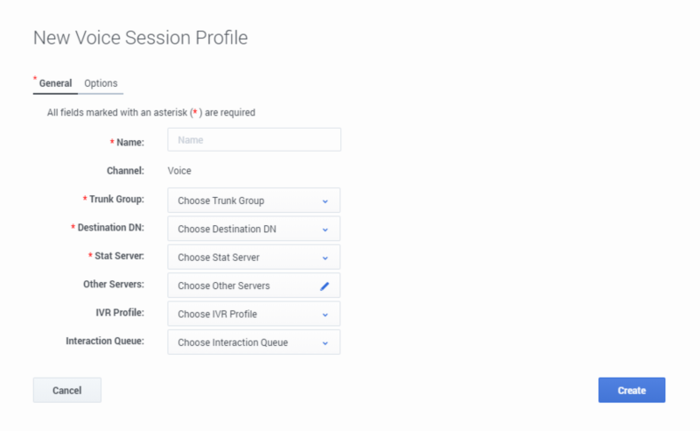
- Name - The Session Profile name.
- Channel - Indicates the Session Profile type (for example, Voice, SMS or Email).
- Agent Group - A drop down menu that includes the names of all of the enabled Agent Groups that are included in the Tenant associated with CX Contact.
- Trunk Group - A drop down menu that includes the names of all of the enabled Trunk Group DNs that are included in the Tenant associated with CX Contact (for example, Environment).
- Destination DN - A drop down menu that includes all the enabled DNs types (for example, Routing Point, External Routing Point, ACD Queue) that are included in the Tenant associated with CX Contact.
- Stat Server - A drop down menu that includes all of the enabled Stat Server applications.
- Other Servers - A drop down menu that includes all of the enabled applications for Interaction Server and T-Server.
- IVR Profile - A drop down menu that includes all of the IVR Profile objects that are included in the Tenant associated with CX Contact.
- Interaction Query - A drop down menu that includes all of the Interaction Queue scripts that are included in the Tenant associated with CX Contact.
The following image is an example of the New Voice Session Profile window > General tab.
Options
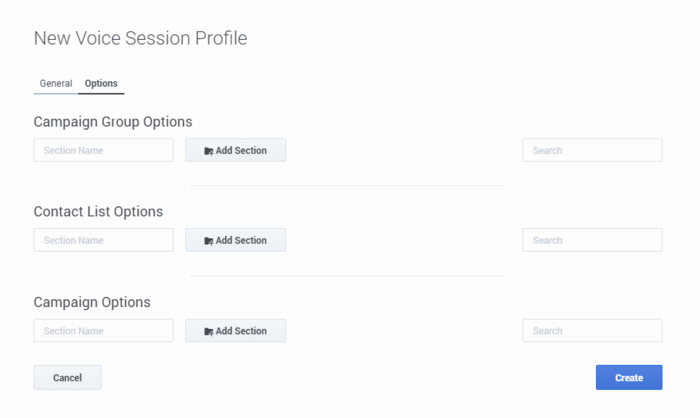
Use the options available in the Options tab to add Outbound Contact Configuration options. For details, refer to the OCS Options by Logical Group.
The following image is an example of the New Voice Session Profile window > Options tab.
For additional information about Session Profiles, refer to Campaign Structure and Terminology > Session Profiles.
Partitions
The partition list in the menu bar contains a list of the partitions the user has credentials to access. Selecting a partition from the list provided defines where new objects are stored and excludes administrators from seeing outbound objects (for example, campaigns and lists) belonging to a different department.
Enable partitioning
- Select Settings > Partitions.
- Select Enable Partitioning to turn partitioning on.
Create a new partition
- Select Settings > Partitions and click New.
- In the Create new Partition dialog, enter a name and description in the fields provided and click Save.ImportantOnce a partition is created and saved, you cannot change the partition name.
Edit a partition
- Select Settings > Partitions and click the Edit icon associated with the partition you want to edit.
- Change the partition's description in the field provided.
View a partition's members list
- Select Settings > Partitions.
- Click the partition members icon associated with the partition whose partition list you want to view.


