
Import / Export a Dashboard and Panels
Contents
Learn how to import/export a Dashboard and Panels.
Import an Analytics Dashboard
CX Contact Analytics dashboards can be imported/exported. The imported/exported file is a .json file. The dashboards can also be manually exported as a .pdf file and a dashboard panel can be manually exported as a .csv file.
- Select Analytics and click the Load icon
 .
. - In the Type to filter text box type the name of the dashboard you want to load. A list of dashboards matching the name appears. Or, click Advanced and then click Choose file to import dashboard data from an existing .json file.
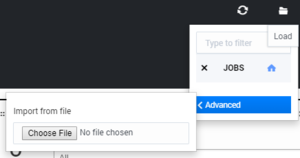 .
.
- Select the .json file containing the dashboard data you would like to import. The data in the select .json file is uploaded as the current dashboard.
Export an Analytics Dashboard
- Select Analytics.
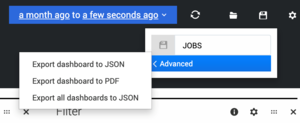
- Open the dashboard whose data you would like to export to a .json file and click the Save icon
 .
. - Click Advanced and then click Export dashboard to JSON (that is, to export the current dashboard only) or click Export all dashboards to JSON (to export all dashboards from all indexes).
 .
.
- Select a location for the .json file and click Save.
- The JSON file will store the definition of the Dashboard, not the actual data displayed on it.
Schedule an export of the Dashboard or Panel
In addition to being able to create automation jobs to export the fields in Elasticsearch indexes, you can also schedule an export of the Analytics Dashboard to PDF files or the Panel to PDF or CSV files for the purposes of reporting. Export of the Dashboard and Panel is implemented via the API Aggregator, using a headless browser (Puppeteer) to render the Outbound Analytics pages and store them in PDF format. The API Aggregator receives the name of Dashboard or Panel and the time interval for data rendering by means of input parameters from the Job Scheduler. List Manager implements the export of Panels with tabular data to the CSV files.
To schedule an export of the Dashboard or Panel:
- In the List Automation job, select the Edit Automation tab.
- In the Rules section, for the Action type, choose Export Analytics Data.
- In the Export type field, choose either Dashboard or Individual panel.
- In the Data Source (Dashboard) field, select the data source from the drop-down list.
- If you are exporting a Panel, select the panel name from the drop-down list.
- This control is enabled only when the selected Export type is Individual panel.
- Select the time interval for this export.
- In the Output file name format field, enter the format you want to use for the output file.
- For the Output data file format, choose PDF or CSV.
- The CSV button is enabled, only when Individual panel is selected for Export type.
- (Optional) Select secure with encryption to encrypt the export if PGP encryption is not mandatory.
- Click Save list automation.
Manually export a Dashboard as a PDF file
- Select Analytics.
- Open the dashboard whose data you would like to manually export to a .pdf file and click the Save icon .
- Click Advanced and then click Export dashboard to PDF.
- Select a location for the .pdf file and click Save.
- The PDF file will contain the data currently displayed on the screen.
Manually export a Dashboard Panel as a CSV file or PDF file
- Select Analytics.
- Open the dashboard whose panel you would like to manually export to a .csv or .pdf file.
- Click the download Export icon
 .
. - Select either the Export panel to CSV tab or the Export panel to PDF tab.
- Review the details in the window that appears and click Download CSV / Download PDF.
- Export the contents of the panel, as shown, selecting all data or currently loaded data.