
Create and Manage List Automation Tasks
Contents
Learn how to create and manage List Automation Tasks.
CX Contact's List Automation feature enables you to schedule repetitive tasks that trigger predefined events.
More specifically, you can schedule frequent scans of a remote FTP directory in search of lists matching specified rule criteria. When a list matching the criteria is found, one of the following events occur:
- The file is imported into CX Contact as a new contact list or the records within the list are appended to an existing contact list.
- The file is imported into CX Contact as a new contact list or the records within the list are appended to an existing contact list, which triggers a new campaign group.
- The file is imported into CX Contact as a new suppression list or the records within the suppression list are appended to an existing suppression list.
You can also use the List Automation feature to schedule a contact list export. The file is exported out of CX Contact and sent to a remote FTP directory. This can be useful in the scenarios outlined below.
| List Export Use Cases |
|
The videos and article below describe how to use the List Automation feature in CX Contact.
Use the instructions below to create any list automation task, regardless of the event you intend to trigger.
To start, go to the Lists-->List Automation page and click New. Give the job a name, a description (optional), and then follow these steps:
Create a Run Schedule
Here, you'll specify the day, time, and frequency of the scheduled job runs. You can do this in one of two ways:
- Choose from a series of scheduling options
- Specify a Cron expression

Scheduling Options
To choose from the available scheduling options, click the Schedule radio button and specify the following:
- Schedules every - This is the frequency of the run. For example, if you schedule a run on Wednesday from 1 pm to 2 pm, and in this field you select 15 minutes, four runs will take place between 1 pm and 2 pm on Wednesday. Minimum frequency is 15 minutes; maximum is 60 minutes.
- Day/s of the Week - The day/s in which the run will take place. You can select one or multiple days of the week, or you can select All if you want the run to take place every day for this particular job.
- Start time - The start time of the run.
- End time - The end time of the run.
- Time Zone - The time zone associated with the start and end time of the run.
Cron Expression
Alternatively, you can click the Crontab string radio button and enter a string of five values that represent a run schedule and frequency. The system will convert the string into a time interval and schedule the run/s accordingly.

Specify the SFTP Connection Parameters
Select the SFTP Server to use, the remote FTP directory and the login credentials used to access it. Only the secure file transfer protocol (SFTP) is supported. The following are valid protocols:
- sftp://hostname/[directory]
- sftp:hostname/[directory]
The File Server drop down menu is populated during the CX Contact configuration phase. Specifically this information is stored in the transaction object. To configure the transaction object with the SFTP host FQDN, or the IP address, and the public key fingerprint (optional), please refer to your Genesys Care team.
When you are using list automation, it is possible that duplicate files are imported. Select the Ignore duplicate files check box to ignore duplicates with the same file name and extension.
If you're using the List Automation feature to import lists from an SFTP remote directory, the Delete files after import option applies. You should always leave this option checked (default). If you do not select the check box, the file being imported will remain on the remote directory and will be processed again during the next scheduled run.
If you want to move files to a specific file path after import, select the Move files after import to... check box. In the Destination Path field, specify the path to which the files should be moved.
If you want to enable SFTP event logging select the Trace connection attempt check box. By default, this check box is not selected.

If you're using the List Automation feature to export a list from CX Contact and onto a remote directory, the Zip files option applies. Leave this checked if you want to zip the files being exported to the remote directory.

SFTP Server Authentication
Authenticate to the SFTP Server using one of the following authentication options.
- Username and password authentication
- ImportantThis authentication model is less secure.
- Obtain the SFTP Server username and password.
- Enter the SFTP Server username and password in the List Automation Job settings page.
- Username and SSH key authentication
- ImportantThis authentication model is more secure than authentication with username and password.
- Obtain the SFTP Server username.
- Download the CX Contact SSH Public Key using the List Automation Job Create/Edit dialog. Note: CX Contact uses RSA public and private keys that are 4096 bits long.
- Provision the SSH Public Key and username on the SFTP Server.
- Once the public key is provisioned, CX Contact uses its private key (securely stored within the CX Contact platform), and username to establish the connection between the CX Contact components and the SFTP Server.
- Username, SSH key, and password authentication
- The Username, SSH key, and password authentication model adds an additional layer of security (that is, an additional password), on top of the username and SSH Key authentication process.
- Download the CX Contact SSH Public Key using the List Automation Job Create/Edit dialog.
- Provision the SSH Public Key, username and password on the SFTP Server.
- Once the public key is provisioned, CX Contact uses its private key (securely stored within the CX Contact platform), username and password to establish the connection between the CX Contact components and the SFTP Server.
- The Username, SSH key, and password authentication model adds an additional layer of security (that is, an additional password), on top of the username and SSH Key authentication process.
Define the Trigger Event and Rules
When a scheduled task takes place and a list is extracted from either CX Contact (in the case of an export) or from an FTP directory (in the case of an import), the resulting action will be determined by the rules you set in this section.
To start, go to the Action type menu and select the event you intend to trigger:
- Import file - The file is imported into CX Contact as a new contact list or the records within the file are appended to an existing contact list. It appears on the Lists page with all other contact lists.
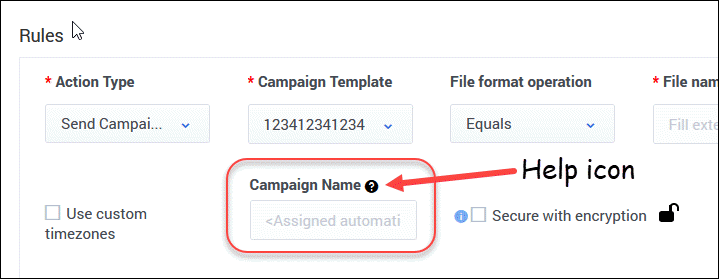
- Send Campaign Group - One or more input files are imported into CX Contact as a new contact list(s) or the records within the file are appended to an existing contact list(s). A new Campaign Group is then created. The new Campaign Group references the imported contact list(s) and is executed. Note: A single Campaign Group is created for all resulting contact lists.
- When selecting this Action Type, and selecting a Campaign template, the Campaign Name field displays, enabling you to optionally enter a campaign name. Click the Help icon (see graphic below) to open the list of supported tokens.
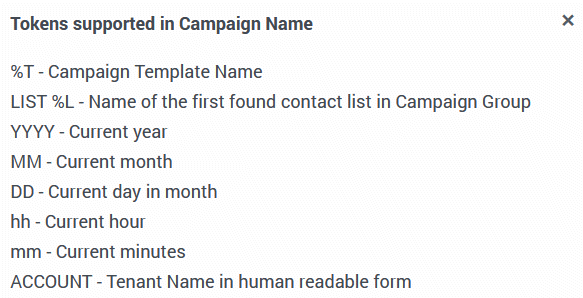
- When selecting this Action Type, and selecting a Campaign template, the Campaign Name field displays, enabling you to optionally enter a campaign name. Click the Help icon (see graphic below) to open the list of supported tokens.
- Suppress file - The file is imported into CX Contact as a new suppression list or the records within the file are appended to an existing suppression list. Note: If you select Suppress file, the Required checkbox appears onscreen. If the suppression list being imported or appended is required, check the box. See the Suppression Lists page for more information about Required versus Optional suppression lists.
- Export Contact List - The contact list is exported from CX Contact and sent to an FTP directory.
- Export Analytics Data - Outbound Analytics is exported from CX Contact as CSV files. The CSV files are uploaded to a remote SFTP Server.


The table below describes each rule and identifies its associated triggered event. Remember to watch the videos above to learn how to configure these rules to accomplish a particular list automation task.
| Rule | Triggered Event | Description |
|---|---|---|
| File format operation |
|
Select an operator from the list. This is used to define the naming convention you're searching for on the remote FTP directory. |
| File name format |
|
Specify the value of the file name you're searching for, depending on the operator you selected. For example, let's say you're looking for a CSV file that contains the word Collections in the file name. From the File format operation list, select the operator Contains, and then in the File name format box, type Collections. If, during the run, CX Contact sees a file that contains Collections in its name, it will grab the list and load it into CX Contact. |
| Append type |
|
Specify how you want to upload records into CX Contact. Options are as follows:
Important
|
| Suppression list |
|
Select the suppression list for the contacts being loaded into CX Contact. |
| Suppression List Channel |
|
Specify the channel (voice, SMS, or Email) that the suppression list applies to.
|
| Upload rule (Optional) |
|
Apply an upload rule to a contact list or suppression list being loaded into CX Contact. If you use an upload rule, the Specification file option is removed because upload rules already contain specification files. |
| Use Specification file (Optional) |
|
If you want to apply a specification file to a list being loaded into CX Contact, set the Use Specification File switch to the On position and select the specification file from the menu. This field will not apply if you've already applied a specification file to your upload rule. |
| Select Data Mapping (Optional) |
|
If, instead of a specification file, you want to apply a data mapping schema to the list being imported, set the Use Specification File switch to the Off position. The Select Specification File menu changes to the Select Data Mapping File menu, where you can select and apply a data mapping schema.
|
| Use custom timezones |
|
If you want to override the automatic system timezone assignment and instead use the entries you created in the time zone compliance section of CX Contact, leave the Use custom timezones option checked (this is checked by default).
|
| Secure with encryption |
|
To secure a Contact list or Suppression list with encryption, select the checkbox. When this option is selected, the system will accept input files encrypted with an asymmetric key using PGP Encryption. Also, when this option is selected exported files will also be encrypted with an asymmetric key using PGP Encryption.
|
|
Campaign Template |
|
Select the campaign template that you will use when creating the Campaign Group. The campaign template contains the dialing and session profiles. |
| Specify Campaign Group name |
|
Specify the name of the campaign group that will be created.
|
| Campaign Group |
|
|
| Contact list(s) |
|
|
| Contact list name operation |
|
If you select the By name option in order to specify the name of a contact list you want the system to export, select an operator that will correspond to the value in the Contact list name format field. |
| Contact list name format |
|
Specify the value of the file name you're searching for, depending on the operator you selected. For example, let's say you're looking for a contact list that contains the word Collections in its name. From the Contact list name operation list, select the operator Contains, and then in the Contact list name format field, type Collections. The contact list containing the word Collections in its name will be exported to the FTP directory. |
| Selection rule |
|
CX Contact can apply a selection rule to a list being exported and sent to a remote directory. Select a selection rule from the list and only the records that satisfy the selection rule condition(s) will be exported.
|
| Output file name format |
|
If you apply a selection rule to the contact list export, you must specify an output file name. For a list of supported naming conventions, click the question mark next to the name of this field in CX Contact or refer to the List Rules page in this manual.
|
| Use label |
|
If you turn on the Use label option, the default field names will be replaced with the field names from the associated list label schema (that is, the names given by the user to better recognize and understand the field). For detailed information, refer to the Create and Manage User-defined Field Labels page. |
| Retention Period |
|
This option indicates the amount of time for which the entries in the Suppression list should be maintained. A Retention period is mandatory and supports the following options:
If a Retention period is not selected, Permanent is selected by default. |
| Record Retention |
|
This option indicates the amount of time for which records in the contact list should be retained. A Retention period is mandatory and supports the following options:
If a retention period is not selected, Permanent is selected by default. |
| Records Selection Rule |
|
This option is used to specify criteria for deleting records from the contact list:
The default value of this field is Completed. |
| Export type |
|
Select the export of raw data, dashboard and individual panel. |
| Data Source (Dashboard) |
|
Select the analytics data index, data source or dashboard that should be exported. |
| Panel |
|
Select the specific panel that should be exported. |
| Output data file format |
|
Select the output data file format depending on the Export Type: Raw data - CSV, Dashboard - PDF, or Panel - PDF or CSV.
Note: The CSV format is supported only for panel types table and audittable. |
| Time Interval |
|
Select the time interval and time range at which analytics data should be exported. |
| Custom Time Interval |
|
Select the time interal or time range according to days, hours and minutes. |
View List Automation Job Details
When you create a new list automation job, the details and status of the job appear in a table on the Lists-->List Automation page. The table contains the following fields:
| Property | Description |
|---|---|
| Name | The name of the list automation job. |
| List Source | Your username to the FTP directory and the FTP directory address. For example johnsmith@ftp.xyz.com. |
| Last Run | The date and time of the last completed job run. |
| Status | The current status of the job. If the status is failure, for example, click the Activity icon in the Actions menu. The Message field on the Job Activity page will display the reason for the failure.
 |
| Last Modified Date | The date and time you created or modified the job. |
| Schedule | The scheduled start day and start and end time. If you used a Cron expression, the string is displayed here. |
| #Success | An accumulation of successful runs. For example, if the system finds and uploads a list on three runs, the number 3 will display in this field. |
| #Failures | An accumulation of failed runs. Examples of a failed run could include a failed connection to an FTP directory or a partial file transfer. It does not count or display the number of times the system executed a run but failed to locate a list matching the rule criteria. |
| Actions | From the Actions menu, you can do any of the following:
|
View List Automation Job Activity
From the Lists -> List Automation page, you can click Activity (document icon) to open the Activity page for that job. The following information displays for each run.
- Start Time - The start time of the last run.
- End Time - The end time of the last run.
- Job Result - The result of the run.
- Message - Displays associated messages for that job result.