Create / Edit a Schedule
From Genesys Documentation
This topic is part of the manual Outbound (CX Contact) CX Contact Help for version Current of Outbound (CX Contact).
Contents
Learn how to create and edit schedules that automatically and periodically run Campaign Groups.
Related documentation:
Create or edit a Schedule
CX Contact Schedules allow you to create and run one or more Campaign Groups automatically and periodically using a predefined schedule. You can access and customize near-real time reporting data about Schedules from the Schedules Dashboard.
- Click the Schedules menu. The Schedules list appears. For details, see the Schedules List Properties table below.
- Select your preferred view.
- Table View - Lists all the existing schedules.
- Calendar View - Displays all of the existing schedules in the day on which they are scheduled to start.
- Select New to create a new schedule or click the name of the schedule you want to edit. Use the Global toggle to switch between global (UTC) and local time zones for the schedule.
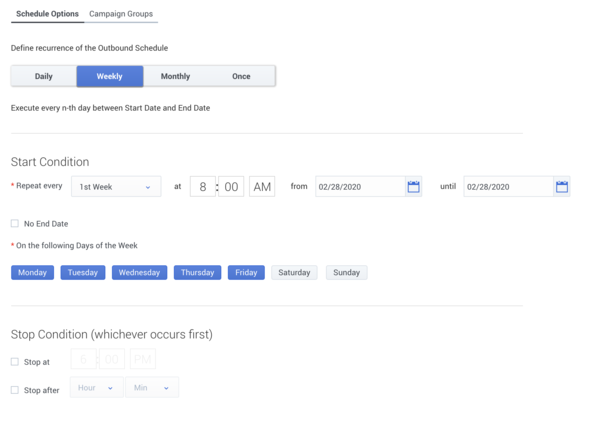
- Select the Schedule Options tab and set the available options. The options in the Schedule Options tab enable you to define when the Campaign Groups associated with the schedule is run. For details, see the Schedule Options Properties table below.
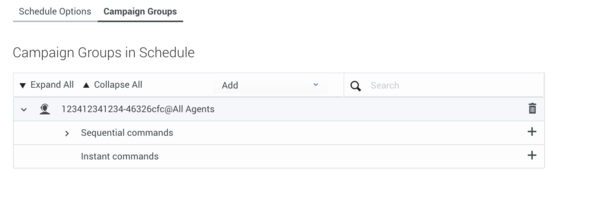
- Select the Campaign Groups tab and select the Campaign Groups to which this schedule is applied. When the schedule is run, the selected Campaign Groups are activated. For details, see the Campaign Groups Properties table below.
- Select the Campaign Group Dialing panel and configure the following options:
- Change Dialing parameters - Change the Campaign Group's pacing parameters.
- Force Stop - Force the Campaign Group to be unloaded.
- Start - Load the Campaign Group.
- Start Paused - Pause the Campaign Group.
- Stop - Unload the Campaign Group.
- Click Save Schedule.
Schedules List Properties
| Column | Description |
|---|---|
| Name | Schedule name. |
| Description | Provides information about the purpose of the schedule. |
| Last Run | The last time and date the schedule was activated. |
| Status |
|
| Schedule | A plain text description of the Schedule activation rules. |
| Last Modified Date | The last date and time the schedule was edited. |
| Created Date | The date and time the schedule was created. |
| Actions |
|
Schedule Options Properties
| Column | Description |
|---|---|
| Name | Schedule name. |
| Description | Provides information about the purpose of the schedule. |
| Daily / Weekly / Monthly / Once | Indicates the type of recurrence and defines the view of the Schedules Dashboard where you can view reports on Outbound Schedules. |
| Start Condition | Indicates the date and time interval at which you would like the schedule to be activated. |
| Stop Condition | Indicates the time the schedule ends. |
Campaign Groups Properties
| Column | Description |
|---|---|
| Name | Schedule name. |
| Description | Provides information about the purpose of the schedule. |
| Add | Enables you to add an existing Campaign Group.
When a new Campaign Group is added, it automatically contains an empty Instant command and two Sequential commands:
|
| Enables you to delete a command/Campaign Group from the schedule. | |
Enables you to add/edit a command to the Campaign Group. The add/edit Campaign Group command requires you to configure the following options:
| |
| Enables you to place the command up or down one step in the sequential execution line. | |
| Repeat | Enables you to define a repeat interval for the Instant command. |
Related Topics
Comments or questions about this documentation? Contact us for support!


