Create and Manage Caller ID Sets
Contents
Learn how to build and modify what appears on the called phones per-campaign or per-call.
To increase your market penetration rate and spread awareness of your brand or product, add a Caller ID Set to your Outbound Campaign. With a Caller ID Set you can control what appears on the called phones per-campaign or per-call.
When an Outbound Campaign Group includes a Caller ID Set, the Outbound Contact Server (OCS) selects (sequentially or randomly) a different Caller ID each time a specific outbound phone number is contacted. As a result, the same outbound phone number will see a different Caller ID every time he/she receives a call from the same Outbound Campaign.
Each Caller ID value represents a phone number (a string of digits with an optional + sign).
Caller ID Sets Table View
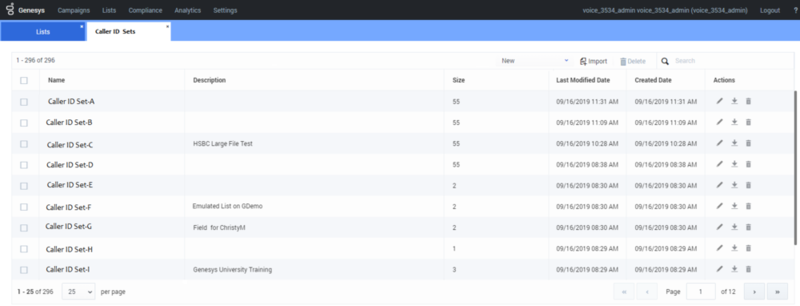
To view the Caller ID Sets table view click Campaigns > Caller ID Sets. The following image represents a typical Caller ID Sets view.
The following table describes the Caller ID Sets options.
| Type of Information | Description |
|---|---|
| New | Enables you to create a new Caller ID Set. |
| Import | Enables you to import a Caller ID Set. See Import Caller ID Set. |
| Delete | Enables you to delete the selected Caller ID Set(s). |
| Search | Enables you to search for a specific Caller ID Set. |
| Name | The Caller ID Set name. |
| Description | An arbitrary representation of the Caller ID Set. |
| Size | The number of Caller IDs in the specific Caller ID Set. |
| Actions |
|
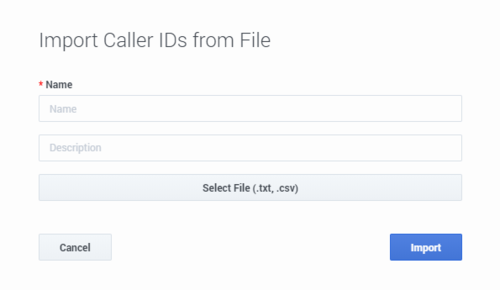
Import Caller IDs from a File
- Click Campaigns > Caller ID Sets and click Import.
- In the fields provided enter a Caller ID Set name and description.
- Click Select File (*.txt, .csv) and browse to the location of the file.
- After you select the *.txt or *CSV file click OK and then Import. The imported Caller ID(s) are now a part of a specific Caller ID set that will automatically appear in the Caller ID Sets view with the name given in the second step.
Create / Edit a Caller ID Set
- Click Campaigns > Caller ID Sets.
- From the list provided click the name of the Caller ID Set you want to edit or click +New to create a new Caller ID Set.
- In the fields provided enter a Caller ID Set name and description.
- From the list provided select one or more Caller IDs.
- Click Update. The new / edited Caller ID Set automatically appears in the Caller ID Sets view.
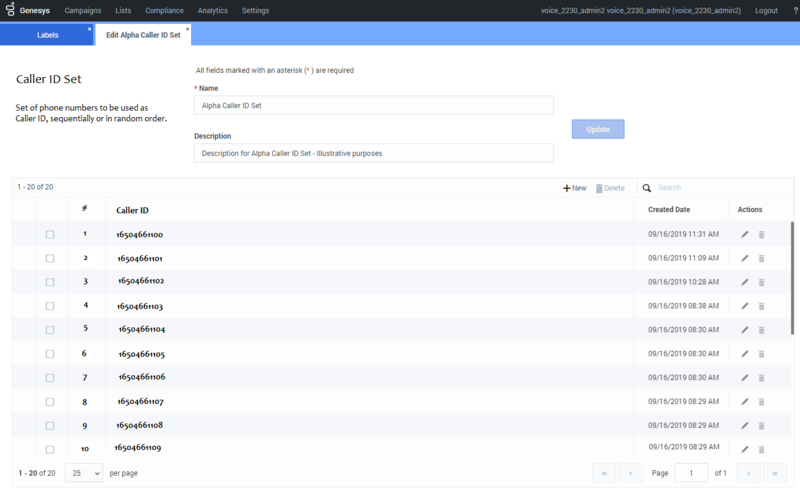
The following table describes the options available when creating/editing a Caller ID Set.
| Type of Information | Description |
|---|---|
| New | Enables you to create a new Caller ID. When you click +New enter a Caller ID in the field provided and click Save. The new Caller ID is added to the Caller ID Set you are creating / editing.
Note: A Caller ID can only include numbers and an optional plus character + at the beginning of the number. |
| # | A sequential order value based on the Caller ID creation date/time. |
| Caller ID | Indicates the Caller ID value. This column is sorted by the Created Date column. |
| Created Date | Indicates the date and time at which the Caller ID was added to the Caller ID Set. |
Assign a Caller ID Set
To assign a Caller ID Set to a Create a Dialing Profile, Create a Campaign Template and/or Create a Campaign Group:
- Create / Edit a Dialing Profile, Campaign Template and/or Campaign Group.
- In the General tab turn on the Caller ID Set switch option.
- Click Change and in the dialog window that appears select the Caller ID Set order.
- Select one of the Caller ID Sets from the list provided.
- Click Save. The selected Caller ID Set(s) appear next to the Change button.


