Difference between revisions of "PEC-OU/Current/CXContact/SMSCampaign"
(Published) |
(Published) |
||
| Line 9: | Line 9: | ||
|Application=CX Contact | |Application=CX Contact | ||
|Section={{Section | |Section={{Section | ||
| + | |sectionHeading=Create SMS Content | ||
| + | |anchor=SMSContent | ||
|alignment=Vertical | |alignment=Vertical | ||
| − | |structuredtext= | + | |structuredtext=To get started, you need to {{Link-SomewhereInThisManual|topic=DialingProfile|anchor=CreateProfile|display text=create an SMS dialing profile}} |
| − | |||
| − | |||
| − | + | When you set up your SMS profile, you'll see a tab named '''Content'''. This is where you'll create a template for an SMS message and one for responses to Help and Opt-out requests from customers. | |
| − | |||
| − | |||
| − | |||
| − | |||
|Status=No | |Status=No | ||
}}{{Section | }}{{Section | ||
| − | | | + | |alignment=Horizontal |
| − | | | + | |Media=Image |
| − | | | + | |image=Variable-alert SMS-alert-type.png |
| − | |structuredtext= | + | |structuredtext=<br /> |
| + | {{AnchorDiv|Labels}} | ||
| + | To begin, specify the following: | ||
| − | + | *Type - Select '''Alert''' or '''Variable Alert'''. When you select '''Variable Alert''', you can create additional SMS templates by clicking the plus button. The templates can have different Sender IDs and messages. | |
| − | + | *Labels - If you plan to personalize messages using fields you defined in a labeling schema, select the labeling schema here. Otherwise, the Personalization menu will populate the default CX Contact list fields. See the {{Link-SomewhereInThisManual|topic=SMSCampaign|anchor=Personalization|display text=Personalized Content}} section below for more information. | |
| − | + | *Use Smart Filter - When enabled (default), CX Contact removes unnecessary symbols, spaces, and line breaks before sending the text message. | |
| + | |structuredtextwide={{NoteFormat|The alert type cannot be changed after a dialing profile is created.|Important}} | ||
| − | |||
| − | |||
| − | + | For variable alerts, the first template you create is the default template. For subsequent templates you can add a custom JavaScript expression in the '''Selection Expression''' field, which evaluates the conditions for a True or False outcome. True allows for that template to be used. If the conditions specified in all such expression fields fail, the default template is used. | |
| − | |||
| − | |||
Now, insert the text into the message body for each type of alert message: | Now, insert the text into the message body for each type of alert message: | ||
| Line 61: | Line 56: | ||
*Unsub | *Unsub | ||
*Unstop | *Unstop | ||
| − | *Start | + | *Start |
*Subscribe | *Subscribe | ||
*Resume | *Resume | ||
Revision as of 13:52, November 23, 2021
Contents
Learn how to build and modify SMS templates if you plan to run a campaign using the SMS channel.
Create SMS Content
To get started, you need to create an SMS dialing profile
When you set up your SMS profile, you'll see a tab named Content. This is where you'll create a template for an SMS message and one for responses to Help and Opt-out requests from customers.
To begin, specify the following:
- Type - Select Alert or Variable Alert. When you select Variable Alert, you can create additional SMS templates by clicking the plus button. The templates can have different Sender IDs and messages.
- Labels - If you plan to personalize messages using fields you defined in a labeling schema, select the labeling schema here. Otherwise, the Personalization menu will populate the default CX Contact list fields. See the Personalized Content section below for more information.
- Use Smart Filter - When enabled (default), CX Contact removes unnecessary symbols, spaces, and line breaks before sending the text message.
For variable alerts, the first template you create is the default template. For subsequent templates you can add a custom JavaScript expression in the Selection Expression field, which evaluates the conditions for a True or False outcome. True allows for that template to be used. If the conditions specified in all such expression fields fail, the default template is used.
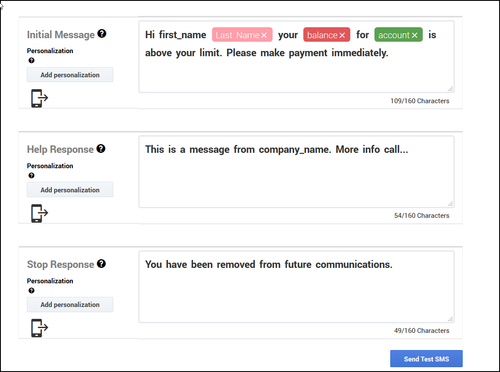
Now, insert the text into the message body for each type of alert message:
- Initial Message - The initial outbound message, also known as the Message Termination (MT).
- Help Response - The response used when a customer texts the Help or Info keyword. See the Supported Keywords section for a list of supported keywords.
- Opt-out/Stop Response - The response used when a customer texts the STOP keyword. Those customers are automatically added to the suppression list. Additional Supported Keywords such as, Unsubscribe, Cancel, Quit, and END will also automatically add the customers device/mobile number to the suppression list.
Supported Keywords
The following is a list of supported keywords. These are not case sensitive.
- Help
- Info
- Stop
- Unsubscribe
- Cancel
- Quit
- Aide
- Arret
- Unsub
- Unstop
- Start
- Subscribe
- Resume
Character Length in Message Bodies
There is no limit to the amount of characters in the message body text, but sending an SMS with more than 160 characters is enabled with SMS Concatenation. Also, when using Personalized content, those field values count toward the maximum field length. Every tag counts as 10 characters.
Personalized Content
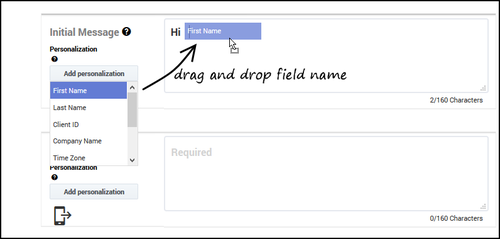
To personalize a message (for example, greet the customer by name):
- Select the labeling schema from the Labels menu
- Fom the personalization menu, drag the contact list field name to the body of the message.


