Difference between revisions of "PEC-AD/Current/Agent/ADOutbound"
m (Text replacement - "\|Platform=([^\|]*)GenesysEngage-onpremises([\|]*)" to "|Platform=$1GenesysEngage-cloud$2") |
(Published) |
||
| Line 43: | Line 43: | ||
This tab lists all the campaigns that are active or running to which you belong. | This tab lists all the campaigns that are active or running to which you belong. | ||
| − | The table contains information about each campaign, including '''Status''' (Active or Running) | + | The table contains information about each campaign, including: |
| + | |||
| + | *'''Status''' (Active or Running) | ||
| + | *'''Name''' | ||
| + | *'''Delivery Mode''' (Manual or Automatic) | ||
| + | *'''Description''' of the campaign provided by your company. | ||
|structuredtextwide=When you want to get a new calling record, select the campaign you want to work on and click '''Get Record''' ([[File:GAPI_900_Outbound_Get_Record_Button.png|link=]]). | |structuredtextwide=When you want to get a new calling record, select the campaign you want to work on and click '''Get Record''' ([[File:GAPI_900_Outbound_Get_Record_Button.png|link=]]). | ||
| − | In some campaigns, records are delivered to you automatically whenever your status is '''Ready'''. If you have selected '''Done and Stop''' in a campaign and you are ready to resume | + | In some campaigns, records are delivered to you automatically whenever your status is '''Ready'''. If you have selected '''Done and Stop''' in a campaign and you are ready to resume receiving records, select the campaign you want to work on and click '''Get Record'''. |
| + | |Status=No | ||
| + | }}{{Section | ||
| + | |sectionHeading=How do I work with Record Information? | ||
| + | |anchor=RecordInformation | ||
| + | |alignment=Horizontal | ||
| + | |Media=Image | ||
| + | |image=GAPI_900_Outbound_Record_Information.png | ||
| + | |structuredtext=Some Outbound records include the '''Record Information''' view. It appears below the call status area (below the '''Case Information''' block). | ||
| + | |||
| + | The '''Record Information''' area might contain both editable and non-editable fields set up by your organization to enable you to add information to the call record. A pencil icon next to a field indicates that you can edit it. Editable fields include the following: | ||
| + | |||
| + | *Check boxes | ||
| + | *Text fields that you fill in | ||
| + | *Calendar pickers that let you set dates and times | ||
| + | *Drop-down lists from which you can make selections. | ||
|Status=No | |Status=No | ||
}}{{Section | }}{{Section | ||
| Line 56: | Line 76: | ||
|structuredtext=In campaigns using Progressive and Predictive dialing modes, outbound calls are directed to your workstation and dialed automatically. | |structuredtext=In campaigns using Progressive and Predictive dialing modes, outbound calls are directed to your workstation and dialed automatically. | ||
| − | You | + | You receive a pop-up notification each time an administrator loads or starts a new campaign that you are part of. When you get the '''Campaign Started''' pop-up, click '''OK''' to close the notification. |
| − | |structuredtextwide=If your {{Link-SomewhereInThisManual|topic=ADQuickStart|anchor=status|display text=status}} is Ready, a new interaction preview appears. You can then '''Accept''' to connect the call, or '''Reject''' to return the record to the top of the calling list. If you do nothing, the interaction goes back to the top of the calling list. In some environments, if you do not accept or reject the record notification before a time interval | + | |structuredtextwide=If your {{Link-SomewhereInThisManual|topic=ADQuickStart|anchor=status|display text=status}} is Ready, a new interaction preview appears. You can then '''Accept''' to connect the call, or '''Reject''' to return the record to the top of the calling list. If you do nothing, the interaction goes back to the top of the calling list. In some environments, if you do not accept or reject the record notification before a certain time interval, the record is automatically rejected and your status is set to '''Not Ready'''. |
| − | When you accept the record you are | + | When you accept the record, you are connected to the outbound call ''after'' the contact answers the phone. The '''Origin''' of the call is the name and or number of the contact. |
When you're connected to the contact, you can view the campaign call information, the Call Status, and the available Call Actions. Use the standard {{Link-SomewhereInThisManual|topic=ADVoice|anchor=top|display text=call}} controls to manage the call. | When you're connected to the contact, you can view the campaign call information, the Call Status, and the available Call Actions. Use the standard {{Link-SomewhereInThisManual|topic=ADVoice|anchor=top|display text=call}} controls to manage the call. | ||
| Line 77: | Line 97: | ||
|structuredtext=In campaigns using Preview dialing mode, you request a record from the system and then dial the contact. You can preview the case information and other details ''before'' you start the call. | |structuredtext=In campaigns using Preview dialing mode, you request a record from the system and then dial the contact. You can preview the case information and other details ''before'' you start the call. | ||
| − | You | + | You receive a pop-up notification each time an administrator loads or starts a new campaign that you are a part of. When you get the '''Campaign Started''' pop-up, you can choose: |
*'''Get Record''' to retrieve a contact record from the campaign list. | *'''Get Record''' to retrieve a contact record from the campaign list. | ||
| − | *'''OK''' to close the notification. (With this option you | + | *'''OK''' to close the notification. (With this option you must retrieve a record manually. Go to '''My Campaigns''', select the campaign you want to use, and select '''Get Record'''.) |
|structuredtextwide=When you have previewed the record, use: | |structuredtextwide=When you have previewed the record, use: | ||
| Line 91: | Line 111: | ||
If asked, select the {{Link-SomewhereInThisManual|topic=ADVoice|anchor=callid|display text=caller ID details}} you want to use. | If asked, select the {{Link-SomewhereInThisManual|topic=ADVoice|anchor=callid|display text=caller ID details}} you want to use. | ||
| − | + | In some environments, the Preview campaign has a time limit during which you can preview the interaction before it is dialed automatically. In this case, a timer next to the '''Party Action''' menu that counts down the time until the call is automatically connected if you do not click '''Call''' ([[File:GAPI_900_Outbound_Preview_Call_Button.png|link=]]). Some Preview campaigns connect the call automatically. | |
[[File:GAPI_900_Outbound_Preview_Call_Timer.png]] | [[File:GAPI_900_Outbound_Preview_Call_Timer.png]] | ||
| − | You might be required to manually dial a call due to local regulations. | + | You might be required to manually dial a call due to local regulations. In this case, click the contact's phone number at the top of the interaction and either select the phone number, or, if you are required to do so, select '''Dial New Phone Number'''. When the '''Dial New Phone Number''' window is displayed, type the phone number into the '''Enter Phone Number''' field, select the phone number type from the drop-down menu, then click '''Dial'''. |
[[File:GAPI_900_Dial_New_Phone_Number_Dialog.png|300px|Dial New Phone Number dialog]] | [[File:GAPI_900_Dial_New_Phone_Number_Dialog.png|300px|Dial New Phone Number dialog]] | ||
| Line 110: | Line 130: | ||
|structuredtext=In campaigns using Push-Preview dialing mode, a record is delivered to your desktop automatically from the system and then you dial the contact. You can preview the case information and other details ''before'' you start the call. You must be in a '''Ready''' status to receive records. | |structuredtext=In campaigns using Push-Preview dialing mode, a record is delivered to your desktop automatically from the system and then you dial the contact. You can preview the case information and other details ''before'' you start the call. You must be in a '''Ready''' status to receive records. | ||
| − | {{NoteFormat|In the '''My Channels''' tab, Push Preview is a separate channel from Voice. | + | {{NoteFormat|In the '''My Channels''' tab, Push Preview is a separate channel from Voice. Set the '''outbound preview''' channel to '''Ready''' to receive records.|1}} |
<br /> | <br /> | ||
| − | |structuredtextwide=You | + | |structuredtextwide=You receive a pop-up notification each time an administrator loads or starts a new campaign. When you get the '''Campaign Started''' pop-up, click '''OK''' to join the campaign. |
| − | If your {{Link-SomewhereInThisManual|topic=ADQuickStart|anchor=status|display text=status}} is Ready, a new interaction preview appears. You can then '''Accept''' to connect the call, or '''Reject''' to return the record to the top of the calling list. If you do nothing, the interaction goes back to the top of the calling list. In some environments, if you do not accept or reject the record notification before a time interval | + | If your {{Link-SomewhereInThisManual|topic=ADQuickStart|anchor=status|display text=status}} is Ready, a new interaction preview appears. You can then '''Accept''' to connect the call, or '''Reject''' to return the record to the top of the calling list. If you do nothing, the interaction goes back to the top of the calling list. In some environments, if you do not accept or reject the record notification before a certain time interval, the record is automatically rejected and your status is set to '''Not Ready'''. |
When you have previewed the record, use: | When you have previewed the record, use: | ||
| Line 127: | Line 147: | ||
If asked, select the {{Link-SomewhereInThisManual|topic=ADVoice|anchor=callid|display text=caller ID details}} you want to use. | If asked, select the {{Link-SomewhereInThisManual|topic=ADVoice|anchor=callid|display text=caller ID details}} you want to use. | ||
| − | + | In some environments, the Push-Preview campaign has a time limit during which you can preview the interaction before it is dialed automatically. In this case, you'll see a timer next to the '''Party Action''' menu that counts down the time until the call is automatically connected if you do not click '''Call''' ([[File:GAPI_900_Outbound_Preview_Call_Button.png|link=]]). Some Push-Preview campaigns connect the call automatically. | |
[[File:GAPI_900_Outbound_Preview_Call_Timer.png]] | [[File:GAPI_900_Outbound_Preview_Call_Timer.png]] | ||
| − | You might be required to manually dial a call due to local regulations. | + | You might be required to manually dial a call due to local regulations. In this case, click the contact's phone number at the top of the interaction and either select the phone number, or, if you are required to do so, select '''Dial New Phone Number'''. When the '''Dial New Phone Number''' window is displayed, type the phone number into the '''Enter Phone Number''' field, select the phone number type from the drop-down menu, then click '''Dial'''. |
[[File:GAPI_900_Dial_New_Phone_Number_Dialog.png|300px|Dial New Phone Number dialog]] | [[File:GAPI_900_Dial_New_Phone_Number_Dialog.png|300px|Dial New Phone Number dialog]] | ||
| Line 143: | Line 163: | ||
|structuredtext=In campaigns using Direct Push-Preview dialing mode, a record is delivered to your desktop automatically from the system. You can preview the case information and other details in the pop-up call record notification ''before'' you start the call. After previewing it, you click '''Accept''' to dial the contact. | |structuredtext=In campaigns using Direct Push-Preview dialing mode, a record is delivered to your desktop automatically from the system. You can preview the case information and other details in the pop-up call record notification ''before'' you start the call. After previewing it, you click '''Accept''' to dial the contact. | ||
| − | As with other Outbound campaign types, pop | + | As with other Outbound campaign types, pop up notifications inform you when a campaign assigned to you is loaded into the system and when it starts and stops. |
|structuredtextwide={{#widget:Vimeo|id=400728626|width=572|height=392}} | |structuredtextwide={{#widget:Vimeo|id=400728626|width=572|height=392}} | ||
| − | + | To see which campaigns are assigned to you, check the '''My Campaigns''' tab. Because Direct Push Preview campaigns ignore your Ready/Not Ready status, to tell the system when you are ready to receive records and when you want to stop receiving records, you must use the '''Get Record''' ([[File:GAPI_900_Direct_Push_Preview_Get_Record_Toggle.png|link=]])/'''Stop''' ([[File:GAPI_900_Direct_Push_Preview_Stop_Toggle.png|link=]]) toggle in the '''My Campaigns''' tab in the '''Action''' column in the Direct Preview Campaign row. | |
| + | |||
| + | After handling an Outbound campaign call, click '''End''' to end the call and '''Done''' to mark it Done. You automatically receive new calls until you do one of the following actions: | ||
| − | + | *Select '''Stop''' in the '''My Campaigns''' tab | |
| + | *Select '''Done and Stop''' [[File:GAPI_900_Done_And_Stop_Button.png|link=]] when you mark the interaction '''Done''' | ||
To start receiving previews again, go to the '''My Campaigns''' tab, select the campaign you want to use, and select '''Get Record'''. | To start receiving previews again, go to the '''My Campaigns''' tab, select the campaign you want to use, and select '''Get Record'''. | ||
| Line 165: | Line 188: | ||
'''Tip:''' During Preview campaigns, you might be able to use this feature to postpone a preview call before the call is dialed. | '''Tip:''' During Preview campaigns, you might be able to use this feature to postpone a preview call before the call is dialed. | ||
| − | |structuredtextwide=When you've set the | + | |structuredtextwide=When you've set the values for the callback, the Schedule Callback button changes to [[File:GAPI_900_Schedule_Callback_ON_button.png|Link=]] to indicate that a callback is scheduled. You can then end the call. |
| − | If you | + | If you must change a scheduled callback, you can open the Schedule Callback window and change the settings. |
| − | To cancel a scheduled callback, | + | To cancel a scheduled callback, clear the '''Schedule Callback''' box. You must do this ''before'' closing the Outbound Record or the Interaction Preview. |
| − | When a rescheduled callback is directed to your workstation, an interaction preview is displayed as usual | + | When a rescheduled callback is directed to your workstation, an interaction preview is displayed as usual, but the Case Information includes an indication in the '''Origin''' field that the call is a '''Callback''' or a '''Personal Callback'''. |
| − | '''Note:''' You might see | + | '''Note:''' You might see a message in the Agent Desktop interface when you try to mark Done a rescheduled Outbound interaction. This can happen if the specified rescheduled date and time are invalid (for example, you might have set the rescheduled date and time in the past). You must fix any errors or cancel the rescheduled call first before you can mark the interaction as Done. |
|Status=No | |Status=No | ||
}}{{Section | }}{{Section | ||
Revision as of 20:44, December 22, 2020
Contents
- 1 What types of campaigns are available?
- 2 Video Tutorial: Outbound Campaigns
- 3 How do I use the My Campaigns tab?
- 4 How do I work with Record Information?
- 5 How do I work with Progressive and Predictive campaigns?
- 6 How do I work with Preview campaigns?
- 7 How do I work with Push-Preview campaigns?
- 8 How do I work with Direct Push-Preview campaigns?
- 9 How do I schedule callbacks for a campaign?
- 10 What happens if the contact is on a Do-Not-Call list?
- 11 What next?
- 12 Top 5 topics
As an agent, you might work on campaigns (for example, collections, telemarketing, or fundraising) where you make outbound calls to contacts. You can view and manage your campaigns from the My Campaigns tab.
What types of campaigns are available?
You might be working with one of the following campaign types:
- Progressive or Predictive campaigns, in which the system automatically sends you a number to dial.
- Preview campaigns, in which you manually request (or pull) a number to dial from the system.
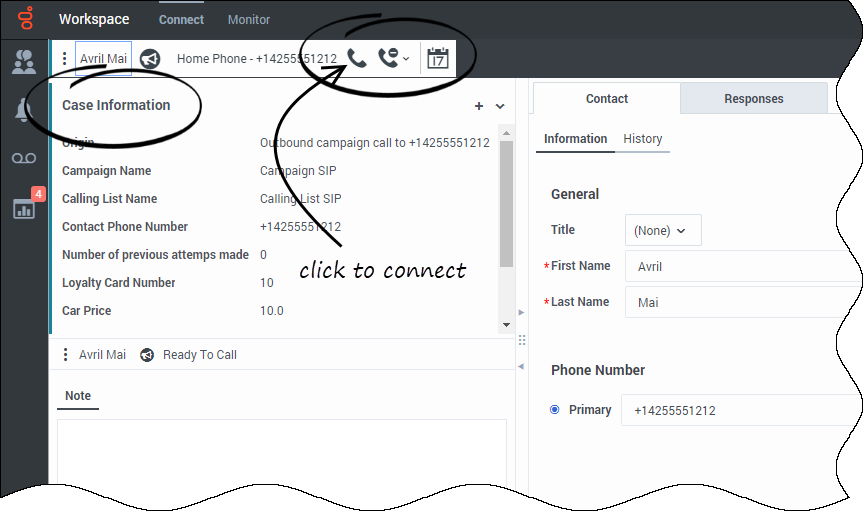
- Push-Preview campaigns, in which the system automatically sends you a record to preview, then you click to connect the call.
- Direct Push-Preview campaigns, in which Outbound Contact Server automatically sends you a record to preview, then you click to connect the call.
Video Tutorial: Outbound Campaigns
Here are four tutorial videos that give you a quick overview of being an agent in an Outbound Campaign. The first video introduces Outbound Campaigns, the second demonstrates Predictive and Progressive (automatic) campaigns, the third demonstrates Preview (manual) campaigns, and the fourth demonstrates Push-Preview (semi-automatic) campaigns.
Outbound Campaign Overview
Automatic record retrieval (Predictive and Progressive)
Manual record retrieval (Preview)
Semi-automatic record retrieval (Push-Preview)
Semi-automatic record retrieval (Direct Push-Preview)
How do I use the My Campaigns tab?
You can find the My Campaigns tab in the Connect view of the Main Window.
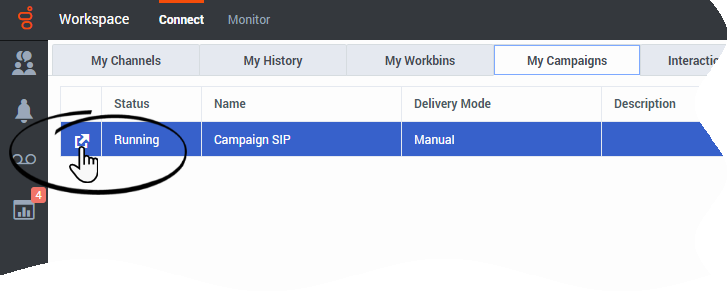
This tab lists all the campaigns that are active or running to which you belong.
The table contains information about each campaign, including:
- Status (Active or Running)
- Name
- Delivery Mode (Manual or Automatic)
- Description of the campaign provided by your company.
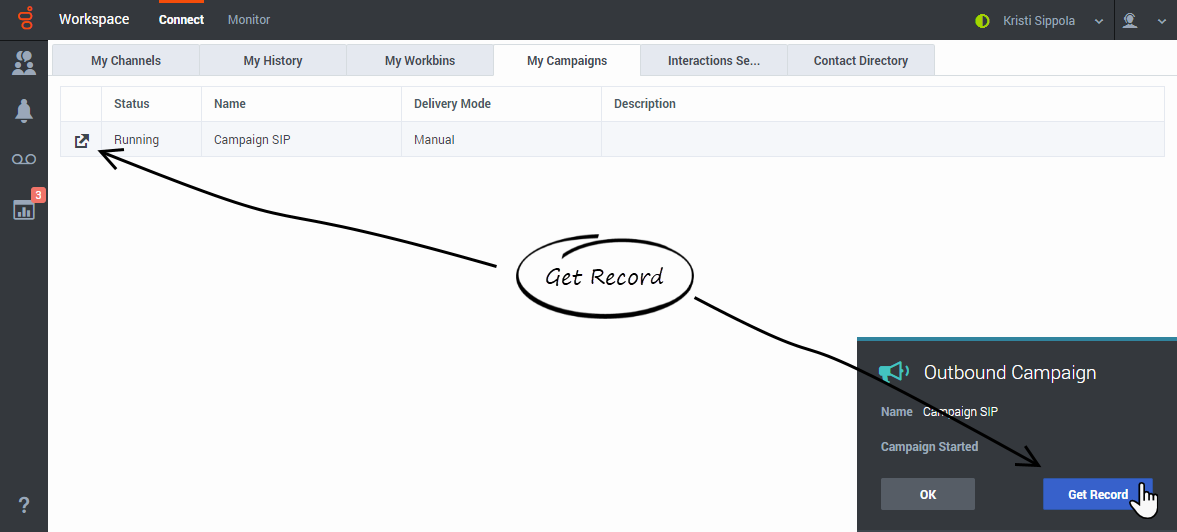
When you want to get a new calling record, select the campaign you want to work on and click Get Record (![]() ).
).
In some campaigns, records are delivered to you automatically whenever your status is Ready. If you have selected Done and Stop in a campaign and you are ready to resume receiving records, select the campaign you want to work on and click Get Record.
How do I work with Record Information?
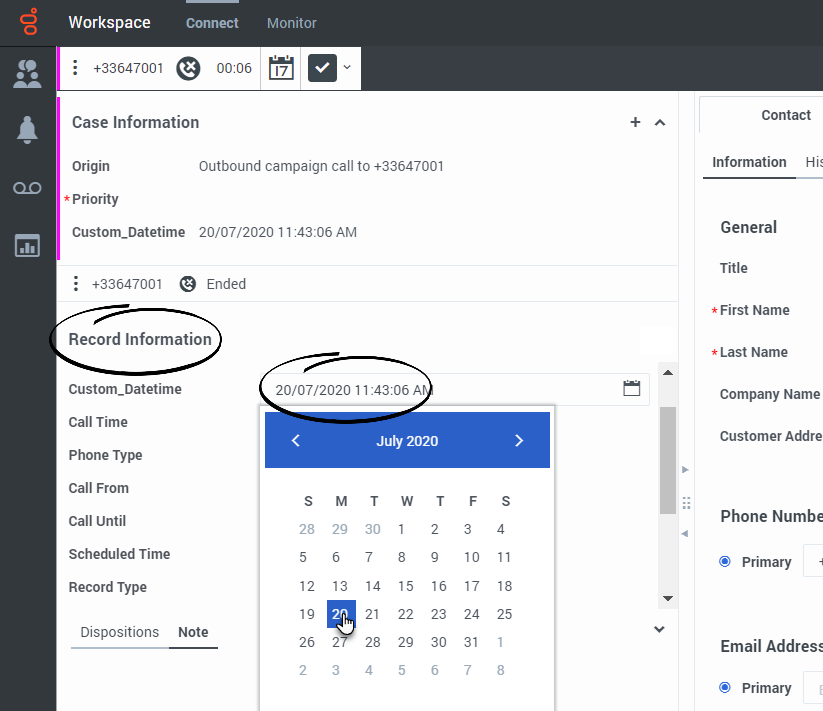
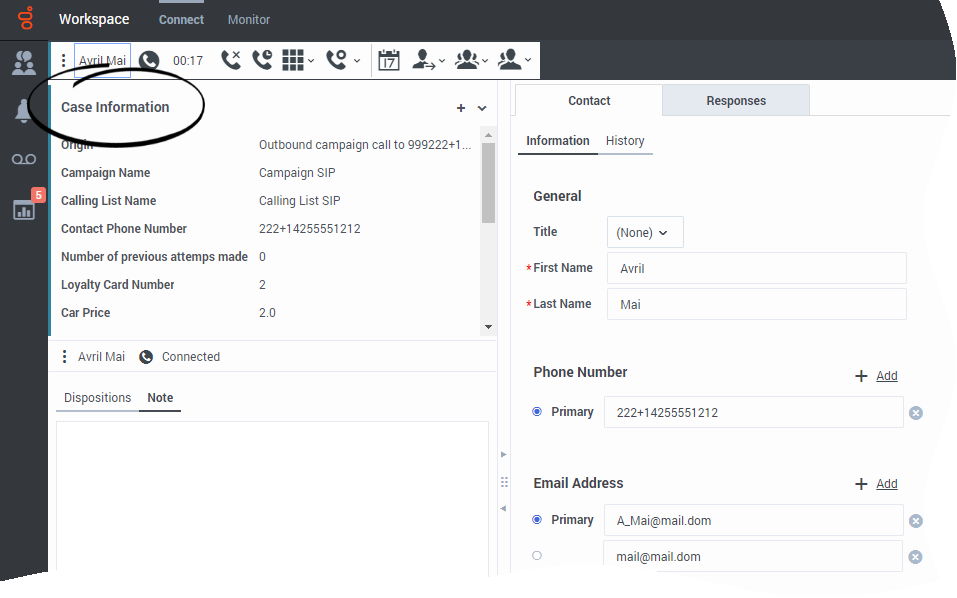
Some Outbound records include the Record Information view. It appears below the call status area (below the Case Information block).
The Record Information area might contain both editable and non-editable fields set up by your organization to enable you to add information to the call record. A pencil icon next to a field indicates that you can edit it. Editable fields include the following:
- Check boxes
- Text fields that you fill in
- Calendar pickers that let you set dates and times
- Drop-down lists from which you can make selections.
How do I work with Progressive and Predictive campaigns?
In campaigns using Progressive and Predictive dialing modes, outbound calls are directed to your workstation and dialed automatically.
You receive a pop-up notification each time an administrator loads or starts a new campaign that you are part of. When you get the Campaign Started pop-up, click OK to close the notification.If your status is Ready, a new interaction preview appears. You can then Accept to connect the call, or Reject to return the record to the top of the calling list. If you do nothing, the interaction goes back to the top of the calling list. In some environments, if you do not accept or reject the record notification before a certain time interval, the record is automatically rejected and your status is set to Not Ready.
When you accept the record, you are connected to the outbound call after the contact answers the phone. The Origin of the call is the name and or number of the contact.
When you're connected to the contact, you can view the campaign call information, the Call Status, and the available Call Actions. Use the standard call controls to manage the call.
How do I work with Preview campaigns?
In campaigns using Preview dialing mode, you request a record from the system and then dial the contact. You can preview the case information and other details before you start the call.
You receive a pop-up notification each time an administrator loads or starts a new campaign that you are a part of. When you get the Campaign Started pop-up, you can choose:
- Get Record to retrieve a contact record from the campaign list.
- OK to close the notification. (With this option you must retrieve a record manually. Go to My Campaigns, select the campaign you want to use, and select Get Record.)
When you have previewed the record, use:
![]() to call the contact. When the call is connected, you can monitor the call status and use the standard voice call controls to manage the call.
to call the contact. When the call is connected, you can monitor the call status and use the standard voice call controls to manage the call.
![]() to decline the record. You can then choose Call this contact later to return the record to the campaign list or Do not call this contact to remove the contact from the campaign list.
to decline the record. You can then choose Call this contact later to return the record to the campaign list or Do not call this contact to remove the contact from the campaign list.
![]() to stop receiving previews (Done and Stop). To start receiving previews again, go to My Campaigns, select the campaign you want to use, and select Get Record.
to stop receiving previews (Done and Stop). To start receiving previews again, go to My Campaigns, select the campaign you want to use, and select Get Record.
If asked, select the caller ID details you want to use.
In some environments, the Preview campaign has a time limit during which you can preview the interaction before it is dialed automatically. In this case, a timer next to the Party Action menu that counts down the time until the call is automatically connected if you do not click Call (![]() ). Some Preview campaigns connect the call automatically.
). Some Preview campaigns connect the call automatically.
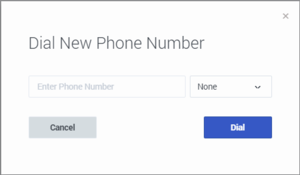
You might be required to manually dial a call due to local regulations. In this case, click the contact's phone number at the top of the interaction and either select the phone number, or, if you are required to do so, select Dial New Phone Number. When the Dial New Phone Number window is displayed, type the phone number into the Enter Phone Number field, select the phone number type from the drop-down menu, then click Dial.
How do I work with Push-Preview campaigns?
In campaigns using Push-Preview dialing mode, a record is delivered to your desktop automatically from the system and then you dial the contact. You can preview the case information and other details before you start the call. You must be in a Ready status to receive records.
You receive a pop-up notification each time an administrator loads or starts a new campaign. When you get the Campaign Started pop-up, click OK to join the campaign.
If your status is Ready, a new interaction preview appears. You can then Accept to connect the call, or Reject to return the record to the top of the calling list. If you do nothing, the interaction goes back to the top of the calling list. In some environments, if you do not accept or reject the record notification before a certain time interval, the record is automatically rejected and your status is set to Not Ready.
When you have previewed the record, use:
![]() to call the contact. When the call is connected, you can monitor the call status and use the standard voice call controls to manage the call.
to call the contact. When the call is connected, you can monitor the call status and use the standard voice call controls to manage the call.
![]() to decline the record. You can then choose Call this contact later to return the record to the campaign list or Do not call this contact to remove the contact from the campaign list.
to decline the record. You can then choose Call this contact later to return the record to the campaign list or Do not call this contact to remove the contact from the campaign list.
![]() to close a record.
to close a record.
If asked, select the caller ID details you want to use.
In some environments, the Push-Preview campaign has a time limit during which you can preview the interaction before it is dialed automatically. In this case, you'll see a timer next to the Party Action menu that counts down the time until the call is automatically connected if you do not click Call (![]() ). Some Push-Preview campaigns connect the call automatically.
). Some Push-Preview campaigns connect the call automatically.
You might be required to manually dial a call due to local regulations. In this case, click the contact's phone number at the top of the interaction and either select the phone number, or, if you are required to do so, select Dial New Phone Number. When the Dial New Phone Number window is displayed, type the phone number into the Enter Phone Number field, select the phone number type from the drop-down menu, then click Dial.
How do I work with Direct Push-Preview campaigns?
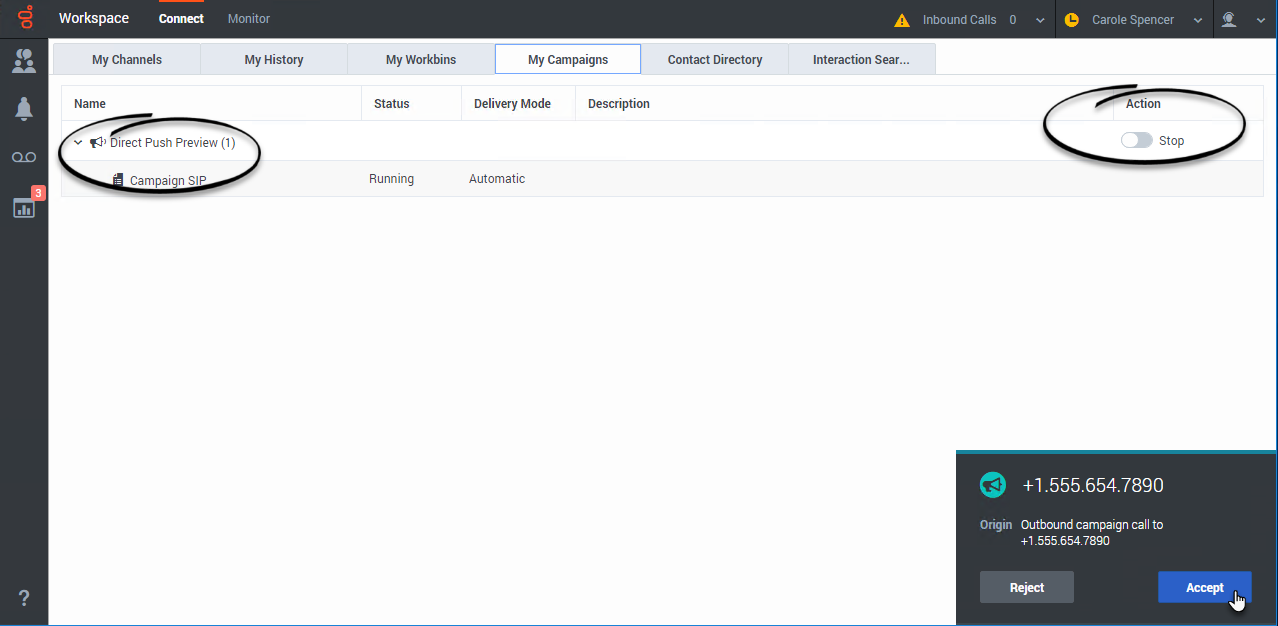
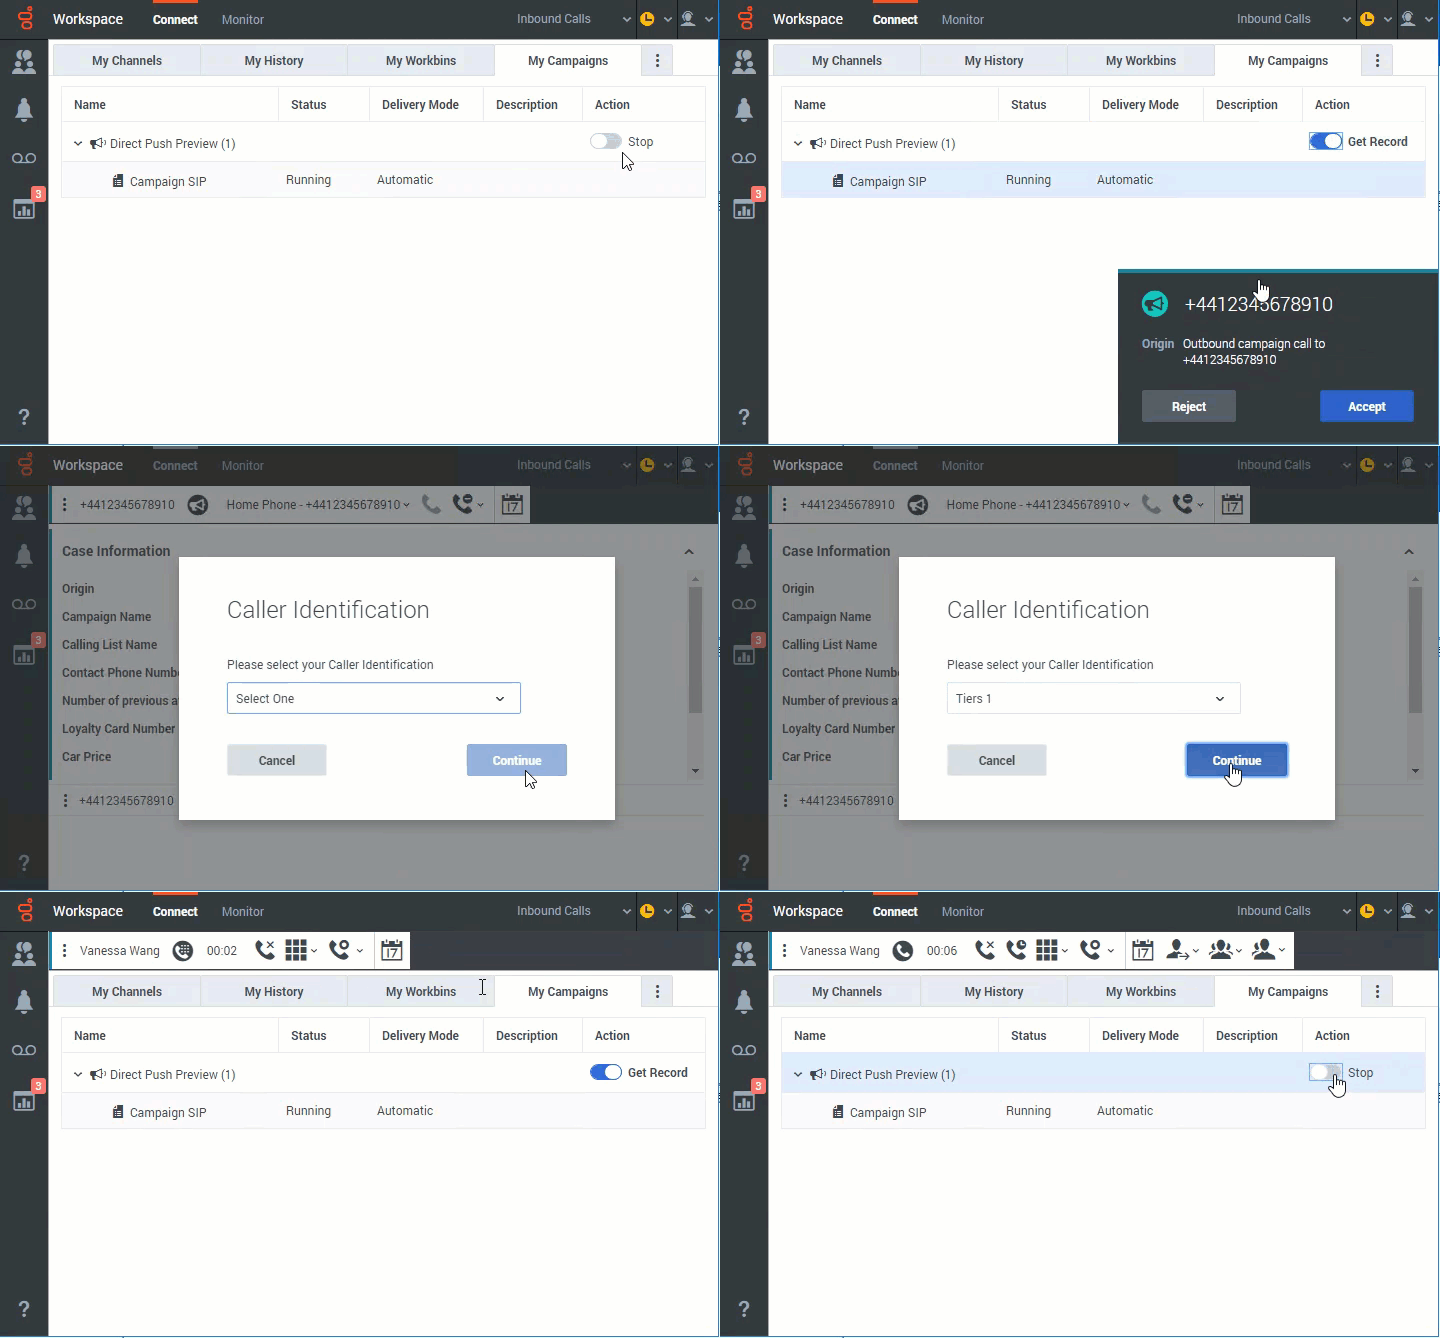
In campaigns using Direct Push-Preview dialing mode, a record is delivered to your desktop automatically from the system. You can preview the case information and other details in the pop-up call record notification before you start the call. After previewing it, you click Accept to dial the contact.
As with other Outbound campaign types, pop up notifications inform you when a campaign assigned to you is loaded into the system and when it starts and stops.
To see which campaigns are assigned to you, check the My Campaigns tab. Because Direct Push Preview campaigns ignore your Ready/Not Ready status, to tell the system when you are ready to receive records and when you want to stop receiving records, you must use the Get Record (![]() )/Stop (
)/Stop (![]() ) toggle in the My Campaigns tab in the Action column in the Direct Preview Campaign row.
) toggle in the My Campaigns tab in the Action column in the Direct Preview Campaign row.
After handling an Outbound campaign call, click End to end the call and Done to mark it Done. You automatically receive new calls until you do one of the following actions:
- Select Stop in the My Campaigns tab
- Select Done and Stop
 when you mark the interaction Done
To start receiving previews again, go to the My Campaigns tab, select the campaign you want to use, and select Get Record.
How do I schedule callbacks for a campaign?
During a campaign, you might not be able to reach the contact or they might request to be called back at another specific date and time. You can schedule a callback at any time while you are handling an Outbound campaign call, even after the call has ended.
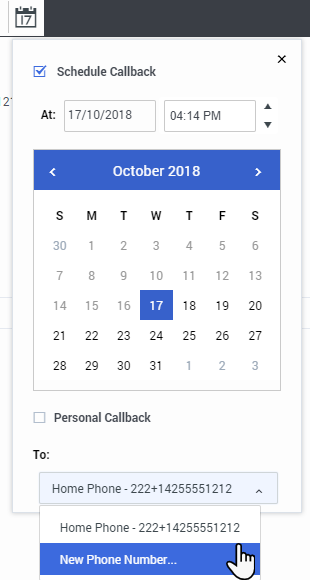
The Schedule Callback button (![]() ) opens the Schedule Callback window, where you can set a date, time, and even a different phone number for the callback. You can also specify whether the callback is personal (you will handle the callback) or whether any available agent will handle the callback.
) opens the Schedule Callback window, where you can set a date, time, and even a different phone number for the callback. You can also specify whether the callback is personal (you will handle the callback) or whether any available agent will handle the callback.
When you've set the values for the callback, the Schedule Callback button changes to ![]() to indicate that a callback is scheduled. You can then end the call.
to indicate that a callback is scheduled. You can then end the call.
If you must change a scheduled callback, you can open the Schedule Callback window and change the settings.
To cancel a scheduled callback, clear the Schedule Callback box. You must do this before closing the Outbound Record or the Interaction Preview.
When a rescheduled callback is directed to your workstation, an interaction preview is displayed as usual, but the Case Information includes an indication in the Origin field that the call is a Callback or a Personal Callback.
Note: You might see a message in the Agent Desktop interface when you try to mark Done a rescheduled Outbound interaction. This can happen if the specified rescheduled date and time are invalid (for example, you might have set the rescheduled date and time in the past). You must fix any errors or cancel the rescheduled call first before you can mark the interaction as Done.
What happens if the contact is on a Do-Not-Call list?
Some records in your campaign might have phone numbers that are listed in the Do-Not-Call registry. If you call one of these numbers, it could mean penalties for your business. Your administrator might have set up a pre-dial validation service to check the numbers before you make a call.
If so, Agent Desktop displays messages to alert you when a number is on the Do-Not-Call list or the number can't be validated:
- The phone number <number> is on the Do-Not-Call list
The pre-dial validation service has determined that the number is on the Do-Not-Call registry and there is no other number available for the contact. Mark the record Done to get the next record.
- The phone number <number> is on the Do-Not-Call list. The next available phone number will be selected.
The pre-dial validation service has determined that the number is on the Do-Not-Call registry and there is another number available for the contact. The next number is used.
- The phone number <number> cannot be validated (Do-Not-Call list service is unavailable).
The pre-dial validation service is unavailable. Mark the record as Done to get the next record.
- The phone number <number> cannot be validated (Do-Not-Call list service is unavailable). The next available phone number will be selected.
The pre-dial validation service is unavailable and there is another number available for the contact. The next number is used.
Go back to How do I work with Preview campaigns.
What next?
Top 5 topics

