
Configure the browser
From Genesys Documentation
This topic is part of the manual Genesys Recording, Quality Management, and Speech Analytics User's Guide for version Current of Genesys Recording, Quality Management, and Speech Analytics.
Contents
Learn to configure Internet Explorer or Google Chrome to enable you to access the SpeechMiner UI.
Related documentation:
SpeechMiner end users access the SpeechMiner browser-based interface from Internet Explorer or Google Chrome. The selected browser connects to the SpeechMiner Web server through the local network.
In order for the SpeechMiner interface to work properly, you must configure your browser as explained in the relevant section below:
Performing the required configuration enables:
- The use of pop-ups from the SpeechMiner Domain.
- Treating the SpeechMiner domain as part of the local intranet (or as a trusted site).
- Automatic updating of cached web pages.
Important
To run SpeechMiner 8.5.5, you must use a minimum resolution of 1280X1024. Genesys recommends that you work with a 1680X1050 resolution.Configure Internet Explorer to work with SpeechMiner
Perform the following steps to configure Internet Explorer to work with SpeechMiner:
Important
- If Internet Explorer is running on a Windows Server 2008 machine or Windows Server 2012 machine, the Enhanced Security Configuration feature should be turned off. Refer to the Windows Server 2008 or Windows Server 2012 section below.
- When working with Internet Explorer 11+, the Online Help documentation may not appear as it should due to your Internet Explorer compatibility view settings. To view the Online Help properly, go to the Tools menu, select Compatibility View Settings and verify that Display intranet sites in Compatibility View is not checked.
- When you playback an interaction in an Internet Explorer environment, the Playback button does not appear after you play the specific interaction for the first time. The Playback button reappears after you close the specific interaction and reopen it.
- Open the Internet Options dialog box.
- Select the Security tab and Local Intranet.
- Add the SpeechMiner domain to the list of websites in the Local Intranet zone.
- Click Sites > Advanced and add the SpeechMiner web server URL to the list of safe websites.
- ImportantThis step is not required if you already turned off the Enhanced Security Configuration Feature.
- Click Custom Level to customize the local intranet zone security.
- ImportantWhen working with Internet Explorer 11+, the Online Help documentation may not appear as it should. To view the Online Help properly, you must enable Active Scripting in the Internet Options > Security > Custom Level window.
- Under Miscellaneous change Access data sources across domains to Enable. Selecting Enable makes Screen Recording playback possible because it allows access from the browser to Web Services and Applications.
- ImportantAllowing access from the browser to Web Services and Applications is only relevant in a 8.5.512 environment.
- In the Privacy tab, add the SpeechMiner domain to the list of web sites that are permitted to open pop-ups.
- In the General tab, under Browsing History, select Settings.
- Under Check for newer versions of stored pages, select Automatically.
- Click OK to save the changes.
- ImportantIf the SpeechMiner domain is treated as part of the local intranet, Local Intranet
 should appear in the Status Bar at the bottom of the Internet Explorer window whenever the browser displays a SpeechMiner page. In newer versions of Internet Explorer, the same information can be found in File > Properties.


Turn off the Enhanced Security Configuration Feature on Windows Server 2008
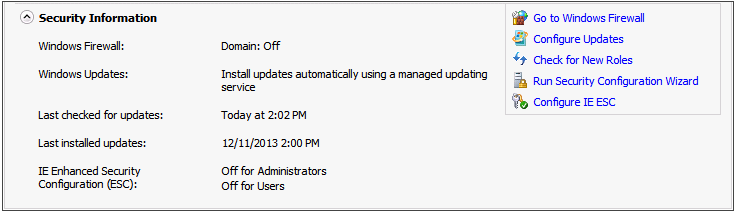
- In Server Manager's home page (the top level), expand the Security Information section. The current settings for the Enhanced Security Configuration feature appear under IE Enhanced Security Configuration (ESC).
- If the current settings are not Off for Administrators and Off for Users, click Configure IE ESC. The Internet Explorer Advanced Security Configuration dialog box opens.
- For both Administrators and Users, select Off.
- Click OK to save the changes.


Turn off the Enhanced Security Configuration Feature on Windows Server 2012
- In the Server Manager, in the home page (the top level), select Local Server.
- In the Server Properties for the Local Server, you will see the option for IE Enhanced Security Configuration. Click On to change the option.
- At this point, you will be prompted with the options to turn off Internet Explorer Enhanced Security Configuration for Administrators and/or Users. After selecting your option, click OK.
- Click the Refresh button
 at the top of the Server Manager and the IE Enhanced Security Configuration should now show as Off.


Configure Chrome to work with SpeechMiner
- In the Chrome browser, click the Chrome menu
 and select Settings.
 - Under Privacy, click Content Settings....
- Under Pop-ups, verify that Allow all sites to show pop-ups is selected. If it is not selected perform the following:
- Click Manage exceptions....
- In the field provided, type *. genesyscloud.com and select the Allow behavior.
- Press Enter and click Done.
Important
When working with the search filter in a Chrome environment and the zoom value is 100%, the last value in the filter may be hidden by the scrollbar.Verify that JavaScript is Enabled
- In the Chrome Browser, navigate to Chrome Settings > Privacy and security > Site Settings.
- Under JavaScript, select Sites can use JavaScript.
For more information about enabling JavaScript, see the following example: https://support.google.com/adsense/answer/12654.
Configure Edge to work with SpeechMiner
- In the Edge browser, click the menu ... and select Settings.
- Select Cookies and site permissions.
- Under Site Permissions, choose All permissions > Pop-ups and redirects.
- In the Allow sub-section, click Add.
- In the Add a site window, enter the site value as: [*.]genesyscloud.com.
- Click Add to add the site to the list of sites from which you allow pop-ups.
Verify that JavaScript is Enabled
- In the Edge browser, navigate to Settings > Cookies and site permissions > All permissions.
- Under JavaScript, enable Allowed (recommended).
Comments or questions about this documentation? Contact us for support!