Configuration with Channel Integration Framework (CIF) version 2.0
Contents
Procedure to configure the Adapter with CIF V2.0.
Introducation
If you have already installed the Gplus Adapter, the following procedure explains how to configure the Microsoft Dynamics 365 Channel Integration Framework (CIF) application version 2.0.
- Navigate to the Make Power Apps website and log in with the same system administrator’s credentials.
- In the upper right, set the environment where you want to enable the Adapter.
- Select Apps in the left-hand menu.
- Click the three-dot icon next to Customer Service workspace and choose App profile manager from the menu.
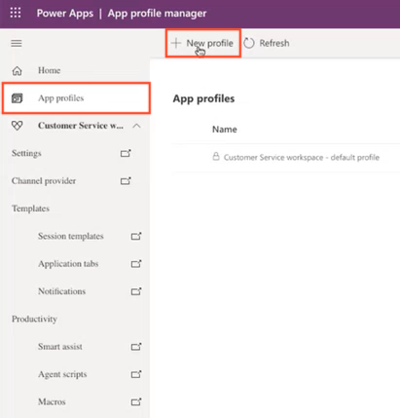
- Click App profiles in the left-hand menu, then + New profile.
- Fill the form displayed on the right as follows, the click Save:
- Name: any name
- Unique name: <prefix>_anyname
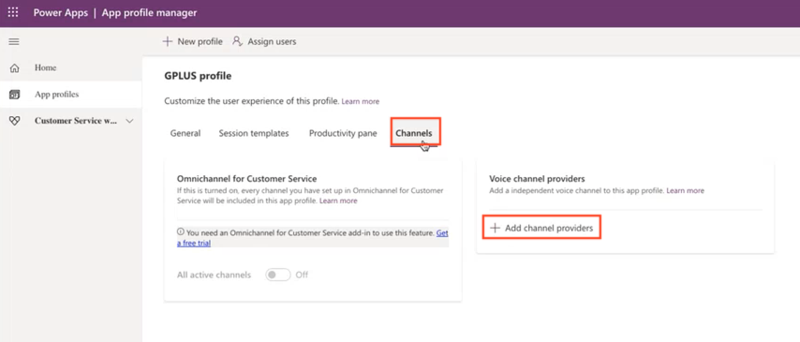
- Click the new profile to open it and select the Channels tab.
- Click + Add channel providers in the Voice channel providers box, then select Create a new channel provider in Unified Interface, which will open in a new tab.

- Provide the following parameters:
- Name: any name
- Unique Name: <prefix>_anyname
- Label: Gplus Adapter for MS Dynamics 365
- Channel URL: https://<DynamicsDomain>/webresources/softphon_CIFWWEv2.html
- Enable Outbound Communication: Yes/No
- Channel Order: 1
- API Version: 2.0
- Trusted Domain:
- Custom Parameters: {"InstanceURL": <Engage Cloud Instance URL>, "Logo": "/webresources/softphon_microsoft.png", "Width": 470}
- Enable Analytics: Yes/No
- Save and go back to App Profiles in Power Apps.
- Click again + Add channel providers in the Voice channel providers box, then start typing your provider's name and it will be displayed. Click it and it will automatically be saved.
Assigning users to the new provider
While previously one could choose a security role for each user, now you have to assign specific users to the provider you have just created:
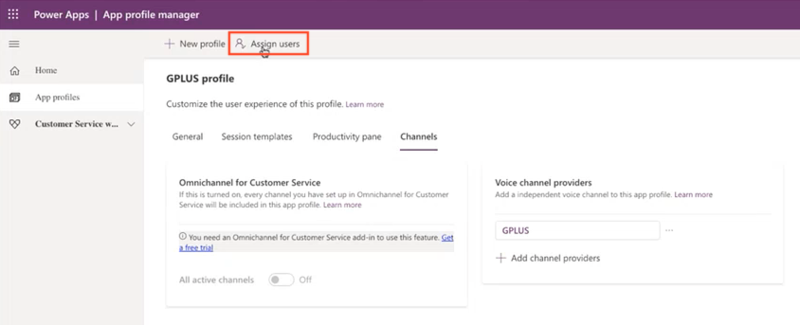
- Click Assign users on the upper menu. The Unified Interface will open in a new tab.
- Select Add Existing User and leverage the lookup function to select them, then click Add. All selected users will be displayed in the App profile’s General tab.

Configuring logo and menu buttons
The following procedure explains how to configure the softphon_iwsconfigCIFWWEv2.js JavaScript file:
- Select the Web Resources Zip File (GplusD365forCIF.zip).
- Open softphon_iwsconfigCIFWWEv2.js:
var params = {
context: this,
integrationType: "wwe",
layoutType: "widget",
stylePath: "/webresources/softphon_wwe_mainstyle.css",
instance: window.Softphone.InstanceURL,
layoutPath: "/webresources/softphon_wwe_mainui.html",
branding: window.Softphone.Logo,
plugins: [
{ path: "/webresources/softphon_wwe_mainui.js",
className: "mainui",
objectName: "mainui",
parameters: { "topView": "CommunicatorView"}
},
{ path: "/webresources/softphon_wwe_interactionbar.js",
className: "interactionbar",
objectName: "interactionbar",
parameters: { "TOOLTIP": { "voice": "callType,direction,call.state,call.phoneNumber"} }
}
]
};log.setLogLevel(enumloglevel.debug);
$(document).ready(function(){
iwscore.initCTI(params);
iwscore.enableCTI();
});| Key | Value | Description |
|---|---|---|
| branding | default: window.Softphone.Logo
possible value: any valid logo web resources (for example "/webresources/softphone_microsoft.png") |
default: logo is retrieved from CIF configuration
possible value: path where the file name is stored |
| topView | default: CommunicatorView
possible value: CommunicatorView, PerformanceTrackerView |
possibility to visualize menu buttons outside the list menu |
If you are interested in screen pop configuration, check Screen pops configuration.
Importing Configuration Data
In the configuration with the Channel Integration Framework (CIF) version 2.0, JavaScript files are not enough: the Gplus Adapter also needs the Configuration Data offered by Microsoft (Session templates and Application tabs) required by users to design the desired graphic interface.
Import the following package through the Data Migration Utility Tool:
- GplusD365forCIF_USD_9_0_003_00_ConfigurationData.
Once you have imported the package, the Tool will create Application tabs under the Active Session Templates.
Once you have imported the package, the Tool will create Application tabs under the Active Session Templates.


