Managing your time-off requests
Contents
View and manage your time-off requests.
Use the Time Off views (Calendar or Details) to effectively manage your time-off requests. Using the these views, you can:
- Add new requests
- Edit existing requests
- View time-off details within requests
- Recall submitted requests
- Delete requests.
Adding time-off requests
To add a time-off request:
- (Optional) If you want to ensure you have sufficient time to request for a time-off, click Get balance to open the Balance page and view the accrued hours available.
- Click New.
- The Add Time off dialog box opens.
- You can also select several dates by using the keyboard and mouse. Before clicking New, press Ctrl or Shift and select dates by clicking the left mouse button or simply press the left mouse button and move your pointer.
- Click the Calendar icon and select the date that you want to have off.
- Click Add selected date to the list
 .
.
- The date displays above the calendar field. If you've made a mistake and want to delete this date, hover your mouse over it and when the 'x' displays, click it.
- Continue to add dates by repeating steps 3 and 4, if required.
- (Optional) If you want to specify different settings for each added request, click Populate.
- If each time-off item has the same settings, you don't need to use this option.
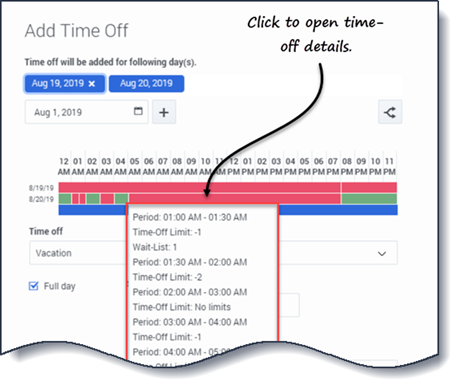
- The (time-off) Limits bar graph displays above the Time off field (see figure).
- In the drop-down list, select the time-off type.
- If you are requesting a full day, select the Full day check box.
- For part-day requests, leave this check box empty.
- Enter the Start time and End time.
- If the end time runs into the next day, select the Next day check box.
- In the Comments field, enter any information that relates to this request.
- Your supervisor might choose to consider these comments when deciding whether to grant or deny time-off requests.
- If WFM successfully processes your requests, a message appears to confirm they've been processed and the time-off items display in Calendar or Details view.
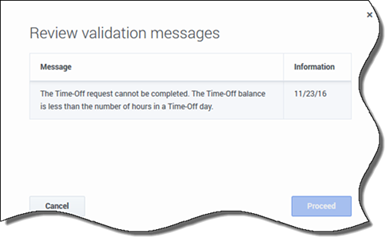
- If WFM returns error messages, it opens the Review validation messages dialog which lists the errors. Click Cancel to return to the Add Time off dialog and edit your request.
- WFM declines time-off requests that violate the terms of your contract. If specifically configured to do so, WFM also declines requests that fall on a day with a granted day off, granted availability with duration of 0 in the calendar, or a rotating pattern day off.
Editing time-off requests
To edit time-off requests in the Calendar view:
- Click the time-off request you want to edit.
- A dialog box opens showing the time-off details.
- Click Edit
 .
.
- The Edit Time off dialog box opens.
- Make any changes you find necessary and then click Save.
- If WFM successfully processes your changes, a confirmation message displays.
To edit a time-off request in the Details view:
- Click Actions
 in the row that has the time-off item you want to edit.
 - A drop-down list opens. See the graphic in Viewing Time-Off Details.
- Select Edit.
- The Edit Time Off dialog opens.
- Make changes as necessary and click Save.
Review validation messages
Viewing time-off details within requests
When adding or editing time-off requests, you'll see the following:
- The time-scale at the top, divided into 1-hour increments.
- A bar for each time-off item in the request. The bar could have various green and red intervals in the same day, representing the time-off limits. Green represents positive-value time-off limits. Red represents negative-value time-off limits.
- A solid blue bar, representing the total period of time available for time-off.
Click the time-off limits bar for any request to see its Period, Time-Off Limit, and Wait-List details. If the time-off limits bar has multiple intervals of both green and red, you might also see multiple wait-list periods and values.
Depending on how the locale is set in your browser, you might see different formats in the time-scale. For example, if am/pm is selected in your browser's locale settings, the 1-hour increments in the time-scale display as 12 AM, 01 AM, 02 AM, etc. If am/pm is not selected, they display as 1, 2, 3, etc.Recalling time-off requests
Recall a time-off request by using either the Calendar or Details view.
To recall a request in the Calendar view:
- In the calendar, select the the time-off request you want to recall.
- When the dialog opens, click Recall
 .
. - When the Confirmation dialog opens, click Yes to recall the request or No to cancel the action.
To recall a time-off request in the Details view:
- In the row that shows the details of the request you want to recall, enter a check mark in the first column.
- Click the Recall button.
- When the Confirmation dialog opens, click Yes to recall the request or No to cancel the action.
- You can also use the Actions menu to recall time-off items. See the graphic in Viewing time-off details.
In both views:
- After clicking Recall, if time-off items are part of a batch, the Recall dialog opens listing the items submitted in the batch. Click Recall to recall all items or Cancel to cancel the action.
The recalled time off is marked in the calendar with one of the following statuses:
- Recalled status—Indicates that the item was completely recalled and no longer affects the agent's schedule.
- Scheduled, Recalled status—Indicates that your recall request was received, but the item is not yet recalled. The item will remain active and in your schedule until a supervisor removes the time off from the schedule.
If your company uses WFM's notification functionality, then WFM sends a notification to the appropriate supervisor. If autopublish is enabled, WFM republishes the schedule, with the time off removed.
Deleting time-off requests
Delete a time-off request by using either the Calendar or Details view.
To delete a request in the Calendar view:
- In the calendar, select the the time-off request you want to delete.
- When the dialog opens, click Delete
 .
. - When the Confirmation dialog opens, click Yes to delete the request or No to cancel the action.
To delete a time-off request in the Details view:
- In the row that shows the details of the request you want to delete, enter a check mark in the first column.
- Click the Delete button.
- When the Confirmation dialog opens, click Yes to delete the request or No to cancel the action.
- You can also use the Actions menu to delete a time-off item. See the graphic in Viewing time-off details.
In both views:
- After clicking Delete, if the time-off items are in a batch, the Delete dialog opens listing items submitted in the batch. Select a single item or the entire batch. Click Delete to delete the selected items or Cancel to cancel the action.
Deleting autogranted requests
If the autogranting feature is off and a time-off request is Granted, you cannot use the time-off views to remove the time-off request. A supervisor must make the change in WFM Web for Supervisors.
If the autogranting feature is enabled, you can remove Granted time off that has not passed the autogranting lead time listed in the balance dialog.
For example, if the Granted time-off request is three weeks in the future and the lead time is set to two weeks, then the Granted time-off request can be removed. However, if the Granted time-off request is only one week in the future, then the request cannot be removed because it has passed the lead time.
To learn more about autogranting, see How autogranting works.


