Common controls in the UI
Contents
Learn about the controls that are commonly used throughout the views in the WFM Supervisor application.
The Supervisor interface
The views and panes in the WFM Supervisor interface display some combination of the controls described below, depending on selections that you make in the Objects pane.
| Buttons and icons | The following buttons and icons appear at the WFM interface: |
| Log Out |
Closes WFM Web without confirming your choice if there are no changes to save. |
| Actions menu |
Enables you to select from a list of view-specific commands. This menu's contents change as you move among modules and views, and often match the command icons that appear on the toolbar. |
| Help |
Opens WFM Web Help at the view-level topic. For example, if you open Forecast > Scenarios and click this icon, the Help topic opens, describing the Scenarios view. |
| Contextual Help |
Opens WFM Web Help at the wizard or dialog topic. For example, if you click this button in a wizard or dialog, the Help topic opens, describing the wizard or dialog. |
| Search |
Enables you to enter search criteria to quickly find the object you are looking for. The criteria you enter will depend on which pane you have open. Result that are found to match the search criteria are highlighted. |
| Sort |
Enables you to sort lists to easily find the items you are looking for. The sorting criteria will vary, depending on which pane you have open. |
| Date selectors |
Enable you to change the date or date range in a view. See more below. |
Paging controls
|
Enable you to browse the previous and next pages or navigate to the first and last items in the data set (start and end of the list), by clicking the appropriate arrow button in the view. To navigate between pages, you can use the Up, Down, Page Up, and Page Down keys on the keyboard. |
| Rows per page |
Enable you to choose the number of table rows you want to see on a page. Use the drop-down menu to select 5, 25, 50, and 100 rows per page. |
| Menus and views | Click to open a drop-down menu of views in the WFM module: Forecast. The views include:
Click Forecast Scenarios to open this view and display a list of all scenarios. Click the drop-down list to select the following Scenarios views:
|
| Actions toolbar | the buttons on toolbar (often) correspond to commands Actions menu. Hover your mouse pointer over a button see tooltip that displays button's name. See an example. |
Date selectors
Many WFM Web modules and views have common date-selection controls to modify the date or date range displayed in them. Use these controls to:
- Select a start date.
- Jump to other dates by opening the monthly calendar.
Also, learn how WFM Web automatically selects the first workday in weekly views.
Selecting the start date
Where available, the date-selection controls appear at the right-most end of the toolbar.
![]()
Use these controls as follows:
- Click the left angle bracket to move the start date back one interval (day, week, or schedule planning period—depending on the context), and the right angle bracket to move the start date forward one interval.
- Type a date into the date box or use the up and down arrows to edit the start date. (The sequence of the month, day, and year digits depend on your operating system's regional settings.) See also, weekly views.
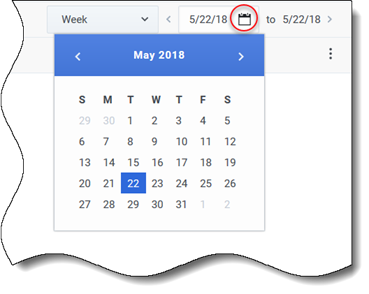
- Click the Calendar icon to open the monthly calendar.
Date selection controls include the end date in views that display information for more than one day, but you cannot modify it.
Selecting the month
Clicking the Calendar icon opens the one-month calendar. You can use the calendar's controls to:
- Find the current start date—The currently-selected start date is indicated by a dark blue square.
- Select a new start date—Click a date to adjust the start date in the current module or view.
- Move forward or backward one month—Click the left or right arrows in the calendar header.
Weekly views: automatic start day selection
In weekly views, if you enter a date other than the first weekday, the view automatically adjusts and starts with the first weekday.
The first weekday is the one specified in Week start day in the Business Units Properties tab. See the Workforce Management Web for Supervisors (Classic) Help.

