Managing shrinkage data
Contents
Manage the shrinkage data for activities in forecast scenarios, in some cases by applying templates.
In Workforce Management (WFM) you'll manage the shrinkage data (previously named overheads) in Forecast Scenarios, by adding, editing and deleting shrinkage associated with the Schedule State Group (SSG) for a specific activity. You can also apply templates to make adjustments to the shrinkage data.
Multi-site activities (MSA) use shrinkage information that is associated with Schedule State Groups from child activities.
Statistics appear in the Shrinkage type drop-down menu for the item that is selected in the Objects pane. If the item is:
- An activity, the menu lists all Schedule State Group shrinkage that is associated with the activity.
- A multi-site activity, the menu lists shrinkage for all Schedule State Groups that are associated with the child activities.
You must edit the shrinkage values for child activities of the MSA individually.
If you select an activity or MSA for which there are no available Schedule State Groups, after clicking Add Shrinkage, you'll see the message There are no available schedule state groups in the dialog.
Adding and deleting shrinkage
Adding shrinkage in forecast scenarios means adding shrinkage values that are associated with a Schedule State Group (SSG) and a target, such as an activity. Deleting shrinkage means deleting these values in the Shrinkage type menu. Once you confirm the deletion of these values, the SSG is removed from the Shrinkage type menu. Use the procedures below to add and delete shrinkage.
Adding shrinkage to activities
Adding shrinkage to an activity in a scenario
- Open the Shrinkage view
- In the Objects pane, expand business units and sites to select an activity.
- In the toolbar, click Add shrinkage
 .
.
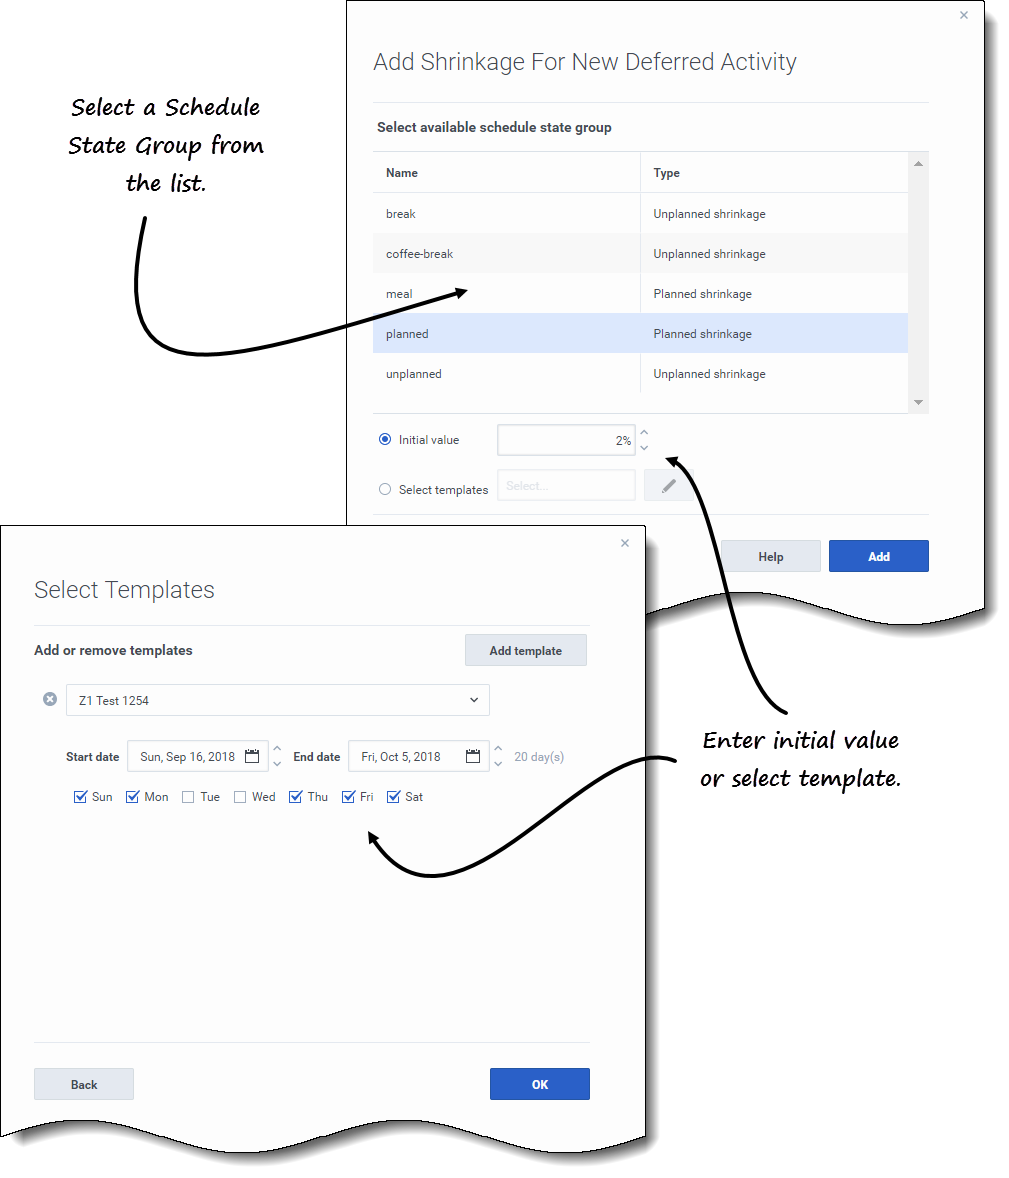
- The Add Shrinkage for <Activity_name> dialog opens.
- Select a Schedule State Group from the list.
- Choose one of these options:
- In the Initial value field, enter a percentage.
- Click the Select templates radio button and click Edit
 .
.
- The Select Templates dialog opens.
Selecting a template
- Select a template from the drop-down list.
- Enter (or use the date selectors to adjust) the Start date and End date, if necessary.
- Uncheck any days of the week that are not applicable to this template.
- To add more templates, click Add template, repeating substeps 2 and 3 for each one.
- Click OK.
- The wizard returns to the Add Shrinkage for <Activity_name> dialog.
- Click Add.
- WFM confirms that the shrinkage was successfully added, and the shrinkage appears in the graph and grid.
Click Cancel or X in the upper-right corner of the dialog to cancel the action and close the dialog.
Deleting shrinkage from activities
Deleting shrinkage from an activity in a scenario
- Open the Shrinkage view
- In the Objects pane, expand business units and sites to select an activity.
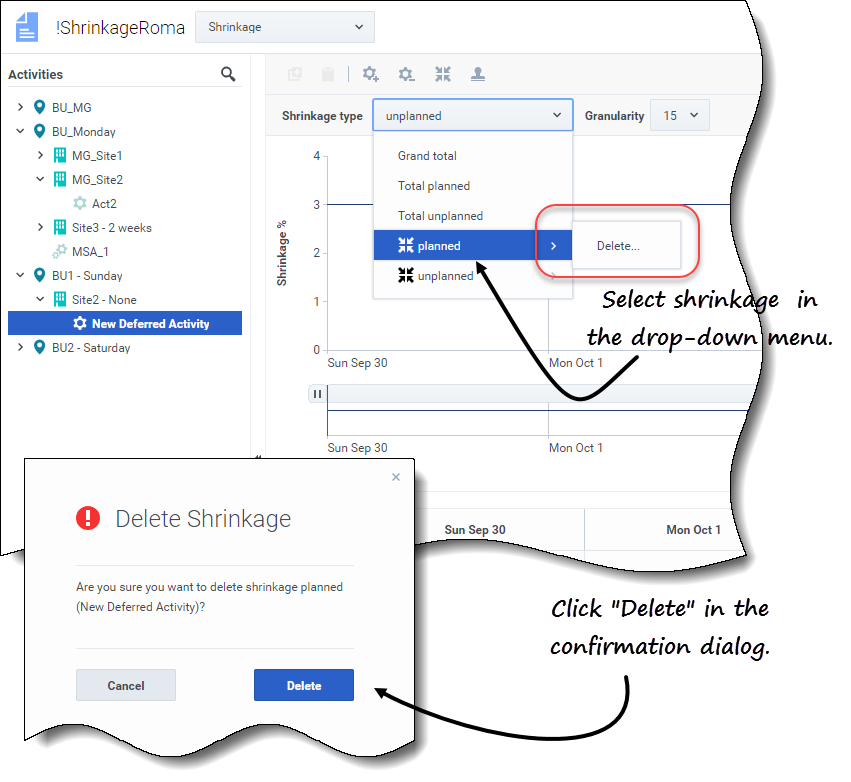
- Click the Shrinkage type drop-down menu and select the Schedule State Group you want to delete.
- In the selected SSG's submenu, click Delete.
- A confirmation dialog opens.
- Click Delete.
- The shrinkage is deleted from the graph and grid for the selected activity.
- Alternatively, click Cancel to cancel the action and close the dialog.
Adding shrinkage by applying templates
Adding shrinkage to Schedule State Groups using a template
- Open the Scenario > Shrinkage view
- Click the Shrinkage type drop-down list to select a Schedule State Group.
- Click Apply templates
 .
.
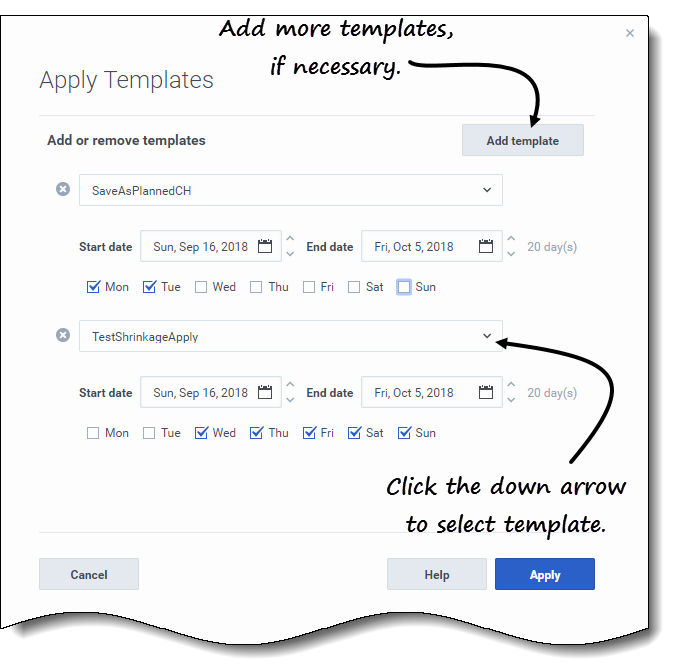
- The Apply Templates dialog opens.
- In the Select template field, select the template you want to apply.
- Change the start and end date, if necessary.
- Ensure the dates are not outside of the scenario start/end dates.
- Uncheck any days of the week that you do not want impacted by this template.
- To add more templates, click Add template, repeating steps 4 to 6 for each one.
- Click Apply.
- When the process is complete, click OK.


