Using the blocks
Contents
Learn how functional blocks are used to build Designer applications.
Build logic
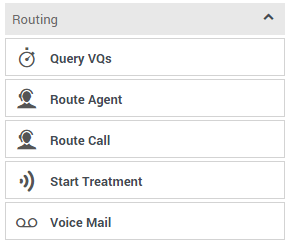
The Palette contains all of the blocks that you can use in Designer. They are organized into groups according to their type of function. For example, the Routing section contains blocks related to routing functionality:
These pages contain more information about the blocks in each category:
- Logic and Control blocks add logical functions to applications, such as assigning variables, changing languages, or directing the application to other blocks.
- User Interaction blocks interact with callers in various ways, such as offering them a list of menu options or invoking a voice or chat bot.
- Business Control blocks control various operational aspects of your site, such as establishing and checking your hours of operation.
- Routing blocks specify how an interaction should be directed when certain conditions are met, such as transferring a customer to an agent.
- Data blocks manage various data-handling functions.
- External Services blocks manage how an application taps into an external service.
- Reporting blocks manage certain reporting functions within an application, such as starting or stopping an activity or indicating the progress of an application.
- Callback blocks manage how Designer interacts with Genesys Callback services.
- Survey blocks enable you to set up and offer surveys to customers.
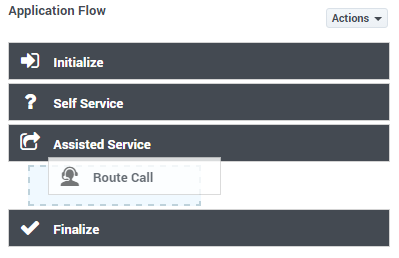
You can drag any block from the Palette into the Application Flow and place it under the phase in which you want it to execute. If the block can be used in that phase, a placeholder block appears and you can drop the block to place it in that phase.
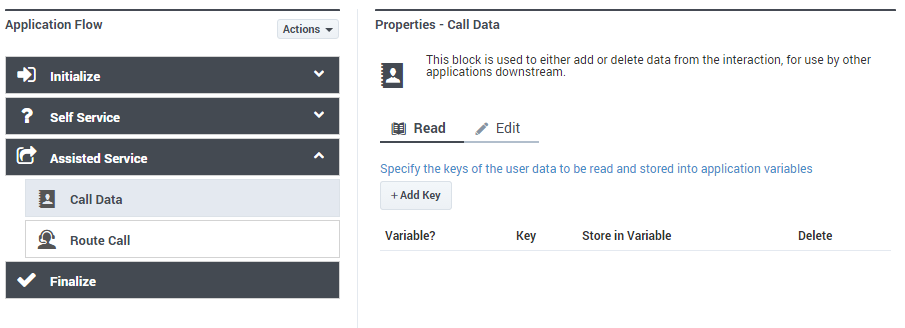
After placing a block, its details are shown in the Property view and you can configure the block and provide your application logic.
Click a block in the Application Flow at any time to select it, highlight it, and show its details.
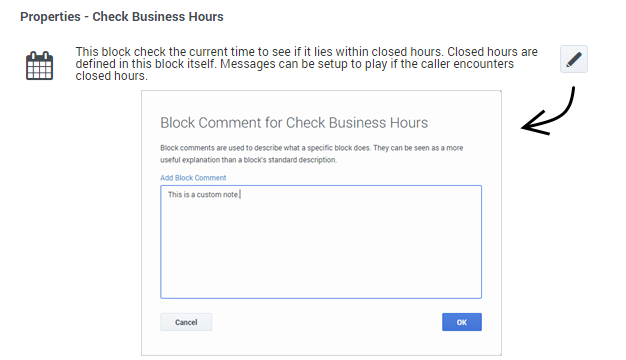
Each block has a default description, which you can edit to add your own description or comment.
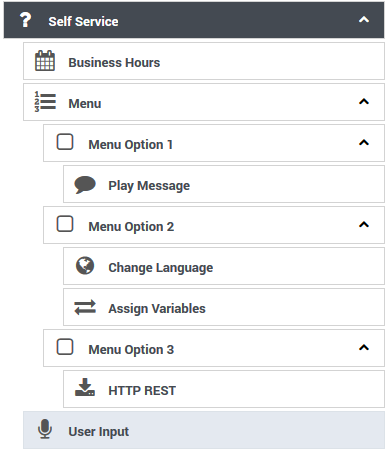
You can place child blocks underneath some blocks. Child blocks are indented underneath their parent block. With the Menu and Segmentation blocks, this indicates that several outcomes are possible but only one path is followed when the application runs.
In the above image:
- A user hears a menu prompt.
- The user enters input corresponding to one of the available menu options.
- The child blocks of that menu option execute before the application continues with the next block after the Menu block.
In this case, if the user chooses Menu Option 2, the Change Language block runs, followed by Assign Variables, and then the menu completes and moves onto User Input. The child blocks under Menu Option 1 and Menu Option 3 do not execute in this scenario.
In general, an indentation on the Application Flow canvas indicates that a decision or branch occurs, and one of several mutually exclusive paths is followed.
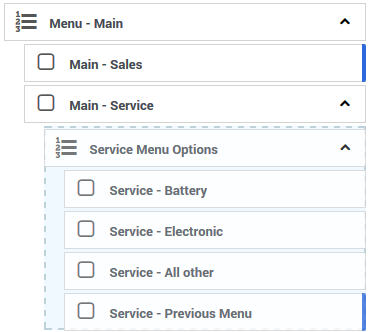
It is also possible for Menu or Segmentation blocks to be nested within one another - that is, a top-level menu option can lead to a second menu. This is indicated with multiple levels of indentation on the Application Flow. Once an option or a branch completes, the application returns one level higher and continues execution.
Moving and arranging blocks
To rearrange the order of blocks, you can drag and drop blocks around the Application Flow. Moving a parent block also moves any child blocks under it, so you can move entire groups of blocks together in one operation.
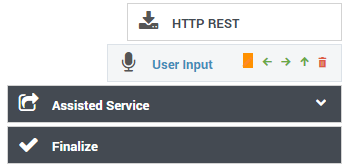
You can also move groups of blocks by clicking the arrows that appear when you hover over a block. This is useful if an application becomes large enough that dragging and dropping is unfeasible. These arrows show allowable operations on a block: up and down to move a block backward and forward within a phase, and left and right to change the indentation of a block underneath a parent block.
You can also use the Copy and Paste functions (under Actions) to copy a block to another location in the flow, or to another module or application. Copying a parent block also copies any child blocks under it, so you can copy entire groups of blocks together in one operation. Keep in mind that blocks can only be copied to locations where that type of block is permitted.
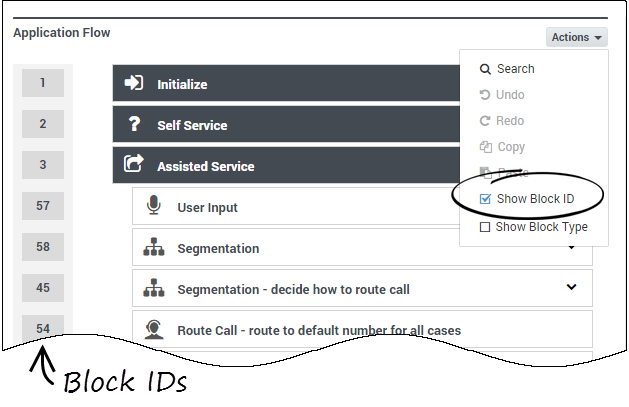
Under Actions, you can select Show Block ID or Show Block Type to toggle the visibility of those attributes. For example:
Limiting Application Indentation
Although Designer allows you to use several levels of indentation, you might not be able to access the block properties element if you have more than 10 levels of indentation.
To prevent your application from becoming too deeply indented, use Menu and Segmentation blocks to jump to specific points in the application. This takes control back to the main trunk and prevents the application from being too indented and difficult to understand. Menu and Segmentation blocks that do not terminate the application within a reasonable depth should include a Go To block to jump to a different part of the application.
Search tools
To search the blocks in the application flow, select Search from the Actions menu.
The search box appears in the main navigation bar and you can start typing the search term you are looking for. As you type, the items on the page are filtered to show only those items that match the text you've entered. The results are highlighted in the application flow, and you can use the up/down buttons to jump to the next or previous result.
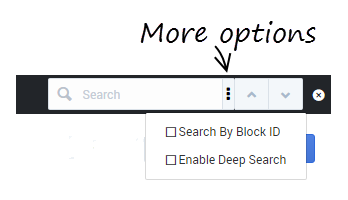
If you click the More Options button, you can also select the Search by Block ID or Enable Deep Search options.
Search by Block ID can be useful if a particular block ID is flagged by Designer Analytics as having an issue. You can toggle the block IDs to be visible in the application flow and then use this search option to quickly locate the block in question.
The Enable Deep Search option enables you to search the entire application flow for a specific value or property. For example, you might search for blocks that contain a certain virtual queue.
This video describes the search tools available in Designer:
ECMAScript Expressions
Some block properties accept ECMAScript expressions that are executed by the application at runtime. This allows the application to perform dynamic operations, such as calling an ECMAScript function or combining the values of other variables.
For information about using ECMAScript in Designer, see ECMAScript Expressions.
Busy Treatments
A busy treatment is a special form of handling that occurs while a customer is waiting to be connected with an agent. For example, music can be played for callers or chat participants can be provided with regular updates about their estimated wait times.
Certain blocks allow you to specify audio files, messages, or self-service type shared modules as busy treatments. When planning to add a busy treatment to your application, keep in mind that the interaction might be routed immediately or take a very long time. In certain scenarios, you might prefer to use a Shared Module instead of a Play Message block, as you can configure the module to adjust (or skip) the busy treatment messages depending on the Estimated Wait Time (see an example).
Routing blocks
The Route Call, Route Digital, and Route Agent blocks have a Treatments tab where you can specify a busy treatment.
If you choose to add an audio-based or text message treatment, a Play Message block is automatically nested below the routing block. Use this block to select and configure the message options.
If you choose to add a module-based treatment, a Shared Module block is automatically nested below the routing block. Use this block to select the shared module that will be used as a busy treatment. Note that you can only select a Self Service shared module.
On the Route Digital block, you can add a chat treatment. This automatically adds a nested Chat Message block below the routing block. You can then use the block properties to set the treatment.
Busy treatments defined in routing blocks will loop automatically until a certain condition is met – such as the call is routed, the customer disconnects, or the timeout specified in the routing block expires – at which point the next block in the application is triggered.
- When routing chat interactions, Designer waits for 100 milliseconds before starting busy treatments for chats (i.e. in-queue messages). This significantly improves the accuracy of Estimated Wait Time (EWT) and Position in Queue (PIQ) values that are typically used by these messages when providing updates to customers, but may also result in the application not sending busy treatment chat messages if routing completes almost immediately (i.e. within 100 ms).
- After a busy treatment has been executed at least 10 times, Designer exits the routing block and moves to the next block if the average duration of the treatment is less than 1000 ms (for example, due to a missing audio file).
Start Treatment block
The Start Treatment block also lets you specify a busy treatment, but it works a bit differently than the treatments used in the routing blocks.
Typically, you would use this block in the Assisted Service phase when you want to start a busy treatment — for example, play an audio file to customers while they wait to speak with an agent — and then move on to the routing blocks, all without interrupting the playback to the customer.
Things to keep in mind when using this option:
- Don't define any additional treatments in the routing blocks that directly follow the Start Treatment block. You want the audio started by the Start Treatment block to continue playing while the routing blocks do their job. If a routing block starts another treatment, the treatment that is playing stops.
- The selected Self Service Shared Module will continue to loop until a new treatment is started, the interaction is routed or terminated, or the Assisted Service phase in which the Start Treatment block was started is exited.
Example of a Shared Module treatment
A potential use case is to execute a shared module based on a specified set of conditions that can change over time and respond to external factors. For example, you might use a shared module that can play one announcement for callers if the estimated wait time (EWT) is beyond a certain threshold, and another announcement for when they are the next caller in the queue.
To set up this feature:
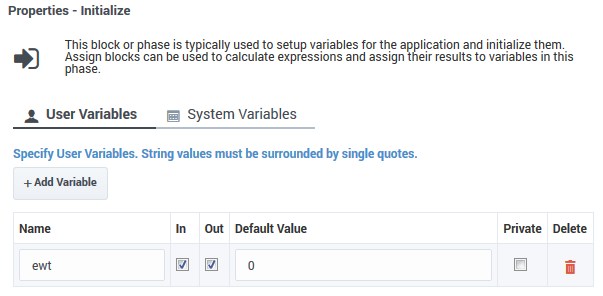
- In the application, create a user variable, ewt, and set its default value to 0.
- Create a Self Service type shared module.
- In the shared module, create a user variable, ewt, and set its default value to 0.
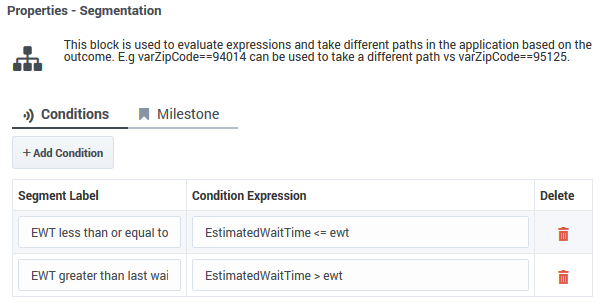
- In the Self Service phase of the shared module, add a Segmentation block. Add the conditions as shown below:
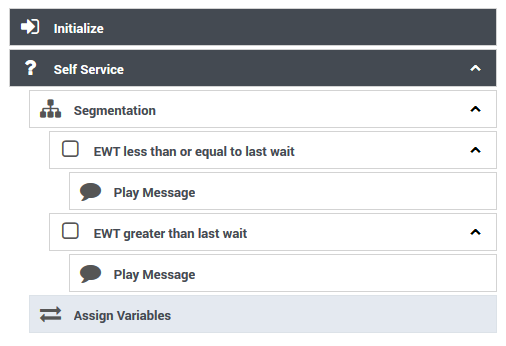
- Add two Play Message blocks as child blocks of the condition blocks, and add an Assign Variables block at the end. Your shared module should appear as shown below:
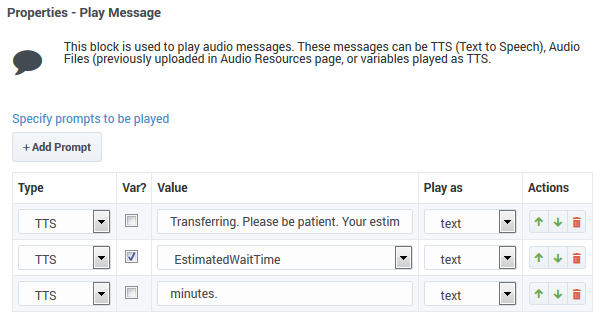
- Configure the first Play Message block. An example is below:
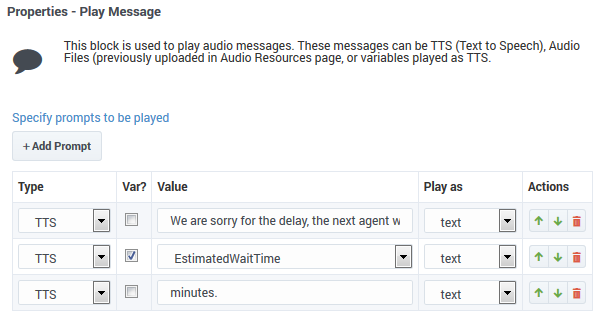
- Configure the second Play Message block. An example is below:
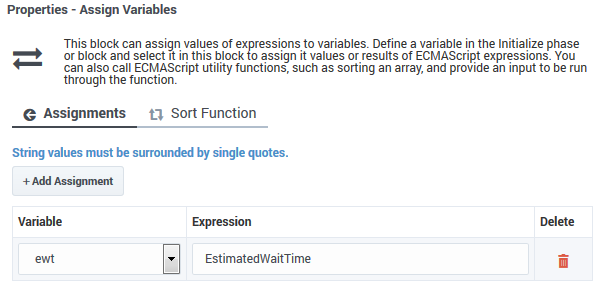
- Configure the Assign Variables block as shown below:
- In your application, select the Route Call block and click the Treatments tab.
- Click Add Module. A child Shared Module block appears beneath the Route Call block.
- In the child Shared Module block, select the shared module that you created in Step 2.
The application passes ewt to the shared module, along with the system variables, which includes EWT. The shared module compares ewt and EWT in the Segmentation block and executes a Play Message block, depending on which variable is larger. At the end, the shared module sets ewt to EWT before returning to the application.
Validation
Designer enforces a drag-and-drop policy to ensure that you can only place blocks into applicable phases. In rare scenarios, a block might be placed in an invalid phase. In these cases, the validation process that occurs after you click Publish will report this failure with an error that includes the blocks placed into invalid phases.
You can update many options without regenerating the code:
- In the Business Hours block, you can:
- change business hours of operation.
- determine whether to terminate the call if it is outside business hours.
- change the closed message (prompts).
- Update the Emergency block.
- Update prompts in the Menu block.
- Update prompts in the Play Message block.
- Specify the audio in the Play Audio tab of the Route Call block.
- Update the Special Day block.
- Update the input and retry prompts in the User Input block.

