Manage standard responses
Contents
- 1 Plan a category tree
- 2 Build a category tree
- 3 Create or edit a standard response
- 4 Text/HTML responses
- 5 Quick Reply responses
- 6 Generic Template responses
- 7 Carousel responses
- 8 Media Notification responses
- 9 List Template responses
- 10 List Picker responses
- 11 Use field codes
- 12 Characters allowed in names
- 13 Copy a standard response
- 14 Delete a standard response
- 15 Search the category tree
Learn how to manage the standard responses you send to customers.
Standard responses are a way for your organization to define a set of prewritten responses. Agents or automated processes can send these responses to customers in email, chat, SMS, WhatsApp, Facebook, and Twitter interactions.
A standard response is a text template with keyword placeholders, called field codes, that the system replaces with appropriate text for the recipient. This template results in a standardized, yet custom message that is crafted according to the situation and customer. Genesys uses standard responses as suggestions for agents, acknowledgments, and autoresponses.
Agents can further personalize the standard response by editing it in their desktop before sending the message to the customer. For more information about how agents use standard responses, see the Agent Workspace Agent's Guide.
This topic covers the steps to create standard responses using Standard Responses Management. At a high level, you must:
- Plan your category tree. A category tree provides the framework for organizing your standard responses.
- Build your category tree.
- Create your standard responses.
- Use Field Code Management to create field codes, then add them to your standard responses. Field codes are the keyword placeholders you can use to personalize standard responses.
Access Standard Responses Management under the Responses menu.
Plan a category tree
A category tree is a way to organize your library of standard responses into a structure that is easy to access and manage.
A category tree consists of one or more "root categories" (units of knowledge), each of which can have subcategories or even sub-subcategories. These categories and subcategories contain the standard responses.
It's important to plan your category tree ahead of time. You can edit it as needed, but a little thought now will save time and frustration later. When planning, think about the root categories and subcategories that make sense in your business.
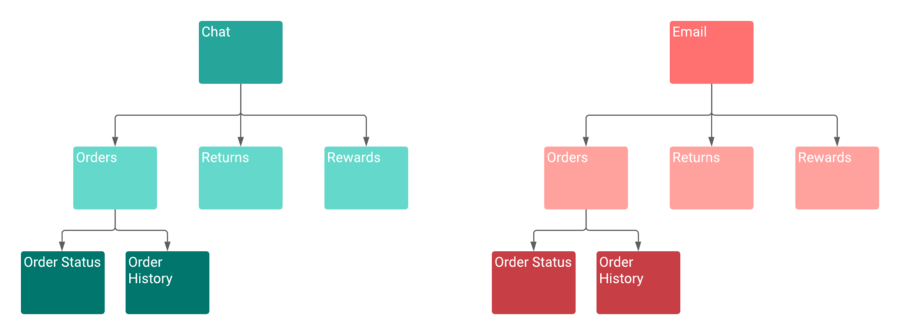
Let's use an online store as an example. Our store website can handle both chat and email interactions from customers. We want to send different responses depending on the interaction type, so let's make root categories for Chat and Email. Those root categories need subcategories for the most common reasons customers contact us: Orders, Returns, and Rewards.
Since Orders is a large topic, let's break it down into sub-subcategories: Order Status and Order History. Our site supports French and English, which means we must actually create two category trees—one for French and one for English.
Here's how our English Category Tree Plan looks:
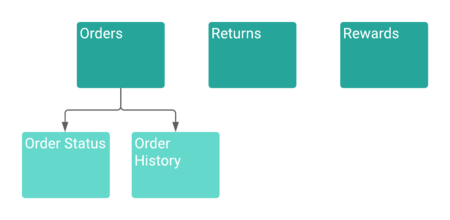
The way you organize your categories is subjective and depends on the needs of your business. For example, we could have made root categories for Orders, Returns, and Rewards. Then populated those categories with standard responses that are named as interaction types (Return Label Chat, Return Label Email, and so on).
Here's how this Alternate Category Tree Plan looks:
You can have a category with no standard responses—its purpose is to group other categories together. However, a standard response must belong to a category.
Category membership is inherited. For example, Chat includes Orders, and Orders includes Order Status and Order History. Then Chat also includes Order Status and Order History.
Build a category tree
Now that planning is complete, it's time to build the category tree. In these instructions, you build the category tree first and then add standard responses, but you can also add standard responses as you build your category tree.
Create or edit a category
To begin, choose a language from the drop-down—remember, your category tree is specific to the language.
Next, click Add to create a root category. In the category editor, give your category a name and helpful description. After you save, the standard response table displays. You can use this table to add standard responses now or continue defining your tree.The category name can consist of no more than 64 alphanumeric characters supported in UTF-8. For more valid characters, see Characters allowed in names.
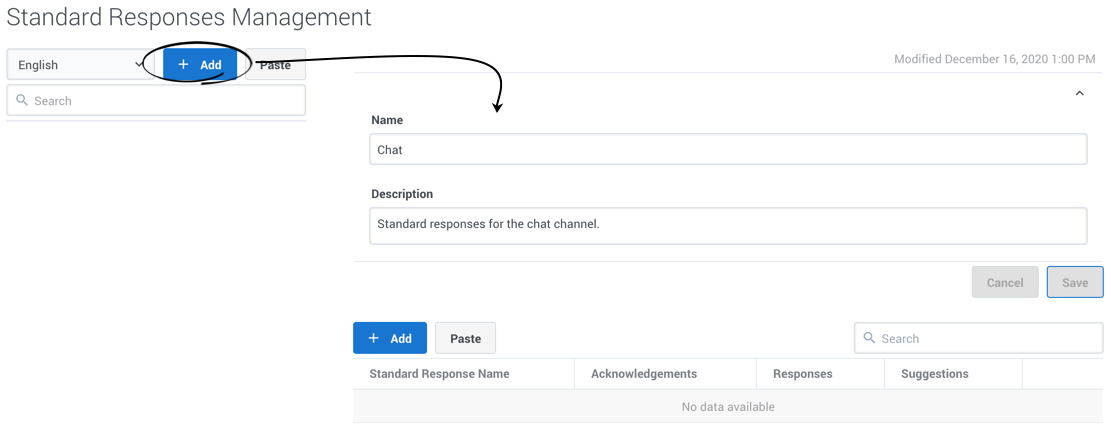
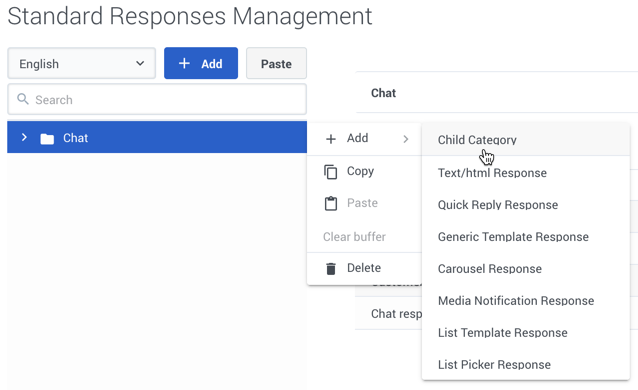
Once you have a root category, select its menu (![]() ) and add a child category. You set up child categories the same way as root categories. First, define the category in the editor and then add standard responses as needed.
) and add a child category. You set up child categories the same way as root categories. First, define the category in the editor and then add standard responses as needed.
Continue adding categories until your tree is complete. As you work with your category tree, you can adjust the layout by using the copy and paste feature or deleting a category.
Copy and paste a category
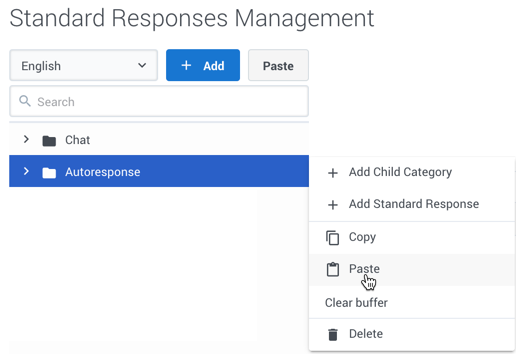
Use the category menu (![]() ) to Copy a category.
) to Copy a category.
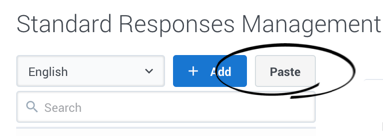
To save a copied category as a root category, click Paste in the main sidebar.
To save a copied category as a sub-category, click the menu (![]() ) of the new parent category and select Paste.
) of the new parent category and select Paste.
The copied category is saved as "<original_name>_N", where "N" is the number of the copy. For example: Chat_1, Chat_2, and so on.
You can also use the category menu (![]() ) to Cut a category, and then paste it as previously described.
) to Cut a category, and then paste it as previously described.
Choose Clear buffer to clear the contents from your computer's clipboard.
Delete a category
You can delete a category by choosing Delete in the category menu. If you delete a category, all of its subcategories and standard responses are also deleted.
Create or edit a standard response
You can create a standard response in two ways:
- Open the category menu and click Add.
- Edit the category and add click Add.
Either method opens a sub-menu where you can choose the type of standard response to add. Standard Responses can be made up of plain text or HTML content, or they can use one of the following Genesys Widgets rich messaging templates:
- Quick Reply
- Generic Template
- Carousel
- Media Notification
- List Template
- List Picker
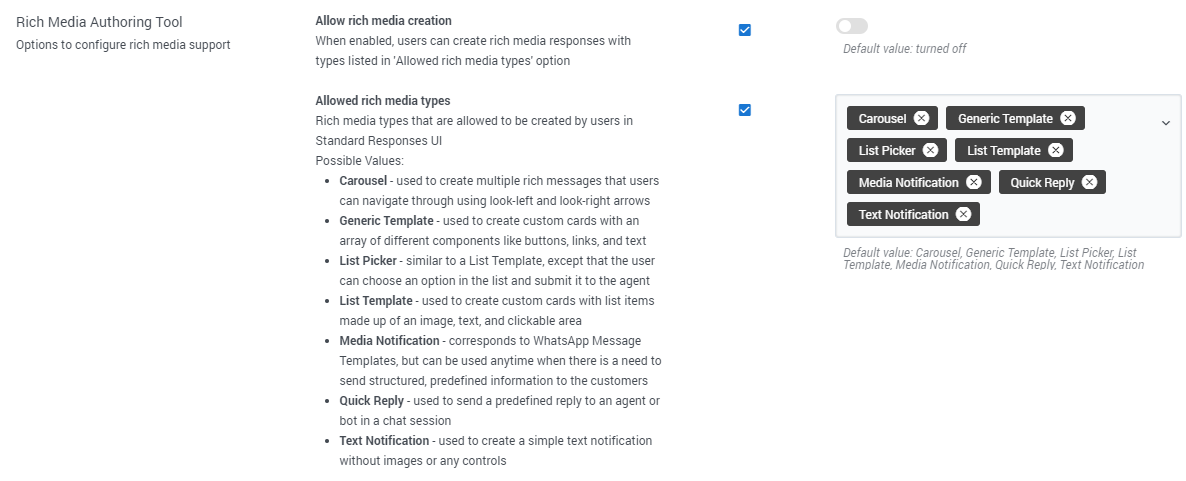
To allow agents create standard responses with rich media content, the Allow rich media creation option must be enabled in the Tenant Settings and the Allowed rich media types option must include the set of templates that the agent can use.
Name section
To get started, choose a standard response type. In the standard response view, you can set the name and description, Content, Attachments, and Properties. Enter the name and description and Save. The standard response view updates to display fields specific to your chosen response type.Content section
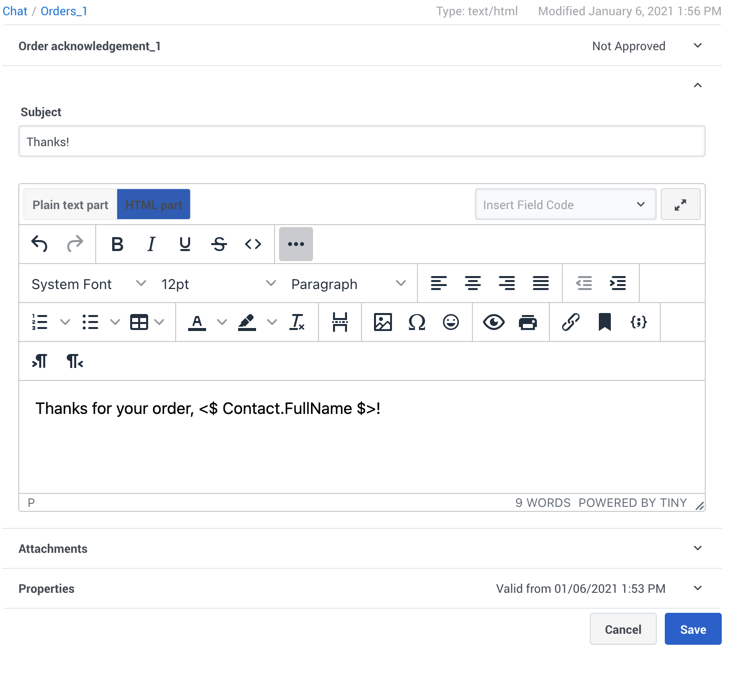
Most of the fields in the Content section depend on the type of standard response. However, you can insert field codes to customize any type of standard response. To add a field code, select a field code in the drop-down menu. You can also set browser's hotkeys to insert field codes. See Use field codes or details. You can also expand this section to view it at full width, which is helpful for rich messaging standard responses.
When you create a rich messaging standard response, you can Preview how it looks in a Genesys Widgets webchat widget in either the Dark or default theme. This preview updates dynamically as you make changes in the form. You can interact with rich message fields, including button clicks, opening links, and selecting items.
Rich messaging standard responses also have a JSON view that updates dynamically and shows how the response is structured. Any changes you make directly in the JSON are reflected in the form and preview areas. This view has a toolbar of options you can use to format, sort, and fix the JSON.
The following sections provide more information about the Content fields for each response type:
- Text/HTML responses
- Quick Reply responses
- Generic Template responses
- Carousel responses
- Media Notification responses
- List Template responses
- List Picker responses
Attachments
In the Attachments section, you can add or remove an attachment by drag-and-drop or browsing your computer. When adding an attachment, make sure to consider the channel type you are targeting for the standard response and align the attachment type with the channel. Different channel types might have different limitations on what is acceptable.
Properties
In the Properties section, define whether the standard response is used manually, automatically, or not at all for these scenarios:
- Acknowledgment—The standard response is sent through Designer to acknowledge the receipt of a message. For example: "Thank you for your email. One of our agents will reply to you in the next 24 hours."
- Autoresponse—The standard response is sent by agents to an incoming interaction. It can also be used by Designer if you can be certain the customer's message is answered in this response.
- Suggestions—The standard response is offered to agents as suggested wording to use in their own replies to interactions.
Finally, set a start date (today's date by default) and specify whether the standard response expires.
If a standard response expires, it has the following effects:
- Designer cannot use the standard response in a new or modified application.
- If a Designer application saved a standard response after the expiration date, Genesys does not send the standard response. Instead, Genesys returns an error message.
When your standard response is ready, click the check box to approve. You can only use approved responses in Designer applications and for Agents.
Text/HTML responses
The content of a Text/HTML response can be in either plain text or HTML, depending on the type of standard response. For example, use plain text for SMS responses and HTML for email.
The text mode supports using Markdown syntax to compose responses. The following Markdown elements are supported:
- Headers
- Bold text
- Italic text
- Bullets
- Number bullets
- Links
- Images
- Strikethrough
- Backticks (Code)
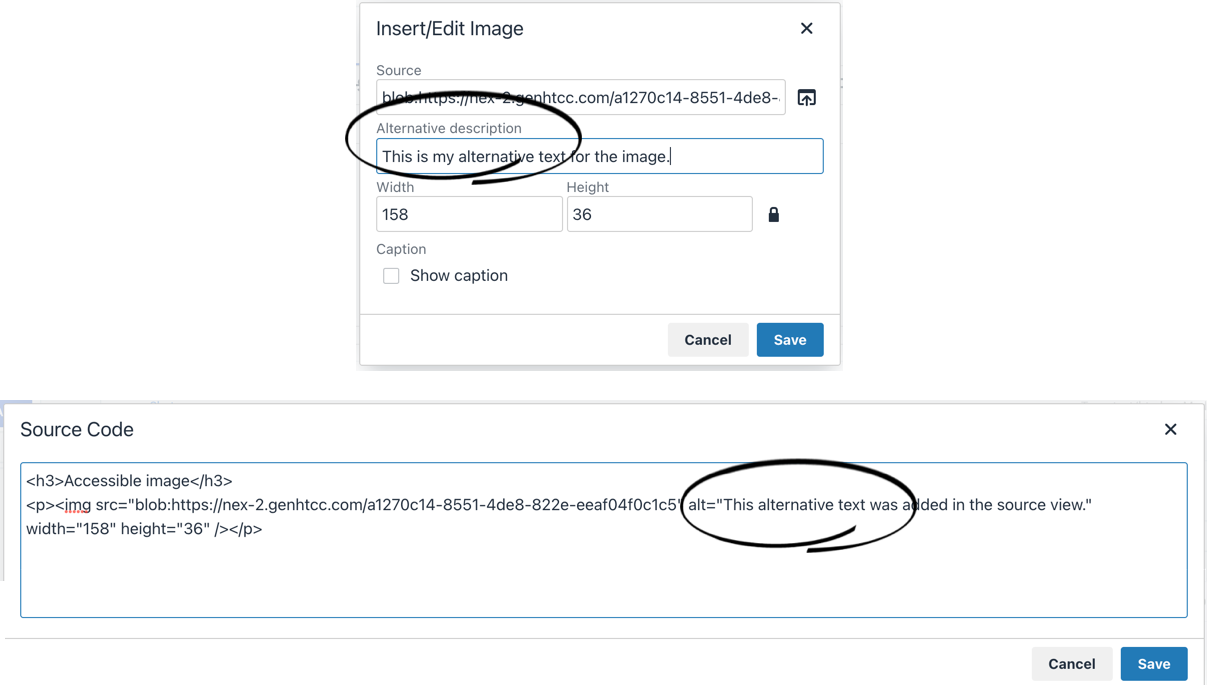
Make images accessible
You can make images in your HTML-based standard responses accessible by adding alternative text. In HTML mode, click the Insert/Edit Image button to add your image and include the alternative text in the Alternative description field.
You can also add the "alt" attribute directly to the <img> tag when working in the source view (Quick Reply responses
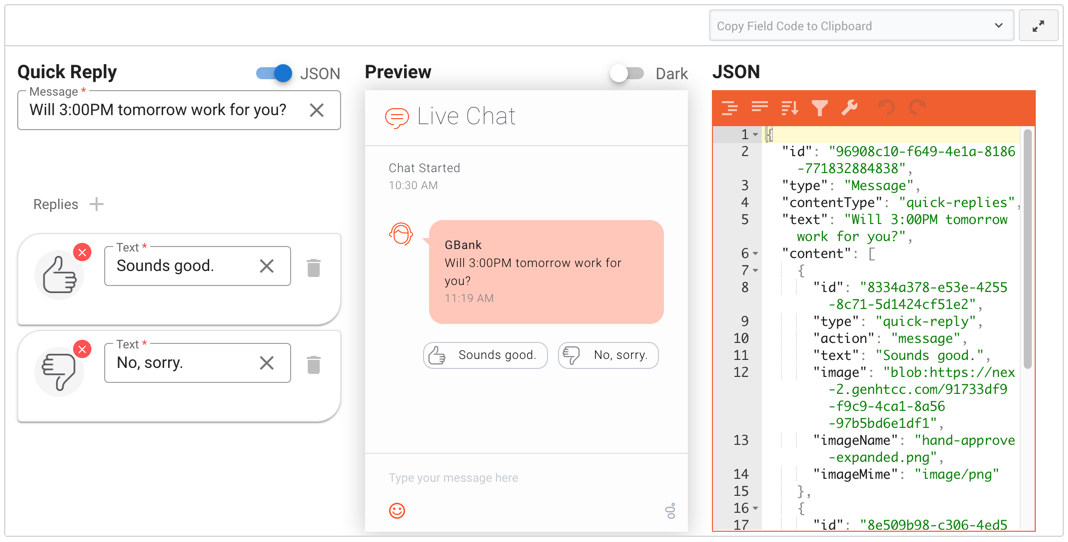
A Quick Reply is a simple way for customers to send a predefined reply to an agent or bot in a chat session. See Quick Replies for details.
To create a Quick Reply, define a Message to accompany your replies. Next, click (![]() ) to define at least one reply. Enter the Text for the reply and, optionally, add an image to display next to the text. As you edit these fields, the Preview pane updates dynamically to reflect your changes.
) to define at least one reply. Enter the Text for the reply and, optionally, add an image to display next to the text. As you edit these fields, the Preview pane updates dynamically to reflect your changes.
Generic Template responses
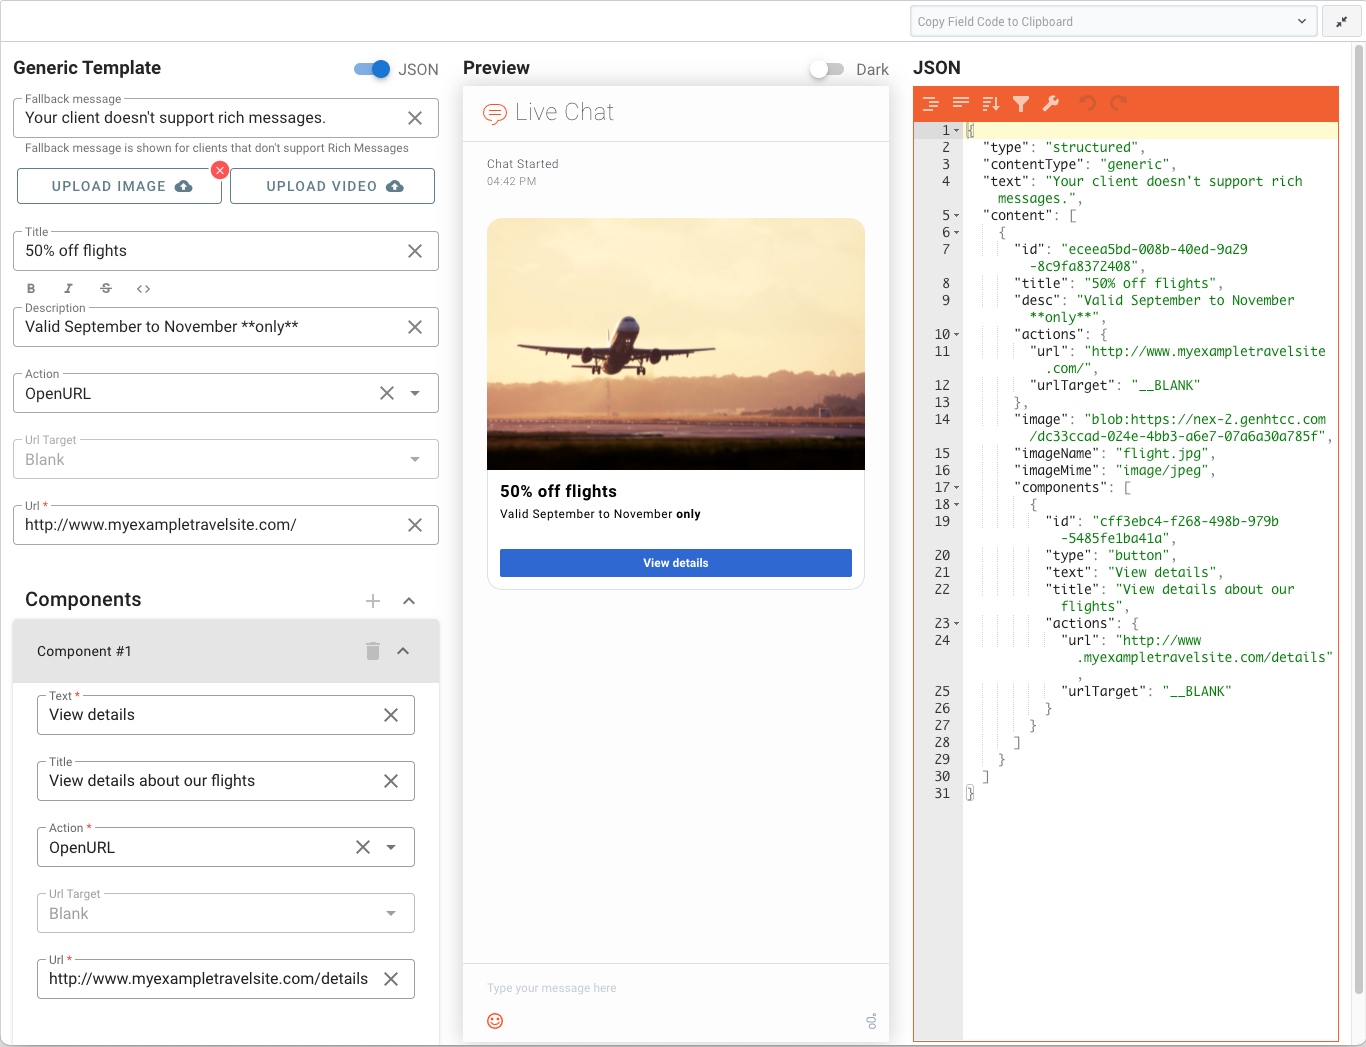
Use a Generic Template to create custom cards with an array of different components like buttons, links, and text. See Generic Template for details.
To create a Generic Template, first define a Fallback message to display to users who don't support rich messages. This field is populated by default, but you can adjust it to whatever suits your needs.
At a minimum, give your Generic Template one of the following fields: Title, Description, Image, Video, or Component.
To format text in the Description field, highlight one or more words and click the related button for bold, italic, strikethrough, or code. Avoid combining additional symbols with formatting symbols and text for precise formatting.
The Generic Template is divided into clickable areas that each have their own defined action. The top-level clickable area includes the title, description, image, and video. Define the action for this clickable area by choosing from the Action drop-down. "OpenURL" is supported. Next, choose the URL Target, which specifies where the link opens. "Blank" (open in a new tab or window) is supported. Finally, specify the URL for the clickable area.Each Component you add is also its own clickable area, in the form of a button. To create a component, click (![]() ). The Text displays in the button, while the Title displays when a user hovers over the button.
). The Text displays in the button, while the Title displays when a user hovers over the button.
Define the action for this clickable area by choosing from the Action drop-down. As with the top-level area, choosing "OpenURL" prompts you for a URL Target and the URL. If you choose "Textback", specify the text you want to send back to the agent when the customer clicks this button.
Carousel responses
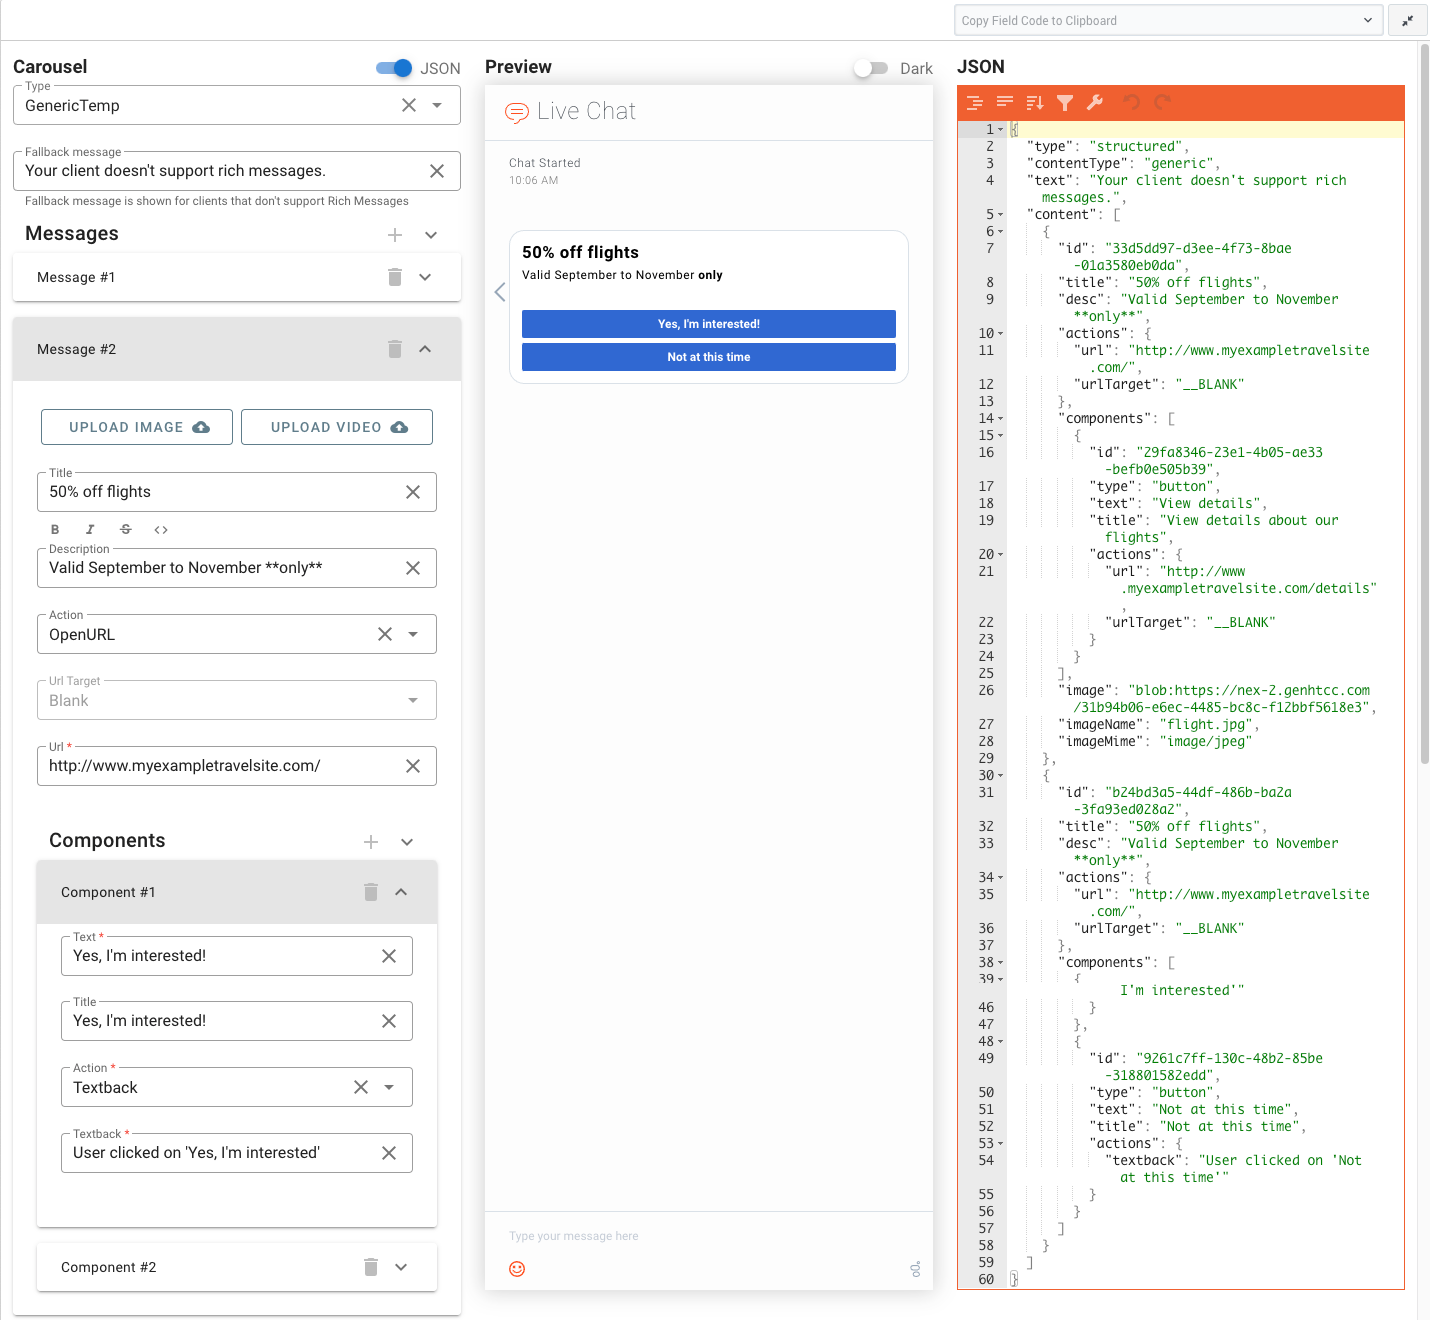
A Carousel shows multiple rich messages that users can navigate through using look-left and look-right arrows. See Carousel for details.
To create a Carousel, first choose the Type. You can choose only one type per Carousel, from the following rich messaging types: Generic Template, List Template, and List Picker.
Next, define a Fallback message to display to users who don't support rich messages. This field is populated by default, but you can adjust it to whatever suits your needs.
to define your Messages, click (![]() ) . The fields displayed in this section depend on which type of Carousel you chose. Don't forget to use the arrows (
) . The fields displayed in this section depend on which type of Carousel you chose. Don't forget to use the arrows (![]() ) to expand and collapse Messages and Components so they're easier to view.
) to expand and collapse Messages and Components so they're easier to view.
Media Notification responses
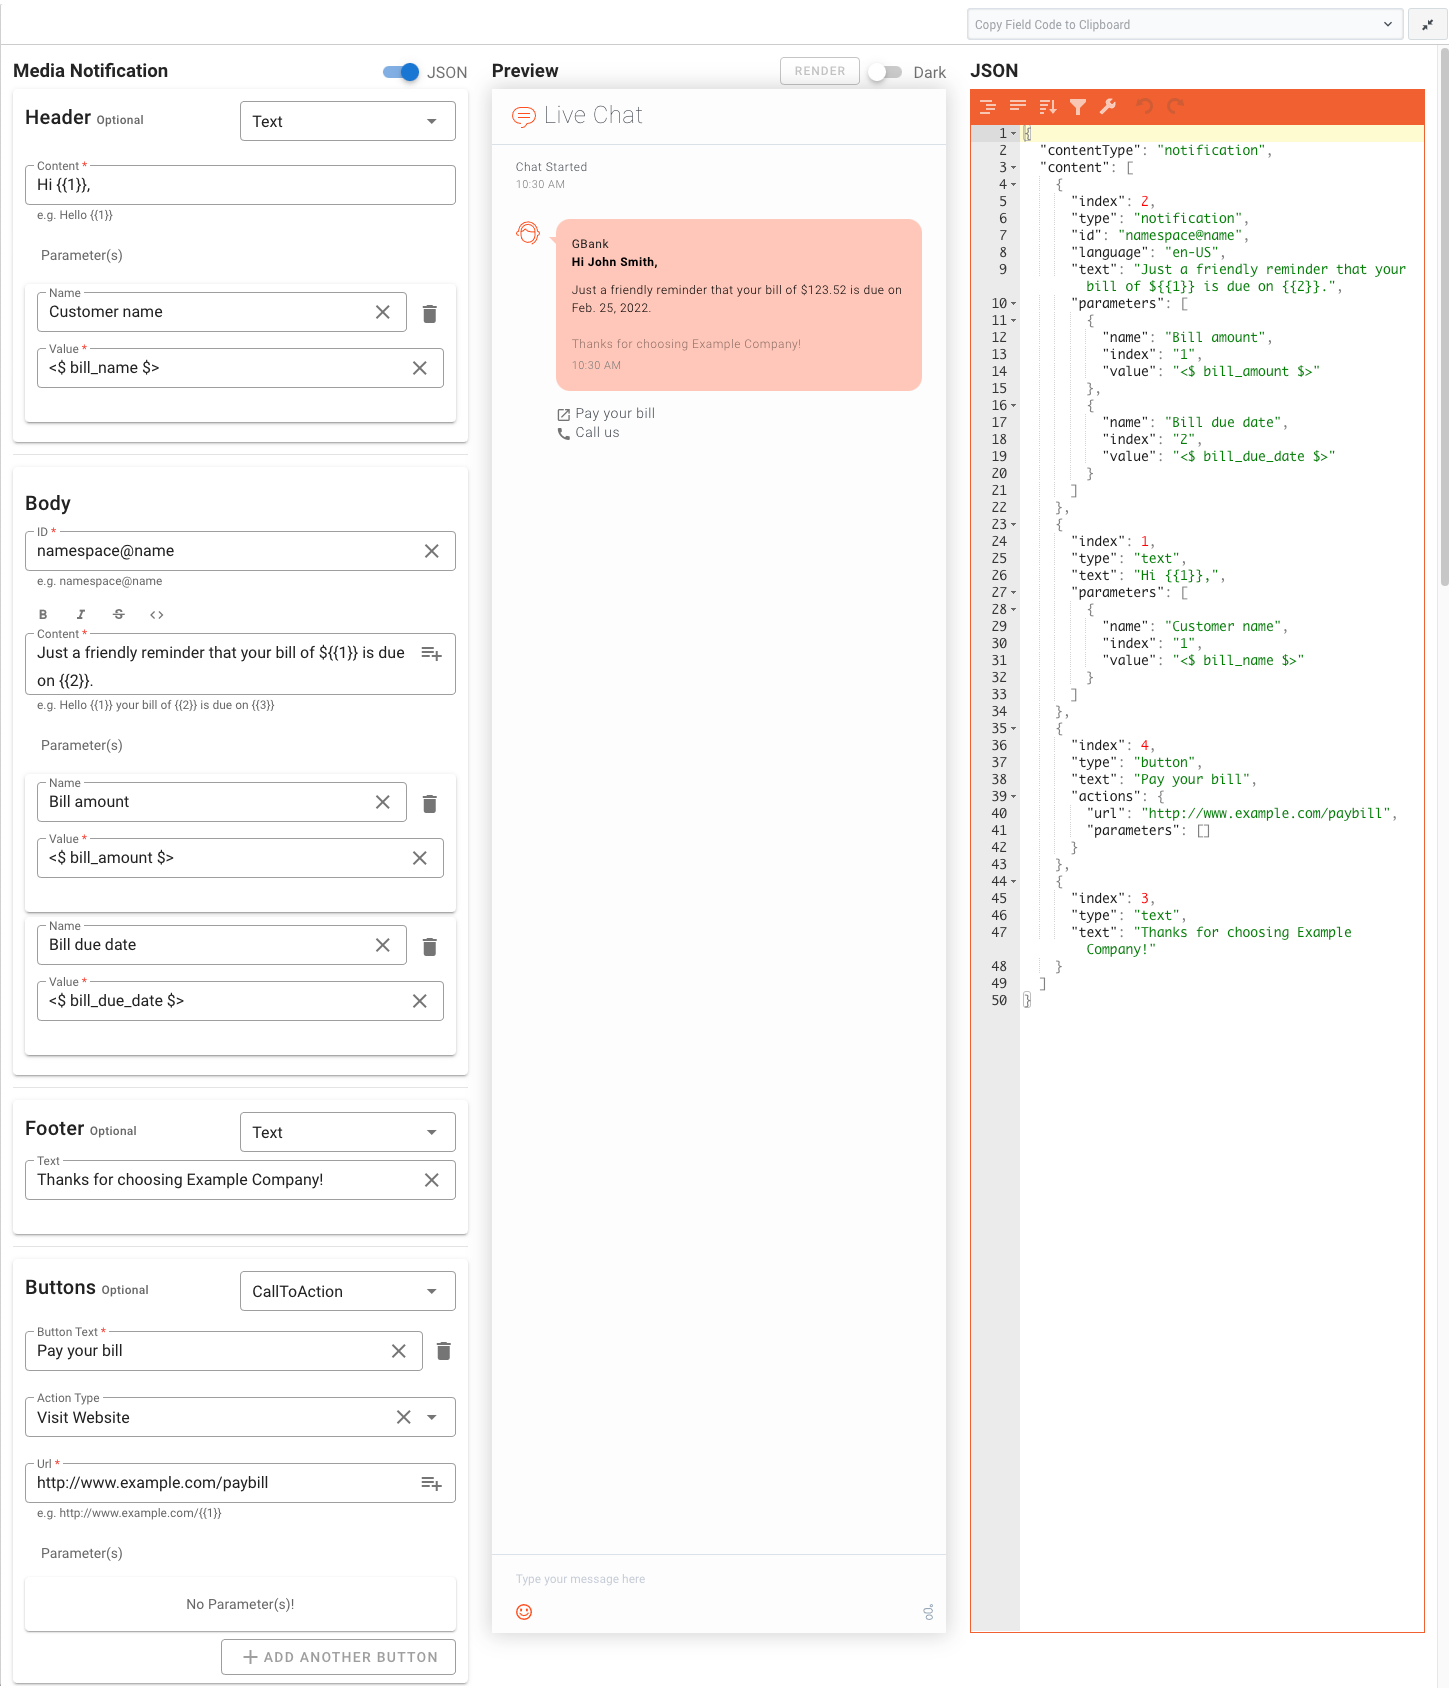
Media Notifications correspond to WhatsApp Message Templates, but you can use them anytime you must send structured, predefined information to your customers. Use parameters and field codes to customize these notifications with details that are specific to your customer, such as their name or account information.
A Media Notification standard response has four sections:
- Header (optional)
- Body (required)
- Footer (optional)
- Buttons (option)
When you insert Custom Variables (created in the Custom Variable tab) and System Variables (created by the system and related to interaction, agent, and customer) in the expected fields, the RENDER button appears. Click the RENDER button to fetch the default values of custom and system variables.
Header
In the Header section, choose the type of content to include, Text or Media.
If you choose Text, the display updates with a Content field where you can add some introductory text, such as a greeting. To insert a parameter in the Content—a name, for example—click (![]() ). In the Parameters section, give your parameter a Name and Value, such as a field code so you can personalize the greeting.
). In the Parameters section, give your parameter a Name and Value, such as a field code so you can personalize the greeting.
If you choose Media, select the file type (File, Image, or Video) and upload the file.
Body
In the Body section, provide an ID. (After WhatsApp has approved the media notification, it sends the ID to you.)
In the Content field, fill in the main text for your message and add any necessary parameters. To format text, highlight one or more words and click the related button for bold, italic, strikethrough, or code.Footer
If your notification requires a Footer section, choose Text from the drop-down and provide some Text.
Buttons
In the Buttons section, first choose a type: CallToAction or QuickReply.
For CallToAction, specify the Button Text and choose an Action Type: Visit Website or Call Phone Number. If you select Visit Website, provide the URL with any necessary parameters. If you select Call Phone Number, provide the Phone Number.
You can add up to two buttons, which are displayed below the footer at the bottom of the notification.
List Template responses
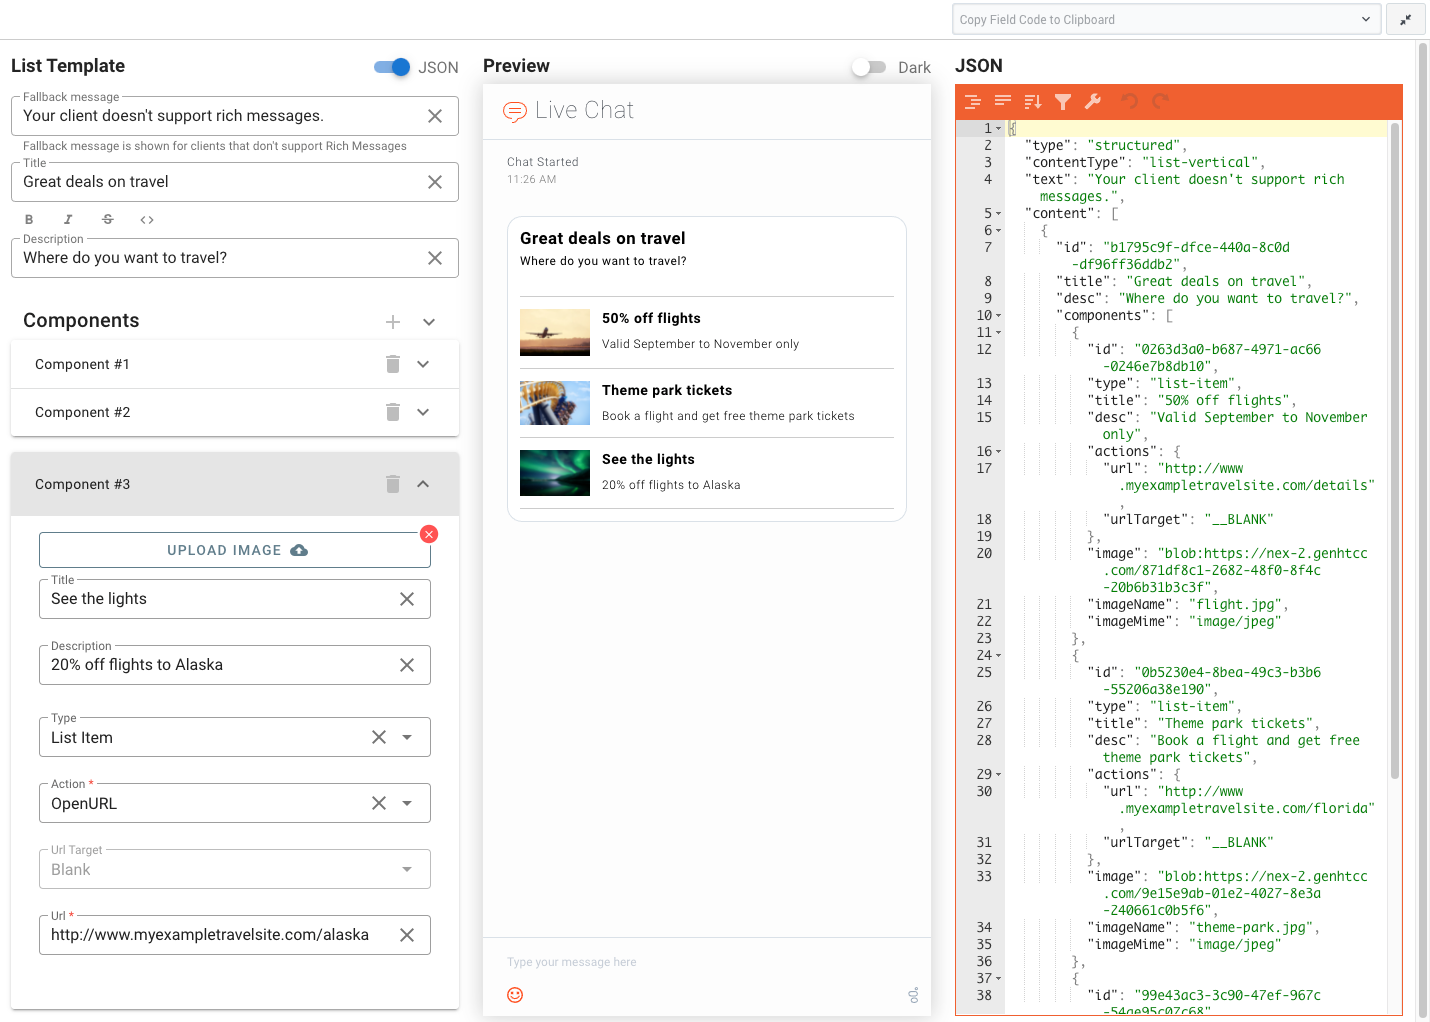
A List Template lets you create custom cards with list items made up of an image, text, and clickable area. See List Template for details.
To create a List Template standard response, first define a Fallback message to display to users who don't support rich messages. This field is populated by default, but you can adjust it to whatever suits your needs.
Give your List Template a Title. You can format text in the Description field by highlighting one or more words and click the related button for bold, italic, strikethrough, or code.
Click (![]() ) to create a component, a clickable list item that is displayed in the response. Give your component and image, Title, and Description (optional). The Type field has two options:
) to create a component, a clickable list item that is displayed in the response. Give your component and image, Title, and Description (optional). The Type field has two options:
- List Item—The image is displayed to the left of the title and description.
- Big List Item—The component fields are stacked in this order: image, title, description.
You can use combinations of List Item and Big List Item in a single List Template standard response.
Define the action for this clickable list item by choosing from the Action drop-down. There are two options:
- OpenURL—Choose this option if you want the click action to open a link. Provide the URL Target, which specifies where the link opens. Currently, "Blank" (open in a new tab or window) is supported. Specify the URL for the clickable area.
- Textback—Choose this option if you want the click action to send the text in the Textback field to the agent when the customer clicks this button.
List Picker responses
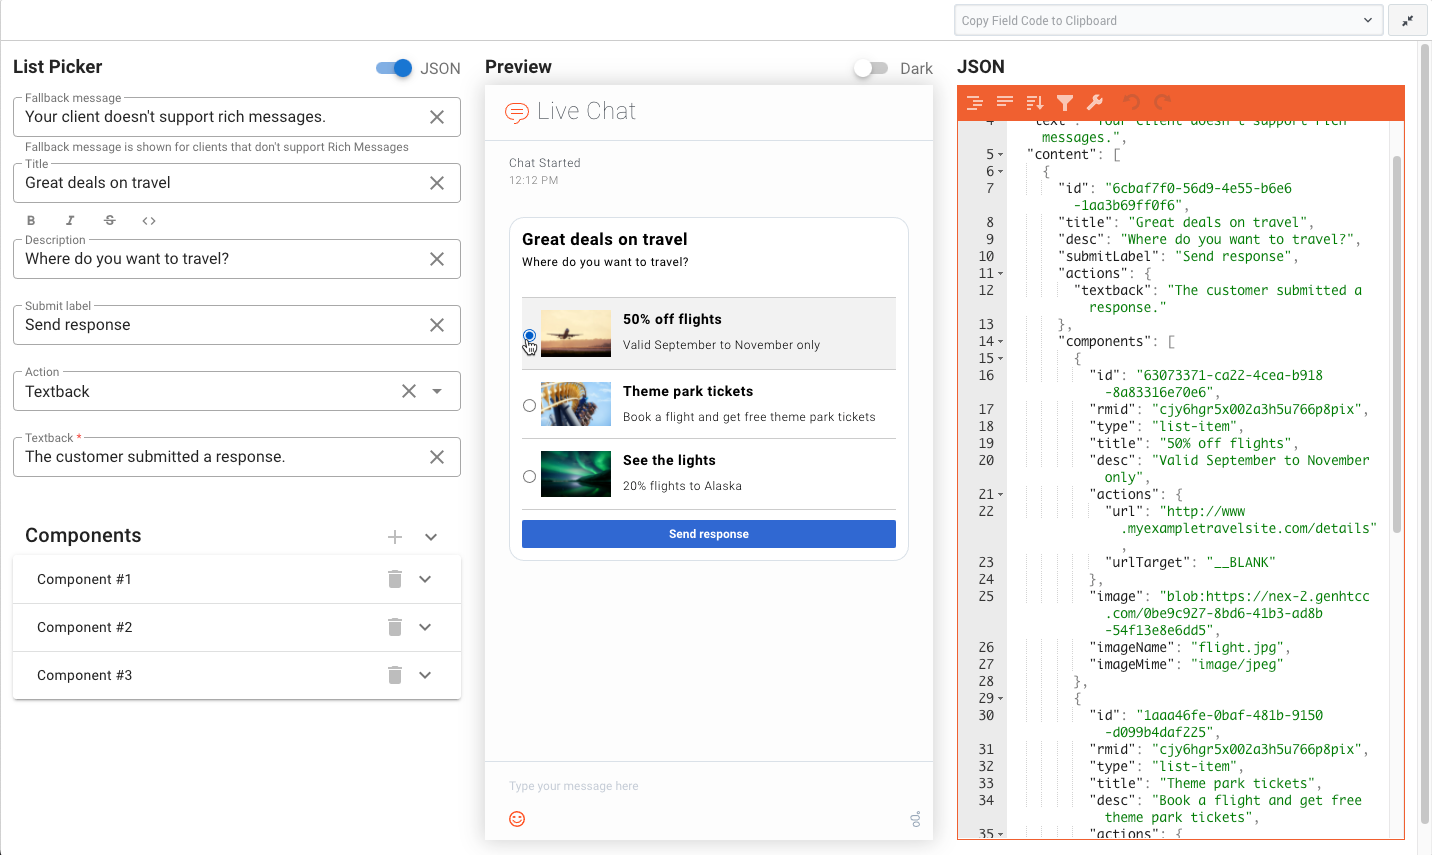
A List Picker is similar to a List Template, except that the user can choose an option in the list and submit it to the agent. See Single Selection List for details.
To create a List Picker standard response, review the details in the List Template section. There are just a few differences in the fields for these two types of rich messaging standard responses.
Define the Submit Label, which is the text displayed on the submit button. This button appears after the user has chosen one of the list items (do the same in the Preview to see how your buttons look). Also specify which Action the button takes: "OpenURL" or "Textback".
Use field codes
You can insert field codes to customize any type of standard response. If the field code you need is not in the list, you can create it using Field Codes Management. Field codes are delimited using <$ … $> syntax. If you type a field code directly into the body of a standard response, then you must enter the delimiters yourself. If you select from the list of field codes, then the delimiters are added automatically.
Characters allowed in names
| Name | Character | Name | Character |
|---|---|---|---|
| Hyphen | - | Exclamation point | ! |
| Number sign, pound | # | Dollar sign | $ |
| Caret | ^ | Asterisk | * |
| Underscore | _ | Curly brackets | { } |
| Angle brackets | <> | Period, full stop | . |
| Backslash | \ | Parentheses | () |
| Question mark | ? | Space | |
| At sign | @ |
Copy a standard response
You can copy responses from the standard responses table in a category. Just click Copy (![]() ) for the standard response you want to copy and then paste it to the current category.
) for the standard response you want to copy and then paste it to the current category.
To copy a standard response to a different category, choose Paste from the category's menu.
Delete a standard response
You can delete standard responses from the responses table view in a category. Just click Delete (![]() ) for the standard response you want to remove.
) for the standard response you want to remove.
Search the category tree
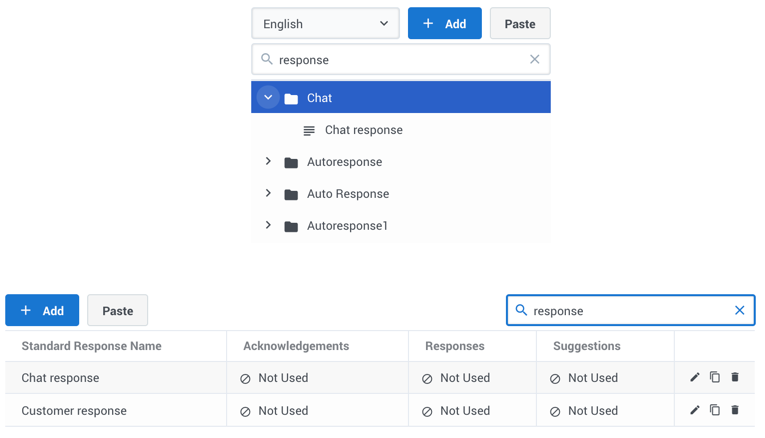
To locate a category or standard response, use the search box above the category tree. The category tree filters automatically based on the search term.
To search for standard responses in a category, use the search box above the responses table. The results filter automatically based on the search term.
