Provision the Voicemail Service
From Genesys Documentation
This topic is part of the manual Voice Microservices Private Edition Guide for version Current of Voice Microservices.
Contents
Learn how to provision the Voicemail Service.
Related documentation:
RSS:
You provision the voicemail service using Agent Setup. Provisioning consists of the following tasks:
- Enable voicemail.
- Create voicemail profiles.
- Configure mailbox settings, as required.
- Configure greetings.
- Bulk-provision mailboxes.
Enabling Voicemail
To provision the voicemail service in Agent Setup, you must first enable voicemail:
- Log in to Agent Setup.
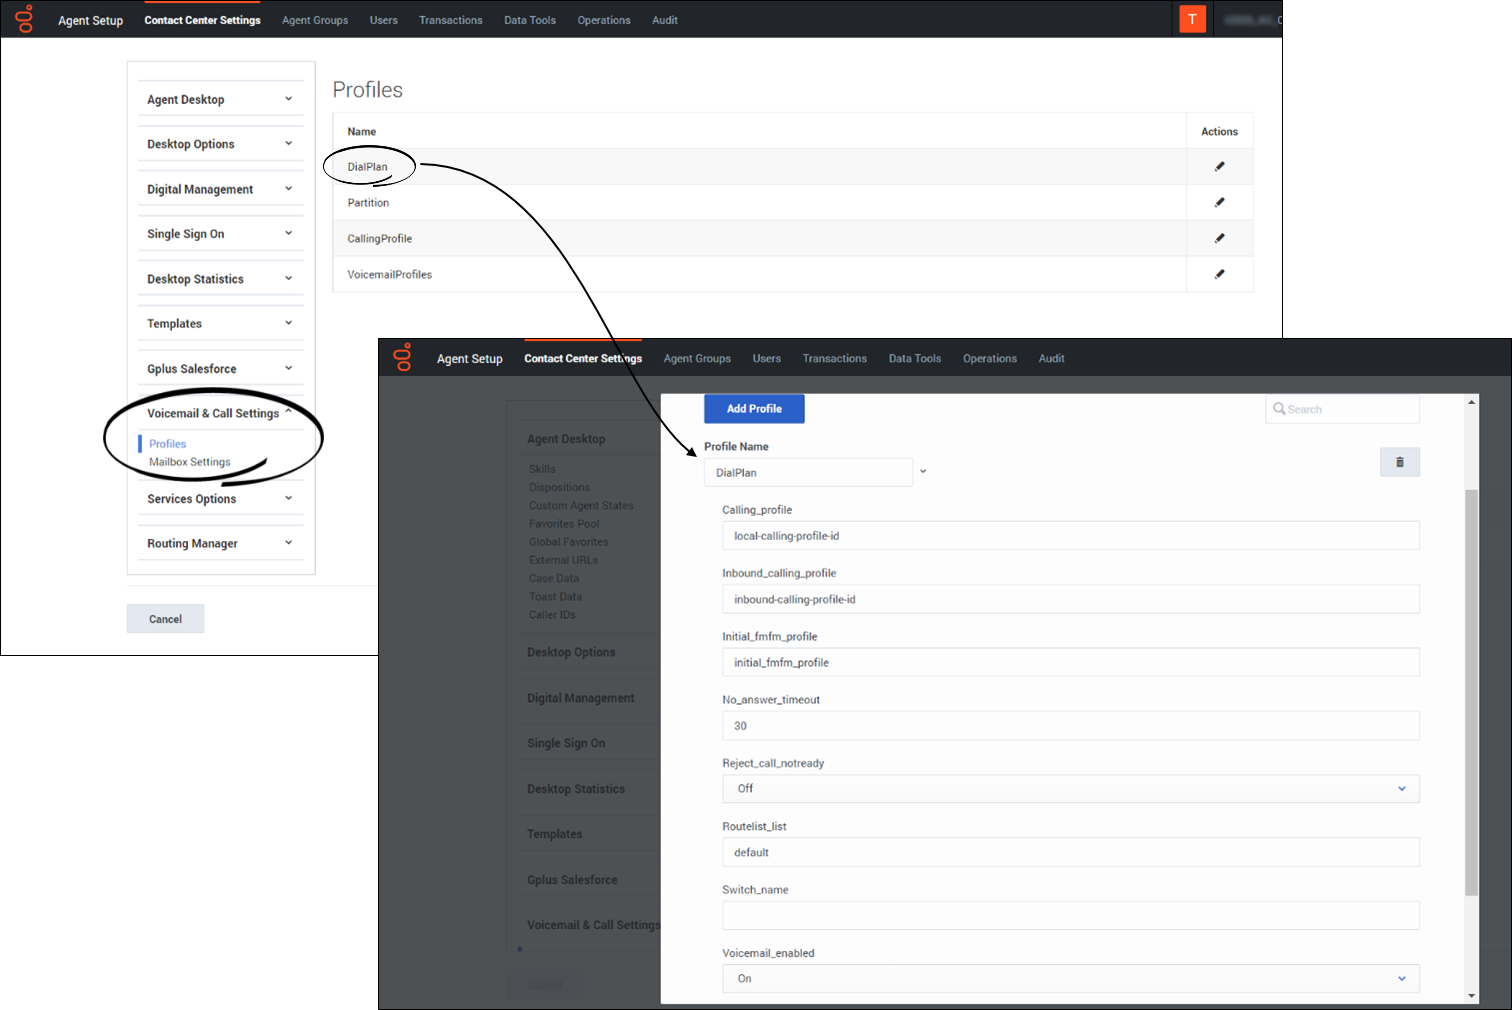
- Navigate to Contact Center Settings > Voicemail & Call Settings > Profiles.
- Select the DialPlan profile.
- Select On in the Voicemail_enabled field.
Managing voicemail profiles
You use voicemail profiles to assign voicemail settings. To create and manage voicemail profiles:
- Log in to Agent Setup.
- Navigate to Contact Center Settings > Voicemail & Call Settings > Profiles > VoicemailProfiles.
- To create a new profile, click Add Profile. To edit an existing profile, select it in the list.
- The following table describes the options you can configure for a voicemail profile.
| Option | Values (bold indicates the default value) | Description |
|---|---|---|
| Email Body | "Mailbox <MailboxID> has a new message from <CallerID>", or any text | The body of the notification email. It can contain any of the following parameter tokens:
To insert a parameter, type < and select from the list or type the tag name surrounded by angle brackets: <tagname>. The message also includes any static text you type. |
| Email From Address | user@domain | The email address from which you want to send notifications. |
| Email Notification | true, false | Enable or disable email notifications. |
| Email Subject | "Genesys Voicemail Notification: New Message from <CallerID>", or any subject line | The subject line of the notification email. It can contain any of the parameter tokens available in the Email Body. |
| Max Duration | 30, or any positive integer | Specifies, in seconds, the maximum message length. |
| Max Message Count | 100, or any positive integer | Type a value to set a new maximum number of messages. |
| Retention Limit | 10, 20, 30, 40, 50, 60 | Deletes the voicemail from storage after the configured number of days. |
| Voicemail Forwarding | true, false | When the Voicemail Forwarding option is set to true, you can use your telephone to forward voicemail messages left in your mailbox to any mailbox. |
Configuring mailbox settings
To configure and manage mailbox settings:
- Log into Agent Setup.
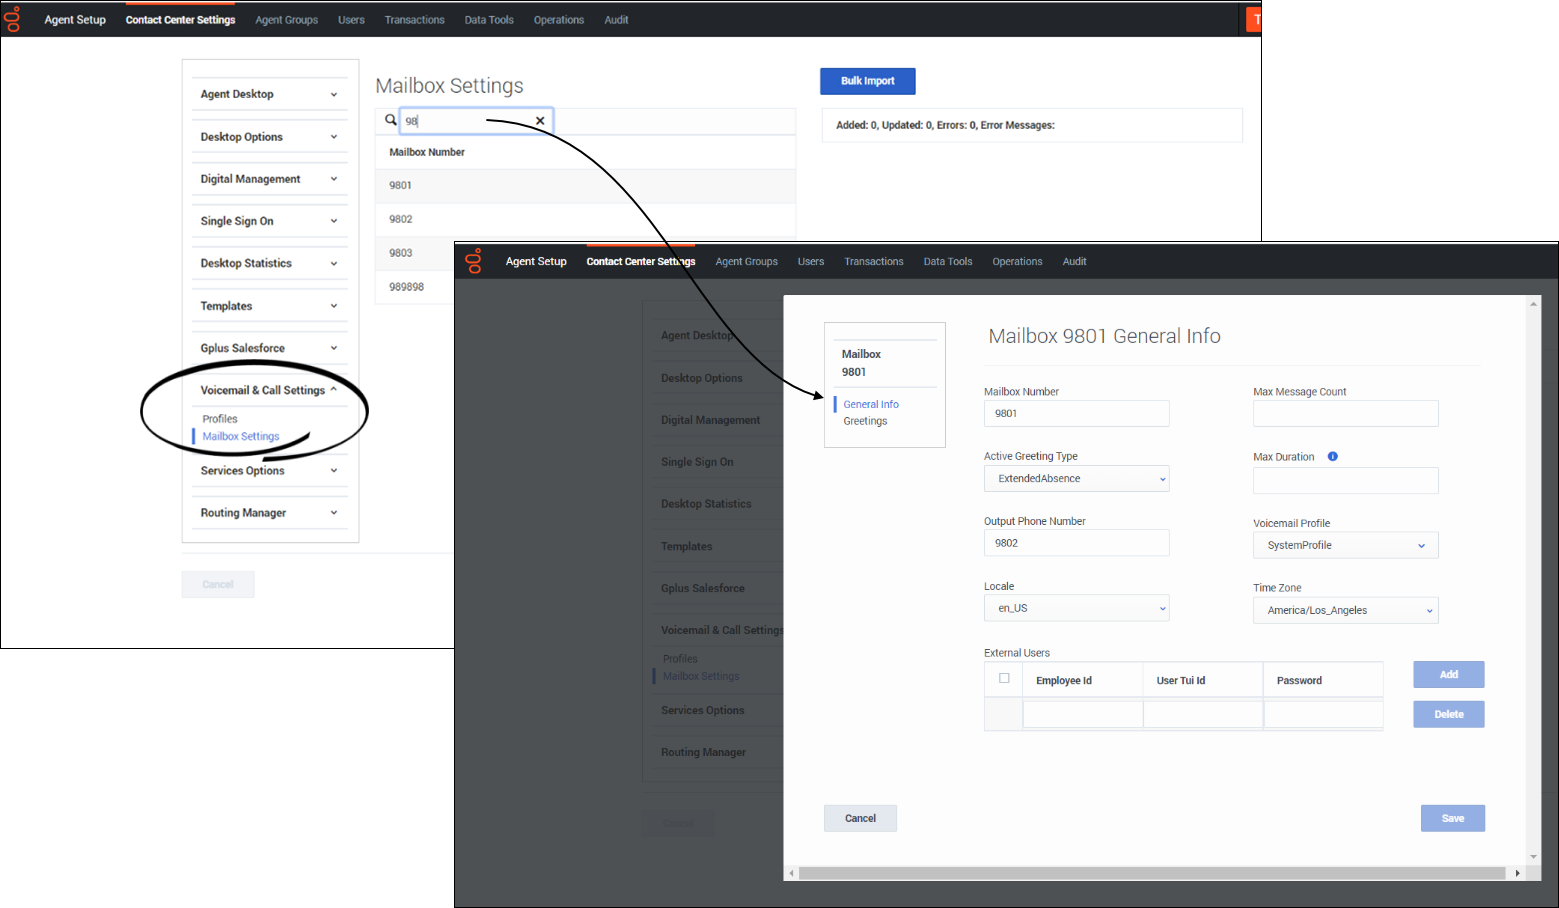
- Navigate to Contact Center Settings > Voicemail & Call Settings > Mailbox Settings.
- Search and select the mailbox for which the settings need to be modified. The selected mailbox opens in a new window.
- On the General Info tab, use the following options to provision the selected mailbox.
| Setting | Values (bold indicates the default value) | Description |
|---|---|---|
| Max Message Count | 100, or any positive integer | Type a value to set a new maximum number of messages. |
| Active Greeting Type | Standard, or a greeting type from the menu | Specifies the type of mailbox greeting. |
| Max Duration | 30, or any positive integer | Specifies, in seconds, the maximum message length. |
| Output Phone Number | System (Not Set), or any phone number or routing point | When set, enables a caller to transfer out of voicemail to the specified destination at any time during a call. Select the radio button and type a value to set a new optout phone number. Select System to restore the value to the number in parentheses, which is the value set at the application or switch level for the configuration option voicemail-optout-destination. |
| Voicemail Profile | SystemProfile, or a profile from the menu | Specifies the profile that the mailbox uses. |
| Locale | en-US, or other locale strings | Specifies the default locale for the Telephone User Interface (TUI). |
| Time Zone | America/Los_Angeles, or a time zone from the menu | Select a time zone from the menu to set a new time zone for all mailboxes that use the system (default) time zone. Select System to restore the system value. |
Managing your greetings
To manage your voicemail greetings:
- Log into Agent Setup.
- Navigate to Contact Center Settings > Voicemail & Call Settings > Mailbox Settings.
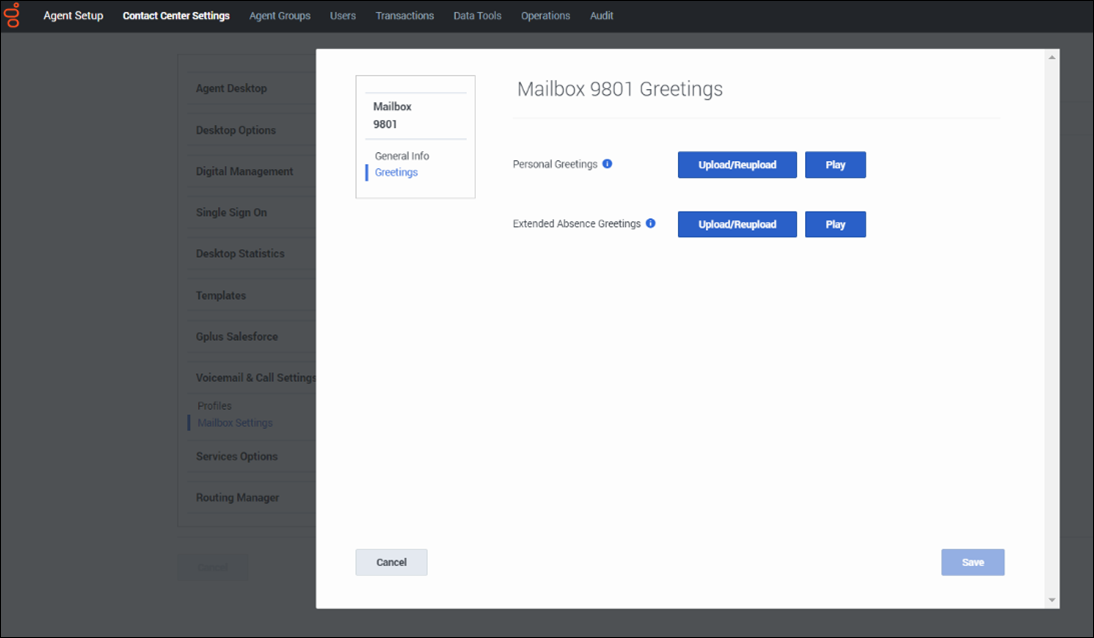
- Search and select the mailbox for which the settings need to be modified. The selected mailbox opens in a new window.
- On the Greetings tab:
- Click Upload/Reupload to upload a Personal or Extended Absence greeting.
- Click Play to listen to the existing Personal or Extended Absence greeting.
Bulk-provisioning mailboxes
To provision many mailboxes simultaneously:
- Log in to Agent Setup.
- Navigate to Contact Center Settings > Voicemail & Call Settings > Mailbox Settings.
- To add or modify mailbox settings simultaneously, click Bulk Import.
- Create a CSV file with the following fields:
- Mailbox Number
- Active Greeting Type
- Output Phone Number
- Locale
- Time Zone
- Max Message Count
- Max Duration
- Voicemail Profile
- Select the created CSV file. The mailbox settings will be updated for the mailboxes mentioned in CSV file after successful Bulk Import.
Comments or questions about this documentation? Contact us for support!


