
Search, display, manage, and update work items
Contents
Quickly filter, find, display, manage the status of, or update the content attributes of work items, emails and leads ("work items") either individually or in bulk.
Overview of search and filter functions
Search for work items

- Search for a specific work item by entering its ID in the Search field at the top of the Universal Queue tab and clicking return.
- Search for any list of work items by entering a text string in the Search field and clicking return.
- Search the work items database directly by using the Lucene query syntax described in the Lucene query syntax document.
- Clear the current search citeria by clicking X in the Search field.
- Create a new Category from the current search criteria by clicking the new Category button in the Search field.
Filter by Category

Using the Filter & View tab

Save filters and views

Use the Views button to do the following:
- Select a view for the State column.
- Save/reset filters (Category + query) and views (columns + sorting):
- Save the current filter and/or view for future use (subject to privileges).
- Reset the filter to clear the filtering details from the page.
- Reset the table view to the default.
- Restore the list of preconfigured filter and view states.
Extended states
The workitem's state is displayed in an extended State column in Workload Manager. The table below describes the meaning of the symbols.
| Extended | Colored | Description |
|---|---|---|
| New | ||
| Not yet distributed | ||
| Classified | ||
| Queued | ||
| Held | ||
| In routing state, not yet assigned | ||
| Being processed by an agent | ||
| Completed with agent involvement | ||
| Expired (reached its due date) with agent involvement | ||
| Completed without agent involvement | ||
| Expired (reached its due date) without agent involvement | ||
| Workitem has been deleted | ||
| Workitem has an error |
Search by time interval

Use the Select time interval button (which shows the currently selected time interval) to display either:
- Quick search using predefined time ranges such as This week, Yesterday, Last 15 min, Last 7 days, and so on.
- Absolute date/time ranges for customized time intervals.
- Select a From date and time using the date calendar and time drop-down field (hh:mm format). You can use the Day start and Day end selectors to select the day start and end times configured for your contact center. A time zone indicator is available to help you with time selection.
- Select a To date and time using the date calendar and time drop-down field (hh:mm format). You can use the Day start and Day end selectors to select the day start and end times configured for your contact center. A time zone indicator is available to help you with time selection.
- Click Save to apply the filter.
Display and update work item attributes
For individual work items
Select a work item and/or click one of its attributes to display all its attributes.
Toggle the display of specific fields in the summary display by clicking the symbols indicated.
To update the attribute values of a work item, click the value you want to change, add the new value, then click the Update button. System properties of the work item are protected, so you can't update them.
Add an attribute to the display by clicking Add attribute... at the bottom of the first panel of attributes.
Search for other work items corresponding to a specific attribute value by clicking on the search symbol next to the attribute.For multiple work items
To make an identical value change to one or more attributes of multiple work items:
- Select the work items by checking their checkboxes or by filtering them using a search query
- Click the value you want to change.
- Add the new value(s).
- Click the Bulk Update button.
System properties of the work item are protected, so you can't update them.
Delete attachments from emails
Supervisors can delete one or more attachments from emails.
The Delete feature must be enabled using the option enableDeleteAttachments : True in Workload Manager’s interaction-workspace section.
To delete an attachment from an email:
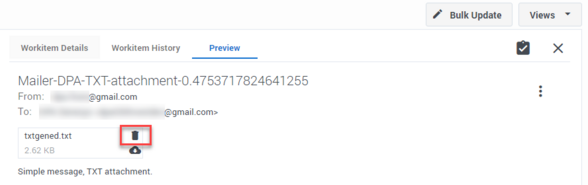
- Select an email by clicking on the item. The Workitem Details tab displays the email properties.
- Click Preview. A preview of the email is shown along with any attachments the email contains in the Preview tab.
- Click the Delete icon displayed over the attachment that you want to delete. TipYou can download an attachment using the download icon and see whether the attachment must be deleted or not. For example, if the attachment contains any Personal Identifiable Information (PII), you can choose to remove it.
- Click Yes on the confirmation window. The attachment is deleted from the email.

Manage work items

Use the control buttons at the top of the Universal Queue window to do the following to either individual or multiple work items:
- Activate work item(s)—Select a work item(s) that has been assigned an activation date in the future, and click Activate to activate it immediately.
- Hold work item(s)—Select a work item(s) and click Hold. Held work items can't be reprioritized or distributed, but you can cancel, restart or resume them.
- Resume work item(s)—Select a held work item(s) and click Resume to resume processing. You can only resume held work items.
- Cancel work item(s)—Select a work item(s) and click Cancel to permanently cancel it. You can't cancel a work item if it's been completed, canceled, or rejected. But you can cancel a work item that has already been assigned to an agent. Canceled work items remain in IWD for a configurable (by Genesys) amount of time before being deleted. Work items can only be completed through the source system or the API, so Genesys recommends canceling any workitems that you no longer want matched with an employee.
- Restart work item(s)—Select a work item(s) to send it back to the beginning of the process, where it will be treated as if it was new.
Any action can be applied to one or many individually selected items (checked in the table) or to all the items that satisfy the current query, including time frame and any applied Category filter.
Use the Rows per page counter at the bottom left to choose to display either 30, 50, 80 or 100 items per page.
Work items that are in the Default category have not been segmented by any of the existing Categories. Genesys recommend that administrators monitor these work items to decide whether a category should be established to segment them.
Transfer of work items to Universal Queue
After a work item is assigned to an agent, the work item can be transferred back to the Universal Queue during the following scenarios:
- Agents can transfer work items or emails back to the Universal Queue for re-classification from within the Agent Workspace if the agent identifies that the work item is categorized incorrectly.
- IWD can be configured to automatically pull work items or emails from agents’ workbins if these items are not processed within the configured time. IWD subsequently sends these items to available agents again.