Difference between revisions of "PEC-DC/Current/Administrator/GSEHub"
m (Text replacement - "PureEngage" to "Genesys Engage") |
|||
| (5 intermediate revisions by 3 users not shown) | |||
| Line 3: | Line 3: | ||
|DisplayName=Integrate with Genesys Hub | |DisplayName=Integrate with Genesys Hub | ||
|TocName=Integrate with Genesys Hub | |TocName=Integrate with Genesys Hub | ||
| − | |Context=Genesys Hub is our centralized platform that connects to Twitter, Facebook and WhatsApp. Set up an account with Genesys Hub and enable channels and services. | + | |Context=Genesys Hub is our centralized platform that connects to Twitter, Facebook, and WhatsApp. Set up an account with Genesys Hub and enable channels and services. |
|ComingSoon=No | |ComingSoon=No | ||
| − | |Platform=GenesysEngage- | + | |Platform=GenesysEngage-cloud |
|Role=Administrator | |Role=Administrator | ||
|Section={{Section | |Section={{Section | ||
|alignment=Vertical | |alignment=Vertical | ||
| − | |structuredtext=Complete the steps below to set up an account with Genesys Hub and enable channels and services, | + | |structuredtext=Complete the steps below to set up an account with Genesys Hub and enable channels and services. When you have finished, go back to {{Link-SomewhereInThisManual|topic=GSEFacebookTwitter|anchor=top|display text=Set up Facebook and Twitter}} or {{Link-SomewhereInThisManual|topic=GSEWhatsApp|anchor=top|display text=Set up WhatsApp}} to finish the rest of the setup. |
| − | {{NoteFormat| | + | {{NoteFormat|To get access to Genesys Hub, contact your Genesys representative.|}} |
|Status=No | |Status=No | ||
}}{{Section | }}{{Section | ||
| Line 21: | Line 21: | ||
|structuredtext=Go to [https://socialanalytics.genesyscloud.com/gse/signup https://socialanalytics.genesyscloud.com/<wbr />gse/<wbr />signup] and complete the form. | |structuredtext=Go to [https://socialanalytics.genesyscloud.com/gse/signup https://socialanalytics.genesyscloud.com/<wbr />gse/<wbr />signup] and complete the form. | ||
| − | You | + | You will receive a confirmation email titled "Confirmation required for Genesys Social Engagement deployment" (don't forget to check your spam folder). Follow the steps in the email and login to Genesys Hub. |
'''Note:''' You can always use {{#Widget:ExtLink|link=https://socialanalytics.genesyscloud.com/|displaytext=https://socialanalytics.genesyscloud.com}} to access Hub. If you prefer a static URL, you can use {{#Widget:ExtLink|link=https://static.socialanalytics.genesyscloud.com/|displaytext=https://static.socialanalytics.genesyscloud.com}} instead. | '''Note:''' You can always use {{#Widget:ExtLink|link=https://socialanalytics.genesyscloud.com/|displaytext=https://socialanalytics.genesyscloud.com}} to access Hub. If you prefer a static URL, you can use {{#Widget:ExtLink|link=https://static.socialanalytics.genesyscloud.com/|displaytext=https://static.socialanalytics.genesyscloud.com}} instead. | ||
| Line 29: | Line 29: | ||
|anchor=twitteraccount | |anchor=twitteraccount | ||
|alignment=Horizontal | |alignment=Horizontal | ||
| − | |Media= | + | |Media=Video |
| − | |image= | + | |image=754739765 |
| + | |AltText=This video is about creating a Twitter account channel | ||
|structuredtext=Create a Twitter account channel to authenticate with Twitter using your organization's Twitter handle (login) and password. | |structuredtext=Create a Twitter account channel to authenticate with Twitter using your organization's Twitter handle (login) and password. | ||
| Line 37: | Line 38: | ||
*Choose ''Twitter:Account'' for the '''Channel Type'''. | *Choose ''Twitter:Account'' for the '''Channel Type'''. | ||
*Set the '''Channel Name''' to <tt><your channel's Twitter handle> - Twitter Account</tt>. Example: <tt>@Genesys - Twitter Account</tt>. | *Set the '''Channel Name''' to <tt><your channel's Twitter handle> - Twitter Account</tt>. Example: <tt>@Genesys - Twitter Account</tt>. | ||
| − | *Add an optional description of how you | + | *Add an optional description of how you use the channel. |
Save your channel and click '''Login to Twitter'''. | Save your channel and click '''Login to Twitter'''. | ||
| − | Enter the Twitter credentials for your organization: | + | Enter the Twitter credentials for your organization: user name (handle) or email, and the password associated with your Twitter account. '''Important:''' Also check '''Remember me'''. |
| + | |||
| + | If you have successfully authenticated, you see the following message: '''Access_token successfully saved'''. | ||
| − | + | After saving your channel, open the Genesys Hub application and save the '''Channel ID''' for further configuration. | |
| + | {{{!}} | ||
| + | !Parameter | ||
| + | !Variable | ||
| + | !Type | ||
| + | !Notes | ||
| + | {{!}}- | ||
| + | {{!}}Hub Service Channel ID | ||
| + | {{!}}$channelId | ||
| + | {{!}}UUID string | ||
| + | {{!}}Your Hub service Channel ID | ||
| + | {{!}}} | ||
|Status=No | |Status=No | ||
}}{{Section | }}{{Section | ||
| Line 49: | Line 63: | ||
|anchor=twitterservice | |anchor=twitterservice | ||
|alignment=Horizontal | |alignment=Horizontal | ||
| − | |Media= | + | |Media=Video |
| − | |image= | + | |image=753884421 |
| − | |structuredtext=Create a Twitter service channel to listen for mentions of your | + | |AltText=This video is about creating a Twitter service channel. |
| + | |structuredtext=Create a Twitter service channel to listen for mentions of your keywords on Twitter. | ||
Under '''My Channels''' in the left navigation menu, click '''+Add Channel'''. | Under '''My Channels''' in the left navigation menu, click '''+Add Channel'''. | ||
| Line 57: | Line 72: | ||
*Choose ''Twitter:Service'' for the '''Channel Type'''. | *Choose ''Twitter:Service'' for the '''Channel Type'''. | ||
*Set the '''Channel Name''' to <tt><your channel's Twitter handle> - Twitter Service</tt>. Example: <tt>@Genesys - Twitter Service</tt>. | *Set the '''Channel Name''' to <tt><your channel's Twitter handle> - Twitter Service</tt>. Example: <tt>@Genesys - Twitter Service</tt>. | ||
| − | *Add an optional description of how you | + | *Add an optional description of how you use the channel. |
|structuredtextwide={{AnchorDiv|managekeywords}} | |structuredtextwide={{AnchorDiv|managekeywords}} | ||
===Best practices for managing keywords in Twitter service channels=== | ===Best practices for managing keywords in Twitter service channels=== | ||
| − | When setting up a Twitter:Service channel, you can add any text in the '''Keyword''' field. For example, if | + | When setting up a Twitter:Service channel, you can add any text in the '''Keyword''' field. For example, if you set up a channel to monitor mentions of Genesys on Twitter, some good keywords might be ''@Genesys'', ''#Genesys,'' and ''Genesys software''. |
| − | Make sure to use keywords that are specific to your business or use case and not too broad or ambiguous. You can check this using Twitter's search functionality at {{#Widget:ExtLink|link=https://twitter.com/search-home|displaytext=https://twitter.com/search-home}}. Enter each keyword, one at a time, and assess the search results. For example, if your company is | + | Make sure to use keywords that are specific to your business or use case and not too broad or ambiguous. You can check this using Twitter's search functionality at {{#Widget:ExtLink|link=https://twitter.com/search-home|displaytext=https://twitter.com/search-home}}. Enter each keyword, one at a time, and assess the search results. For example, if your company is "United Ultra Local Bank Inc.," you might want to use the keyword ''#United.'' This would be a mistake, as it would return a flood of posts related to topics as broad as ''#United Nations'', ''#United States'', ''Manchester #United'', and so on. Even worse would be ''#Check,'' ''savings account,'' ''#balance,'' or ''overdraft'' as these keywords are even more generic. |
| − | Ambiguous keywords can clutter your inbound feed and, | + | Ambiguous keywords can clutter your inbound feed and, if the volumes are too high, Twitter might cut off access to data. If a channel's inbound traffic exceeds 300 tweets per minute for a certain keyword, Genesys Hub automatically removes the keyword from the channel to keep data volumes below Twitter's thresholds. After three days, Hub unblocks the keyword and you can add it back to your channel. If you must add the keyword before the three days are up, contact your Genesys representative. |
| − | After you re-add the keyword, you can run a recovery task to get the data | + | After you re-add the keyword, you can run a recovery task to get the data Hub did not monitor while it blocked the keyword. '''Note:''' Hub does not block the keyword again while data recovery is running. |
|Status=No | |Status=No | ||
}}{{Section | }}{{Section | ||
| Line 74: | Line 89: | ||
|Media=Image | |Media=Image | ||
|image=GSE_Hub_New_FB_Channel.png | |image=GSE_Hub_New_FB_Channel.png | ||
| − | |structuredtext=Create a Facebook account channel to authenticate with Facebook using your organization's Facebook administrator login credentials. These user credentials must have admin access to all the pages you want to associate with this channel. For simplicity, make sure you | + | |structuredtext=Create a Facebook account channel to authenticate with Facebook using your organization's Facebook administrator login credentials. These user credentials must have admin access to all the pages you want to associate with this channel. For simplicity, make sure you log in to Facebook with the same browser you're using for this setup. |
Under '''My Channels''' in the left navigation menu, click '''+Add Channel'''. | Under '''My Channels''' in the left navigation menu, click '''+Add Channel'''. | ||
| Line 80: | Line 95: | ||
*Choose ''Facebook:Account'' for the '''Channel Type'''. | *Choose ''Facebook:Account'' for the '''Channel Type'''. | ||
*Set the '''Channel Name''' to <tt><company name> - Facebook Account</tt>. Example: <tt>Genesys - Facebook Account</tt>. | *Set the '''Channel Name''' to <tt><company name> - Facebook Account</tt>. Example: <tt>Genesys - Facebook Account</tt>. | ||
| − | *Add an optional description of how you | + | *Add an optional description of how you use the channel. |
| − | |structuredtextwide=After saving your channel, the application displays an extended view where you can ''' | + | |structuredtextwide=After saving your channel, the application displays an extended view where you can '''Log in to Facebook'''. |
Use the Facebook admin credentials for your organization. '''Important:''' Also check '''Keep me logged in'''. | Use the Facebook admin credentials for your organization. '''Important:''' Also check '''Keep me logged in'''. | ||
| − | If you have successfully authenticated, you | + | If you have successfully authenticated, you see the following message: '''access_token successfully saved, close window'''. |
|Status=No | |Status=No | ||
}}{{Section | }}{{Section | ||
| Line 93: | Line 108: | ||
|Media=Image | |Media=Image | ||
|image=GSE_fb-update-chnl-svc_9.0.png | |image=GSE_fb-update-chnl-svc_9.0.png | ||
| − | |structuredtext=Create a Facebook service channel to listen for posts, comments and messages on Facebook. | + | |structuredtext=Create a Facebook service channel to listen for posts, comments, and messages on Facebook. |
| − | Under '''My Channels''' in the left navigation menu, click '''+Add Channel'''. | + | |
| + | Under '''My Channels''' in the left navigation menu, click '''+Add Channel'''. | ||
*Choose ''Facebook:Service'' for the '''Channel Type'''. | *Choose ''Facebook:Service'' for the '''Channel Type'''. | ||
*Set the '''Channel Name''' to <tt><company name> - Facebook Service</tt>. Example: <tt>Genesys - Facebook Service</tt>. | *Set the '''Channel Name''' to <tt><company name> - Facebook Service</tt>. Example: <tt>Genesys - Facebook Service</tt>. | ||
| − | *Add an optional description of how you | + | *Add an optional description of how you use the channel. |
| − | |structuredtextwide=After saving your channel, the application displays an extended view where you can configure | + | |structuredtextwide=After saving your channel, the application displays an extended view where you can configure more settings: |
| − | *Choose the pages you want to monitor from the list under '''Facebook Pages'''. This list | + | *Choose the pages you want to monitor from the list under '''Facebook Pages'''. This list contains all the pages your login account can administer. |
| + | |||
| + | Save the '''Channel ID''' for further configuration. | ||
| + | {{{!}} | ||
| + | !Parameter | ||
| + | !Variable | ||
| + | !Type | ||
| + | !Notes | ||
| + | {{!}}- | ||
| + | {{!}}Hub Service Channel ID | ||
| + | {{!}}$channelId | ||
| + | {{!}}UUID string | ||
| + | {{!}}Your Hub service Channel ID | ||
| + | {{!}}} | ||
|Status=No | |Status=No | ||
}}{{Section | }}{{Section | ||
| Line 114: | Line 143: | ||
*Choose ''WhatsApp: Service'' for the '''Channel Type'''. | *Choose ''WhatsApp: Service'' for the '''Channel Type'''. | ||
| − | *Choose ''Genesys | + | *Choose ''Genesys Multicloud CX'' for the '''Platform'''. |
*Enter your business phone number. '''Note:''' If you want to create more than one WhatsApp channel, you must use a unique phone number for each channel. | *Enter your business phone number. '''Note:''' If you want to create more than one WhatsApp channel, you must use a unique phone number for each channel. | ||
| − | *Enter a channel name. This is | + | *Enter a channel name. This is the phone display name in WhatsApp and it's visible to consumers in WhatsApp Messenger. Make sure that the name complies with WhatsApp policies: {{#Widget:ExtLink|link=https://developers.facebook.com/docs/whatsapp/guides/vname|displaytext=https://developers.facebook.com/<wbr />docs/<wbr />whatsapp/<wbr />guides/vname}}. |
| − | *Add an optional description of how you | + | *Add an optional description of how you use the channel. |
|structuredtextwide=After you create the channel, it goes through the following stages in the activation process: | |structuredtextwide=After you create the channel, it goes through the following stages in the activation process: | ||
| Line 124: | Line 153: | ||
#VERIFIED - The channel information was reviewed and is correct. | #VERIFIED - The channel information was reviewed and is correct. | ||
#REGISTERED or REJECTED - The channel can be registered or rejected by the Genesys team based on the provided channel data. | #REGISTERED or REJECTED - The channel can be registered or rejected by the Genesys team based on the provided channel data. | ||
| − | #ACTIVATED - The channel is activated and | + | #ACTIVATED - The channel is activated and enabled for WhatsApp Business. |
|Status=No | |Status=No | ||
}}{{Section | }}{{Section | ||
| Line 130: | Line 159: | ||
|anchor=register | |anchor=register | ||
|alignment=Vertical | |alignment=Vertical | ||
| − | |structuredtext=Register your channel by sending a request to Genesys. The Genesys team verifies, provisions and configures all the required infrastructure for your business contact number to function | + | |structuredtext=Register your channel by sending a request to Genesys. The Genesys team verifies, provisions, and configures all the required infrastructure for your business contact number to function. '''Note:''' After registering, you must contact your Genesys representative if you want to change your business phone number or channel name. |
| − | Under '''My Channels''' in the left navigation menu, edit the {{Link-SomewhereInThisManual|topic=GSEHub|anchor=whatsappservice|display text=WhatsApp service channel}} you created previously and click '''Initiate''' to send a review request to Genesys. Your channel is now in the INITIATED stage. | + | Under '''My Channels''' in the left navigation menu, edit the {{Link-SomewhereInThisManual|topic=GSEHub|anchor=whatsappservice|display text=WhatsApp service channel}} you created previously and click '''Initiate''' to send a review request to Genesys. Your channel is now in the INITIATED stage. Your Genesys representative might contact you to verify your WhatsApp channel, so make sure that all email addresses for the users registered in your account are valid. Next, Genesys verifies the channel and sets the state to VERIFIED. |
| − | After Genesys completes the full review, you'll receive an email indicating whether your request | + | After Genesys completes the full review, you'll receive an email indicating whether your request is approved. Your channel now has one of the following states: |
*REGISTERED - You can now {{Link-SomewhereInThisManual|topic=GSEHub|anchor=whatsappactivate|display text=activate the WhatsApp service channel}}. | *REGISTERED - You can now {{Link-SomewhereInThisManual|topic=GSEHub|anchor=whatsappactivate|display text=activate the WhatsApp service channel}}. | ||
| Line 155: | Line 184: | ||
|Media=Image | |Media=Image | ||
|image=Hub_New_User.png | |image=Hub_New_User.png | ||
| − | |structuredtext=Create an administrator user account in Genesys Hub. Under '''Users''' in the left navigation menu, click '''+Add User'''. | + | |structuredtext=Create an administrator user account in Genesys Hub. |
| + | |||
| + | Under '''Users''' in the left navigation menu, click '''+Add User'''. | ||
*For '''First Name''', use your company's name followed by a 1; for example, <tt>Genesys1</tt>. For '''Last Name''' field, type <tt>admin</tt>. | *For '''First Name''', use your company's name followed by a 1; for example, <tt>Genesys1</tt>. For '''Last Name''' field, type <tt>admin</tt>. | ||
*In the '''Email''' field, type an email address using a format like the following: <tt>Genesys1_Admin@GenSocialEngage.com</tt>. | *In the '''Email''' field, type an email address using a format like the following: <tt>Genesys1_Admin@GenSocialEngage.com</tt>. | ||
*Make sure to choose '''Admin''' for the role. | *Make sure to choose '''Admin''' for the role. | ||
| − | |structuredtextwide=After you create this user, return to the '''Users''' menu. | + | |structuredtextwide=After you create this user, return to the '''Users''' menu. The view shows a list of the users associated with the account that you have set up. Lastly, reset the password for the administrator user to finish the setup. |
|Status=No | |Status=No | ||
}}{{Section | }}{{Section | ||
| − | |sectionHeading=Production | + | |sectionHeading=Production switch |
|anchor=Production_Toggle | |anchor=Production_Toggle | ||
|alignment=Horizontal | |alignment=Horizontal | ||
|Media=Image | |Media=Image | ||
|image=Hub_combo_Production_Toggle.png | |image=Hub_combo_Production_Toggle.png | ||
| − | |structuredtext=You can | + | |structuredtext=You can switch between production and non-production (lab, staging, test) modes for using a switch on each channel. |
| − | Under '''My Channels''' in the left navigation menu, edit a channel and slide the | + | Under '''My Channels''' in the left navigation menu, edit a channel and slide the switch to the right to engage '''Production mode'''. On the confirmation window, add any email address that should receive notifications for the channel. Hub uses these addresses to create a distribution list in the Hub Status page. |
Note the following: | Note the following: | ||
| Line 176: | Line 207: | ||
*Internal Service Level Agreements (SLAs) apply only to accounts in production mode. | *Internal Service Level Agreements (SLAs) apply only to accounts in production mode. | ||
*Genesys carries out recovery, or assists with it, for production accounts only. | *Genesys carries out recovery, or assists with it, for production accounts only. | ||
| − | * | + | *Reports indicate whether the channel is in production mode. |
*Production mode requires all required licenses to be in place. | *Production mode requires all required licenses to be in place. | ||
|Status=No | |Status=No | ||
}} | }} | ||
}} | }} | ||
Latest revision as of 05:00, August 7, 2023
Contents
- 1 Set up your account
- 2 Set up Twitter: Create a Twitter account channel
- 3 Set up Twitter: Create a Twitter service channel
- 4 Set up Facebook: Create a Facebook account channel
- 5 Set up Facebook: Create a Facebook service channel
- 6 Set up WhatsApp: Create a WhatsApp service channel
- 7 Set up WhatsApp: Register a WhatsApp service channel
- 8 Set up WhatsApp: Activate a WhatsApp service channel
- 9 Create an administrator user for the account
- 10 Production switch
Genesys Hub is our centralized platform that connects to Twitter, Facebook, and WhatsApp. Set up an account with Genesys Hub and enable channels and services.
Complete the steps below to set up an account with Genesys Hub and enable channels and services. When you have finished, go back to Set up Facebook and Twitter or Set up WhatsApp to finish the rest of the setup.
Set up your account
Go to https://socialanalytics.genesyscloud.com/
You will receive a confirmation email titled "Confirmation required for Genesys Social Engagement deployment" (don't forget to check your spam folder). Follow the steps in the email and login to Genesys Hub.
Note: You can always use https://socialanalytics.genesyscloud.com to access Hub. If you prefer a static URL, you can use https://static.socialanalytics.genesyscloud.com instead.Set up Twitter: Create a Twitter account channel
Create a Twitter account channel to authenticate with Twitter using your organization's Twitter handle (login) and password.
Under My Channels in the left navigation menu, click +Add Channel.
- Choose Twitter:Account for the Channel Type.
- Set the Channel Name to <your channel's Twitter handle> - Twitter Account. Example: @Genesys - Twitter Account.
- Add an optional description of how you use the channel.
Save your channel and click Login to Twitter.
Enter the Twitter credentials for your organization: user name (handle) or email, and the password associated with your Twitter account. Important: Also check Remember me.
If you have successfully authenticated, you see the following message: Access_token successfully saved.
After saving your channel, open the Genesys Hub application and save the Channel ID for further configuration.
| Parameter | Variable | Type | Notes |
|---|---|---|---|
| Hub Service Channel ID | $channelId | UUID string | Your Hub service Channel ID |
Set up Twitter: Create a Twitter service channel
Create a Twitter service channel to listen for mentions of your keywords on Twitter.
Under My Channels in the left navigation menu, click +Add Channel.
- Choose Twitter:Service for the Channel Type.
- Set the Channel Name to <your channel's Twitter handle> - Twitter Service. Example: @Genesys - Twitter Service.
- Add an optional description of how you use the channel.
Best practices for managing keywords in Twitter service channels
When setting up a Twitter:Service channel, you can add any text in the Keyword field. For example, if you set up a channel to monitor mentions of Genesys on Twitter, some good keywords might be @Genesys, #Genesys, and Genesys software.
Make sure to use keywords that are specific to your business or use case and not too broad or ambiguous. You can check this using Twitter's search functionality at https://twitter.com/search-home. Enter each keyword, one at a time, and assess the search results. For example, if your company is "United Ultra Local Bank Inc.," you might want to use the keyword #United. This would be a mistake, as it would return a flood of posts related to topics as broad as #United Nations, #United States, Manchester #United, and so on. Even worse would be #Check, savings account, #balance, or overdraft as these keywords are even more generic.
Ambiguous keywords can clutter your inbound feed and, if the volumes are too high, Twitter might cut off access to data. If a channel's inbound traffic exceeds 300 tweets per minute for a certain keyword, Genesys Hub automatically removes the keyword from the channel to keep data volumes below Twitter's thresholds. After three days, Hub unblocks the keyword and you can add it back to your channel. If you must add the keyword before the three days are up, contact your Genesys representative.
After you re-add the keyword, you can run a recovery task to get the data Hub did not monitor while it blocked the keyword. Note: Hub does not block the keyword again while data recovery is running.
Set up Facebook: Create a Facebook account channel
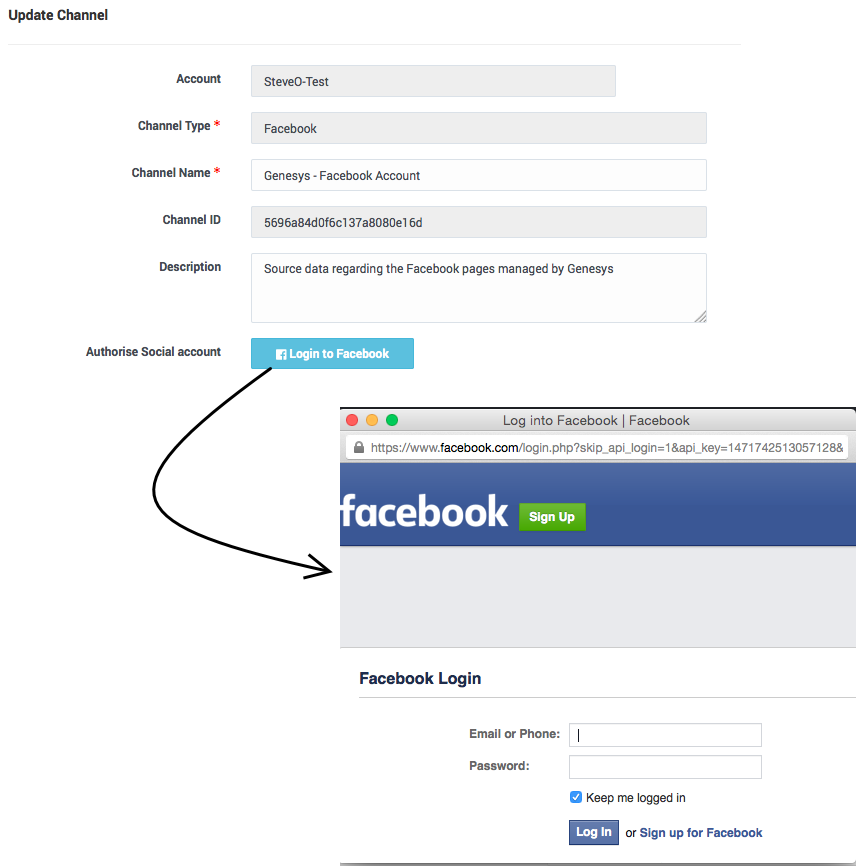
Create a Facebook account channel to authenticate with Facebook using your organization's Facebook administrator login credentials. These user credentials must have admin access to all the pages you want to associate with this channel. For simplicity, make sure you log in to Facebook with the same browser you're using for this setup.
Under My Channels in the left navigation menu, click +Add Channel.
- Choose Facebook:Account for the Channel Type.
- Set the Channel Name to <company name> - Facebook Account. Example: Genesys - Facebook Account.
- Add an optional description of how you use the channel.
After saving your channel, the application displays an extended view where you can Log in to Facebook.
Use the Facebook admin credentials for your organization. Important: Also check Keep me logged in.
If you have successfully authenticated, you see the following message: access_token successfully saved, close window.
Set up Facebook: Create a Facebook service channel
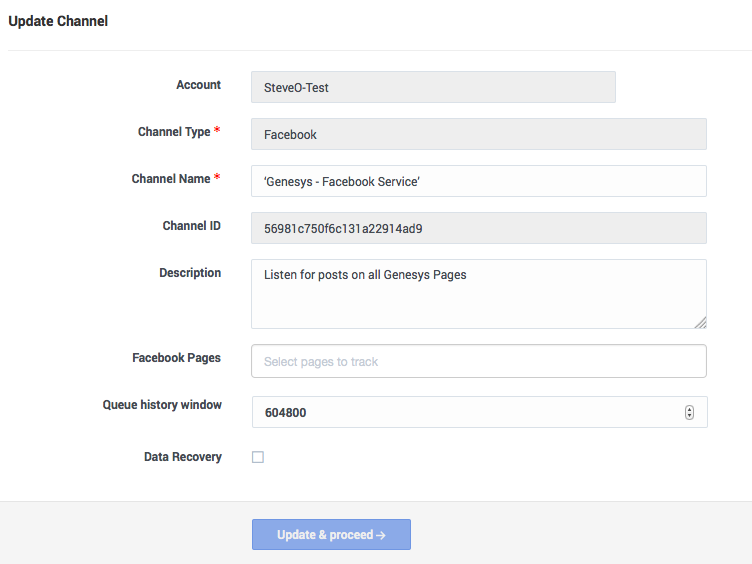
Create a Facebook service channel to listen for posts, comments, and messages on Facebook.
Under My Channels in the left navigation menu, click +Add Channel.
- Choose Facebook:Service for the Channel Type.
- Set the Channel Name to <company name> - Facebook Service. Example: Genesys - Facebook Service.
- Add an optional description of how you use the channel.
After saving your channel, the application displays an extended view where you can configure more settings:
- Choose the pages you want to monitor from the list under Facebook Pages. This list contains all the pages your login account can administer.
Save the Channel ID for further configuration.
| Parameter | Variable | Type | Notes |
|---|---|---|---|
| Hub Service Channel ID | $channelId | UUID string | Your Hub service Channel ID |
Set up WhatsApp: Create a WhatsApp service channel
Create a WhatsApp service channel to communicate with your customers.
Under My Channels in the left navigation menu, click +Add Channel.
- Choose WhatsApp: Service for the Channel Type.
- Choose Genesys Multicloud CX for the Platform.
- Enter your business phone number. Note: If you want to create more than one WhatsApp channel, you must use a unique phone number for each channel.
- Enter a channel name. This is the phone display name in WhatsApp and it's visible to consumers in WhatsApp Messenger. Make sure that the name complies with WhatsApp policies:
https://developers.facebook.com/
docs/ whatsapp/ guides/vname. - Add an optional description of how you use the channel.
After you create the channel, it goes through the following stages in the activation process:
- CREATED - The first stage after channel creation.
- INITIATED - The channel is under review by Genesys.
- VERIFIED - The channel information was reviewed and is correct.
- REGISTERED or REJECTED - The channel can be registered or rejected by the Genesys team based on the provided channel data.
- ACTIVATED - The channel is activated and enabled for WhatsApp Business.
Set up WhatsApp: Register a WhatsApp service channel
Register your channel by sending a request to Genesys. The Genesys team verifies, provisions, and configures all the required infrastructure for your business contact number to function. Note: After registering, you must contact your Genesys representative if you want to change your business phone number or channel name.
Under My Channels in the left navigation menu, edit the WhatsApp service channel you created previously and click Initiate to send a review request to Genesys. Your channel is now in the INITIATED stage. Your Genesys representative might contact you to verify your WhatsApp channel, so make sure that all email addresses for the users registered in your account are valid. Next, Genesys verifies the channel and sets the state to VERIFIED.
After Genesys completes the full review, you'll receive an email indicating whether your request is approved. Your channel now has one of the following states:
- REGISTERED - You can now activate the WhatsApp service channel.
- REJECTED - Contact your Genesys Representative for details about why your channel was rejected.
Set up WhatsApp: Activate a WhatsApp service channel
Activate your WhatsApp channel once you receive a registration confirmation email from Genesys.
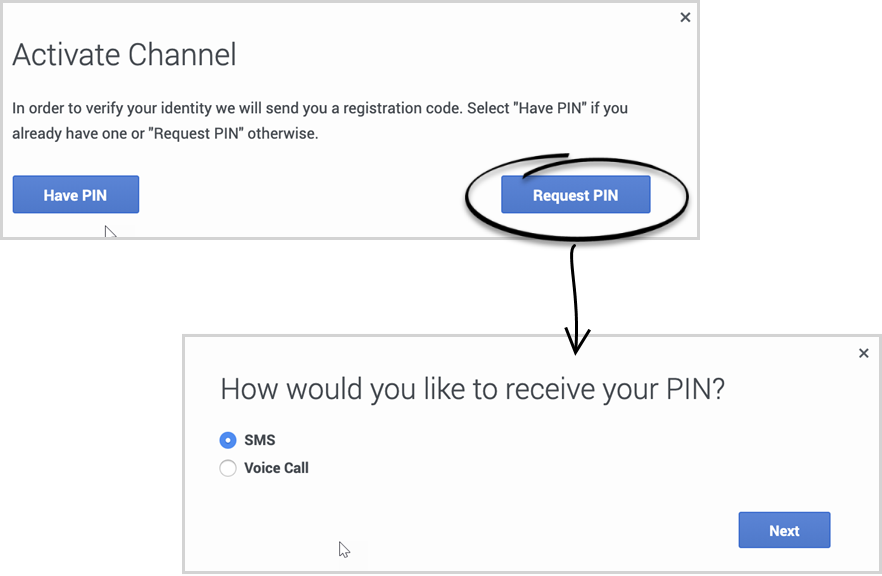
Under My Channels in the left navigation menu, edit the WhatsApp service channel you created previously and click Activate. Now, click Request PIN and choose your contact method. Enter your PIN in the form and click Activate.Create an administrator user for the account
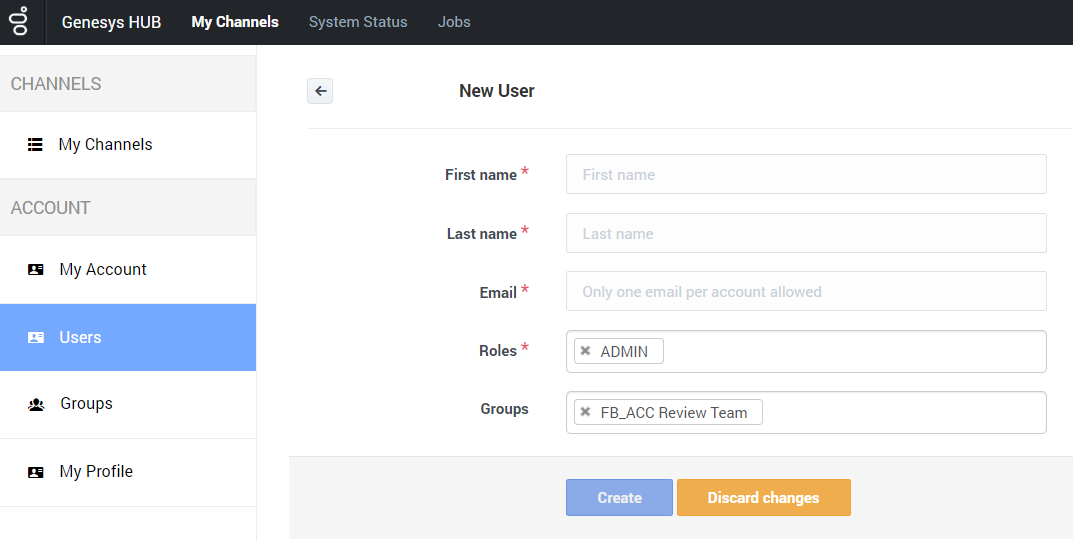
Create an administrator user account in Genesys Hub.
Under Users in the left navigation menu, click +Add User.
- For First Name, use your company's name followed by a 1; for example, Genesys1. For Last Name field, type admin.
- In the Email field, type an email address using a format like the following: Genesys1_Admin@GenSocialEngage.com.
- Make sure to choose Admin for the role.
After you create this user, return to the Users menu. The view shows a list of the users associated with the account that you have set up. Lastly, reset the password for the administrator user to finish the setup.
Production switch
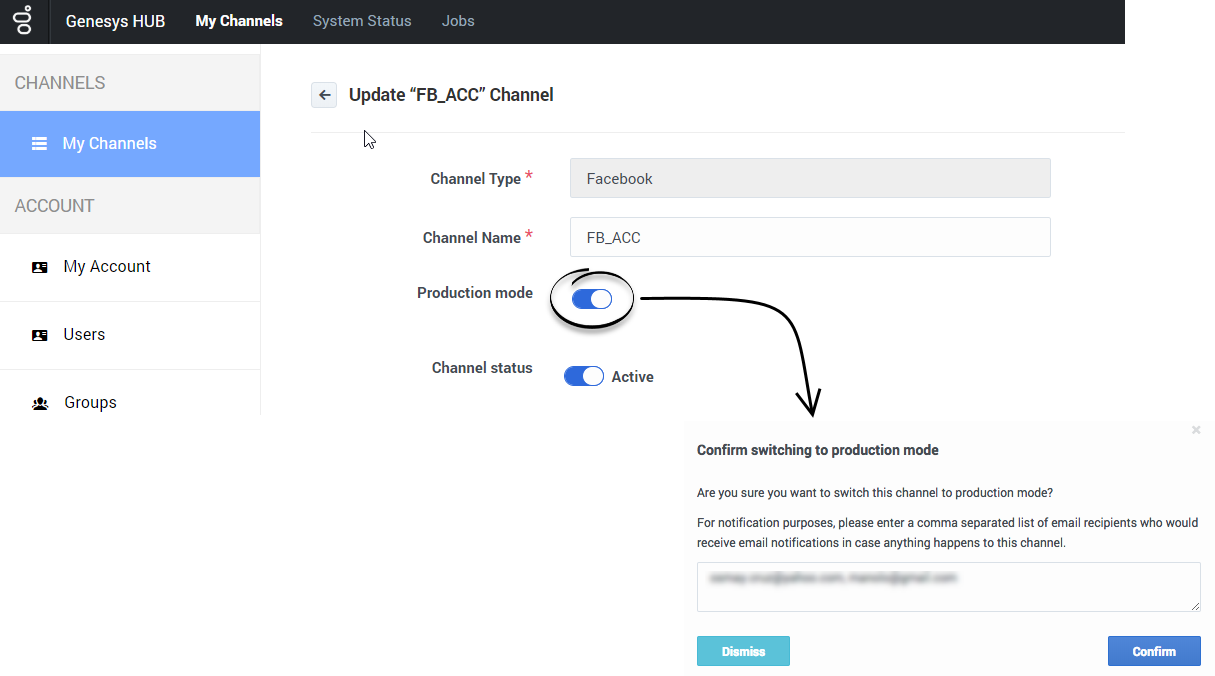
You can switch between production and non-production (lab, staging, test) modes for using a switch on each channel.
Under My Channels in the left navigation menu, edit a channel and slide the switch to the right to engage Production mode. On the confirmation window, add any email address that should receive notifications for the channel. Hub uses these addresses to create a distribution list in the Hub Status page.
Note the following:
- Internal Service Level Agreements (SLAs) apply only to accounts in production mode.
- Genesys carries out recovery, or assists with it, for production accounts only.
- Reports indicate whether the channel is in production mode.
- Production mode requires all required licenses to be in place.


