Supervising agents
Contents
- 1 The Supervisor Role
- 2 How do I monitor my agents?
- 3 How do I coach my agents?
- 4 How do I Barge-in on my agent's call?
- 5 How do I switch my Agent Monitoring Mode?
- 6 How do I manage the State of my agents?
- 7 How do I review an outbound email?
- 8 How do I approve a fixed outbound email?
- 9 How do I use the My Team Workbins?
- 10 How do I manage one or more interactions in a Workbin or Interaction Queue?
- 11 How do I manage My Interaction Queues?
- 12 How do I edit Case Information for interactions in Workbins and Queues?
- 13 What next?
- 14 Top 5 topics
Some workers at contact centers are designated to be Team Leads or Supervisors. In this role, it is your responsibility to ensure that the agents that you supervise are successful.
The Supervisor Role
As a supervisor, your account might be set up to enable you to perform different tasks to manage and support your team and assist with interactions, including monitoring, coaching, barging in on interactions being handled by an agent on your team, managing your agents' state, and reviewing email interactions before they are sent to contacts.
Monitor, Coach, and Barge-in
Agent Workspace enables you to monitor, coach, and/or barge-in to voice and/or chat interactions that are being handled by the agents that you supervise.
- If you are monitoring all the calls of a specific agent, monitoring will resume with the next call unless the contact opts out.
- If you are monitoring only the current call, you will not be able to monitor the next call automatically. If a contact has opted out of call monitoring for the current call, you might see a notice alerting you that the call cannot be monitored.
You can monitor their performance on voice calls and chat interactions, coach them on voice calls and chat interactions as part of their training or to help with a difficult-to-handle contact, or join (barge-in to) a voice call or chat interaction to help the contact directly.
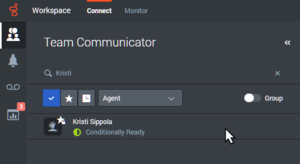
You select which agent or agents to monitor by using the Team Communicator.
- You can monitor only one agent at a time on the voice channel.
- You can monitor several agents simultaneously on the chat channel.
- If an agent that you want to monitor is logged in to both the voice and chat channels, you can monitor that agent on both channels.
When the agent whom you are monitoring accepts an interaction, an interaction notification is displayed on your desktop. If you accept the interaction, an interaction window is displayed on your desktop, and you are connected to the voice call or chat interaction.
- If you are monitoring the agent, neither the agent nor the contact can hear you or are aware of your presence unless the agent's account is configured to notify the agent when he or she is being monitored (an icon is displayed in the interaction window), or he or she might be configured to be monitored without his or her knowledge.
- If you are coaching an agent during a voice call, the agent can hear you, but the contact cannot. If you are coaching an agent during a chat interaction, the agent can see your chat messages, but the contact cannot.
- You can choose to join (barge-in to) a call or chat interaction that you are monitoring.
- Agent Workspace enables you to switch from certain team supervision modes to others.
How do I monitor my agents?
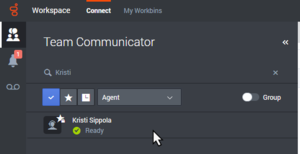
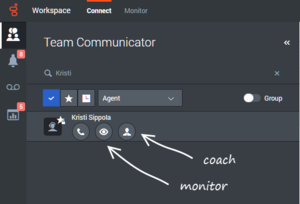
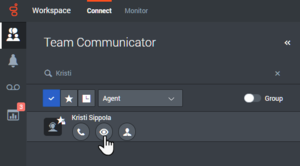
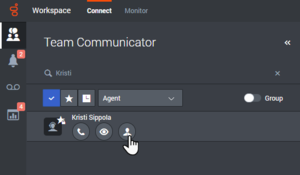
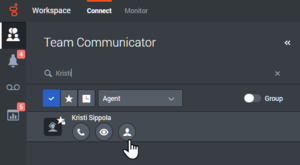
You start monitoring an agent in your group by using the Team Communicator to find the agent. In the Action Menu, select Monitor Agent (![]() ).
).
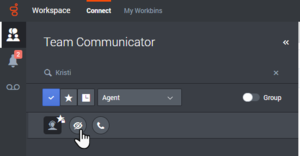
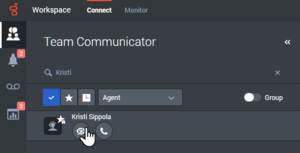
You can end monitoring an agent by using the Team Communicator and selecting Stop Monitoring in the Action Menu (![]() ).
).
You can stop monitoring the current interaction by clicking End Monitoring (![]() ) in the Call Actions toolbar in the interaction window.
) in the Call Actions toolbar in the interaction window.
When you monitor a selected agent who is already handling an interaction, an interaction preview window tells you that the selected agent is handling an interaction. Your account might be set up to let you start monitoring the current voice interaction of an agent; if not, you can monitor the next voice interaction of the agent.
Monitoring a Voice Interaction
Monitoring an agent who is handling an interaction means that you can listen to a voice interaction between an agent and a contact without the agent or contact being aware that you are listening. Agent accounts can be configured to notify the agent when they are being monitored.
- Use the Team Communicator in the Main Window to find an agent in the agent group to which you have been assigned as a Supervisor.
- Open the Action Menu for the agent whom you want to monitor and select Monitor Agent.
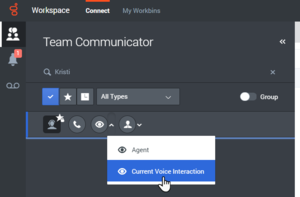
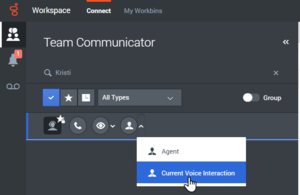
Or, to monitor the next interaction if your account is set up to let you monitor the current or next interaction, open the Action Menu for the agent you want to monitor and select Monitor, then select Agent. To monitor the current interaction, open the Action Menu for the agent you want to monitor and select Monitor, then select Current Voice Interaction.
A system message is displayed that informs you that monitoring of interactions has started for the selected agent.
In the Team Communicator, the Action Menu for the agent whom you are monitoring changes to the Stop Monitoring button. - When the monitored agent accepts a voice interaction, a notification is displayed on your desktop. Click Accept to begin monitoring the interaction. The Voice Interaction Monitoring window is displayed on your desktop and you are connected to the call. Neither the contact nor the agent can hear you, but you can hear both parties.
If you do not click Accept, the notification will be dismissed automatically.
In some environments, if the agent is already handling an interaction when you start monitoring, you immediately start monitoring the call.
If the account of the monitored agent is configured so that the agent is notified when he or she is being monitored, an eye icon is displayed next to the party-interaction icon in the Voice Interaction window on the agent's desktop.The same icon is displayed in the Voice Interaction Monitoring window on your desktop next to the party Action menu.
- During a monitoring session, you can perform the following actions from the Voice Interaction Monitoring window:
- End Monitoring—Click End Monitoring (
 ) in the Supervisor controls of the Call Actions toolbar to end the monitoring session.
 - Barge-in—Click Barge-in (
 ) in the Supervisor controls of the Call Actions toolbar to join the monitored call. Both parties are able to hear you. You can switch back to monitoring by clicking End the Call (
 ) in the Call Actions toolbar.
If the agent ends the call while you are still monitoring the agent, your monitoring session ends automatically. - End Monitoring—Click End Monitoring (
- Click Done to close the Voice Interaction Monitoring window and mark the interaction as Done.
- To stop monitoring the agent, use the Team Communicator to find the agent whom you are monitoring.
- Open the Action Menu for the agent, and select Stop Monitoring. A system message is displayed that informs you that monitoring of interactions on your configured channels has ended for the selected agent.
Monitoring a Chat Interaction
Monitoring an agent who is handling an interaction means that you can read a chat interaction between an agent and a contact without the agent or contact knowing that you are reading the interaction. Agent accounts can be configured to notify agents when they are being monitored.
- Use the Team Communicator in the Main Window to find an agent in the agent group to which you have been assigned as a Supervisor.
- To monitor the next interaction, open the Action Menu for the agent whom you want to monitor and select Monitor Next Interactions.
A system message is displayed that informs you that monitoring of interactions on your configured channels has started for the selected agent. In the Team Communicator, the Action Menu for the agent whom you are monitoring changes to the Stop Monitoring button.
- When the monitored agent accepts a chat interaction, a notification is displayed on your desktop. Click Accept to begin monitoring the interaction. The Chat Interaction Monitoring window is displayed on your desktop and you are connected to the chat session. You can read the chat transcript, but you cannot send any text to the contact or the agent.
If you do not click Accept, the notification is dismissed automatically.
If the agent is already handling an interaction when you start monitoring, you might have to wait for the next interaction to start monitoring.
The monitoring icon is displayed in the Chat Interaction Monitoring window on your desktop next to the party Action menu. - During a monitoring session, you can perform the following actions from the Chat Interaction Monitoring window:
- End Monitoring—Click End Monitoring (
 ) in the Supervisor controls of the Call Actions toolbar to end the monitoring session.
 - Barge-in—Click Barge-in (
 ) in the Supervisor controls of the Call Actions toolbar to join the monitored chat session. Both parties are able to see your messages. You can switch back to monitoring by clicking End Chat (
 ) in the Call Actions toolbar.
 - Coach via voice—Select Coach via Voice from the agent party Action menu. A voice session is added to the Chat Interaction window. You can coach the agent whom you are monitoring by speaking directly to the agent.
- Coach via chat—Select Coach via Chat from the agent party Action menu. A chat session is added to the Chat Interaction window. You can coach the agent whom you are monitoring by sending chat messages to the agent.
If you stop monitoring, you are disconnected from the chat session. The monitoring indicator icon is removed from the Chat Interaction window of the agent.
If the agent ends the chat session while you are still monitoring the agent, your monitoring session ends automatically.
- End Monitoring—Click End Monitoring (
- Click Done to close the Chat Interaction Monitoring window and mark the interaction as Done.
- To stop monitoring the agent, use the Team Communicator to find the agent whom you are monitoring.
- Open the Action Menu for the agent and select Stop Monitoring. A system message is displayed that informs you that monitoring of interactions on your configured channels has ended for the selected agent.
How do I coach my agents?
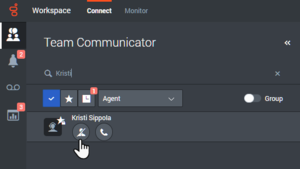
You can start coaching an agent in your group by using the Team Communicator to find the agent. In the Action Menu, select Coach Agent (![]() ). Your account might also be set up to let you coach the current voice interaction of an agent.
). Your account might also be set up to let you coach the current voice interaction of an agent.
You can end coaching an agent by using the Team Communicator and selecting Stop Coaching from the Action Menu (![]() ).
).
You can end coaching the current interaction by selecting End Monitoring (![]() ) in the Call Actions toolbar in the interaction window.
) in the Call Actions toolbar in the interaction window.
When you coach a selected agent who is already handling an interaction, an interaction preview window tells you that the selected agent is handling an interaction. Your account might be set up to let you start monitoring the current voice interaction of an agent; if not, you can monitor the next interaction of the agent.
Coaching a Voice Interaction
Coaching an agent who is handling an interaction means that you can listen to a voice interaction between an agent and a contact and speak to that agent without the contact being aware that you are listening and speaking to the agent. You can coach the current or next interaction of an agent.
- Use the Team Communicator in the Main Window to find an agent in the agent group to which you have been assigned as a Supervisor.
- Open the Action Menu for the agent whom you want to coach and select Coach Agent. If there is a currently active interaction, it is displayed in the Coach menu.
Or, to coach the next interaction if your account is set up to let you coach the current or next interaction, open the Action Menu for the agent you want to coach and select Coach, then select Agent. To coach the current interaction, open the Action Menu for the agent you want to coach and select Coach, then select Current Voice Interaction.
A system message is displayed that informs you that coaching of interactions on your configured channels has started for the selected agent.
In the Team Communicator, the Action Menu for the agent whom you are coaching changes to the Stop Coaching button. - When the coached agent accepts a voice interaction, a notification is displayed on your desktop. Click Accept to begin coaching the interaction. The Voice Interaction Monitoring window is displayed on your desktop and you are connected to the call. You can hear the agent and the agent can hear you, but the contact can hear only the agent.
If you do not click Accept, the notification will be dismissed automatically, and you will not be able to coach the interaction unless you stop coaching and start coaching the same agent.
- During a coaching session, you can perform the following actions from the Voice Interaction Coaching window:
- End Monitoring—Click End Monitoring (
 ) in the Supervisor controls of the Call Actions toolbar to end the coaching session.
If the agent ends the call while you are still coaching the agent, your coaching session ends automatically. - End Monitoring—Click End Monitoring (
- Click Done to close the Voice Interaction Coaching window and mark the interaction as Done.
- To stop coaching the agent, use the Team Communicator to find the agent whom you are coaching.
- Open the Action Menu for the agent and select Stop Coaching. A system message is displayed that informs you that coaching of interactions on your configured channels has ended for the selected agent.
Coaching a Chat Interaction
Coaching an agent who is handling an interaction means that you can read the transcript of the interaction between an agent and a contact and send chat messages to the agent without the contact being aware that you are reading the transcript and communicating with the agent.
- Use the Team Communicator in the Main Window to find an agent in the agent group to which you have been assigned as a Supervisor.
- Open the Action Menu for the agent whom you want to coach and select Coach next interactions.
A system message is displayed that informs you that coaching of interactions on your configured channels has started for the selected agent.
In the Team Communicator, the Action Menu for the agent whom you are coaching changes to the Stop Coaching button. - When the coached agent accepts a chat interaction, a notification is displayed on your desktop. Click Accept to begin coaching the interaction. The Chat Interaction Monitoring window is displayed on your desktop and you are connected to the chat session. You can read the chat transcript and send private chat messages to the agent without the contact seeing your messages.
If you do not click Accept, the notification will be dismissed automatically, and you will not be able to coach the interaction unless you stop coaching and start coaching the same agent.
The eye icon is displayed in the Chat Interaction Coaching window on your desktop next to the party Action menu. - During a coaching session, you can perform the following actions from the Chat Interaction Coaching window:
- End Monitoring—Click End Monitoring (
 ) in the Supervisor controls of the Call Actions toolbar to end the coaching session.
 - Barge-in—Click Barge-in (
 ) in the Supervisor controls of the Call Actions toolbar to join the monitored chat session. Both parties will be able to see your messages. Your coaching session ends when you barge-in to the chat.
Click Done to close the coaching session in the window and mark the coaching interaction as Done. You can switch to monitoring the chat session (see Monitoring a Chat Interaction in the Monitor tab) by clicking End Chat ( ) in the Call Actions toolbar.
 - Coach via voice—Select Coach via Voice from the agent party Action menu. A voice session is added to the Chat Interaction window. You can coach the agent whom you are monitoring by speaking directly to the agent.
If the agent ends the chat session while you are still coaching the agent, your coaching session ends automatically. - End Monitoring—Click End Monitoring (
- Click Done to close the Chat Interaction Coaching window and mark the interaction as Done.
- To end coaching the agent, use the Team Communicator to find the agent whom you are coaching.
- Open the Action Menu for the agent and select Stop Coaching. A system message is displayed that informs you that coaching of interactions on your configured channels has ended for the selected agent.
How do I Barge-in on my agent's call?
When you barge-in (join) to an active interaction, you must already be monitoring or coaching the interaction.
To barge-in to an active interaction that you are monitoring, click Barge-in (![]() ) in the Supervision toolbar. Barge-in is a simple button if you are supervising a single channel interaction (voice or chat).
) in the Supervision toolbar. Barge-in is a simple button if you are supervising a single channel interaction (voice or chat).
How do I switch my Agent Monitoring Mode?
Agent Workspace enables you to switch from certain supervision modes to others. During the monitoring, coaching, or barge-in of an interaction, you can switch from one supervision mode to another. The following transitions are supported:
- Monitoring to barge-in—Click Barge-in (
 ) in the Supervision bar.
 - Coaching to barge-in (chat only)—Click Barge-in (
 in the Supervision bar.
 - Coaching to monitoring (chat only)—Click End Chat (
 ).
). - Barge-in to monitoring—Click End Call (
 ) or End Chat (
 ) in the Interaction toolbar to return to monitoring.
 - Use End Monitoring (
 ) in the Interaction toolbar to end monitoring.
How do I manage the State of my agents?
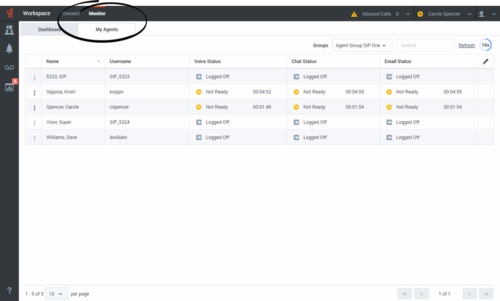
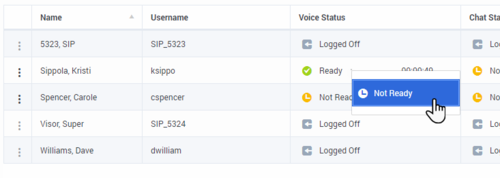
The My Agents view lets you view and control the ready state and logged in state of all of the agents that you manage.
Open My Agents from the Monitor group.
This view has two parts, the filters and the table of agents. Use the filters to find agents by Group, Status, and First name and/or Last name. Find a specific agent or agents by using the Search field.
Click the pencil icon to select which channels to show in the table.
Refresh the view by clicking Refresh. The view might also automatically refresh for you; if your account is enabled for this feature, a countdown to the next refresh is displayed next to the Refresh button.
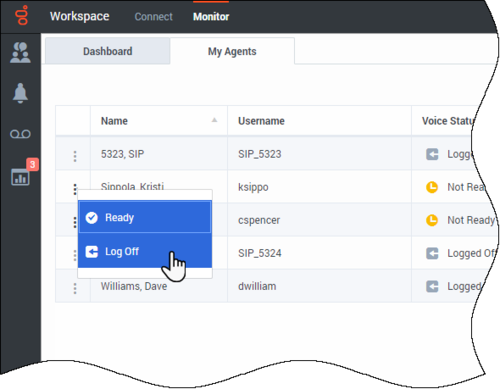
In the table of agents, click a status to change it, for example from Ready to Not Ready. To change the status of an agent on more than one channel, click the action menu next to their name and select the status.
The table displays different agent states depending on whether they are handling interactions and whether they are at or below capacity.
| Agent's state | Handling interaction | At capacity | Table display |
|---|---|---|---|
| Ready | No | No | Ready |
| Not Ready (with or without reason) | No | No | Not Ready (with or without reason) |
| After Call Work (with or without reason) | No | No | After Call Work (with or without reason) |
| Do Not Disturb | No | No | Not Ready |
| Ready | Yes | No | Engaged |
| Ready | Yes | Yes | Busy |
| Not Ready (with or without reason) | Yes | Yes | Busy |
| Not Ready (with or without reason) | Yes | No | Busy |
| After Call Work (with or without reason) | Yes | Yes | Busy |
| After Call Work (with or without reason) | Yes | No | Busy |
| Do Not Disturb | Yes | Yes | Busy |
| Do Not Disturb | Yes | No | Busy |
Log off an agent
The Log off Agent feature is useful if you discover that an agent has forgotten to log off after their shift. Logging off the agent on all channels is beneficial because it ensures that your company is not unnecessarily consuming seat licenses, and it also prevents interactions from being routed to an agent who is not present but is configured for auto-answer!
To log off an agent, click the action menu next to their name in the table and select Log Off.
If you log off an agent while they are handling an interaction you are warned that the agent is still handling an interaction and are given the opportunity to cancel the action. If you proceed with the log off, the interaction finalization is handled according to the type of interaction. Voice calls remain connected to the agent's DN, emails return to queue or workbin, and a chat returns to queue.
Genesys does not recommend logging off an agent who is handling a call until the call is ended.
How do I review an outbound email?
Agents: Your outgoing email interactions might be read and edited by your team lead, supervisor, or another person tasked with Quality Assurance at your organization. They might edit the email before sending it to the contact, or they might return it to you with comments that you have to fix in the email before it will be sent.
Supervisors/Team Leads/Reviewers: You might be assigned the task of reviewing, editing, or commenting on outgoing email interactions at your organization. This section and the next are for you. These sections describe what to do when an outgoing email is directed to you for Quality Review (QA) before being sent to a contact.Your organization might direct outgoing emails to you for QA purposes. The following example shows you what you might do when there is problem with an email and it must be returned to the agent to be fixed.
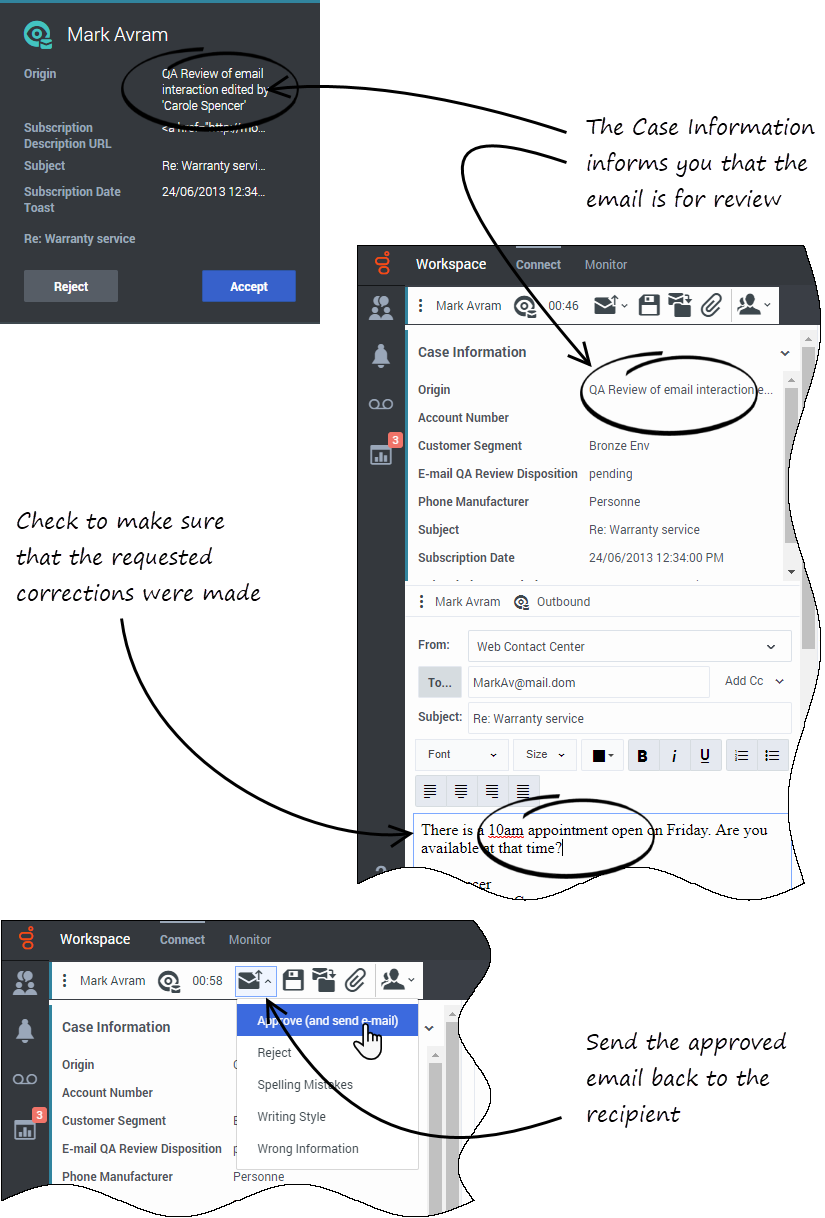
- When an email interaction for review is directed to you, an interaction preview window opens. The Case Information indicates that the email is for QA review. In this example, the "Origin" field contains the text: "QA Review of email interaction...".
- Click Accept to display the interaction. The email interaction is displayed on your desktop.
link=- The Case Information view might be set up to provide you with information about who wrote the email.
- The Email Review icon (link=) is displayed next to the name of the contact to whom the email interaction will be sent once it is approved.
- Review the content that the agent wrote in the email composition area. You can choose to fix any issues yourself, or send it back to the original agent to fix. Depending on the policy at your organization, you might provide feedback by directly editing the content of the email interaction, or you might add notes for the agent, or you might discuss the content with the agent verbally. Other actions available to you include:
- Save changes that you made to the email interaction
- Move the email to a workbin to save the email in your draft email workbin to process later (in some environments, you might have a 'pending review' workbin in which to save QA review emails)
- Attach a file to the email
- Start a consultation
- Email interactions that are sent to you for review have a drop-down menu on the Send (link=) button.
- The contents of this menu are set up by your administrator and so might be different from the example and video to the on the left side.
- Click to open the menu.
- In this example, a problem was found, so this email is being returned to the agent to fix. The administrator has set up different 'Reject Reasons' which will be included in the Case Information when the interaction is returned to the agent.
- Click one of the Reject options to send the email back to the original agent.
- After the agent fixes the email, it is directed to you or another reviewer and is ready to be approved and sent.
How do I approve a fixed outbound email?
If you are a reviewer, outbound emails might be directed to you before they are sent to a contact. In this example, the agent has fixed an earlier identified problem, and the email is directed to you to review.
- When an email interaction for review is directed to you, an interaction preview is displayed on your desktop. The Case Information indicates that the email is for QA review. In the example on the left side, the "Origin" field contains the text: "QA Review of email interaction...".
- Click Accept to display the interaction. The email interaction is displayed on your desktop.
- The Case Information view might be set up to provide you with information about who wrote the email.
- The Email Review icon (
 ) is displayed next to the name of the contact to whom the email interaction will be sent once it is approved.
- Review the content that the agent wrote in the email composition area. You can choose to fix any issues yourself, or send it back to the original agent to fix.
- Assuming that the email is now okay to send to the contact, click the Send (
 ) button to open the menu. Since the email is now ready to send to the contact, select the option that represents Accept. In this example, the administrator has added the Approve (and send email) option to the menu.
How do I use the My Team Workbins?
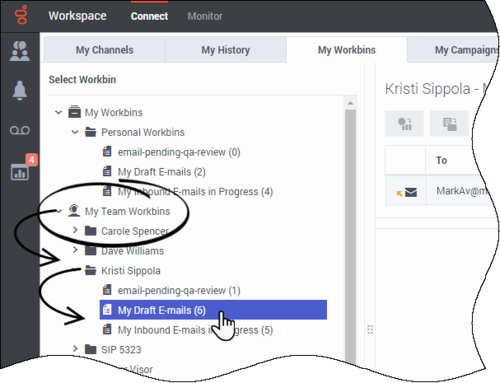
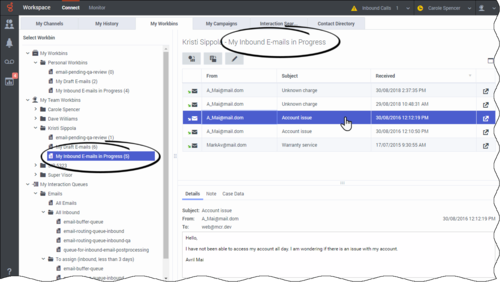
If your account is set up to enable you to manage the workbins of the agents that you supervise, you will see the My Team Workbins list in the Select Workbin list of the My Workbins tab in the Connect group area.
The My Team Workbins view contains an expandable list of all the agents you supervise. If you click the agent name or the arrow next to the name of one of your agents the view expands to show you the workbins for that agent and the number of interactions stored in each.
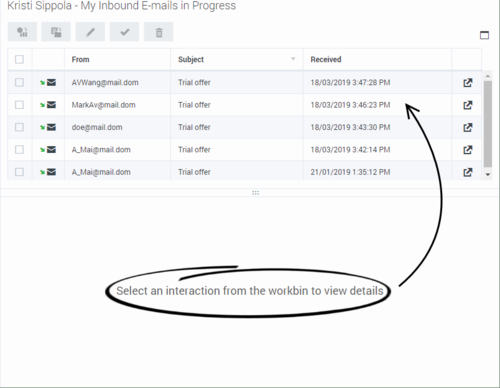
To view and manage the interactions stored in the agent's workbin, click the name of the workbin. The list of interactions stored in the workbin is displayed for you in the pane to the right of the workbin list.
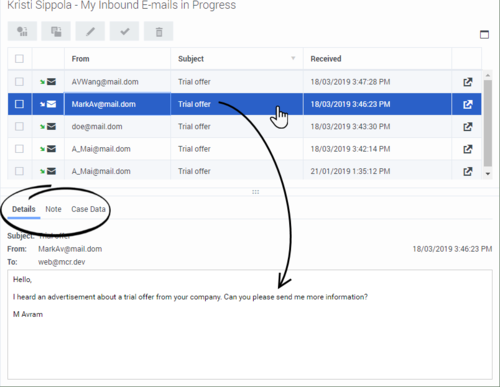
When you select an interaction in a workbin, the contents, notes, and case data are displayed in tabs at the bottom of the Workbin view.
You can open an interaction to view or handle it by double-clicking it or by clicking Open ![]() .
.
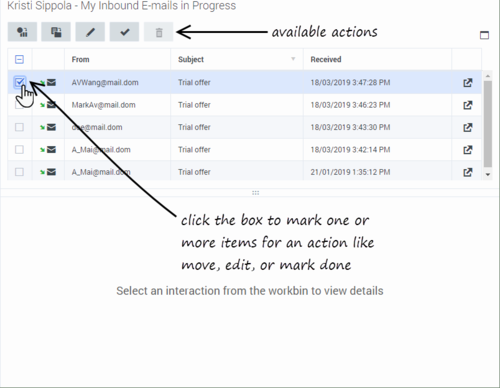
Workbin action controls are displayed at the top of the Workbin view. These controls let you perform actions on the interaction that you mark. Mark interactions for actions by clicking the check box next to them. The following actions might be available to you, depending on how your system is set up by your administrator or what interaction type you have marked:
- Done

- Delete

- Move to Queue

- Move to Workbin

- Edit Case Information
 Opens the Edit Case Information window to enable you to edit the content of the Case Data tab for the marked interaction(s).
Watch this video to learn how to use My Team Workbins:
How do I manage one or more interactions in a Workbin or Interaction Queue?
There are two ways to choose items in a Workbin or Interaction Queue, one for viewing and one for different actions.
Click a row to view the details, notes, and case data of the interaction in the tabs at the bottom of the view.
You can also mark one or more items for actions. The following actions might be available to you, depending on how your system is set up by your administrator or what interaction type you have marked:
- Done

- Delete

- Move to Queue

- Move to Workbin

- Edit Case Information
 Opens the Edit Case Information window to enable you to edit the content of the Case Data tab for the marked interaction(s).
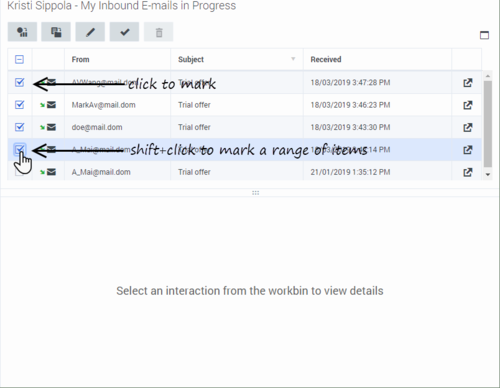
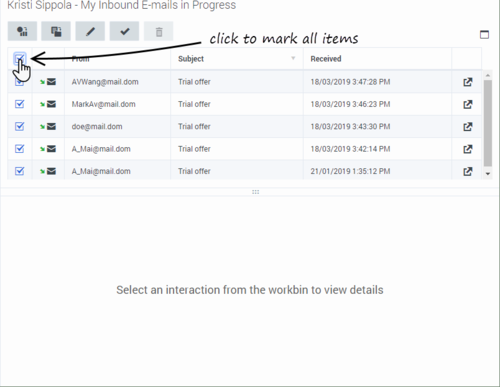
There are different ways to mark multiple interactions:
- You can click the check box next to each one that you want to mark
- You can click one, then shift+click another to mark both plus all the interactions in between
- You can click the Mark All box at the top of the table to mark all interactions (click it again to unmark all)
After marking one or more interactions, click an action button to perform that action on all the marked interactions.
How do I manage My Interaction Queues?
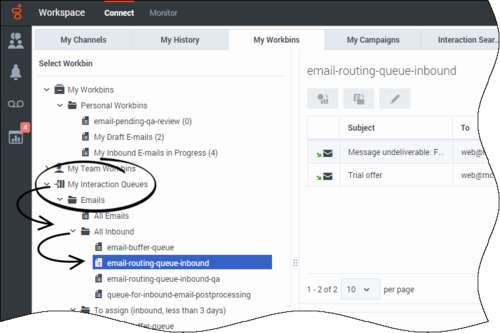
If your account is set up to enable you to manage the Interaction Queues of your contact center, you will see the My Interaction Queues list in the Select Workbin list of the My Workbins tab in the Connect group area.
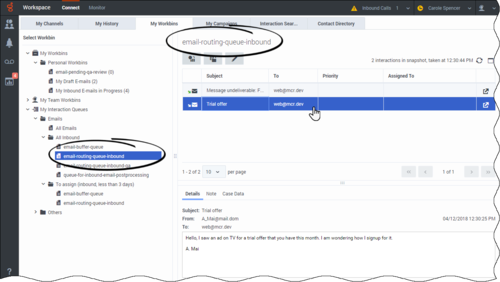
The My Interaction Queues view contains an expandable list of all the interaction queues that your account is set up to manage. Interaction queues might be grouped by type in folders. If you click the folder name or the arrow next to the name of the folders, the view expands to show you the queues in that folder. Click a queue to view its contents. The list of interactions stored in the queue are displayed for you in the pane to the right of the queue list.
When you select an interaction in an interaction queue, the contents, notes, and case data are displayed in tabs at the bottom of the interaction queue list view.
To open an interaction to view or handle it, double-click it or click Open ![]() .
.
Controls are displayed at the top of the interaction queue view that let you perform actions on the interaction that you mark. Mark interactions by clicking the check box next to them. The following actions might be available to you, depending on how your system is set up by your administrator or what interaction type you have marked:
- Done
 marks the interaction(s) as Done.
 - Delete
 deletes the interaction(s).
 - Move to Queue
 moves the interaction(s) to a different interaction queue
 - Move to Workbin
 moves the interaction to the workbin of one of the agents that you supervise, or to one of your own workbins.
 - Edit Case Information
 opens the Edit Case Information window to enable you to edit the content of the Case Data tab for the marked interaction(s).
Interaction Queue name versus alias
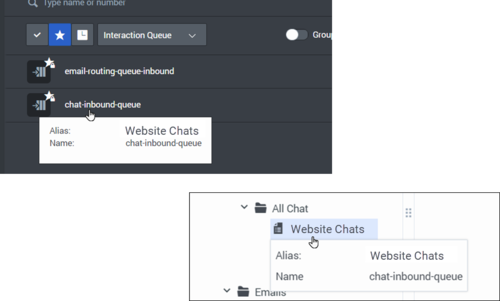
Some contact center environments have aliases (display names) for Interaction Queues in the Workbin and Interaction Queue view and Team Communicator. In these environments, the administrator specifies whether the Interaction Queue alias or the actual queue name is displayed.
If you are looking for a queue by name but only the alias is displayed, you can view the queue name by hovering your mouse pointer over the name of the queue. The mouse pointer tooltip displays both the alias and the queue name. If only one name is displayed in the tooltip, then both the alias and the queue name are the same.
How do I edit Case Information for interactions in Workbins and Queues?
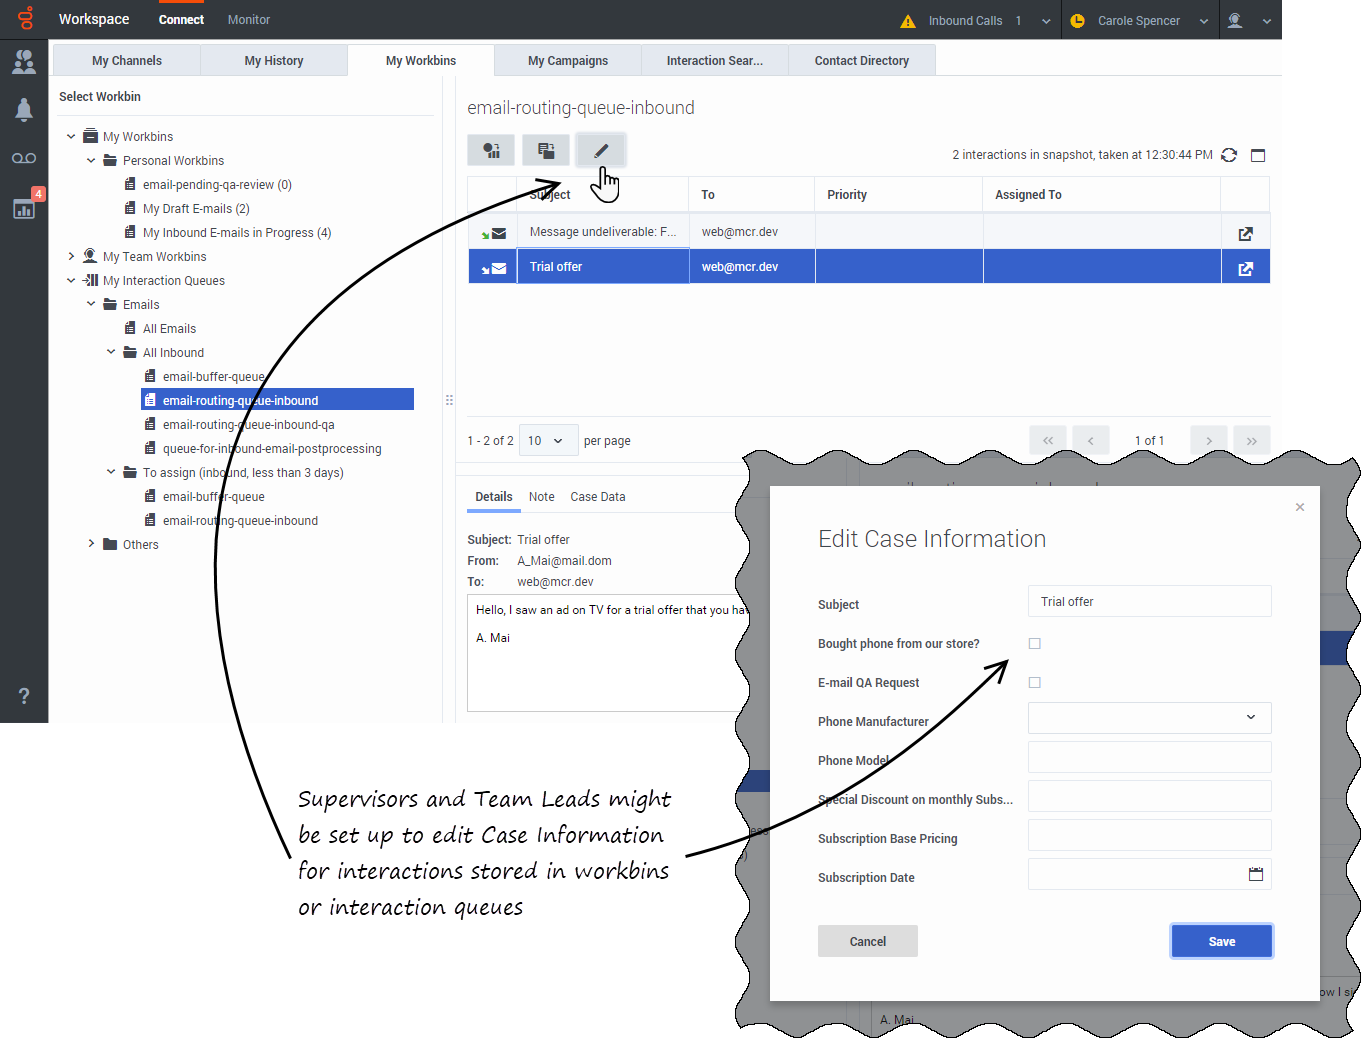
Supervisors and Team Leads might be set up to edit Case Information for interactions that are stored in a workbin or queue.
![]() : Mark an interaction to enable the Edit Case Information icon.
: Mark an interaction to enable the Edit Case Information icon.
Click the icon to open the Edit Case Information dialog box. The editing features of this dialog box work the same as the editing features of the Case Information area of an interaction window.
You can edit case information for multiple interactions by marking two or more interactions. The following rules apply to editing the case information of multiple interactions:
- The Edit Case Information dialog box displays a mix of all of the case information fields that are available in all of the marked interactions.
- Only the common editable fields, check boxes, and menus of the marked interactions are displayed.
- If an editable item has the same value for all of the marked interactions, that value is displayed in the editable field.
- If an editable item has different values for one or more of the marked interactions, the field is displayed as "Mixed Values".
- If you make an edit and you decide to undo it, click the 'Cancel icon:


