How to configure and customize screen pops
Contents
This section explains how to configure and customize screen pops.
The out-of-the-box use cases are deployed with the XML file configuration as described in How to install the Gplus Adapter. However, if they do not fulfill your requirements, you can customize them.
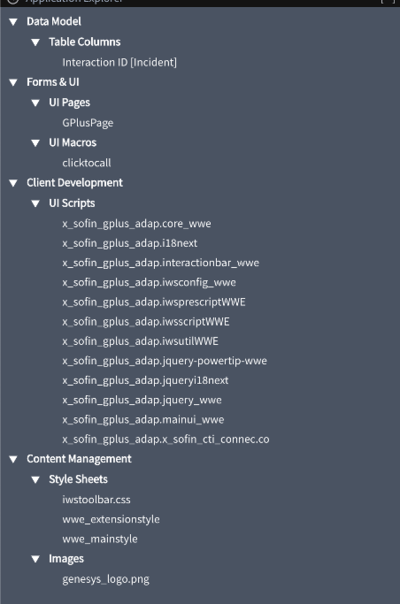
Customizations are based on three JavaScript files, which implement the out-of-the-box scenario for different fields. Over here are the first two:
- x_sofin_gplus_adap.iwsscriptWWE: Computer Telephony Integration (CTI) events that can be captured by the connector
- x_sofin_gplus_adap.iwsutilWWE: implementation of the events mentioned in the previous point.
Customize the click-to-call feature
To customize the outbound-call scenario, an additional file must be handled. This procedure describes how to configure the connector click-to-call feature inside ServiceNow:
To configure the click-to-call feature, follow these steps:
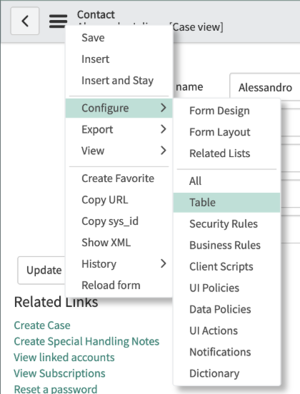
- Open the Contact form and then the Contact menu.
- Select Configure and click Table.
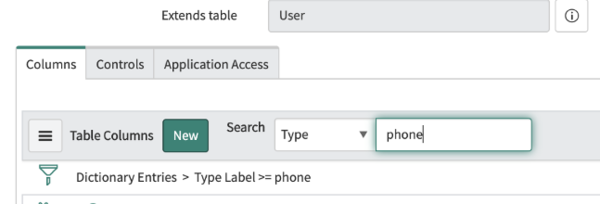
- Search the phone fields as shown in the image below.
- Select one field among the proposed ones.
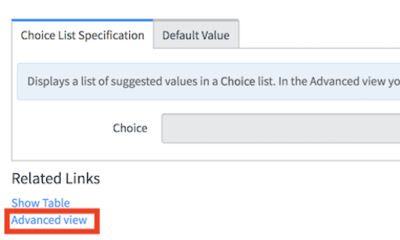
- Go to Default Value and add the following attribute in the related box:
field_decoration= x_sofin_gplus_adap_clicktocall
Enable the click-to-call feature on reference fields
The following procedure describes how to configure the Gplus click-to-call feature inside ServiceNow for the lookup/reference field.
By default, ServiceNow provides some macros to enable the click-to-call feature on reference fields as well. The following macros are available:
- show_phone
- This macro requires the OpenFrame plugin activation.
- You can configure the Unique Interface (UI) macro using the ref_contribution parameter to display a phone icon next to the sys_user reference field. The icon is only shown if the phone field in the sys_user record is populated with the user's contact number.
- show_phone_customer_service
- This macro requires Customer Service Management and OpenFrame plugins activation.
- You can configure the UI macro using the ref_contribution parameter to display a phone icon next to the Contact customer_account reference field in the case form. The icon is only displayed if the phone field in the Contact customer_account record is populated with the user's contact number.
It is possible to enable one of these macros on reference fields (such as Caller in an Incident, or Contact in a Case). These macros will display the phone icon next to the field, as shown below, only if the reference field has at least one telephone number.
After clicking the phone icon, the available telephone list about the Contact will be displayed.
However, to allow one of these macros to work with Gplus Adapter (that means starting a call in the Adapter), you will need to edit them.
Here you can find the procedure to enable the proper behavior:
- Search and open the show_phone macro.
- Search the row named createInteractionData.opened_for = p.attr('data-caller-id').
- Remove the GlideAjax section as shown below (adding comments).
    /*
                    var ga = new GlideAjax('global.CTIAjaxUtility');
                    ga.addParam('sysparm_name', 'createInteractionWithPropertyCheck');
                    ga.addParam('context', JSON.stringify(createInteractionData));
                    ga.getXML(function(serverResponse) {
                        var result = serverResponse.responseXML.getElementsByTagName("result");
                        var output = JSON.parse(result[0].getAttribute("data"));
                        if(output.status == "success"){
                            var interaction = {"entity": "interaction", "query" :"sys_id="+output.fields.interactionSysId, "value":output.fields.number, "label":"Interaction", "display":false};
                            payload.data.data.push(interaction);
                        }
                        var context = {"payload": payload, "method" : "openframe_communication" };
                        jslog("context with interaction : "+ JSON.stringify(context));
                        CustomEvent.fireAll("openframe_request", context);
                    });
*/- Replace the previous section with the following snippet:
var payload = {"type": "OUTGOING_CALL", "data" : data, "action":"makecall", "number":p.attr('data-caller-phone'), "attributes": {"ACTIVITY_ID": p.attr('data-task-id'), "ENTITY_TYPE": p.attr('data-task-table'), "CONTACT_ID":p.attr('data-caller-id')}};
var context = {"payload": payload, "method" : "openframe_communication" };
CustomEvent.fireAll("openframe_request", context);- Click Save.
- In the end to enable the antecedent, associate the macro to ref_contributions: open the Incident table, search Caller, put ref_contributions=show_phone or ref_contributions=show_phone_customer_service in the Attribute field.
Create new screen pop scenarios
To create new screen pop scenarios, you have to modify the above-mentioned files by using the procedure given below:
- Open ServiceNow Studio.
- Select the Gplus-Adapter-ServiceNow application.
- Choose the needed file in the left panel.
- Select x_sofin_gplus_adap.iwsscriptWWE or x_sofin_gplus_adap.iwsutilWWE and modify the code as required.
- Click Save to finalize the procedure.


