Controlling user access
Contents
You can limit user access within the Callback UI to what is appropriate for each user's role. This article describes the predefined Access Groups and Callback Roles to which you can assign users and includes information about how to restrict user access to callback information based on your lines of business. If you are migrating Roles and Access Groups from an earlier version of Callback, be sure to read the note related to this activity.
If you do not configure access and activity restrictions for a user, then that user has full access to everything in the Callback UI. Genesys provides predefined Callback Roles that administrators assign to users. Each Role includes permissions that control what users can see and do in the UI. For example, to perform their duties, it is sufficient for some users to view the list of callback records in the Callback UI, without the ability to modify a callback in any way. Other users might require additional permissions; for example, some users might require access permissions that allow them to create, cancel, and modify callbacks and to view errors associated with callbacks.
Review Platform administration for detailed information about which applications and documentation to use to create or modify Roles and Access Groups or to assign users to these groups.
Migration of Roles
If you have not yet moved to the Roles and Access Group settings described on this page, the original method for configuring Callback access still applies to your setup. In the original configuration, Callback access was granted when the ges or gms section in the Person object's annex included a role option (for example, Administrator).
To move to the new configuration method for granting access, add your user to the correct Callback or custom Access Group and remove the ges or gms section. If you don't remove the ges or gms section, the old configuration applies and the Access Group is not taken into consideration.
Callback Roles
Genesys provides the following default Callback Roles:
- Callback Administrator—Callback Administrators have full access to the Callback UI, which includes the ability to create, cancel, and reschedule callbacks, and to export reports. Users with this Role can also access all of the Developer tab features.
- Callback Supervisor—Supervisor users have full access to the Callback tab in the UI, which includes the ability to create, cancel, and reschedule callbacks, and to export reports. They cannot access the Developer tab in the UI.
- Callback Monitor—Monitor users can only view callbacks.
- Callback Developer—Developer users can view callbacks on the Callback tab and have full access to the Developer tab, which includes the ability to view recent errors, test API keys, and to provision Callback.
If a user is a member of more than one Role, the Role that allows the most access to Callback features takes precedence.
Predefined Access Groups
By default, Genesys defines a list of Access Groups and adds Callback Roles to some of these groups, as described below. Users who are already in these Access Groups are given Callback permissions by default. For example, any user in your Administrators Access Group is automatically granted the Callback Administrator Role.
| Access Group | Callback Administrator Role | Callback Supervisor Role | Callback Monitor Role | Callback Developer Role |
|---|---|---|---|---|
| Administrators | ✓ | |||
| Supervisors | ✓ | |||
| Managers | ✓ | |||
| Callback Developers | ✓ |
Line of Business segmentation
By default, all users who are part of standard Access Groups and can access the Callback UI will have Read permission for all the virtual queues. To restrict access to queues based on your lines of business, you can create custom Access Groups and enable or disable Read permissions as required.
To control access to queues based on your lines of business, you must create Access Groups for your various lines of business and then enable or disable access to the script objects that represent the virtual queues for each group. For a user to access a specific queue, the Access Group to which the user belongs must have the Read permission for the script object that represents that queue. The Read permission is assigned by default to all Access Groups, which means that all Access Groups can access all virtual queues until you change the permissions. To deny access to a virtual queue, navigate to the Script object associated with the queue and remove the Read permission from Access Groups that do not require access to that queue.
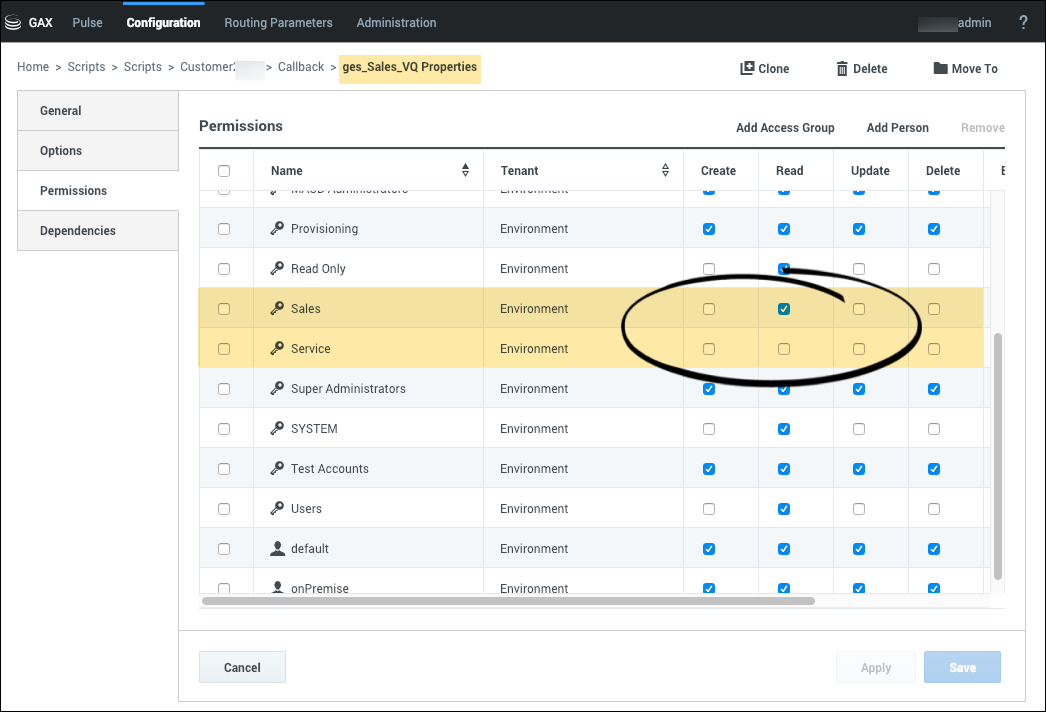
For example, if your Tenant has two lines of business called Sales and Service, you could create two Access Groups for Callback: Sales and Service. Then, navigate to each script object representing these queues and add the Access Group with Read permission:
- In the ges_Sales_VQ Script object, retain the Read access for the Sales team and disable the Read permission for the Service team.
- In the ges_Service_VQ Script object, retain the Read access for the Service team and remove the Read permission from the Sales team.
Check the Propagate box to apply the permissions to any object that is in the folder. The permissions apply to any virtual queue that is in the subfolder now and will apply to any new virtual queue that you add to the subfolder in the future.


