
Gplus Adapter support for Service Client API
Contents
Gplus Adapter supports the Genesys Service Client API, which you can use for custom features.
Support for Service Client API in Salesforce Lightning
Gplus Adapter supports the Service Client API, which you can use for custom features such as invoking click-to-email, starting or stopping a recording when a sensitive field is on the screen, and attaching data from Salesforce to Genesys key/value pairs. Complete the following steps in Salesforce Lightning:
- Deploy your Salesforce domain.
- Create and deploy a message channel using Salesforce CLI or a third-party tool such as Workbench. For example, here's a breakdown of the steps you must complete using Workbench:
- Create a folder called messagedeploy and add a new file called package.xml with the following contents:
<?xml version="1.0" encoding="UTF-8"?> <Package xmlns="http://soap.sforce.com/2006/04/metadata"> <types> <members>*</members> <name>LightningMessageChannel</name> </types> <version>47.0</version> </Package> - In your messagedeploy folder, create a new folder called messageChannels and add a new file called GplusChannel.messageChannel with the following contents:
<?xml version="1.0" encoding="UTF-8"?> <LightningMessageChannel xmlns="http://soap.sforce.com/2006/04/metadata"> <masterLabel>GplusChannel</masterLabel> <isExposed>true</isExposed> <description>This Lightning Message Channel sends information from VF to LWC and back.</description> </LightningMessageChannel> - Zip (compress) the messagedeploy folder.
- Navigate to https://workbench.developerforce.com/login.php and log in to Salesforce with the account you will use for the Service Client API.
- Open the migration menu, click Deploy and attach the zip you previously created.
- Open the info menu, click Metadata Types & Components and choose LightningMessageChannel - you created this in step 2-a.
- Create a folder called messagedeploy and add a new file called package.xml with the following contents:
- Download gplus-service-client-api.js from here and add it to your static resources in Salesforce.
- Download the SCAPI example from here.
- Create a Visualforce page in Salesforce that uses your new message channel (from step 2-b) and the Service Client API to implement your custom functionality.
- Add the Visualforce page to your dashboard.
In Agent Setup, configure Gplus Adapter to use your message channel with the Salesforce Message Channel Name for Service Client API option.
The value of the Salesforce Message Channel Name for Service Client API option must be specified using one of the following formats:
- NameSpacePrefix_ChannelName__c
- ChannelName__c
You must use this format to confirm to the Salesforce Naming Conventions for Custom Fields.
Troubleshooting: If you encounter an error after completing this configuration, Genesys might have to adjust your environment settings so that the value of CORS is set to * the Allow full service client API setting is enabled. Contact Genesys to confirm these settings.
- To attach key-value pairs to interaction UserData using SCAPI, use the interaction.setUserData Method.
- To validate your Gplus Adapter configuration with SCAPI, login to Adapter, navigate to the SCAPI page and click one of the Methods, such as agent.get. If you see the result message SUCCEEDED, then configuration is correct.
- If some SCAPI Methods do not return SUCCEEDED, verify that the Workspace options related to the SCAPI Method functionality are configured correctly.
Support for Salesforce Lightning Component with Service Client API
Gplus Adapter supports the Salesforce Lightning Component with Service Client API to enable custom integrations between Salesforce and Genesys. To enable this support, complete the following steps:
Prerequisites:
- Deploy your Salesforce domain.
- Create and deploy the message channel.
References:
- About the message channel in Lightning Aura Components.
- How to create a Message Channel.
- How to publish a Message Channel.
- How to subscribe to a Message Channel.
- Lightning Message Service limitations.
- Download gplus-service-client-api-universal.js from here and add it to your static resources in Salesforce.
- In Lightning mode open Setup > Developer Console.
- Create a new Lightning component: File > New > Lightning Component.
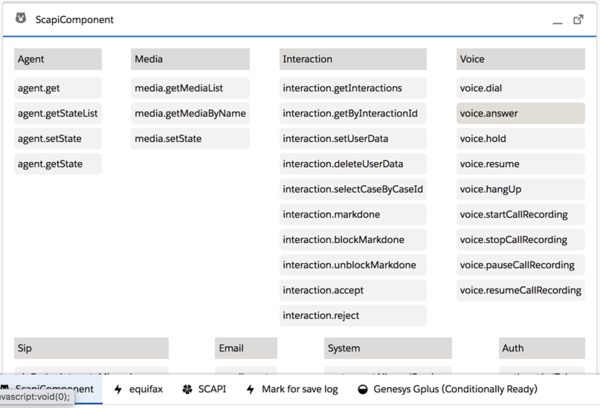
- Name the new Lightning component ScapiComponent.
- Download component.html from here and add the code to your component.
- Download controller.js from here and add the code to the Controller.
- Download style.css from here and add the code to the Style.
- Add your component to console. Open Setup > App Manager > <your app> > Edit > App Builder > Utility Items > Add utility Items and select ScapiComponent.
- Your result should look something like this:
In Agent Setup, configure Gplus Adapter to use your message channel with the Salesforce Message Channel Name for Service Client API option.
The value of the Salesforce Message Channel Name for Service Client API option must be specified using one of the following formats:
- NameSpacePrefix_ChannelName__c
- ChannelName__c
You must use this format to confirm to the Salesforce Naming Conventions for Custom Fields.
Troubleshooting: If you encounter an error after completing this configuration, Genesys might have to adjust your environment settings so that the value of CORS is set to * the Allow full service client API setting is enabled. Contact Genesys to confirm these settings.
- To attach key-value pairs to interaction UserData using SCAPI, use the interaction.setUserData Method.
- To validate your Gplus Adapter configuration with SCAPI, login to Adapter, navigate to the SCAPI page and click one of the Methods, such as agent.get. If you see the result message SUCCEEDED, then configuration is correct.
- If some SCAPI Methods do not return SUCCEEDED, verify that the Workspace options related to the SCAPI Method functionality are configured correctly.

Support for Service Client API in Salesforce Classic
Gplus Adapter supports the Service Client API, which you can use for custom features such as invoking click-to-email, starting or stopping a recording when a sensitive field is on the screen, and attaching data from Salesforce to Genesys key/value pairs. Complete the following steps in Salesforce Classic:
-
Download the SCAPI script from here.
-
Download the SCAPI example from here.
-
Add gplus-service-client-api-classic.js to your static resources in Salesforce.
-
Create a Visualforce page with SCAPI (according to the SCAPI example) or a custom console component.