Difference between revisions of "PEC-REP/Current/RT/AgentManagement"
From Genesys Documentation
| (One intermediate revision by the same user not shown) | |||
| Line 9: | Line 9: | ||
|Section={{Section | |Section={{Section | ||
|alignment=Vertical | |alignment=Vertical | ||
| − | |structuredtext=Starting with release 100.0.000.0012, Genesys Pulse offers a new Manage Agents tab, where Pulse Administrators and Pulse Managers can: | + | |structuredtext=Starting with release 100.0.000.0012, Genesys Pulse offers a new Manage Agents tab, where Pulse Administrators and Pulse Managers can: |
*View information about each agent. | *View information about each agent. | ||
*Change agent skills. | *Change agent skills. | ||
| − | *Log out agents ( | + | *Log out agents (end agent login sessions). |
[[File:PA_90_ManageAgents.png|thumb|right|The Manage Agents tab]] | [[File:PA_90_ManageAgents.png|thumb|right|The Manage Agents tab]] | ||
| − | + | Pulse displays the following fields for each agent, as shown in the figure '''The Manage Agents tab''': | |
| − | *Agent Group ( | + | *Agent Group (Pulse displays Agent Group only if the agent widget was created <nowiki>''</nowiki>By Group<nowiki>''</nowiki>; otherwise it displays <nowiki>''</nowiki>N/A<nowiki>''</nowiki>) |
*Agent's Name | *Agent's Name | ||
*Current Status | *Current Status | ||
| Line 26: | Line 26: | ||
*Skills | *Skills | ||
| − | {{NoteFormat|Pulse collects the data in these fields only if the Agent Management feature is enabled | + | {{NoteFormat|Pulse collects the data in these fields only if the Agent Management feature is enabled. Pulse also collects data for the following hidden fields: '''Agent DBID''', '''Switch DBID''', '''Agent DN''', '''Tenant ID''', and '''Employee ID'''.|}} |
|Status=No | |Status=No | ||
}}{{Section | }}{{Section | ||
| Line 33: | Line 33: | ||
|Media=Video | |Media=Video | ||
|image=709005910 | |image=709005910 | ||
| − | |AltText= | + | |AltText=Learn how use Pulse Manage Agents. |
|Status=No | |Status=No | ||
}}{{Section | }}{{Section | ||
| Line 43: | Line 43: | ||
#Edit the agent widget, and enable '''Manage Agents''', as shown in the figure '''Enable Manage Agents'''. | #Edit the agent widget, and enable '''Manage Agents''', as shown in the figure '''Enable Manage Agents'''. | ||
| − | # | + | #On the '''More''' menu (the three vertical dots gadget) of the widget, click the '''Manage Agents''' link, and open the '''Manage Agents''' tab as shown in the figure '''Open the Manage Agents tab'''. |
#:You can now manage agents. | #:You can now manage agents. | ||
{{NoteFormat| | {{NoteFormat| | ||
| − | *Genesys Pulse starts collecting additional stats once the Management Agents feature is enabled. This can take several minutes, depending on the number of agents in the widget. | + | *Genesys Pulse starts collecting the additional stats once the Management Agents feature is enabled. This can take several minutes, depending on the number of agents in the widget. |
| − | * | + | * Genesys Pulse stops collecting the additional stats once the Management Agents feature is disabled.|2}} |
|Status=No | |Status=No | ||
}}{{Section | }}{{Section | ||
| Line 58: | Line 58: | ||
#Open the '''Manage Agents''' tab. | #Open the '''Manage Agents''' tab. | ||
#Select one or more agents. | #Select one or more agents. | ||
| − | #Click '''Change Skills''' | + | #Click '''Change Skills''', and optionally add new skills, change skill levels, or remove existing skills: |
| − | # | + | #:The '''Add/Remove Skills''' window shows selected agents and their current skills, as shown in the figure '''The Add/remove skills window''': |
| − | # | + | #*For a given skill, if all selected agents have the same skill level, the corresponding skill level is displayed next to the skill. |
| − | # | + | #*For a given skill, if not all selected agents have the same skill level, the text '''Multiple values''' is displayed next to the skill. |
| − | # | + | #*For a given skill, if none of the selected agents have the skill, the skill is displayed as disabled (grayed out) and the skill level value is displayed as '''-'''. |
| − | #* | + | #*Skills are ordered alphabetically by default; all the selected or partially selected skills are grouped before the non-selected skills. |
| − | # | + | #*You can add new skills, change the skills levels, or remove existing skills. |
| − | + | #*If you have selected a skill (or partially selected a skill), click on a skill level or perform any edit action (press enter, backspace, delete, or any number) of the focused skill level to display the skill level as editable with a cursor. | |
| − | #Click '''Confirm'''.<br />The '''Manage Agents''' tab shows modified skills. Depending on the refresh rate of the widget | + | #*When you select the checkbox, the skill level becomes editable with a cursor, automatically. |
| + | #*To stop skill level editing, press '''Enter''' or move focus away from the skill level cell. | ||
| + | #:{{NoteFormat|To confirm changes, Genesys Pulse users must have the Write (Change/Update) permission on the Person object (for all agents to be changed) in the Configuration Server. |2}} | ||
| + | #Click '''Confirm'''.<br />The '''Manage Agents''' tab shows the modified skills. Depending on the refresh rate of the widget, it can take some time for the changes to appear. | ||
|Status=No | |Status=No | ||
}}{{Section | }}{{Section | ||
| − | |sectionHeading= | + | |sectionHeading=End an agent login session |
|alignment=Vertical | |alignment=Vertical | ||
| − | |structuredtext=From the '''Manage Agents''' tab, you can | + | |structuredtext=From the '''Manage Agents''' tab, you can end an agent login session. |
| − | To | + | To end an agent login session: |
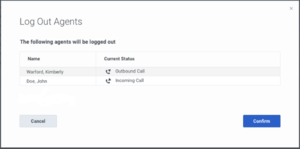
[[File:PA_90_LogoutPopup.png|thumb|right|The Log Out Agents window]] | [[File:PA_90_LogoutPopup.png|thumb|right|The Log Out Agents window]] | ||
| Line 79: | Line 82: | ||
#Select one or more agents. | #Select one or more agents. | ||
#Click '''Log Out'''. | #Click '''Log Out'''. | ||
| − | #The '''Log Out Agents''' window appears, as shown in the figure '''The Log Out Agents window''', which lists the selected agents and their current statuses. The '''Log Out''' action applies only to logged-in agents | + | #The '''Log Out Agents''' window appears, as shown in the figure '''The Log Out Agents window''', which lists the selected agents and their current statuses. <br />The '''Log Out''' action applies only to logged-in agents. If you select multiple agents, some of whom are logged in and some of whom are logged, the '''Log Out Agents''' window lists only the agents who are logged in. |
| − | #Click '''Confirm'''. | + | #Click '''Confirm'''.<br />The '''Manage Agents''' tab displays updated agent statuses. |
| − | |||
|Status=No | |Status=No | ||
}} | }} | ||
}} | }} | ||
Latest revision as of 13:15, June 16, 2022
Contents
Using Agent Widgets, perform agent management actions such as managing agent skills, or forcing agents to logout.
Related documentation:
Starting with release 100.0.000.0012, Genesys Pulse offers a new Manage Agents tab, where Pulse Administrators and Pulse Managers can:
- View information about each agent.
- Change agent skills.
- Log out agents (end agent login sessions).
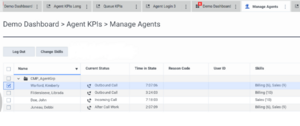
Pulse displays the following fields for each agent, as shown in the figure The Manage Agents tab:
- Agent Group (Pulse displays Agent Group only if the agent widget was created ''By Group''; otherwise it displays ''N/A'')
- Agent's Name
- Current Status
- Time in State
- Reason Code
- User ID
- Skills
Important
Pulse collects the data in these fields only if the Agent Management feature is enabled. Pulse also collects data for the following hidden fields: Agent DBID, Switch DBID, Agent DN, Tenant ID, and Employee ID.Video: Manage Agents
Enable the Manage Agents tab
Manage Agents features are not enabled by default. Before you can use these features, you must complete the following steps to enable them:
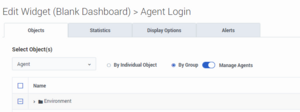
- Edit the agent widget, and enable Manage Agents, as shown in the figure Enable Manage Agents.
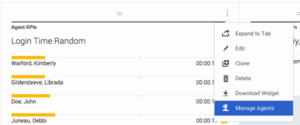
- On the More menu (the three vertical dots gadget) of the widget, click the Manage Agents link, and open the Manage Agents tab as shown in the figure Open the Manage Agents tab.
- You can now manage agents.
Tip
- Genesys Pulse starts collecting the additional stats once the Management Agents feature is enabled. This can take several minutes, depending on the number of agents in the widget.
- Genesys Pulse stops collecting the additional stats once the Management Agents feature is disabled.
Change skills
From the Manage Agents tab, you can change skills of the selected agents.
To modify agents skills:
- Open the Manage Agents tab.
- Select one or more agents.
- Click Change Skills, and optionally add new skills, change skill levels, or remove existing skills:
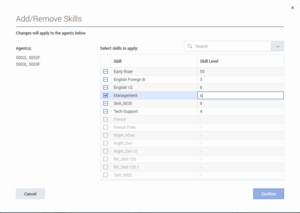
- The Add/Remove Skills window shows selected agents and their current skills, as shown in the figure The Add/remove skills window:
- For a given skill, if all selected agents have the same skill level, the corresponding skill level is displayed next to the skill.
- For a given skill, if not all selected agents have the same skill level, the text Multiple values is displayed next to the skill.
- For a given skill, if none of the selected agents have the skill, the skill is displayed as disabled (grayed out) and the skill level value is displayed as -.
- Skills are ordered alphabetically by default; all the selected or partially selected skills are grouped before the non-selected skills.
- You can add new skills, change the skills levels, or remove existing skills.
- If you have selected a skill (or partially selected a skill), click on a skill level or perform any edit action (press enter, backspace, delete, or any number) of the focused skill level to display the skill level as editable with a cursor.
- When you select the checkbox, the skill level becomes editable with a cursor, automatically.
- To stop skill level editing, press Enter or move focus away from the skill level cell.
- TipTo confirm changes, Genesys Pulse users must have the Write (Change/Update) permission on the Person object (for all agents to be changed) in the Configuration Server.
- Click Confirm.
The Manage Agents tab shows the modified skills. Depending on the refresh rate of the widget, it can take some time for the changes to appear.
End an agent login session
From the Manage Agents tab, you can end an agent login session.
To end an agent login session:
- Open the Manage Agents tab.
- Select one or more agents.
- Click Log Out.
- The Log Out Agents window appears, as shown in the figure The Log Out Agents window, which lists the selected agents and their current statuses.
The Log Out action applies only to logged-in agents. If you select multiple agents, some of whom are logged in and some of whom are logged, the Log Out Agents window lists only the agents who are logged in. - Click Confirm.
The Manage Agents tab displays updated agent statuses.
Comments or questions about this documentation? Contact us for support!

