Configure WebRTC Agents with Genesys Softphone
Contents
Configure WebRTC agents with Genesys Softphone in Genesys cloud using Agent Setup.
Pre-requisites
- Deploy WebRTC in the Tenant’s region. For more information, see Configure and Deploy WebRTC.
- Install Genesys Softphone in the Agent's place. For more information, see Deploying Genesys Softphone.
- Install WWE 9.0+ version, which is a part of GWS.
- Install GWS 9.0+ version in the tenant's region.
Genesys Softphone with WWE works in a Connector mode. In the Connector mode, the configuration is retrieved from the Configuration Server by WWE and sent to the Genesys Softphone.
To configure the Genesys Softphone in WebRTC mode, see Genesys Softphone in WebRTC mode.
Configure WebRTC agent with Genesys Softphone using Agent Setup
To configure WebRTC agent with Genesys Softphone using Agent Setup:
- Log in to the Agent Setup for the corresponding tenant.
- Select Users.
- Click Add User.
- Update all the required fields and configure the phone number.
- Select the Softphone check box and Genesys SoftPhone with WebRTC in the SIP Phone Type drop-down to assign all the mandatory DN level options.
- Click Save.
- Go to Users > Annex section and click Add Section.
- In the Group name text box, type interaction-workspace and click + to configure the options. Use the following table to fill the options and its values.
| Option name | Option value for WWE9 |
|---|---|
| privilege.sipendpoint.can-use | true |
| privilege.webrtc.can-use | false |
| privilege.voice.can-use | true |
| sipendpoint.transport-protocol | https |
| sipendpoint.uri | https://localhost:8000 |
| sipendpoint.enable-webrtc-auth | true |
| sipendpoint.codecs.enabled.audio | opus |
| sipendpoint.enable-webrtc-signin-with-switchname | true |
| sipendpoint.proxies.proxy0.http_proxy | {http_proxy_fqdn:http_proxy_port}
Example: sipendpoint.proxies.proxy0.http_proxy = proxy.company.com:8080 |
| webrtc.server-urn | webrtc.service-urn = <webrtc.ingress.api>
webrtc.service-urn can be templated using “expression.gws-url.capturing-groups” option. This option can be configured on CloudCluster application level and/or Agent Group level. Hence, the customer need not configure it for each agent. |
9. Click Save.
10. Go to Desktop Options > Genesys Softphone section.
11. Select the following check boxes:
- Usage of Genesys Softphone
- Uri with https://localhost:8000
- 12. Configure other options if needed.
13. Click Save.
Configure Genesys Softphone in WebRTC mode
This section includes information on how to configure Genesys Softphone in WebRTC Connector mode.
Enabling Dynamic Configuration Connector in Connector Mode
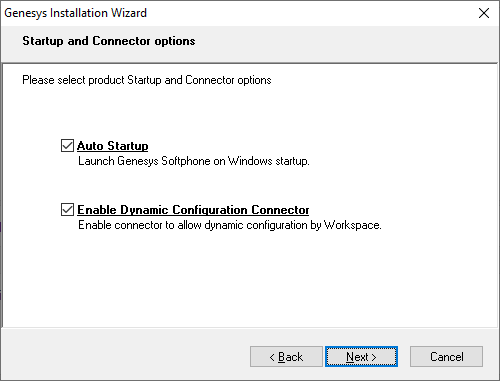
1. Select Auto Startup and Enable Dynamic Configuration Connector checkboxes in the Startup and Connector options window.
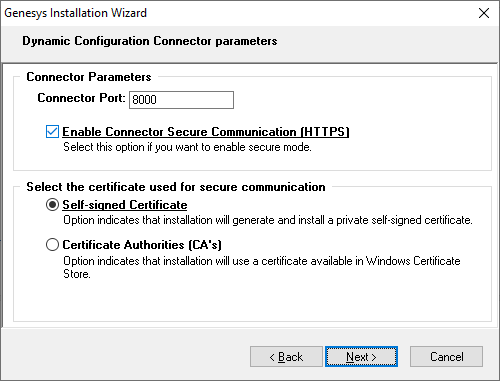
3. Select the Self-signed Certificate check box if you do not have appropriate certificate available in the Windows Certificate Store. Else, select the Certificate Authorities (CA's) check box. Proceed with the regular installation process.


