Deploy GCXI
Contents
Learn how to deploy Genesys Customer Experience Insights (GCXI).
Deploy in OpenShift
Deploy Genesys CX Insights using Red Hat OpenShift.
This is an example scenario — This page provides a high-level outline, illustrating one scenario to help you visualize the overall process. Genesys does not provide support for OpenShift or other third-party products, so you must have knowledge of OpenShift and other products to complete this type of installation. This page describes an example of deployment with OpenShift Cluster 4.5.16.
Prerequisites for deploying using OpenShift
Before you begin, ensure that:
- Your OpenShift cluster is up and running, with nodes in the Ready state.
- For HA deployments, at least two worker nodes are available for GCXI pods.
- Each Worker machine meets the following minimum requirements:
- 64-bit compatible CPU architecture. (2 or more CPUs).
- 10 GB for each GCXI container, and 2 GB for the PostgreSQL container. Production deployments commonly reserve 16 – 64 GB RAM for each container.
- 40 GB of available disk space if loading images from a repository
- OpenShift client and Helm-3 are installed on the host where the deployment will run.
- Images gcxi and gcxi_control are properly tagged and loaded on the registry. OpenShift will pull the images from there to each OpenShift worker node during deployment.
- On each worker node, values are set for
kernel.semandvm.max_map_count, as required by MicroStrategy. For example:echo "kernel.sem = 250 1024000 250 4096" >> /etc/sysctl.conf echo "vm.max_map_count = 5242880" >> /etc/sysctl.conf sysctl -p
| Mount Name | Mount Path (inside container) | Description | Access Type | Default Mount Point on Host (can be changed through values; these directories MUST pre-exist on your host to accommodate the local provisioner) | Shared across Nodes? | Required Node Label (applies to deafult Local PVs setup) |
|---|---|---|---|---|---|---|
| gcxi-backup | /genesys/gcxi_shared/backup | Backups
Used by control container / jobs. |
RWX | /genesys/gcxi/backup
Can be overwritten by: Values.gcxi.local.pv.backup.path |
Not necessarily. | gcxi/local-pv-gcxi-backup = "true" |
| gcxi-log | /mnt/log | MSTR logs
Used by main container. The Chart allows log volumes of legacy hostPath type. This scenario is the default. |
RWX | /mnt/log/gcxi
subPathExpr: $(POD_NAME) Can be overwritten by: Values.gcxi.local.pv.log.path |
Must not be shared across nodes. | gcxi/local-pv-gcxi-log = "true"
Node label is not required if you are using hostPath volumes for logs. |
| gcxi-postgres | /var/lib/postgresql/data | Meta DB volume
Used by Postgres container, if deployed. |
RWO | /genesys/gcxi/shared
Can be overwritten by: Values.gcxi.local.pv.postgres.path |
Yes, unless you tie PostgreSQL container to a particular node. | gcxi/local-pv-postgres-data = "true" |
| gcxi-share | /genesys/gcxi_share | MSTR shared caches and cubes.
Used by main container. |
RWX | /genesys/gcxi/data subPathExpr: $(POD_NAME)
Can be overwritten by: Values.gcxi.local.pv.share.path |
Yes | gcxi/local-pv-gcxi-share = "true" |
Deploying GCXI with OpenShift
The following procedures describe example steps to deploy GCXI with OpenShift. The exact steps required will vary for your environment.1. Preconfigure the environment
Complete the following steps to ensure that the environment is properly prepared for deployment.
- Ensure that the GCXI project has been created.
- Ensure that four PersistentVolumes (PV) have been created. See the table PVCs required by GCXI
- For more information, see About security context constraints in the Open Shift documentation.
- For test and development environments, execute the following command if you wish to run pods as any user:
oc adm policy add-scc-to-user anyuid -z default
2. Prepare for deployment
Complete the following steps to prepare the environment, and gather files needed for deployment.
Prerequisites
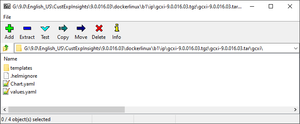
Within the the Genesys Customer Experience Insights package for the Docker Linux OS, look for the Helm installation package (IP) — a small TGZ file (for example gcxi-9.0.018.00.tgz) that contains the Helm files. You require these files to complete this procedure.
- On the host where the deployment will run, create a folder: helm.
- Copy the Helm installation package (for example gcxi-9.0.018.00.tgz) into the helm folder, and extract the archive into a subfolder called helm/gcxi.
- View the file helm/gcxi/Chart.yaml, and ensure that the appVersion is set to the desired GCXI version.
- Open the file helm/gcxi/values.yaml, and follow the instructions it provides to guide you in creating a new file, values-test.yaml with appropriate settings. Save the new file in the helm folder.
- For example, the following content in the values-test.yaml file is appropriate for a simple deployment using PostgreSQL inside the container, with PersistentVolumes named gcxi-log-pv, gcxi-backup-pv, gcxi-share-pv, and gcxi-postgres-pv (which are deployed in Step 2 of Preconfigure the environment). Create content in the values-test.yaml file that is appropriate for your environment:
gcxi:
  env:
    GCXI_GIM_DB:
      DSNDEF: DSN_NAME=GCXI_GIM_DB;DB_TYPE=POSTGRESQL;DB_TYPE_EX=PostgreSQL;HOST=gim_db_host;PORT=5432;DB_NAME=gim_db;LOGIN=;PASSWORD=;DRV_TYPE=JDBC;GCXI_QENGINE=ON
      LOGIN: gim_login
      PASSWORD: gim_password

    IWD_DB:
      DSNDEF: DSN_NAME=IWD_DB;DB_TYPE=POSTGRESQL;DB_TYPE_EX=PostgreSQL;HOST=iwd_db_host;PORT=5432;DB_NAME=dm_gcxi;LOGIN=;PASSWORD=;DRV_TYPE=JDBC;GCXI_QENGINE=ON
      LOGIN: iwd_login
      PASSWORD: iwd_password

    PGDATA: /var/lib/postgresql/data/mydata4

  deployment:
    deployPostgres: true
    deployLocalPV: false
    useDynamicLogPV: false
    useHostPathLogInitContainer: true
    hostIPC: false

  imagePullPolicy:
    worker: IfNotPresent
    control: IfNotPresent

  replicas:
    worker: 2

  images:
    postgres: postgres:11

  pvc:
    log:
      volumeName: gcxi-log-pv
    backup:
      volumeName: gcxi-backup-pv
    share:
      volumeName: gcxi-share-pv
    postgres:
      volumeName: gcxi-postgres-pv
3. Deploy GCXI
Complete the following steps to deploy GCXI. This procedure provides steps for environments without LDAP — for environments that include LDAP (or other features not supported in values.yaml) you can pass container environment variables such MSTR_WEB_LDAP_ON=true using the gcxi.envvars file (for example: --set-file gcxi.envext=gcxi.envvars).
- Log in to OpenShift cluster from the host where you will run deployment; for example, by executing the following command:
oc login --token <token> --server <url of api server>
- Execute the following command to make the GCXI project the default:
oc project gcxi
- For debug purposes, execute the following command to render templates without installing:
helm template --debug -f values-test.yaml gcxi-helm gcxi/
- Kubernetes descriptors are displayed. The values you see are generated from Helm templates, and based on settings from values.yaml and values-test.yaml. Ensure that no errors are displayed; you will later apply this configuration to your Kubernetes cluster.
- To deploy GCXI, execute the following command:
helm install --debug --namespace gcxi --create-namespace -f values-test.yaml gcxi-oc gcxi/
- This process takes several minutes. Wait until all objects are created and allocated, and the Kubernetes descriptors applied to the environment appear.
- To check the installed Helm release, execute the following command:
helm list –all-namespaces
- To check the GCXI project status, execute the following command:
oc status
- To check GCXI OpenShift objects created by Helm, execute the following command:
oc get all -n gcxi
- Make GCXI accessible from outside the cluster, using the standard HTTP port. For production environments, Genesys recommends that you create secure routes as discussed on the OpenShift website. For testing or development environments, perform the following steps:
- Execute the following command to expose the gcxi service:
oc expose service gcxi --port web --name web
- Execute the following command to verify that the new route is created in the gcxi project:
oc get route -n gcxi
- Route information appears, similar to the following:
NAME      HOST/PORT                            PATH   SERVICES   PORT      TERMINATION   WILDCARD
web       web-gcxi.<host>                             gcxi       web                     None
- where <host> is the host name generated by OpenShift.
- Execute the following command to expose the gcxi service:
- Verify that you can now access GCXI at the following URL:
http://web-gcxi.<host>/MicroStrategy/servlet/mstrWeb
Validate the deployment in OpenShift
http://<servername>:<port>/MicroStrategy/servlet/mstrWeb*, where <servername>:<port> are the server name and port provided by your administrator.
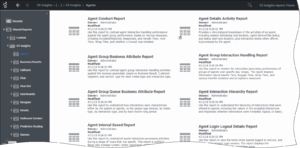
Verify that an assortment of report folders are present (Agents, Business Results, Callback, and so on) and that each one contains one or more reports. Note that, before you can view a report, you must run the report in order to populate data. For more information, see Generate historical reports.
Maintenance and troubleshooting
Use the instructions in this section only if you encounter errors or other difficulties. Problems with the deployment are most often associated with the following three kinds of objects:
- PVs
- PVCs
- pods
Use the following steps to examine events associated with these objects:
- To list the objects that might cause problems, execute the following commands:
oc get pv -o wide
oc get pvc -o wide -n gcxi
oc get po -o wide -n gcxi
- Examine the output from each get command.
- If any of the objects have a non-ready state (for example, Unbound (PVCs only), Pending, or CrashLoop) execute the following command to inspect the object more closely using oc describe:
oc describe <type> <name>
- For example:
oc describe po gcxi-0
- In the describe output, inspect the section Events.


