
Voice Calls
Contents
- 1 How do I handle an incoming call?
- 2 Videos about handling calls
- 3 Where can I get help to handle a call?
- 4 What other actions can I take during a call?
- 5 How do I control the volume of my headset and mute myself?
- 6 What do I do at the end of a call?
- 7 What happens when I put someone on hold?
- 8 How do I manually select a Caller Identification?
- 9 How do I record a call?
- 10 How do I forward my calls?
- 11 How do I call someone back?
- 12 What next?
- 13 Top 5 topics
The controls and features that let you handle voice interactions with contacts or team members.
- Due to continual changes to Agent Desktop, screen shots in this manual might show interface elements that are not yet available for this product or might not accurately reflect what you see in the product when you use it.
- Some Workspace Agent Desktop features are available only for PureEngage Cloud users.
- Some Workspace Agent Desktop features are available only for PureEngage On-Premises users.

How do I handle an incoming call?

What is a voice interaction?
A voice interaction is a view that is displayed on your Agent Desktop when you accept an inbound call. It includes all the call controls, information about the call (Case Information), and Disposition and Note tabs where you can add information about the call. There might also be tabs on the right side of the view that contain contact information, history, and other features.
Use the Contact tab to review the contact information, such as name, phone number, and email address.
What can I do with a voice interaction?
- Handle it myself
- Handle it myself with help
- Transfer it
- Instantly

- After a consultation. If you want to perform a warm transfer or a two-step transfer, click Consult to talk to the consultation target and then click Transfer to transfer the call.
- Instantly
- End the call

How do I know when a call is directed to me?
When a call is directed to you a pop-up notification is displayed on your desktop. You might also hear a ringing tone. The Interaction Notification view displays Case Data that is defined by your administrator. Case Data can help you decide whether you should Accept or Reject the call.

- Your account might be set up for auto-answer. In that case, calls are accepted for you automatically.
- In some environments, the Reject option is not available.
In some environments, you will receive a call preview, which looks just like the Interaction Notification view, before the call is connected and your contact hears your phone ringing. The call preview lets you decide whether to connect to the call or put the call back in queue. If a contact directly dials you, call preview is by-passed and you will receive the normal Interaction Notification, even if you are not in the Ready state.
What if the caller is Anonymous?
In some contact centers, inbound calls might be anonymous. In this case, there is no information to identify the contact in the interaction view or in the Contact tab.
If an anonymous caller provides you with Personally Identifiable Information (PII) and it is your corporate policy to add the PII to the Contact tab, then the caller is no longer anonymous and Agent Desktop will search for the contact in the contact database. Enter the PII into the contact search field and select the contact from the search results then click Assign to assign the interaction to the contact.
If no matching contact is found, click ![]() to create a new contact. Add the contact information and click Save.
to create a new contact. Add the contact information and click Save.
If you transfer, conference, or consult the call, it remains anonymous to the other party. The call also remains anonymous to Supervisors monitoring the call.

How do I expand or collapse panes to avoid scrolling?
Use the little chevrons (up/down arrows) to expand or collapse different parts of the interaction view to give yourself more room to work or to enable you to focus on just one pane.
![]()
Videos about handling calls
Here are some quick videos to show you some of the things you can do while handling a call.
Where can I get help to handle a call?

- Start a consultation

- Start a conference

What other actions can I take during a call?
You can:
- Record the call
- Hold
 and resume
- Dial digits
 without using your phone. For instance, you can use this dialer when you are navigating a phone system.
 - View and modify contact information in the Contact tab.
- View the contact's interaction history in the Contact tab.
- Sometimes Workspace is unable to assign a call to a contact or it assigns the call to the wrong contact. Your account might be set up to let you assign or change a contact in the Contact tab.
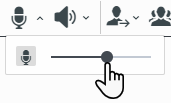
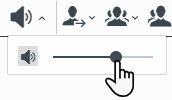
How do I control the volume of my headset and mute myself?

Depending on how things are set up, you might see different configurations of buttons:
- Mute/unmute your microphone:
- Adjust the volume of your microphone:
- Mute/unmute your speaker:
- Adjust the volume of your speaker:
What do I do at the end of a call?

- End call
- Select a disposition code if required
- Mark Done

- Change status as needed
What happens when I put someone on hold?

You can see how long you have placed a caller on hold, if enabled.
After you click Hold (![]() ), a timer and progress bar begin to count the seconds that the call is on hold.
), a timer and progress bar begin to count the seconds that the call is on hold.
How do I manually select a Caller Identification?

When you make a call, you might have to choose a Caller Identification to be displayed on the phone of the contact. This feature might also be enabled for calls that you are transferring or conferencing.
The person you call sees the Caller ID you select. The previous Caller ID that you selected is selected by default. To hide your identity, you can select Anonymous if available. Ask your supervisor about when to use this feature.How do I record a call?
The Call Recording functionality enables you to record the current voice interaction with a contact or an internal target. Agent Desktop supports two different types of call recording: emergency recording and controlled call recording. Your system administrator configures the type of call recording that is supported in your environment.
If your account is set up for emergency recording, you can start and stop recording by using a single toggle button.
If your account is set up for controlled recording, you can start a recording, pause a recording, resume a recording, and end a recording.
In addition, you might also be configured for automatic or system-guided recording. If this is the case, you will receive a notification that recording is in progress.
Call recording enables you to perform the following functions:
- Record the call — Select Record the Call (
 ) to record a call.
 - Stop recording the call — Select Stop Recording the Call (
 ) to stop recording a call that you are currently recording.
 - Pause recording the call — Select Pause Recording the Call (
 ) to pause recording a call that you are currently recording. Not all agents might have this feature.
 - Resume recording the call — Select Resume Recording the Call (
 ) to resume recording a call that is currently paused recording.
When you are recording a call, the call icon in the connected-parties area changes to red.
When you pause a call recording, the red call icon changes back to gray.
A Tooltip indicates both that the call is being recorded and the length of time of the recording.
A call-recording icon (![]() ) is displayed in the title bar of the Main View when a call recording is active.
) is displayed in the title bar of the Main View when a call recording is active.
How do I forward my calls?
To forward calls to a different extension or phone number, on the selected media channel, in the Forward column, click No Active Forward and Forward.
This action opens the Forward dialog box. Enter the number to which you want to forward your calls and click Apply. Click Cancel to return to the My Channels tab without forwarding your calls.
If you have an Active Forward set and you want to disable it, on the voice channel, in the Forward column, select Forwarded to <number>, and select Cancel Forward to <number>.
In the Cancel Forward dialog box, select Yes to cancel the forward; this removes the active forward and changes the Forward status to No Active Forward. To keep the forward active, select No.
How do I call someone back?
