Difference between revisions of "PE-GPR/9.0.0/Help/cfgUserMgmt"
From Genesys Documentation
m (Text replacement - "\|Platform=([^\|]*)GenesysEngage-onpremises([\|]*)" to "|Platform=$1GenesysEngage-cloud$2") |
(Published) |
||
| Line 3: | Line 3: | ||
|DisplayName=Create and update users and roles | |DisplayName=Create and update users and roles | ||
|TocName=Create and update users and roles | |TocName=Create and update users and roles | ||
| − | |Context=The User Management | + | |Context='''This window is available only to users with the ADMIN role.''' |
| + | |||
| + | The User Management window enables you to add new ADMIN and REVIEWER users to your account and to configure user settings. | ||
|ComingSoon=No | |ComingSoon=No | ||
|Platform=GenesysEngage-cloud | |Platform=GenesysEngage-cloud | ||
| − | | | + | |Role=Administrator |
|Section={{Section | |Section={{Section | ||
|sectionHeading=Create a new user | |sectionHeading=Create a new user | ||
| − | |||
|alignment=Horizontal | |alignment=Horizontal | ||
|Media=Image | |Media=Image | ||
| − | |image= | + | |image=GPRAcreateUser.png |
| − | |structuredtext=To add a new user to an account: | + | |structuredtext=To add a new user to an account: |
| − | # | + | #Click the '''Settings''' gear icon, located on the right side of the top menu bar: [[File:GPMsettingsGear.png|50px]], to open the configuration menu. |
#Click the '''Account''' > '''User Management''' tab on the left-hand navigation bar. | #Click the '''Account''' > '''User Management''' tab on the left-hand navigation bar. | ||
#Click '''New User'''. | #Click '''New User'''. | ||
| − | |structuredtextwide=Enter the user name and email, and select the appropriate roles. | + | |structuredtextwide=Enter the user name and email, and select the appropriate {{Link-SomewhereInThisVersion|manual=Help|topic=PrMConfig|anchor=gprRoles|display text=role or roles}}. |
| − | #To | + | #By default, the '''Roles''' text box contains both the ADMIN and REVIEWER roles when you create a user. |
| + | #*To remove a role, click the '''X''' next to the name of that role. | ||
| + | #*If you decide to add a role back after removing it, click in the Roles text box to open the list of roles. | ||
| + | #*If you already assigned a role to the user, click ''below'' the already-assigned role. Clicking to the right of an assigned role does not open the list of roles. | ||
#Click '''Create''' to finish setting up the user. | #Click '''Create''' to finish setting up the user. | ||
| − | |||
| − | GPR sends | + | GPR then sends a {{Link-SomewhereInThisVersion|manual=Help|topic=cfgUserProfile|display text=password reset}} email to the new user. |
| − | |||
|Status=No | |Status=No | ||
}}{{Section | }}{{Section | ||
|sectionHeading=Update a user | |sectionHeading=Update a user | ||
| − | |||
|alignment=Horizontal | |alignment=Horizontal | ||
|Media=Image | |Media=Image | ||
|image=GPReditUser.png | |image=GPReditUser.png | ||
| − | |structuredtext=To | + | |structuredtext=To update user information: |
#Click the '''Account''' > '''User Management''' tab on the left-hand navigation bar. A table containing data for all configured users appears. | #Click the '''Account''' > '''User Management''' tab on the left-hand navigation bar. A table containing data for all configured users appears. | ||
| Line 41: | Line 42: | ||
If you need to remove the user, click '''Delete user'''. | If you need to remove the user, click '''Delete user'''. | ||
| − | |||
| − | |||
| − | |||
| − | |||
| − | |||
| − | |||
| − | |||
| − | |||
| − | |||
| − | |||
| − | |||
| − | |||
| − | |||
| − | |||
| − | |||
| − | |||
| − | |||
| − | |||
| − | |||
| − | |||
| − | |||
| − | |||
| − | |||
| − | |||
| − | |||
| − | |||
| − | |||
| − | |||
| − | |||
| − | |||
| − | |||
| − | |||
| − | |||
|Status=No | |Status=No | ||
}}{{Section | }}{{Section | ||
| Line 79: | Line 47: | ||
|anchor=roles | |anchor=roles | ||
|alignment=Vertical | |alignment=Vertical | ||
| − | |||
| − | |||
|structuredtext=GPR supports the following roles: | |structuredtext=GPR supports the following roles: | ||
| − | *ADMIN - | + | *ADMIN - View the Feature Coverage and Model Accuracy charts. Manage users, account password policies, and update passwords. |
| − | * | + | |
| − | + | *REVIEWER - View the View the Feature Coverage and Model Accuracy graphs. Change their own password. | |
| − | + | *: | |
| − | *: | ||
| − | |||
| − | |||
|Status=No | |Status=No | ||
}} | }} | ||
}} | }} | ||
Latest revision as of 20:55, December 16, 2020
This topic is part of the manual Genesys Predictive Routing Help for version 9.0.0 of Genesys Predictive Routing.
Read this topic for other versions:
Contents
This window is available only to users with the ADMIN role.
The User Management window enables you to add new ADMIN and REVIEWER users to your account and to configure user settings.
Related documentation:
Create a new user
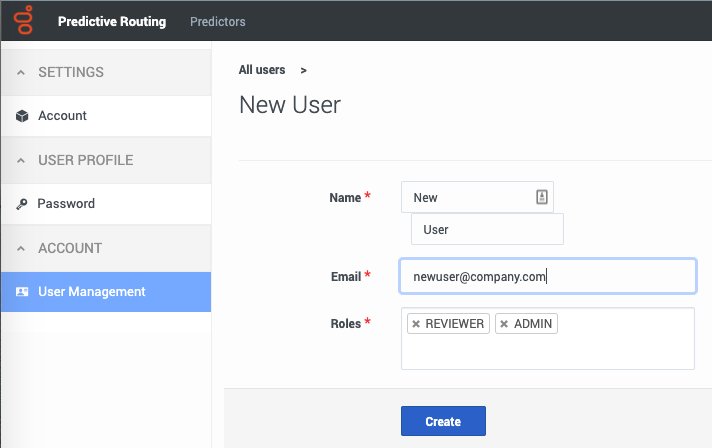
To add a new user to an account:
Enter the user name and email, and select the appropriate role or roles.
- By default, the Roles text box contains both the ADMIN and REVIEWER roles when you create a user.
- To remove a role, click the X next to the name of that role.
- If you decide to add a role back after removing it, click in the Roles text box to open the list of roles.
- If you already assigned a role to the user, click below the already-assigned role. Clicking to the right of an assigned role does not open the list of roles.
- Click Create to finish setting up the user.
GPR then sends a password reset email to the new user.
Update a user
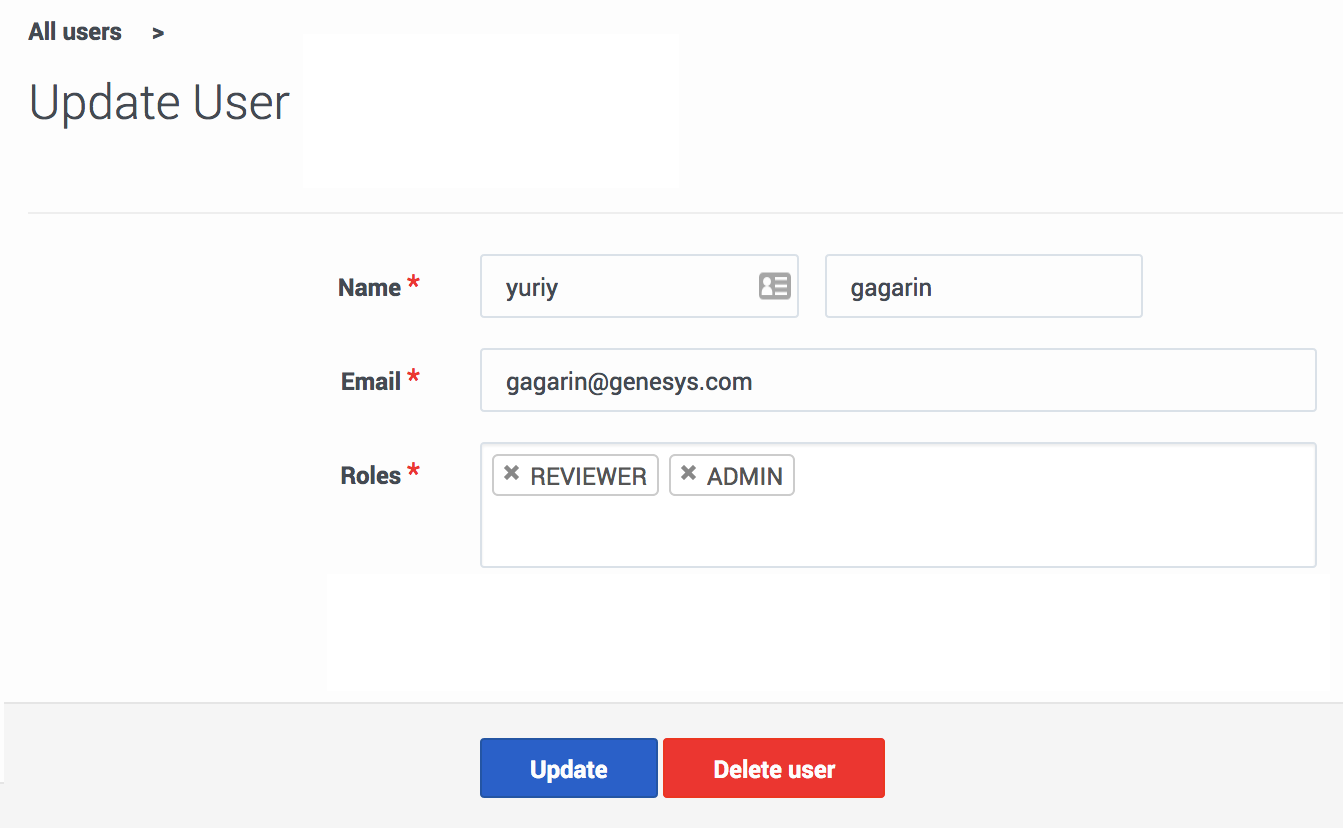
To update user information:
- Click the Account > User Management tab on the left-hand navigation bar. A table containing data for all configured users appears.
- Click a user's email address.
- Make the desired changes to the user name, email, or roles.
- Click Update to save your changes.
Roles
GPR supports the following roles:
- ADMIN - View the Feature Coverage and Model Accuracy charts. Manage users, account password policies, and update passwords.
- REVIEWER - View the View the Feature Coverage and Model Accuracy graphs. Change their own password.
Comments or questions about this documentation? Contact us for support!


