Explore the sample Designer application
Contents
Explore the sample Designer application for Genesys Task Routing and learn how to modify it to work with your solution.
Genesys Task Routing (GTR) includes a sample Designer application that you can use as a starting point to help meet your custom requirements for task routing. The application also includes a simplified Open Media Routing Data Table (called OPEN_MEDIA_ROUTING_CONFIG) to map the routing tasks based on agent, skill, agent group, and so on.
The sample application routes tasks to agents based on attributes you specify on the workitem interaction and information included in the Open Media Routing Data Table. It has four routing cascades that run in the following order:
- GTR routes the task to the requested agent.
- If not, GTR routes the task to an agent with the requested skill.
- If not, GTR routes the task to the requested agent group.
- If not, GTR routes the task to the default agent group.
The application works based on the assumption that all workitems are pre-classified in the third-party system before integrating with GTR. You can read more about this in Input values.
Using the Open Media Routing Table, you can configure specific values for agents, skills, and agent groups, or set a default mapping instead. If the interactions have more than one row, you can define a default row as routing precedence. You can also override the default routing table by specifying the requested agent, skill, or agent group directly in the interaction user data.
Prerequisites
Complete the following steps before you get started:
- Create a default agent group named workitems. The sample application uses workitems as the default agent group, so if you choose another name, you must update the application to use the new name.
- Configure the third-party pop-up as described in Integrate third-party applications.
Import the application
Contact your Genesys representative to get the sample Designer application and the Open Media Routing Data Table. Once you have the application, follow the steps in the Designer documentation to import the application.
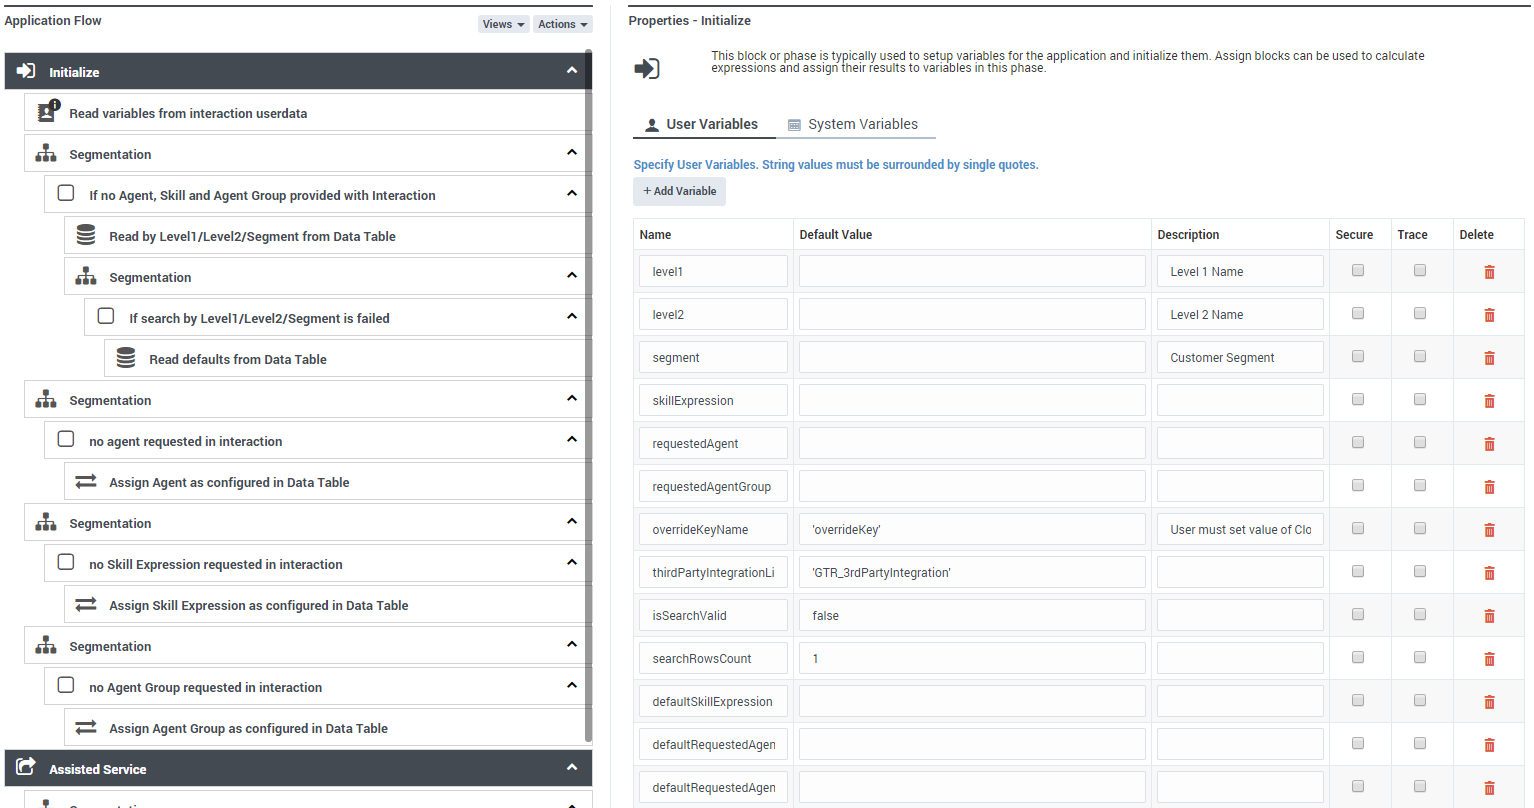
To complete the setup, edit the sample application and click the Initialize header. Set the default value for the overrideKeyName variable — you can get this value from the Transactions Override Attached Data Key in Agent Setup.
Configure the routing table
Once the application is imported, you can find the OPEN_MEDIA_ROUTING_CONFIG table under Business Controls > Data Tables.
In the image above:
- Level1, Level2, and Customer Segment form a compound key.
- Agent, Skill Expression, and Agent Group are searchable values in the table.
- The row with _ANY-LEVEL1_, _ANY-LEVEL2_, and _ANY-SEGMENT_ enables the default mapping. If you change the values in this compound key, the application won't be able to use the default mapping. If you don't need the default mapping, you can leave the Agent, Skill Expression, and Agent Group fields blank in this row.
Input values
To work with the sample application, make sure your third-party system adapter adds the following user data keys on the workitem interaction:
- GTR_level1 — The value for Level1. Use this field to add any kind of classification that makes sense for your business. For example, this could represent a particular category in your business structure or a severity/escalation level.
- GTR_level2 — The value for Level2. This field provides another level of classification.
- CustomerSegment — The value for Customer Segment. This is a third classification level that represents how important the customer is for your business. For example, you could have values such as Bronze, Silver, and Gold.
Together these three attributes form a compound key that is used to get the Agent, Skill Expression, and Agent Group values from the routing table. If you don't provide values for these attributes, the sample application uses the default mapping (see Configure the routing table above).
You can also override the default routing table values for Agent, Skill Expression, and Agent Group by specifying values for these fields with the following user data keys:
- GTR_requestedAgent
- GTR_skillExpression
- GTR_requestedAgentGroup
Application flow
The sample application goes through two phases when routing tasks: Initialize and Assisted Service.
Initialize phase
In the Initialize phase, the sample application goes through the following setup:
- The Read variables from interaction userdata block reads GTR_level1, GTR_level2, and CustomerSegment from the user data on the interaction. Next, the application writes a key/value pair to the interaction user data to support the media type for third-party application pop-up in Agent Workspace:
- overrideKeyName = thirdPartyIntegrationListObject (the default is overrideKey = GTR_3rdPartyIntegration).
- The Segmentation block checks to see If no Agent, Skill or Agent Group provided with an interaction.
- If none exist, the application tries to read the missing parameter from the OPEN_MEDIA_ROUTING_CONFIG data table in the Read by Level1/Level2/Customer Segment from Data Table block.
- If the key is not available or more than one row is present, the application sets the isSearchValid and searchRowsCount variables.
- If the previous iteration is not successful, the application tries to Read defaults from Data Table by getting the values from the _ANY-LEVEL1_, _ANY-LEVEL2_, and _ANY-SEGMENT_ default row.
- After going through the parameters, the application runs three independent Segmentation blocks that check if there was an agent, skill, or agent group requested in the interaction user data (see Input values). If not, the application sets the values configured in the data table.
Assisted Service phase
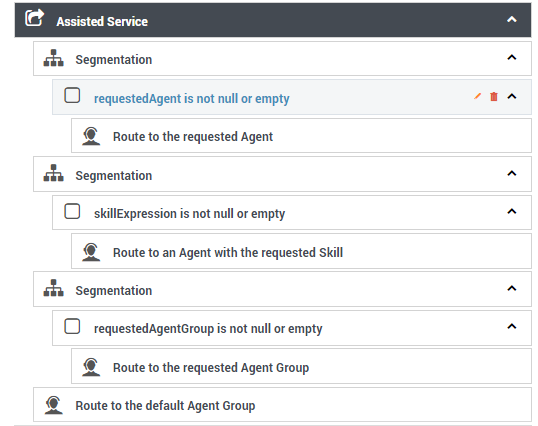
In the Assisted Service phase, the application follows four routing cascades in this order:
- Route to the requested Agent
- Route to an agent with the requested Skill
- Route to the requested Agent Group
- Route to the default Agent Group
The first three routing cascades are a sequence of Segmentation blocks that perform null checks and route to the appropriate agent or agent group. The last cascade, Route to the default Agent Group, uses the workitems agent group you created in Prerequisites. As mentioned previously, you can also set another default group name here to suit your custom needs.
All Route blocks use a 120-second timeout by default. You can adjust this value and enhance the routing data table and application to specify timeouts for the Level1, Level2, and Customer Segment fields.


