
Deploy Designer (versions v9012214 and above)
Contents
- 1 1. About this document
- 2 2. Product overview
- 3 3. Prerequisites
- 4 4. Deployment configuration settings (Helm values)
- 5 5. Post deployment Designer configuration settings
- 6 6. Logging
- 7 7. Platform / Configuration Server and GWS settings
- 8 8. Deployment
- 8.1 8.1 Preparation
- 8.2 8.2 Set up Ingress
- 8.3 8.3 Set up Application Gateway (WAF) for Designer
- 8.4 8.4 Storage
- 8.5 8.5 Set up Secrets
- 8.6 8.6 Deployment strategies
- 8.7 8.7 Rolling Update deployment
- 8.8 8.7.1 Designer
- 8.9 8.7.2 DAS
- 8.10 8.8 Blue-Green deployment
- 8.11 8.8.1 Designer
- 8.12 8.8.2 DAS
- 8.13 8.9 Canary
- 8.14 8.10 Validations and checks
- 9 9. Post deployment procedures
- 10 10. Enabling optional features
- 11 11. Cleanup
- 12 12. Limitations
Learn how to deploy Designer as a service in a Kubernetes cluster (for DesDepMnfst v9012214 and above).
1. About this document
This document guides you through the process of deploying and configuring Designer and Designer Application Server (DAS) as a service in a Kubernetes (K8s) cluster.
Information on the following topics is provided:
- Overview of Designer and DAS
- Configuration details
- Deployment process
- Enabling optional features
- Cleanup
- Known limitations
1.1 Intended audience
This document is intended for use primarily by system engineers and other members of an implementation team who will be involved in configuring and installing Designer and DAS, and system administrators who will maintain Designer and DAS installations.
To successfully deploy and implement applications in Designer and DAS, you must have a basic understanding of and familiarity with:
- Network design and operation
- Network configurations in your organization
- Kubernetes
- Genesys Framework architecture and functions
1.2 Before you begin
- Install Kubernetes. Refer to the Kubernetes documentation site for installation instructions. You can also refer to the Genesys Docker Deployment Guide for information on Kubernetes and High Availability.
- Install Helm according to the instructions outlined in the Helm documentation site.
After you complete the above mandatory procedures, return to this document to complete an on-premise deployment of Designer and DAS as a service in a K8s cluster.
2. Product overview
The following sections provide a brief overview of Designer and DAS.
2.1 Designer
The Designer service provides a web UI to build and manage VXML and SCXML based self-service and assisted service applications for a number of media types. It stores data on the local file system and is synchronized across instances by using services like Network File System (NFS). Genesys customers can build applications using a simple drag and drop method, and assign contact points (Route Points and other media endpoints) to applications directly from the Designer UI. Insights into runtime behavior of applications and troubleshooting aid is provided by Designer Analytics, which includes a rich set of dashboards based on session detail records (SDR) from data stored in Elasticsearch.
Designer offers the following features:
- Applications for working with phone, chat, email, SMS (text messages), Facebook, Twitter, and open media types.
- Bots, ASR, TTS capabilities for self-service.
- Assisted service or routing.
- Callback.
- Business Controls.
- Audio, message management.
- Grammars management.
- Contact points management - route points, chat end points, email pop-client/mailboxes.
- Analytics dashboards through embedded Kibana.
Designer is an Express/Node.js application. The UI is designed using Angular powered Bootstrap. Application data (SCXML and VXML) is stored as a file system. Designer Analytics and Audit data is stored in Elasticsearch.
2.2 Designer Application Server (DAS)
Designer Application Server (DAS) hosts and serves the Designer generated application files (SCXML and VXML), audio, and grammars. It also provides:
- Runtime evaluation of Business Controls (business hours, special days, emergency flags and data tables).
- Callback interface to GES.
DAS uses built-in NGINX to front requests. It consists of 3 modules: NGINX, PHP, and Node.js.
- Requests for static workspace content (SCXML, VXML, JS, audio, grammar, etc) are handled by the NGINX module.
- Requests for PHP content are processed by the FastCGI PHP module.
- SDR (Analytics) processing requests are handled by the DAS Node.js module.
2.3 Deployment architecture
The below architecture diagram illustrates a sample premise deployment of Designer and DAS:

2.4 High Availability (HA), Disaster Recovery (DR), and Scalability
Designer and DAS must be deployed as highly available in order to avoid single points of failure. A minimum of 2 replicas of each service must be deployed to achieve HA.
The Designer and DAS service pods can be automatically scaled up or down based on metrics such as CPU and memory utilization. The Deployment configuration settings section explains how to configure HA and auto-scaling.
Refer to the Genesys Docker Deployment Guide for more information on general HA recommendation for Kubernetes.
3. Prerequisites
Before deploying Designer, ensure the following resources are deployed, configured, and accessible:
3.1 Mandatory prerequisites
- Kubernetes 1.12+
- Helm 3.0
- Docker
- To store Designer and DAS docker images to the local docker registry.
- Ingress Controller
- If Designer and DAS are accessed from outside of a K8s cluster, it is recommended to deploy/configure an ingress controller (for example, NGINX), if not already available. Also, the Blue-Green deployment strategy works based on the ingress rules.
- The Designer UI requires Session Stickiness. Configure session stickiness in the annotations parameter in the values.yaml file during Designer installation.
- Persistent Volumes (PVs)
- Create persistent volumes for workspace storage (5 GB minimum) and logs (5 GB minimum)
- Set the access mode for these volumes to ReadWriteMany.
- The Designer manifest package includes a sample YAML file to create Persistent Volumes required for Designer and DAS.
- Persistent volumes must be shared across multiple K8s nodes. Genesys recommends using NFS to create Persistent Volumes.
- Shared file System - NFS
- For production, deploy the NFS server as highly available (HA) to avoid single points of failure. It is also recommended that the NFS storage be deployed as a Disaster Recovery (DR) topology to achieve continuous availability if one region fails.
- By Default, Designer and DAS containers run as a Genesys user (
uid:gid 500:500). For this reason, the shared volume must have permissions that will allow write access touid:gid 500:500. The optimal method is to change the NFS server host path to the Genesys user:chown -R genesys:genesys. - The Designer manifest package includes a sample YAML file to create an NFS server. Use this only for a demo/lab setup purpose.
- Azure Files Storage - If you opt for Cloud storage, then Azure Files Storage is an option to consider and has the following requirements:
A Zone-Redundant Storage for RWX volumes replicated data in zone redundant (check this), shared across multiple pods.- Provisioned capacity : 1 TiB
- Baseline IO/s : 1424
- Burst IO/s : 4000
- Egress Rate : 121.4 MiBytes/s
- Ingress Rate : 81.0 MiBytes/s
- Genesys Web Services (GWS) 9.x
- Configure GWS to work with a compatible version of Configuration Server.
- Other Genesys Components
- ORS ORS 8.1.400.x
- Nexus 9.x
- URS 8.1.400.x
3.2 Optional prerequisites
- Elasticsearch 7.8.0
- Elasticsearch is used for Designer Analytics and audit trail.
- Redis 3.2.x
- Redis is used for resource index caching and multi-user collaboration locks on Designer resources.
4. Deployment configuration settings (Helm values)
This section provides information on the various settings that have to be configured in Designer and DAS. The configuration settings listed below will be used during the deployment of Designer and DAS. That is, these settings will be used during initial deployment / upgrade. These settings can be configured in the values.yaml Helm file.
4.1 Designer deployment settings
The following table provides information on the Designer deployment settings. These settings are configured in the designer-values.yaml file.
| Parameter | Description | Mandatory? | Default Value |
designer.deployment.replicaCount
|
Number of service instances to be created. | Mandatory | 2
|
designer.deployment.maxreplicaCount
|
The maximum number of replicas to be created. It is recommended to configure this setting if auto-scaling is used. | Optional | 10
|
designer.deployment.strategy
|
The deployment strategy to follow. This determines which type of resources are deployed. Valid values are: rollingupdate, blue-green, blue-green-volume, blue-green-ingress, grafana.
|
Mandatory | rollingupdate
|
designer.deployment.color
|
This is to deploy/upgrade the Designer service in a blue-green upgrade strategy. Valid values are: blue, green.
|
Optional | |
designer.deployment.type
|
This is to specify the type of deployment. Valid value: Deployment.
|
Optional | Deployment
|
designer.image.registry
|
The registry that the organization uses for storing images. | Mandatory | |
designer.image.repository
|
Docker repository that contains the images for Designer. | Mandatory | |
designer.image.tag
|
Designer image version. | Mandatory | 9.0.110.07.7 |
designer.image.PullPolicy
|
Designer image pull policy (imagePullPolicy). Valid values: Always, IfNotPresent, Never.
|
Mandatory | IfNotPresent
|
designer.image.imagePullSecrets
|
Secret name containing credentials for authenticating access to the Docker repository. | Mandatory | |
designer.volumes.workspacePvc.create
|
If a persistent volume is to be created, this value has to be true.
|
Mandatory | true
|
designer.volumes.workspacePvc.mountPath
|
The path where the workspace volume is to be mounted inside the Designer container. | Mandatory | /designer/workspace
(Changing this value is not recommended.) |
designer.volumes.workspacePvc.claim
|
Persistent volume claim name for the workspace. | Mandatory | designer-managed-disk
|
designer.volumes.workspacePvc.claimSize
|
Size of the persistent volume claim for the workspace.
The persistent volume must be equal to or greater than this size. |
Mandatory | |
designer.volumes.workspacePvc.storageClass
|
storageClassName provided in the persistent volume that is created for the Designer workspace (example, nfs). | Mandatory | |
designer.volumes.logsPvc.create
|
If a PVC volume is to be created, this value has to be true, else false.
|
Mandatory | true
|
designer.volumes.logsPvc.mountPath
|
The path where the Designer logs volume is to be mounted inside the Designer container. | Mandatory | /designer/logs
|
designer.volumes.logsPvc.claim
|
Persistent volume claim name for logs. | Mandatory | designer-logs
|
designer.volumes.logsPvc.claimSize
|
Size of the persistent volume claim for the Designer logs.
The persistent volume must be equal to or greater than this size. |
Mandatory | |
designer.volumes.logsPvc.storageClass
|
storageClassName provided in the persistent volume that is created for the Designer logs (example, nfs). | Mandatory | |
designer.podVolumes
|
Log and workspace persistent volume claim names and name of the volumes attached to the pod. | Mandatory |
designer:
  podVolumes:
    - name: designer-pv-volume
      persistentVolumeClaim:
        claimName: designer-managed-disk
    - name: designer-log-volume
      persistentVolumeClaim:
claimName: designer-logs |
designer.volumeMounts
|
Name and mount path of the volumes to be attached to the Designer pods. | Mandatory |
volumeMounts:
    - name: designer-pv-volume
      mountPath: /designer/workspace
    - name: designer-log-volume
mountPath: /designer/logs |
designer.livenessProbe.path
|
Designer liveness probe API path. | Mandatory | /health
|
designer.livenessProbe.containerPort
|
Port running the container. | Mandatory | 8888
|
designer.livenessProbe.startupDelay
|
The liveness probe will be started after a given delay as specified here. | Mandatory | 20
|
designer.livenessProbe.checkInterval
|
The interval between each liveness probe request. | Mandatory | 5
|
designer.livenessProbe.failureCount
|
Number of liveness probe failures after which, to mark the container as unstable or restart. | Mandatory | 5
|
designer.readinessProbe.path
|
Designer readiness probe API path. | Mandatory | /health
|
designer.readinessProbe.containerPort
|
Port running the container. | Mandatory | 8888
|
designer.readinessProbe.startupDelay
|
The readiness probe will be started after a given delay as specified here. | Mandatory | 20
|
designer.readinessProbe.checkInterval
|
The interval between each readiness probe request. | Mandatory | 5
|
designer.readinessProbe.failureCount
|
Number of readiness probe failures after which, to mark the container as unstable or restart. | Mandatory | 5
|
designer.designerSecrets.enabled
|
This enables providing the GWS Client ID and Secret as an input to the Designer pods. Kubernetes Secrets is used to store the GWS client credentials. | Mandatory | true
|
designer.designerSecrets.secrets
|
GWS Client ID and GWS Client Secret. Create a new GWS Client if it does not exist. A link to information on creating a new GWS Client is provided in the Platform settings section. | Mandatory | |
designer.service.enabled
|
Set to true if the service must be created.
|
Optional | true
|
designer.service.type
|
Service type. Valid values are: ClusterIP, NodePort, LoadBalancer.
|
Mandatory | NodePort
|
designer.service.port
|
The Designer service port to be exposed in the cluster. | Mandatory | 8888
|
designer.service.targetPort
|
The Designer application port running inside the container. | Mandatory | http
|
designer.service.nodePort
|
Port to be exposed in case service type is NodePort.
|
Mandatory for designer.service.type=NodePort.
|
30180
|
designer.service.termination_grace_period
|
The period after which Kubernetes starts to delete the pods after service termination. | Optional | 30 seconds.
|
designer.ingress.enabled
|
Set to true to enable ingress.
Ingress should be enabled for all cases except for a lab/demo setup. |
Mandatory | true
|
designer.ingress.annotations
|
Annotations added for ingress. The Designer UI requires Session Stickiness if the replica count is more than 1. Configure Session Stickiness based on the ingress controller type. Configuration specific to ingress such as Session Stickiness can be provided here. | Optional | |
designer.ingress.paths
|
Ingress path | Mandatory | [/]
|
designer.ingress.hosts
|
Hostnames to be configured in ingress for the Designer service. | Mandatory | - <app1>.example.com - <app1>.blue.example.com |
designer.ingress.tls
|
TLS configuration for ingress. | Optional | []
|
designer.resources.limits.cpu
|
Maximum amount of CPU that K8s allocates for the container. | Mandatory | 600m
|
designer.resources.limits.memory
|
Maximum amount of memory that K8s allocates for the container. | Mandatory | 1Gi
|
designer.resources.requests.cpu
|
Guaranteed CPU allocation for the container. | Mandatory | 500m
|
designer.resources.requests.memory
|
Guaranteed memory allocation for the container. | Mandatory | 512Mi
|
designer.securityContext.runAsUser
|
This setting controls which user ID the containers are run with. This can be configured to run Designer as a non-root user. You can either use the Genesys user or arbitrary UIDs. Both are supported by the Designer base image. 500 is the ID of the Genesys user.The file system must reside within the Genesys user account in order to run Designer as a Genesys user. Change the NFS server host path to the Genesys user:
|
Optional | |
designer.securityContext.runAsGroup
|
Controls which primary group ID the containers are run with. This can be configured to run Designer as a non-root user. You can either use the Genesys userGroup (GID - 500) or arbitrary GIDs. Both are supported by the Designer base image.
|
Optional | |
designer.nodeSelector
|
To allow pods to be scheduled based on the labels assigned to the nodes. | Optional | Default value:
nodeSelector:
<label_key>: <label_value> |
designer.affinity
|
The K8s standard node affinity and anti-affinity configurations can be added here. Refer to the this topic in the Kubernetes documentation site for sample values. | Optional | {}
|
designer.tolerations
|
Tolerations work with taints to ensure that pods are not scheduled on to inappropriate nodes. Refer to the Taints and Tolerations topic in the Kubernetes documentation site for sample values. | Optional | []
|
designer.podDisruptionBudget.enabled
|
Set to true if a pod disruption budget is to be created.
|
Optional | false
|
designer.podDisruptionBudget.minAvailable
|
The number of pods that should always be available during a disruption. | Optional | 1
|
designer.dnsPolicy
|
The DNS policy that should be applied to the Designer pods. | Optional | |
designer.dnsConfig
|
The DNS configuration that should be applied to the Designer pods. | Optional | |
designer.priorityClassName
|
The priority class name that the pods should belong to. | Optional | |
designer.hpa.enabled
|
Enables K8s Horizontal Pod Autoscaler (HPA). It automatically scales the number of pods based on average CPU utilization and average memory utilization. For more information on HPA refer to this topic in the Kubernetes documentation site. | Optional | false
|
designer.hpa.targetCPUPercent
|
The K8s HPA controller will scale up or scale down pods based on the target CPU utilization percentage specified here. It scales up or scales down pods between the range - designer.deployment.replicaCount and designer.deployment.maxreplicaCount.
|
Optional | 70
|
designer.hpa.targetMemoryPercent
|
The K8s HPA controller will scale up or scale down pods based on the target memory utilization percentage specified here. It scales up or scales down pods between the range - designer.deployment.replicaCount and designer.deployment.maxreplicaCount.
|
Optional | 70
|
designer.labels
|
Labels that will be added to the Designer pods. | Optional | {}
|
designer.annotations
|
Annotations added to the Designer pods. | Optional | {}
|
designer.prometheus.enabled
|
Set to true if Prometheus metrics must be enabled.
|
Optional | false
|
designer.prometheus.tagName
|
Label key assigned to the pods/service to filter out. | Optional | service
|
designer.prometheus.tagValue
|
Label value assigned to the pods/service to filter out. | Optional | designer
|
designer.prometheus.instance
|
Optional | ❴❴instance❵❵
| |
designer.prometheus.serviceMonitor.enabled
|
Set to true<Set/code> if a service monitor resource is needed to monitor the pods through the Kubernetes service.
|
Optional | false
|
designer.prometheus.serviceMonitor.path
|
The path in which the metrics are exposed. | Optional | /metrics
|
designer.prometheus.serviceMonitor.interval
|
The scrape interval specified for the Prometheus server. That is, the time interval at which the Prometheus server will fetch metrics from the service. | Optional | 10s
|
designer.prometheus.serviceMonitor.labels
|
Labels to be specified for the service monitor resource. | Optional | |
designer.prometheus.alerts.enabled
|
Set to true<Set/code> if Prometheus alerts must to be created.
|
Optional | false
|
designer.prometheus.alerts.customalerts
|
Any custom alerts that are created must be specified here. | Optional | |
designer.prometheus.alerts.labels
|
Labels to be specified for the alerts resource. | Optional | |
designer.prometheus.alerts.<alert_names>
|
Scenarios for which alerts need to be created. | Optional | designer.prometheus.alerts
containerRestartAlert:
        interval: 3m
        threshold: 5
        AlertPriority: CRITICAL
      MemoryUtilization:
        interval: 1m
        threshold: 70
        AlertPriority: CRITICAL
      endpointAvailable:
        interval: 1m
        AlertPriority: CRITICAL
      CPUUtilization:
        interval: 1m
        threshold: 70
        AlertPriority: CRITICAL
      containerReadyAlert:
        interval: 1m
        readycount: 1
        AlertPriority: CRITICAL
      WorkspaceUtilization:
        interval: 3m
        threshold: 80
        workspaceClaim: designer-managed-disk
        AlertPriority: CRITICAL
      AbsentAlert:
        interval: 1m
        AlertPriority: CRITICAL
      Health:
        interval: 3m
        AlertPriority: CRITICAL
      WorkspaceHealth:
        interval: 3m
        AlertPriority: CRITICAL
      ESHealth:
        interval: 3m
        AlertPriority: CRITICAL
      GWSHealth:
        interval: 3m
AlertPriority: CRITICAL |
designer.grafana.enabled
|
Set to true if the Grafana dashboard is to be created.
|
Optional | true
|
designer.grafana.labels
|
Labels that have to be added to the Grafana ConfigMap. | Optional | |
designer.grafana.annotations
|
Annotations that have to be added to the Grafana ConfigMap. | Optional | |
annotations
|
Enables Kubernetes Annotations and adds it to all the resources that have been created.
For more information, refer to the Annotations topic in the Kubernetes documentation site. |
Optional | {}
|
labels
|
Any custom labels can be configured here. It is a key and value pair, for example, key:"value". These labels are added to all resources. | Optional | {}
|
podLabels
|
Labels that will be added to all application pods. | Optional | {}
|
podAnnotations
|
Annotations that will be added to all application pods. | Optional | {}
|
4.1.1 Designer ConfigMap settings
The following table provides information on the environment variables and service-level settings stored in the Designer ConfigMap.
| Parameter | Description | Mandatory? | Default Value |
designer.designerConfig.create
|
This enables providing environment variables as an input to the Designer pods. It uses a ConfigMap to store the environment variables. | Mandatory | true
|
designer.designerConfig.envs.DES_PORT
|
Designer port for container ("port" in flowsettings.json). The input should be a string, within double quotes.
|
Mandatory | "8888"
|
designer.designerConfig.envs.DES_APPSERVER_HOST
|
DAS hostname ("applicationHost" in flowsettings.json).
|
Mandatory | das
|
designer.designerConfig.envs.DES_APPSERVER_PORT
|
DAS port ("applicationPort" in flowsettings.json). The input should be a string, within double quotes.
|
Mandatory | "80"
|
designer.designerConfig.envs.DES_DEPLOY_URL
|
This is normally not changed. It is the relative path to the workspace on DAS. The default value "/workspaces" should be used always ("deployURL" in flowsettings.json).
|
Mandatory | "/workspaces"
|
designer.designerConfig.envs.DES_USE_HTCC
|
Set to "true" so Designer works with GWS. If set to "false", Designer defaults to a local mode and may be used temporarily if GWS is unavailable ("usehtcc" in flowsettings.json). Input should be "true" or "false".
|
Mandatory | "false"
|
designer.designerConfig.envs.DES_HTCC_SERVER
|
GWS server host ("htccserver" in flowsettings.json). For example, "gws.genhtcc.com". The input should be a string, within double quotes.
|
Mandatory | " " |
designer.designerConfig.envs.DES_HTCC_PORT
|
GWS server port ("htccport" in flowsettings.json). For example, "80". The input should be a string, within double quotes.
|
Mandatory | " " |
designer.designerConfig.envs.DES_ENABLE_ANALYTICS
|
To enable or disable Designer Analytics ("enableAnalytics" in flowsettings.json). Input should be "true" or "false".
|
Optional | "false"
|
designer.designerConfig.envs.DES_ES_URL
|
Elasticsearch URL ("esUrl" in flowsettings.json). For example, "http://es-service:9200". The input should be a string, within double quotes.
|
Optional | " " |
designer.designerConfig.envs.DES_ES_SERVER
|
Elasticsearch Server Host Name ("esServer" in flowsettings.json). For example, "es-service"). The input should be a string, within double quotes.
|
Optional | " " |
designer.designerConfig.envs.DES_ES_PORT
|
Elasticsearch port ("esPort" in flowsettings.json). For example, "9200". The input should be a string, within double quotes.
|
Optional | " " |
designer.designerConfig.envs.DES_FILE_LOGGING_ENABLED
|
Enable file logging. If not enabled, Designer will create only verbose logs. Input should be "true" or "false". | Mandatory | "false" |
designer.designerFlowSettings.create
|
Set to true to include the contents of the flowsettings.yaml file in a separate ConfigMap. Input should be true or false.
|
Optional | false
|
designer.designerFlowSettings.envs
|
The flowsettings.yaml file should contain these keys, so that the file's contents will be included in the ConfigMap. Refer to the Updating the flowsettings file section in the Deploy Designer topic for more information on this. | Optional | {} |
4.2 DAS deployment settings
The following table provides information on the DAS deployment settings. These settings are configured in the das-values.yaml file. DAS Deployment Settings
| Parameter | Description | Mandatory? | Default Value |
das.deployment.replicaCount
|
Number of pods to be created. | Mandatory | 2
|
das.deployment.maxreplicaCount
|
The maximum number of replicas to be created. It is recommended to configure this setting if auto-scaling is used. | Optional | 10
|
das.deployment.strategy
|
The deployment strategy to follow. This determines which type of resources are deployed. Valid values are: rollingupdate, blue-green, blue-green-ingress, blue-green-service, canary.
|
Mandatory | rollingupdate
|
das.deployment.color
|
This is to deploy/upgrade the DAS service using the blue-green upgrade strategy. Valid values are: blue, green.
|
Mandatory for blue-green and blue-green-service strategies.
|
|
das.deployment.type
|
Type of Kubernetes controller. Valid value is: Deployment
|
Optional | StatefulSet
|
das.image.repository
|
Docker repository that contains the images for DAS. | Mandatory | |
das.image.tag
|
DAS image version. | Mandatory | |
das.image.pullPolicy
|
DAS image pull policy (imagePullPolicy). Valid values are: Always, IfNotPresent, Never.
|
Optional | IfNotPresent
|
das.image.imagePullSecrets
|
Secret name containing the credentials for authenticating access to the Docker repository. | Mandatory | |
das.podVolumes
|
Provides the name of the volume and name of the persistent volume claim to be attached to the pods | Mandatory |
das:
podVolumes:
- name: workspace
 persistentVolumeClaim:
 claimName: designer-managed-disk
 - name: logs
 persistentVolumeClaim:
claimName: designer-logs |
das.volumes.podPvc.create
|
This volume is usually created to mount a local disk to a DAS container for syncing data in case cloud storage is used for storing Designer files. This value has to be true or false depending on whether the local disk is needed or not
|
Optional | false
|
das.volumes.podPvc.mountPath
|
The path where the workspace volume is to be mounted inside the DAS container. | Optional | |
das.volumes.podPvc.claim
|
Persistent volume claim name for the volume. | Optional | local-workspace
|
das.volumes.podPvc.claimSize
|
Size of the persistent volume claim for the pod.
The persistent volume must be equal to or greater than this size. |
Optional | |
das.volumes.podPvc.storageClass
|
storageClassName provided in the persistent volume that is created for DAS (example, nfs). | Optional | |
das.volumes.podPvc.accessModes
|
The read/write priveleges and mount priveleges of the volume claim with respect to the nodes. Valid types are: ReadWriteOnce, ReadOnlyMany, ReadWriteMany.
For more information, refer to the access modes topic in the Kubernetes documentation site. |
Optional | ReadWriteOnce
|
das.volumeMounts
|
The name of the volume and the mount path to be used by the pods. | Mandatory |
volumeMounts:
- mountPath: /das/www/workspaces
name: workspace
- mountPath: /das/log
name: logs |
das.dasSecrets.enabled
|
Set to true if Kubernetes secrets must be created to store keys/credentials/tokens.
|
Optional | false
|
das.dasSecrets.secrets
|
Key and value pairs containing the secrets, such as a username and password. | Optional | |
das.livenessProbe.path
|
DAS liveness probe API path. | Mandatory | /health
|
das.livenessProbe.containerPort
|
Port running the container. | Mandatory | 8081
|
das.livenessProbe.startupDelay
|
The liveness probe will be started after a given delay as specified here. | Mandatory | 10
|
das.livenessProbe.checkInterval
|
The interval between each liveness probe request. | Mandatory | 5
|
das.livenessProbe.failureCount
|
Number of liveness probe failures after which, to mark the container as unstable or restart. | Mandatory | 3
|
das.readinessProbe.path
|
DAS readiness probe API path. | Mandatory | /health
|
das.readinessProbe.containerPort
|
Port running the container. | Mandatory | 8081
|
das.readinessProbe.startupDelay
|
The readiness probe will be started after a given delay as specified here. | Mandatory | 10
|
das.readinessProbe.checkInterval
|
The interval between each readiness probe request. | Mandatory | 5
|
das.readinessProbe.failureCount
|
Number of readiness probe failures after which, to mark the container as unstable or restart. | Mandatory | 3
|
das.service.enabled
|
Set to true if the service must be created.
|
Optional | true
|
das.service.type
|
Service type. Valid values are: ClusterIP, NodePort, LoadBalancer.
|
Mandatory | NodePort
|
das.service.port
|
The DAS service port to be exposed in the cluster. | Mandatory | 80
|
das.service.targetPort
|
The DAS application port running inside the container. | Mandatory | http
|
das.service.nodePort
|
Port to be exposed in case service type is NodePort.
|
Mandatory if das.service.type is NodePort.
|
30280
|
das.service.termination_grace_period
|
The period after which Kubernetes starts to delete the pods in case of deletion. | Optional | 30 seconds.
|
das.ingress.enabled
|
Set to true to enable ingress.
Ingress should be enabled for all cases except for a lab/demo setup. |
Optional | false
|
das.ingress.annotations
|
Annotations added for the ingress resources. | Optional | |
das.ingress.paths
|
Ingress path. | Optional | [/]
|
das.ingress.hosts
|
Hostnames to be configured in ingress for the DAS service. | Mandatory if ingress is enabled. | |
das.ingress.tls
|
TLS configuration for ingress. | Optional | []
|
das.resources.limits.cpu
|
Maximum amount of CPU that K8s allocates for the container. | Mandatory | 600m |
das.resources.limits.memory
|
Maximum amount of memory that K8s allocates for the container. | Mandatory | 1Gi |
das.resources.requests.cpu
|
Guaranteed CPU allocation for the container. | Mandatory | 400m
|
das.resources.requests.memory
|
Guaranteed memory allocation for the container. | Mandatory | 512Mi
|
das.securityContext.runAsUser
|
This setting controls which user ID the containers are run with and can be configured to run DAS as a non-root user. You can either use the Genesys user or arbitrary UIDs. Both are supported by the DAS base image. 500 is the ID of the Genesys user.
For more information refer to the Security Context topic in the Kubernetes documentation site. |
Optional | |
das.securityContext.runAsGroup
|
This setting controls which primary group ID the containers are run with and can be configured to run DAS as a non-root user. You can either use the Genesys userGroup (GID - 500) or arbitrary GIDs. Both are supported by the DAS base image.
|
Optional | |
das.nodeSelector
|
To allow pods to be scheduled based on the labels assigned to the nodes. | Optional | Default value:
nodeSelector:
<label_key>: <label_value> |
das.affinity
|
The K8s standard node affinity and anti-affinity configurations can be added here. Refer to the this topic in the Kubernetes documentation site for sample values. | Optional | {}
|
das.tolerations
|
Tolerations work with taints to ensure that pods are not scheduled on to inappropriate nodes. Refer to the Taints and Tolerations topic in the Kubernetes documentation site for sample values. | Optional | []
|
das.podDisruptionBudget.enabled
|
Set to true if a pod disruption budget is to be created.
|
Optional | false
|
das.podDisruptionBudget.minAvailable
|
The number of pods that should always be available during a disruption. | Optional | 1
|
das.dnsPolicy
|
The DNS policy that should be applied to the DAS pods. | Optional | |
das.dnsConfig
|
The DNS configuration that should be applied to the DAS pods. | Optional | |
das.priorityClassName
|
The priority class name that the pods should belong to. | Optional | |
das.hpa.enabled
|
Set to true if a K8s Horizontal Pod Autoscaler (HPA) is to be created.
|
Optional | false
|
das.hpa.targetCPUPercent
|
The K8s HPA controller will scale up/down pods based on the target CPU utilization percentage specified. It scale up/down pods between the range deployment.replicaCount to deployment.maxReplicas
|
Optional | 75 |
das.hpa.targetMemoryPercent
|
The K8s HPA controller will scale up or scale down pods based on the target CPU utilization percentage specified here. It scales up or scales down pods between the range - deployment.replicaCount and deployment.maxReplicas.
|
Optional | 70
|
das.labels
|
Labels that will be added to the DAS pods. | Optional | {}
|
das.annotations
|
Annotations added to the DAS pods. | Optional | {}
|
das.prometheus.enabled
|
Set to true if Prometheus metrics must be enabled.
|
Optional | false
|
das.prometheus.tagName
|
Label key assigned to the pods/service to filter out. | Optional | service
|
das.prometheus.tagValue
|
Label key assigned to the pods/service to filter out. | Optional | designer
|
das.prometheus.pod
|
Optional | ❴❴pod❵❵
| |
das.prometheus.instance
|
Optional | ❴❴instance❵❵
| |
das.prometheus.serviceMonitor.enabled
|
Set to true<Set/code> if a service monitor resource is needed to monitor the pods through the Kubernetes service.
|
Optional | false
|
das.prometheus.serviceMonitor.path
|
The path in which the metrics are exposed. | Optional | /metrics
|
das.prometheus.serviceMonitor.interval
|
The scrape interval specified for the Prometheus server. That is, the time interval at which the Prometheus server will fetch metrics from the service. | Optional | 10s
|
das.prometheus.serviceMonitor.labels
|
Labels to be specified for the service monitor resource. | Optional | |
das.prometheus.alerts.enabled
|
Set to true<Set/code> if Prometheus alerts must to be created.
|
Optional | false
|
das.prometheus.alerts.labels
|
Labels to be specified for the alerts resource. | Optional | |
das.prometheus.alerts.customalerts
|
Any custom alerts that are created must be specified here. | Optional | |
das.prometheus.alerts.<alert_names>
|
Scenarios for which alerts need to be created. | Optional |
das.prometheus.alerts.<alert_name> containerRestartAlert:
interval: 3m
threshold: 5
AlertPriority: CRITICAL
MemoryUtilization:
interval: 1m
threshold: 75
AlertPriority: CRITICAL
endpointAvailable:
interval: 1m
AlertPriority: CRITICAL
CPUUtilization:
interval: 1m
threshold: 75
AlertPriority: CRITICAL
containerReadyAlert:
interval: 5m
readycount: 1
AlertPriority: CRITICAL
rsyncContainerReadyAlert:
interval: 5m
readycount: 1
AlertPriority: CRITICAL
WorkspaceUtilization:
interval: 3m
threshold: 70
workspaceClaim: designer-managed-disk
AlertPriority: CRITICAL
AbsentAlert:
interval: 1m
AlertPriority: CRITICAL
LocalWorkspaceUtilization:
interval: 3m
threshold: 70
AlertPriority: CRITICAL
Health:
interval: 3m
AlertPriority: CRITICAL
WorkspaceHealth:
interval: 3m
AlertPriority: CRITICAL
PHPHealth:
interval: 3m
AlertPriority: CRITICAL
ProxyHealth:
interval: 3m
AlertPriority: CRITICAL
PhpLatency:
interval: 1m
threshold: 10
AlertPriority: CRITICAL
HTTPLatency:
interval: 1m
threshold: 60
AlertPriority: CRITICAL
HTTP4XXCount:
interval: 5m
threshold: 100
AlertPriority: CRITICAL
HTTP5XXCount:
interval: 5m
threshold: 100
AlertPriority: CRITICAL |
| das.grafana.enabled | Set to true if the Grafana dashboard is to be created.
|
Optional | true
|
| das.grafana.labels | Labels that must be added to the Grafana ConfigMap. | Optional | |
| das.grafana.annotations | Annotations that must be added to the Grafana ConfigMap. | Optional | |
annotations
|
Enables Kubernetes Annotations and adds it to all the resources that have been created.
For more information, refer to the Annotations topic in the Kubernetes documentation site. |
Optional | {}
|
labels
|
Any custom labels can be configured here. It is a key and value pair, for example, key:"value". These labels are added to all resources. | Optional | {}
|
podLabels
|
Labels that will be added to all application pods. | Optional | {}
|
podAnnotations
|
Annotations that will be added to all application pods. | Optional | {}
|
4.2.1 DAS ConfigMap settings
| Parameter | Description | Mandatory? | Default Value |
das.dasConfig.create
|
This setting enables providing environment variables as an input to the DAS pods. It uses a ConfigMap to store the environment variables. | Mandatory | true
|
das.dasConfig.envs.DAS_FILE_LOGGING_ENABLED
|
Enables file logging. DAS supports only std out logging. This should always be set to false. Input should be "true" or "false".
|
Mandatory | "false
|
das.dasConfig.envs.DAS_LOG_LEVEL
|
Enables log levels. Valid values are: "FATAL", "ERROR", "WARN", "INFO", "DEBUG", "TRACE".
|
Optional | "DEBUG"
|
das.dasConfig.envs.DAS_STDOUT_LOGGING_ENABLE
|
Enables standard output console logging. Input should be "true" or "false". | Mandatory | "true"
|
das.dasConfig.envs.DAS_SERVICES_ELASTICSEARCH_ENABLED
|
To enable Designer Analytics. This configuration is required for DAS to initialize ES templates. Input should be "true" or "false". | Optional | "false"
|
das.dasConfig.envs.DAS_SERVICES_ELASTICSEARCH_HOST
|
Elasticsearch server host name with http:// prefix. For example, http://es-service. The input should be a string, within double quotes. | Optional | " " |
das.dasConfig.envs.DAS_SERVICES_ELASTICSEARCH_PORT
|
Elasticsearch port. For example, "80". The input should be a string, within double quotes.
|
Optional | " " |
5. Post deployment Designer configuration settings
Post deployment, Designer configuration is managed from the following 3 locations:
5.1 Flow settings
Flow Settings is used for controlling global Designer settings that are applicable to all tenants and it contains bootstrap configuration settings such as port, GWS info, and DAS URL.
Configuration path - /workspace/designer/flowsettings.json.
This will be configured using the helm install. Refer to the Updating the flowsettings file section under 9. Post deployment procedures for more information on updating the flowsettings.json file.
5.2 Tenant settings
These are tenant specific settings if the Designer service is configured with multi-tenancy .
Configuration path - workspace/<contactcenter-Id>/config/tenantsettings.json.
The user should logout and log back in after any changes to the tenantsettings.json file. The Designer UI will continue to show the older features until the user logs out and logs back in.
Tenant specific settings are configured by directly editing the file in the above path.
5.3 DesignerEnv transaction list
The DesignerEnv transaction list is available in Configuration Server (Tenant/Transactions/DesignerEnv). This is mostly used to control the run-time settings. Any change to the DesignerEnv transaction list does not require the application to be published again or a new build for the application.
The user should log out and log back in for the changes to reflect in the Designer UI.
The DesignerEnv transaction list is configured using Agent Setup.
5.4 Post deployment configuration settings reference table
| Category: Analytics | |||||
| Setting Name | flowsettings.json | tenantsettings.json | DesignerEnv | Description | Value |
enableAnalytics(optional) |
Yes | Yes | No | This flag enables or disables the analytics feature. |
Sample value: |
esUrl(optional) |
Yes | Yes | No | Elasticsearch URL |
Sample value: http://es-spot.usw1.genhtcc.com:80 |
esServer(optional) |
Yes | Yes | No | Elasticsearch server host name (for example, es-service).
|
Sample value: es-spot.usw1.genhtcc.com |
esPort(optional) |
Yes | Yes | No | Elasticsearch port. | Sample value: 80
|
ReportingURL(optional) |
No | No | Yes Section: |
URL of Elasticsearch where Designer applications will report data. |
Sample value: http://es-spot.usw1.genhtcc.com:80 |
esMaxQueryDuration(optional) |
Yes | Yes | No | The maximum time range (in days) to query in Designer Analytics. Each day's data is stored in a separate index in Elasticsearch. |
Sample value: |
sdrMaxObjCount(optional) |
Yes | Yes | No | The maximum count of nested type objects that will be captured in SDRs. When set to -1, which is the default value, no objects will be trimmed. All the milestones or activities visited in runtime are expected to be captured in an SDR. |
Sample value: |
SdrTraceLevel(optional) |
Yes | Yes | No | Value are:
|
Sample value: |
| Category: Audit | |||||
| Setting Name | flowsettings.json | tenantsettings.json | DesignerEnv | Description | Value |
enableESAuditLogs(optional) |
Yes | Yes | No | Enable or disable audit logs captured in Elasticsearch. |
Sample value: |
enableFSAuditLogs(optional) |
Yes | Yes | No | Enable or Disable audit logs captured in the file system under the logs directory or in standard output. |
Sample value: |
maxAppSizeCompare(optional) |
Yes | Yes | No | The maximum size of data object for which a difference will be captured in the audit logs, value in bytes. That is, the difference between the Designer object's old value and new value. |
Sample value: |
enableReadAuditLogs(optional) |
Yes | Yes | No | Control whether reading of Designer objects is captured in audit trails. If enabled any Designer object viewed in the UI will be recorded in the audit logs. |
Sample value: |
| Category: Authorization | |||||
| Setting Name | flowsettings.json | tenantsettings.json | DesignerEnv | Description | Value |
disableRBAC(optional) |
Yes | Yes | No | Controls if Designer reads and enforces permissions associated with the logged in user's roles. |
Sample value: |
rbacSection(optional) |
Yes | Yes | No | In a Role object, the name of the section within the Annex where the privileges are stored. |
Sample value: |
disablePBAC(optional) |
Yes | Yes | No | Controls if Designer allows partitioning of the Designer workspace and restricts a user's access to Designer objects in the user's partitions. |
Sample value: |
| Category: Collaboration | |||||
| Setting Name | flowsettings.json | tenantsettings.json | DesignerEnv | Description | Value |
locking(optional) |
Yes | No | No | The type of locking used, in an editing session for applications, modules, or data tables. Valid values are: file, redis, none.
|
Sample value: |
| Category: DAS | |||||
| Setting Name | flowsettings.json | tenantsettings.json | DesignerEnv | Description | Value |
applicationHost(mandatory) |
Yes | No | No | The server name Designer uses to generate the URL to the application. ORS and MCP fetch the application code and other resources from this URL. |
Sample value: |
applicationPort
|
Yes | No | No | The corresponding port to be used with applicationHost. |
Sample value: |
deployURL
|
Yes | No | No | This is normally not changed. It is the relative path to the workspace on DAS. |
Sample value: |
| Category: Digital | |||||
| Setting Name | flowsettings.json | tenantsettings.json | DesignerEnv | Description | Value |
rootsSRL(optional) |
Yes | Yes | No | If specified, this is used to filter which Root Categories to display when selecting Standard Responses. |
Sample value: Any REGular EXpression (REGEX). |
maxFlowEntryCount(optional) |
Yes | No | Yes Section: |
Specify how many times the same application can process a specific digital interaction. |
Sample value: |
| Category: External APIs | |||||
| Setting Name | flowsettings.json | tenantsettings.json | DesignerEnv | Description | Value |
httpProxy(optional) |
Yes | Yes | Yes Secion: |
Specify the proxy used for external requests and nexus API calls (if enable_proxy is true).
|
Sample value: [http://vpcproxy-000-int.geo.genprim.com:8080 |
redundantHttpProxy(optional) |
Yes | Yes | Yes Section: |
Specify the backup proxy used for external requests and nexus API calls (if enable_proxy is true), when httpProxy is down.
|
Sample value: [http://vpcproxy-001-int.geo.genprim.com:8080 |
| Category: Features | |||||
| Setting Name | flowsettings.json | tenantsettings.json | DesignerEnv | Description | Value |
features
|
Yes | Yes | No | This is an object. See the 5.5 Features section for a list of supported features. |
Default value: {
nexus: true,
enableBulkAudioImport: true
} |
| Category: GWS | |||||
| Setting Name | flowsettings.json | tenantsettings.json | DesignerEnv | Description | Value |
usehtcc
|
Yes | No | No | Set to true so that Designer works with GWS. If set to false, Designer defaults to a local mode and may be used temporarily if GWS is unavailable.
|
Sample value: |
htccServer
|
Yes | No | No | GWS Server |
Sample value: gws-usw1-int.genhtcc.com |
htccport
|
Yes | No | No | GWS port. |
Sample value: |
ssoLoginUrl
|
Yes | No | No | URL of GWS authentication UI. Designer redirects to this URL for authentication. |
Sample value: https://gws-usw1.genhtcc.com |
maxConcurrentHTCCRequest(optional) |
Yes | No | No | For batch operations to GWS, the max number of concurrent requests that Designer will send to GWS. |
Sample value: |
batchOperationResultTTL(optional) |
Yes | No | No | For batch operations to GWS, the time, in milliseconds, for which duration Designer stores the results of a batch operation on the server, before deleting them. |
Sample value: |
| Category: Help | |||||
| Setting Name | flowsettings.json | tenantsettings.json | DesignerEnv | Description | Value |
docsMicroserviceURL(optional) |
Yes | No | No | URL for Designer documentation. |
Default value: https://docs.genesys.com/Documentation/PSAAS/Public/Administrator/Designer |
| Category: IVR | |||||
| Setting Name | flowsettings.json | tenantsettings.json | DesignerEnv | Description | Value |
recordingType(optional) |
Yes | Yes | No | Specify the recording type to be used in Record block. Set as GIR. If the option is missing or blank, Full Call Recording type will be used.
|
Sample value: |
| Category: Logging | |||||
| Setting Name | flowsettings.json | tenantsettings.json | DesignerEnv | Description | Value |
logging: {
designer: { level:
debug },
audit: { level: trace},
auditdebug: { level: debug },
cli: { level: debug }
}
(optional) |
Yes | No | No | Specify Designer log levels. Each field has valid values: trace, debug, info, warn, error, or fatal.
|
Sample value: logging: {
designer: { level: debug},
audit: { level: trace },
auditdebug: { level: debug},
cli: { level: debug }
}Default value: logging: {
designer: { level: debug },
audit: { level: trace },
auditdebug: { level: debug },
cli: { level: debug }
} |
| Category: Nexus | |||||
| Setting Name | flowsettings.json | tenantsettings.json | DesignerEnv | Description | Value |
url(optional) |
No | No | Yes Section: |
URL of Nexus that typically includes the API version path. For example, https://nexus-server/nexus/api/v3. |
Default value: http://nex-dev.usw1.genhtcc.com |
password(optional) |
No | No | Yes Section: |
The Nexus x-api-key created by Nexus deployment. |
Default value: |
enable_proxy(optional) |
No | No | Yes Section: |
Boolean value to indicate if httpProxy is used to reach Nexus.
Default value: | |
| profile (optional) |
No | No | Yes Section: |
Enable Contact Identification via Nexus (for example, to enable Last Called Agent routing). | |
| Category: Process | |||||
| Setting Name | flowsettings.json | tenantsettings.json | DesignerEnv | Description | Value |
port
|
Yes | No | No | Designer process port in the container. Normally, the default value should be left as is. |
Sample value: |
| Category: Provisioning | |||||
| Setting Name | flowsettings.json | tenantsettings.json | DesignerEnv | Description | Value |
primarySwitch(optional) |
Yes | Yes | No | Specify the primary switch name if more than one switch is defined for the tenant. Designer fetches and works with route points from this switch. |
Default value: |
| Category: Routing | |||||
| Setting Name | flowsettings.json | tenantsettings.json | DesignerEnv | Description | Value |
ewtRefreshTimeout(optional) |
NO | No | Yes Section: |
Specify the interval (in seconds) at which to refresh the Estimated Waiting Time when routing an interaction. |
Sample value: |
| Category: Redis | |||||
| Setting Name | flowsettings.json | tenantsettings.json | DesignerEnv | Description | Value |
redis: {
host: "",
port: "",
tlsEnabled: true,
lockTimeout: 120,
listTimeout: 1800
}
(optional) |
Yes | No | No | Used by Designer for resource index caching and multi-user collaboration locks on Designer resources.
It is a separate object that contains:
|
Sample value: redis: {
host: "",
port: "",
tlsEnabled: true,
lockTimeout: 120,
listTimeout: 1800
}Default value: redis: {
host: redis.server.genhtcc.com,
port: 6379,
tlsEnabled: true,
lockTimeout: 120,
listTimeout: 1800
} |
| Category: Security | |||||
| Setting Name | flowsettings.json | tenantsettings.json | DesignerEnv | Description | Value |
zipFileSizeLimitInMegaBytes(optional) |
Yes | Yes | No | Defines the maximum zipFile size limit (in megabytes) during bulk audio import. |
Sample value: |
disableCSRF(optional) |
Yes | Yes | No | Disable CSRF attack protection. For more information, refer to this topic in the CWE site.
By default, CSRF attack protection is enabled. It can be disabled by setting this flag to |
Sample value: |
disableSecureCookie(optional) |
Yes | No | No | Disables the secure cookies header. |
Sample value: |
| Category: Session | |||||
| Setting Name | flowsettings.json | tenantsettings.json | DesignerEnv | Description | Value |
idleTimeout(optional) |
Yes | Yes | No | Idle timeout, in seconds, before a user session is terminated while editing applications, modules, or data tables. |
Sample value: |
lockTimeout(optional) |
Yes | Yes | No | Timeout, in seconds, before a resource lock is released, for an editing session of applications, modules, or data tables. |
Sample value: |
lockKeepalive(optional) |
Yes | Yes | No | Interval, in seconds, before the client sends a ping to the server, to refresh the lock for an editing session of applications, modules, or data tables. |
Sample value: |
| Category: Workflow | |||||
| Setting Name | flowsettings.json | tenantsettings.json | DesignerEnv | Description | Value |
maxBuilds(optional) |
Yes | Yes | No | Specify the maximum number of builds allowed per application. |
Sample value: |
enablePTE(optional) |
No | No | Yes Section: |
Boolean value to indicate if PTE objects are enabled at runtime. |
Sample value: |
5.5 Features
The features specified in this section are configured under the features object in the flowsettings.json file or the tenantsettings.json file.
For example,
"features": {
           "nexus": true,
..
}| Category | Feature Setting Name | Mandatory | flowsettings.json | tenantsettings.json | Description | Default Value |
| Audio | enableBulkAudioImport
|
Optional | Yes | Yes | Enable/disable the bulk audio import feature. | false
|
grammarValidation
|
Optional | Yes | yes | If this feature is enabled, Designer will validate invalid grammar files during grammar upload and you can upload only valid grammar files (GRXML or Nuance compiled binary grammar files). | false
| |
externalAudioSupport
|
Optional | Yes | Yes | If this feature is enabled, a new audio type, External Audio, is available in the Play Message block. It accepts a single variable that contains a URL to the audio resource. MCP will fetch this resource directly and play it. The only supported value of Play As is Audio URI. There is no automatic language switching for this audio type. | false
| |
| Nexus | nexus
|
Optional | Yes | Yes | Enable/disable the Nexus feature. | false
|
| Survey | survey
|
Optional | Yes | Yes | Enable/disable the survey feature. | true
|
| UI Plugins | plugins
|
Optional | Yes | Yes | Plugin configuration details. (Steps are given below the table.) |
{} |
plugins
|
Optional | Yes | Yes | Enable or disable the plugin feature. | false
| |
| Milestone | enableImplicitModuleMilestones
|
Optional | Yes | Yes | Enable reporting each Shared Module call as an internal milestone. If disabled, Shared Module calls will not generate a milestone. | false
|
| Bots | enableDialogFlowCXBot
|
Optional | Yes | Yes | When enabled, Dialogflow CX bot type is added to the bot registry and available for selection in the Bot provider drop-down when you configure a new bot. | false
|
5.6 Adding a UI plugin to Designer
- Add the
pluginsarray object in the flowsettings.json file (/ofs/designer/flowsettings.json).
Thepluginsobject contains all the input properties for the plugin app. This is a required property. Whenever there is a change in this object, refresh the browser for the changes to take effect.
Example:"plugins": [ { "url": "http://genesysexample.com/", "displayName": "Nexus PII Management", "placement": "messageCollections", "id": "nexuspii", "mappings": { "prod": { "G1-AUS4": "https://genesysexample.com/admin/ux" }, "staging": { "G1-USW1": "http://genesysexample.com/" }, } }, { ... }] - Add the
csplistarray object in the flowsettings.json file (/ofs/designer/flowsettings.json).
ThecspListobject contains the URL forms to be allowed by Designer's security policy. This is a required property. Whenever there is a change in this object, re-start the node container for the changes to take effect.
Example:
If the URL ishttp://genesysexample.com/, thecspListwould be:
"cspList": ["*.genexample1.com:*", "*.genexample2.com:*", "*.genexample3.com:*"] - Turn on the
pluginsandnexusfeature flags in the Designer tenantSettings.json file (/ofs/<tenantId>/config/tenantSettings.json).
This is a required property. Whenever there is a change in this object, log out of Designer and log in again for the changes to take effect.Example:ImportantIf you want to enable the plugins feature for all tenants, add this feature flag in the flowsettings.json file. The feature is enabled for all the tenants under that bucket.{ "features": { "plugins": true, "nexus": true }} - Add the
url_<plugin-id>property under thepluginssection, in Agent Setup. If there is nopluginssection, create one. This section is for the tenant URL override. If theDesignerEnvsetting (Transactions/Internal/DesignerEnv) is not provided, the plugin URL from the flowsettings.json file is considered.
This is an optional property. Whenever there is a change in this object, log out of Designer and log in again for the changes to take effect.
Example:{"url_<plugin-id>" : "https://plugin-genesysexample.com"}
6. Logging
Designer and DAS support console output (stdout) logging. Genesys recommends configuring console output logging to minimize the host IOPs and PVCs consumption by using log volumes. Console output logs can be extracted using log collectors like fluentbit/fluentd and Elasticsearch.
Ensure the below setttings are configured in the respective values.yaml overrides for console logging:
- Designer
designerEnv.envs.DES_FILE_LOGGING_ENABLED = false - DAS
dasEnv.envs.DAS_FILE_LOGGING_ENABLED = false
dasEnv.envs.DAS_STDOUT_LOGGING_ENABLE = true
6.1 Log levels
Post deployment, Designer and DAS log levels can be modified as follows:
6.1.1 Designer
- Configure the
loggingsetting in the flowsettings override (flowsettings.yaml) - Refer to the 5.4 Post deployment configuration settings reference table section for option descriptions. - Execute the steps in the Flowsettings.json update section (see Designer under 8.8 Blue-Green deployment) for the changes to take effect .
6.1.2 DAS
- Configure the
dasEnv.envs.DAS_LOG_LEVELsetting in the Helm das-values.yaml file. Refer to section 4.2 DAS deployment settings for setting descriptions. - Execute the steps in the Upgrade non production color section (see DAS under 8.8 Blue-Green deployment). The same DAS version running in production can be used for the upgrade,
- Execute the steps in the Cutover section (see DAS under 8.8 Blue-Green deployment).
7. Platform / Configuration Server and GWS settings
This section explains the Configuration Server objects and settings required for Designer.
7.1 Create Roles for Designer
Designer uses roles and access groups to determine permissions associated with the logged-in user. To enable this, you must make these changes in GAX or CME.
Designer supports a number of bundled roles suitable for various levels of users.
- Designer Developer - Most users fall into this category. These users can create Designer applications, upload audio, and create business controls. They have full access to Designer Analytics.
- Designer Business User - These users cannot create objects but they can manage them (for example, upload audio, change data tables, and view analytics).
- Designer Analytics - These users only have access to Designer Analytics.
- Designer Admin - These users can set up and manage partitions associated with users and Designer objects.
- Designer Operations - Users with this role have full access to all aspects of the Designer workspace. This includes the Operations menu (normally hidden), where they can perform advanced operational and maintenance tasks.
To create these roles, import the .conf files included in the Designer Deployment package. They are located in the packages/roles/ folder.
In addition, ensure the following for user accounts that need access to Designer:
- The user must have read permissions on its own Person object.
- Users must be associated with one or more roles via access groups.
- The on-Premises user must have at least read access on the user, access group(s), and roles(s).
- The access groups must have read/write permissions to the Agent Setup folders - Scripts and Transactions.
7.2 Create the DesignerEnv transaction list
Designer requires a transaction list for configuration purposes as described in other sections of this document. To set this up:
- Create a transaction list called DesignerEnv.
- Import the file configuration/DesignerEnv.conf, located in the Designer Deployment Manifest package.
- Edit any values according to the descriptions provided in 5.4 Post deployment configuration settings reference table.
- Save the list.
- Ensure Designer users have at least read access to the DesignerEnv transaction list.
7.3 Platform settings
The platform settings listed below must be configured if the Designer application is used for voice calls.
| Component | Config Key | Value | Description |
| SIP Switch -> Voip Services -> msml service | userdata-map-format | sip-headers-encoded | Option needs to set to pass JSON data as user data in SIPS. |
| SIP Switch -> Voip Services -> msml service | userdata-map-filter | * | To allow userdata passing to MSML service. |
| SIPServer --> TServer | divert-on-ringing | false | RONA is handled by the platform. |
| agent-no-answer-timeout | 12 | ||
| agent-no-answer-action | notready | ||
| agent-no-answeroverflow | "" | No value, empty. | |
| after-routing-timeout | 24 | ||
| sip-treatments-continuous | true | ||
| msml-record-support | true | To allow routed calls recording via the Media Server. | |
| Switch object annex --> gts | ring-divert | 1 | |
| ORS --> orchestration | new-session-on-reroute | false | Required for SIPS Default Routing (Default Routing handling (Voice)). |
| MCP | [vxmli] transfer.allowed | TRUE | Required for Transfer block (allows VXML Transfer in MCP). |
| MCP | [cpa] outbound.method | NATIVE | Required for Transfer block (allow CPA detection for Transfer ). |
| UCS | [cview] enabled | TRUE | Enables Customer Context Services. |
7.4 GWS configuration
Ensure that the following steps are performed in GWS.
7.4.1 Create Contact Center
Create a contact center in GWS if it is not already created. Refer to the GWS documentation for more information on this.
7.4.2 Create GWS Client
Create new GWS client credentials if they are not already created . Refer to the GWS documentation for more information on this.
8. Deployment
This section describes the deployment process for Designer and DAS.
8.1 Preparation
Before you deploy Designer and DAS using Helm charts, complete the following preparatory steps:
- Ensure the Helm client is installed.
- Set up an Ingress Controller, if not already done.
- Setup an NFS server, if not already done.
- Create Persistent Volumes - a sample YAML file is provided in the Designer manifest package.
- Download the Designer and DAS docker images and push to the local docker registry.
- Download the Designer package and extract to the current working directory.
- Configure Designer and DAS value overrides (designer-values.yaml and das-values.yaml); ensure the mandatory settings are configured. If the Blue-Green deployment process is used, Ingress settings are explained in the 8.8 Blue-Green deployment section.
8.2 Set up Ingress
Given below are the requirements to set up an Ingress for the Designer UI:
- Cookie name - designer.session.
- Header requirements - client IP & redirect, passthrough.
- Session stickiness - enabled.
- Allowlisting - optional.
- TLS for ingress - optional (should be able to enable or disable TLS on the connection).
8.3 Set up Application Gateway (WAF) for Designer
Designer Ingress must be exposed to the internet using Application Gateway enabled with WAF.
When WAF is enabled, consider the following exception in the WAF rules for Designer:
- Designer sends a JSON payload with data, for example,
{profile . {} }. Sometimes, this is detected asOSFileAccessAttempt, which is a false positive detection. Disable this rule if you encounter a similar issue in your WAF setup.
8.4 Storage
8.4.1 Designer storage
Designer requires storage to store designer application workspaces. Designer storage is a shared file storage that will be used by the Designer and DAS services.- Capacity - 1 TiB
- Tier - Premium
- Baseline IO/s - 1424
- Burst IO/s - 4000
- Egress Rate - 121.4 MiBytes/s
- Ingress Rate - 81.0 MiBytes/s
8.4.2 Permission considerations for Designer and DAS storage
NFS
For NFS RWX storages, the mount path should be owned by <code>genesys:genesys</code>, that is, <code>500:500</code> with <code>0777</code> permissions. It can be achieved by one of the below methods:
- From the NFS server, execute the chmod -R 777 <export_path> and chown -R 500:500 <export_path> commands to set the required permissions.
- Create a dummy Linux based pod that mounts the NFS storage. From the pod, execute the chmod -R 777 <mount_path> and chown -R 500:500 <mount_path> commands. This sets the required permissions. However, this method might require the Linux based pods to be run as privileged.
SMB / CIFS
For SMB / CIFS based RWX storages, for instance, Azure file share, the below <code>mountOptions</code> must be used in the StorageClass or the PersistentVolume template:
<code>mountOptions</code>- dir_mode=0777
- file_mode=0777
- uid=500
- gid=500
- mfsymlinks
- cache=strict8.5 Set up Secrets
Secrets are required by the Designer service to connect to GWS and Redis (if you are using them).
GWS Secrets:
- GWS provides a Client ID and secrets to all clients that can be connected. You can create Secrets for the Designer client as specified in the Set up secrets for Designer section below.
Redis password:
- If Designer is connected to Redis, you must provide the Redis password to Designer to authenticate the connection.
8.5.1 Set up Secrets for Designer
Use the designer.designerSecrets parameter in the values.yaml file and configure Secrets as follows:
designerSecrets:
  enabled: true
  secrets:
    DES_GWS_CLIENT_ID: xxxx
    DES_GWS_CLIENT_SECRET: xxxx
    DES_REDIS_PASSWORD: xxxxx
8.6 Deployment strategies
Designer supports the following deployment strategies:
- Rolling Update (default).
- Blue-Green (recommended).
DAS (Designer Application Server) supports the following deployment strategies:
- Rolling Update (default).
- Blue-Green (recommended).
- Canary (must be used along with Blue-Green and is recommended in production).
8.7 Rolling Update deployment
The rolling update deployment is the standard default deployment to Kubernetes. It works slowly, one by one, replacing pods of the previous version of your application with pods of the new version without any cluster downtime. It is the default mechanism of upgrading for both Designer and DAS.
8.7.1 Designer
Initial deployment
To perform the initial deployment for a rolling upgrade in Designer, use the Helm command given below. The values.yaml file can be created as required.
helm upgrade --install designer -f designer-values.yaml designer-100.0.112+xxxx.tgz --set designer.image.tag=9.0.1xx.xx.xx
The values.yaml overrides passed as an argument to the above Helm upgrade command:
designer.image.tag=9.0.1xx.xx.xx - This is the new Designer version to be installed, for example, 9.0.111.05.5.
Upgrade
To perform an upgrade, the image version has to be upgraded in the designer-values.yaml file or can be set using the --set flag through the command given below. Once the designer-values.yaml file is updated, use this Helm command to perform the upgrade:
helm upgrade --install designer -f designer-values.yaml designer-100.0.112+xxxx.tgz --set designer.image.tag=9.0.1xx.xx.xx
The values.yaml overrides passed as an argument to the above Helm upgrade command:
designer.image.tag=9.0.1xx.xx.xx - This is the new Designer version to be installed, for example, 9.0.111.05.5.
Rollback
To perform a rollback, the image version in the designer-values.yaml file can be downgraded. Or you can use the --set flag through the command given below. Once the designer-values.yaml file is updated, use this Helm command to perform the rollback:
helm upgrade --install designer -f designer-values.yaml designer-100.0.112+xxxx.tgz --set designer.image.tag=9.0.1xx.xx.xx
The values.yaml overrides passed as an argument to the above Helm upgrade command:
designer.image.tag=9.0.1xx.xx.xx - This is the Designer version to be rolled back to, for example, 9.0.111.05.5.
8.7.2 DAS
Initial deployment
To perform the initial deployment for a rolling upgrade in DAS, use the Helm command given below. The values.yaml file can be created as required.
helm upgrade --install designer-das -f designer-das-values.yaml designer-das-100.0.112+xxxx.tgz --set das.image.tag=9.0.1xx.xx.xx
The values.yaml overrides passed as an argument to the above Helm upgrade command:
das.image.tag=9.0.1xx.xx.xx - This is the new DAS version to be installed, for example, 9.0.111.05.5.
Upgrade
To perform an upgrade, the image version has to be upgraded in the designer-das-values.yaml file or can be set using the --set flag through the command given below. Once the designer-das-values.yaml file is updated, use this Helm command to perform the upgrade:
helm upgrade --install designer-das -f designer-das-values.yaml designer-das-100.0.112+xxxx.tgz --set das.image.tag=9.0.1xx.xx.xx
The values.yaml overrides passed as an argument to the above Helm upgrade command:
das.image.tag=9.0.1xx.xx.xx - This is the new DAS version to be installed, for example, 9.0.111.05.5.
Rollback
To perform a rollback, the image version in the designer-das-values.yaml file can be downgraded. Or you can use the --set flag through the command given below. Once the designer-das-values.yaml file is updated, use this Helm command to perform the rollback:
helm upgrade --install designer-das -f designer-das-values.yaml designer-das-100.0.112+xxxx.tgz --set das.image.tag=9.0.1xx.xx.xx
The values.yaml overrides passed as an argument to the above Helm upgrade command:
das.image.tag=9.0.1xx.xx.xx - This is the DAS version to be rolled back to, for example, 9.0.111.05.5.
8.8 Blue-Green deployment
Blue-Green deployment is a release management technique that reduces risk and minimizes downtime. It uses two production environments, known as Blue and Green or active and inactive, to provide reliable testing, continuous no-outage upgrades, and instant rollbacks.When a new release needs to be rolled out, an identical deployment of the application will be created using the Helm package and after testing is completed, the traffic is moved to the newly created deployment which becomes the active environment, and the old environment becomes inactive. This ensures that a fast rollback is possible by just changing route if a new issue is found with live traffic. The old inactive deployment is removed once the new active deployment becomes stable.
8.8.1 Designer
Service cutover is done by updating the Ingress rules. The diagram below shows the high-level approach to how traffic can be routed to Blue and Green deployments with Ingress rules.

Preparation
Before you deploy Designer using the blue-green deployment strategy, complete the following preparatory steps:
- Create 3 hostnames as given below. The blue service hostname must contain the string blue. For example, designer.blue.example.com or designer-blue.example.com. The green service hostname must contain the string green. For example, designer.green.example.com or designer-green.example.com. The blue/green services can be accessed separately with the blue/green hostnames:
designer.example.com- For the production host URL, this is used for external access.designer.blue.example.com- For the blue service testing.designer.green.example.com- For the green service testing.
- Configure the hostnames in the designer-values.yaml file under
ingress. Annotations and paths can be modified as required.ingress: enabled: true annotations: {} paths: [/] hosts: - designer.example.com - designer.blue.example.com - designer.green.example.com
Initial deployment
The resources - ingress and persistent volume claims (PVC) - must be created initially before deploying the Designer service as these resources are shared between blue/green services and they are required to be created at the very beginning of the deployment. These resources are not required for subsequent upgrades. The required values are passed using the -- set flag in the following steps. Values can also be directly changed in the values.yaml file.
- Create Persistent Volume Claims required for the Designer service (assuming the volume service name is
designer-volume).
helm upgrade --install designer-volume -f designer-values.yaml designer-9.0.xx.tgz --set designer.deployment.strategy=blue-green-volume
The values.yaml overrides passed as an argument to the above Helm upgrade command:
designer.deployment.strategy=blue-green-volume- This denotes that the Helm install will create a persistent volume claim in the blue/green strategy. - Create Ingress rules for the Designer service (assuming the ingress service name will be designer-ingress):
helm upgrade --install designer-ingress -f designer-values.yaml designer-100.0.112+xxxx.tgz --set designer.deployment.strategy=blue-green-ingress --set designer.deployment.color=green
The values.yaml overrides passed as an argument to the above Helm upgrade command:
designer.deployment.strategy=blue-green-ingress- This denotes that the Helm install will create ingress rules for the Designer service.
designer.deployment.color=green- This denotes that the current production (active) color is green. - Deploy the Designer service color selected in step 2. In this case, green is selected and assuming the service name is
designer-green:
helm upgrade --install designer-green -f designer-values.yaml designer-100.0.112+xxxx.tgz --set designer.deployment.strategy=blue-green --set designer.image.tag=9.0.1xx.xx.xx --set designer.deployment.color=green
Upgrade
- Identify the current production color by checking the Designer ingress rules (
kubectl describe ingress designer-ingress). Green is the production color in the below example as the production host name points to the green service.
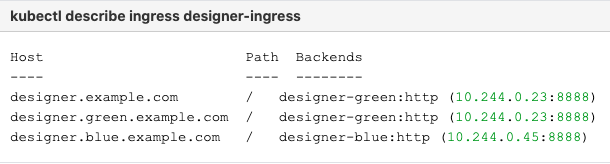
- Deploy the Designer service on to the non-production color. In the above example, blue is the non-production color and assuming the service name will be designer-blue:
helm upgrade --install designer-blue -f designer-values.yaml designer-100.0.112+xxxx.tgz --set designer.deployment.strategy=blue-green --set designer.image.tag=9.0.1xx.xx.xx --set designer.deployment.color=blue
The values.yaml overrides passed as an argument to the above Helm upgrade command:
designer.deployment.strategy=blue-green- This denotes that the Designer service is installed using the blue-green strategy.
designer.image.tag=9.0.1xx.xx.xx- This denotes the new Designer version to be installed, for example,9.0.116.08.12.
designer.deployment.color=blue- This denotes that the blue color service is installed.
The non-production color can be accessed with the non-production host name (for example,designer.blue.example.com). Testing can be done using this URL.

NodePort Service
The designer-green release creates a service called designer-green and the designer-blue release creates a service called designer-blue. If you are using NodePort services, ensure that the value of designer.service.nodePort is not the same for both the releases. In other words, you should assign dedicated node ports for the releases. The default value for designer.service.nodePort is 30180. If this was applied to designer-green, use a different value for designer-blue, for example, 30181. Use the below helm command to achieve this:
helm upgrade --install designer-blue -f designer-values.yaml designer-100.0.112+xxxx.tgz --set designer.deployment.strategy=blue-green --set designer.image.tag=9.0.1xx.xx.xx --set designer.deployment.color=blue --set designer.service.nodePort=30181
Cutover
Once testing is completed on the non-production color, traffic can be moved to the new version by updating the Ingress rules:
- Update the Designer Ingress with the new deployment color by running the following command (in this case, blue is the new deployment color, that is, the non-production color):
helm upgrade --install designer-ingress -f designer-values.yaml designer-100.0.112+xxxx.tgz --set designer.deployment.strategy=blue-green-ingress --set designer.deployment.color=blue
The values.yaml overrides passed as an argument to the above Helm upgrade command:
designer.deployment.strategy=blue-green-ingress- This denotes that the helm install will create ingress rules for the Designer service.
designer.deployment.color=blue- This denotes that the current production (active) color is blue. - Verify the ingress rules by running the following command:
kubectl describe ingress designer-ingress
The production host name must point to the new color service.
Rollback
If the upgrade must be rolled back, the ingress rules can be modified to point to the old deployment pods (green, in this example) by performing a cutover again.
- Perform a cutover using the following command:
helm upgrade --install designer-ingress -f designer-values.yaml designer-100.0.112+xxxx.tgz --set designer.deployment.strategy=blue-green-ingress --set designer.deployment.color=green
The values.yaml overrides passed as an argument to the above Helm upgrade command:
designer.deployment.strategy=blue-green-ingress- This denotes that the Helm install will create Ingress rules for the Designer service.
designer.deployment.color=green- This denotes that the the current production (active) color is green. - Verify the Ingress rules by running the following command:
kubectl describe ingress designer-ingress
The production host name must point to the green service.
8.8.2 DAS
As with Designer, the Blue-Green strategy can be adopted for DAS as well. The Blue-Green architecture used for DAS is given below. Here, the cutover mechanism is controlled by Service, the Kubernetes manifest responsible for exposing the pods. The Ingress, when enabled, will point to the appropriate service based on the URL.

Ingress setup
- Configure Ingress Host names for DAS.
- Create 3 hostnames as follows: The blue service host name must contain the string blue; for instance, das.blue.example.com or das-blue.example.com, The green service host name must contain the string green; for instance, das.green.example.com or das-green.example.com. The green/blue services can be accessed separately with these blue/green hostnames.
- * das.example.com - This is the production host url, and is used for external access.
- * das.blue.example.com - This is for blue service testing.
- * das.green.example.com - This is for green service testing.
- Configure the hostnames in the das-values.yaml file under ingress, annotations, and paths (can be modified based on the requirement).
ingress:
  enabled: true
  annotations: {}
  paths: ["/"]
  hosts:
    - das.example.com
    - das.blue.example.com
    - das.green.example.com
Initial deployment
The Ingress must be created initially before deploying the DAS service since it is shared between blue/green services and it is required to be created at the very beginning of the deployment. The Ingress is not required for subsequent upgrades. The required values are passed using the -- set flag in the following steps. Values can also be directly changed in the values.yaml file.
- Deploy initial DAS pods and other resources by choosing an active color, in this example, green. Use the below command to create a
designer-das-greenservice:
helm upgrade --install designer-das-green -f designer-das-values.yaml designer-das-100.0.106+xxxx.tgz --set das.deployment.strategy=blue-green --set das.image.tag=9.0.1xx.xx.xx --set das.deployment.color=green
The values.yaml overrides passed as an argument to the above Helm upgrade command:
das.deployment.strategy=blue-green- This denotes that the DAS service will be installed using the blue-green deployment strategy.
das.image.tag=9.0.1xx.xx.xx- This denotes the DAS version to be installed, for example,9.0.111.04.4.
das.deployment.color=green- This denotes that the green color service is installed. - Once the initial deployment is done, the pods have to be exposed to the <code>designer-das</code> service. Execute the following command to create the <code>designer-das</code> service:
helm upgrade --install designer-das designer-das-100.0.106+xxx.tgz -f designer-das-values.yaml --set das.deployment.strategy=blue-green-service --set das.deployment.color=green
The values.yaml overrides passed as an argument to the above helm upgrade
das.deployment.strategy=blue-green-service- This denotes that the designer-das service will be installed and exposed to the active color pods.
das.deployment.color=green- This denotes that the designer-das service will point to green pods. - Create ingress rules for the DAS service (assuming the ingress service is das-ingress):
helm upgrade --install das-ingress designer-das-100.0.106+xxxx.tgz -f designer-das-values.yaml --set das.deployment.strategy=blue-green-ingressThe values.yaml overrides passed as an argument to the above command
das.deployment.strategy=blue-green-ingress - This denotes that the helm install will create ingress rules for the DAS service.
NodePort Service
The designer-das-green release creates a service called designer-das-green and the designer-das-blue release creates a service called designer-das-blue. If you are using NodePort services, ensure that the value of designer.service.nodePort is not the same for both the releases. In other words, you should assign dedicated node ports for the releases. The default value for designer.service.nodePort is 30280. If this was applied to designer-das-green, use a different value for designer-das-blue, for example, 30281. Use the below helm command to achieve this:
helm upgrade --install designer-das designer-das-100.0.106+xxx.tgz -f designer-das-values.yaml --set das.deployment.strategy=blue-green-service --set das.deployment.color=green --set das.service.nodePort=30281
8.9 Canary
Canary is optional and is only used along with Blue-Green. It is recommended in production. Canary pods are generally used to test new versions of images with live traffic. If you are not opting for Canary, skip the steps in this section.
Canary deployment
- Identify the current production color by checking the
designer-dasservice selector labels (kubectl describe service designer-das). Green is the production color in the below example as the selector label iscolor=green.

- To deploy canary pods, the
das.deployment.strategyvalue must be set tocanaryin the designer-das-values.yaml file or using the-- setflag as shown in the command below:
helm upgrade --install designer-das-canary -f das-values.yaml designer-das-100.0.106+xxxx.tgz --set das.deployment.strategy=canary --set das.image.tag=9.0.1xx.xx.xx --set das.deployment.color=green
The values.yaml overrides passed as an argument to the above Helm upgrade command:
das.deployment.strategy=canary- This denotes that the Helm install will create canary pods.
das.deployment.color=green- This denotes that the current production (active) color is green.ImportantTo make sure Canary pods receive live traffic, they have to be exposed to thedesigner-dasservice by settingdas.deployment.color=<active_color>, which is obtained from step 1. - Once canary pods are up and running, ensure that the designer-das service points to the canary pods using the
kubectl describe svc designer-dascommand.

The IP address present in the Endpoints must match the IP address of the canary pod. The canary pod's IP address is obtained using thekubectl describe pod <canary_pod_name>command.


Cleaning up
After completing canary testing, the canary pods must be cleaned up.
The das.deployment.replicaCount must be made zero and the release is upgraded. It can be changed in the designer-das-values.yaml file or through the --set flag as follows:
helm upgrade --install designer-das-canary -f das-values.yaml designer-das-100.0.106+xxxx.tgz --set das.deployment.strategy=canary --set das.image.tag=9.0.1xx.xx.xx --set das.deployment.color=blue --set das.deployment.replicaCount=0
Upgrade
- Identify the current production color by checking the
designer-dasservice selector labels (kubectl describe service designer-das). Green is the production color in the below example as the selector label iscolor=green.
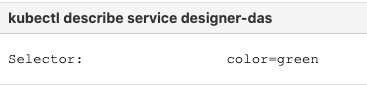
- Deploy the DAS service on to the non-production color. For the above example, blue is the non-production color and assuming the service name is
designer-das-blue):
helm upgrade --install designer-das-blue -f das-values.yaml designer-das-100.0.106+xxxx.tgz --set das.deployment.strategy=blue-green --set das.image.tag=9.0.1xx.xx.xx --set das.deployment.color=blue
The values.yaml overrides passed as an argument to the above Helm upgrade command:
das.deployment.strategy=blue-green- This denotes that the DAS service is installed using the blue-green strategy.
das.image.tag=9.0.1xx.xx.xx- This denotes the new DAS version to be installed, for example,9.0.111.05.5.
das.deployment.color=blue- This denotes that the blue color service is installed.
The non-production color can be accessed with the non-production service name.

Cutover
Once testing is completed on the non-production color, traffic can be moved to the new version by updating the designer-das service.
- Update the
designer-dasservice with the new deployment color by executing the below command. In this example, blue is the new deployment color (non-production color).
helm upgrade --install designer-das-service -f designer-das-values.yaml designer-das-100.0.106+xxxx.tgz --set das.deployment.strategy=blue-green-service --set das.deployment.color=blue - Verify the service by executing the
kubectl describe service designer-dascommand. The type label must have the active color's label, that is,color=blue.
Rollback
- If the upgrade must be rolled back, cutover has to performed again to make the service point to the old deployment (green) again. Use the below command to perform the cutover:
helm upgrade --install designer-das-service -f designer-das-values.yaml designer-das-100.0.106+xxxx.tgz --set das.deployment.strategy=blue-green-service --set das.deployment.color=green
The values.yaml overrides passed as an argument to the above Helm upgrade command:
das.deployment.strategy=blue-green-service- This denotes that the Helm install will create ingress rules for the DAS service.
das.deployment.color=green- This denotes that the current production (active) color is green. - Verify the service by executing the
kubectl describe service designer-dasthe command. The type label must have the active color's label, that is,color=green.
8.10 Validations and checks
Here are some common validations and checks that can be performed to know if the deployment was successful.
- Check if the application pods are in running state by using the
kubectl get podscommand.
- Try to connect to the Designer or DAS URL as per the ingress rules from your browser. You must be able to access the Designer and DAS webpages.
9. Post deployment procedures
Upgrading the Designer workspace
- It is mandatory to upgrade the Designer workspace for all Contact Center IDs.
- Genesys strongly recommends that you first back up the current workspace before performing the upgrade. This ensures that you can rollback to a previous state, if required.
Workspace resources must be upgraded after cutover. This will upgrade the system resources in the Designer workspace:
- Login to one of the Designer pods using the
kubectl exec -it <pod_name >bash command. - Execute the following migration command (this will create new directories/new files introduced in the new version):
node ./bin/cli.js workspace-upgrade -m -t <contact_center_id> - Execute the workspace resource upgrade command (this will upgrade system resources, such as system service PHP files, internal audio files and callback resources):
node ./bin/cli.js workspace-upgrade -t <contact_center_id>
In the above command,contact_center_id, is the Contact Center ID created in GWS for this tenant (workspace resources are located under the Contact Center ID folder (/workspaces/<ccid>/workspace)).
Updating the flowsettings file
Post deployment, the flowsettings.json file can be modified through a Helm install as follows:
- Extract the Designer Helm Chart and find the flowsettings.yaml file under the Designer Chart > Config folder.
- Modify the necessary settings (refer to the Post deployment configuration settings reference table for the different settings and their allowed values).
- Execute the below Helm upgrade command on the non-production color service. It can be done as part of the Designer upgrade by passing the flowsettings.yaml file using the
--valuesflag. In this case, a new Designer version can be used for the upgrade. If it is only a flowsettings.json update, the same Designer version is used.
helm upgrade --install designer-blue -f designer-values.yaml -f flowsettings.yaml designer-9.0.xx.tgz --set designer.deployment.strategy=blue-green --set designer.image.tag=9.0.1xx.xx.xx --set designer.deployment.color=blue - Once testing is completed on the non-production service, perform the cutover step as mentioned in the Cutover section (Designer Blue-Green deployment). After cutover, the production service will contain the updated settings. The non-active color Designer must also be updated with the updated settings after the cutover.
10. Enabling optional features
10.1 Enable Designer Analytics and Audit Trail
Post Designer deployment, features such as Analytics and Audit Trail can be enabled by performing the below steps.
10.1.1 Designer changes
- Configure the following settings in flowsettings override (flowsettings.yaml) - Refer to the 5.4 Post deployment configuration settings reference table section for option descriptions.
- enableAnalytics: true
- enableESAuditLogs: true
- esServer
- esPort
- esUrl
- Configure the below setting in the DesignerEnv transaction list:
ReportingURLin the reporting section. - Perform the steps in the Updating the flowsettings file section under 9. Post deployment procedures.
10.1.2 DAS changes
- Configure the following settings in the helm das-values.yaml file. Refer to the 4.2 DAS deployment settings section for setting descriptions.
dasEnv.envs.DAS_SERVICES_ELASTICSEARCH_ENABLED = true
dasEnv.envs.DAS_SERVICES_ELASTICSEARCH_HOST
dasEnv.envs.DAS_SERVICES_ELASTICSEARCH_PORT - Perform the steps in the Upgrade non production color section (see DAS under 8.8 Blue-Green deployment). The same DAS version running in production can be used for the upgrade.
- Perform the steps in the Cutover section (see DAS under 8.8 Blue-Green deployment).
10.2 Enable Personas
You can enable the Personas feature in Designer by following the below steps.
10.2.1 Deploy personas.json
- Deploy the personas.json file in the workspace location,
/workspace/{tenantID}/workspace/personas/personas.json. - Create the personas directory if it does not exist.
[
    {
        "id": "1",
        "name": "Samantha",
        "gender": "female",
        "tags": ["female", "middle-age", "default"],
        "displayPersona": "female, 30-40s, professional, calm",
        "voice": [{
                "name": "samantha",
                "language": "en-US",
                "ttsname": "Samantha",
                "ttsengine": "NuanceTTS",
                "displayName": "Samantha"
            }, {
                "name": "karen",
                "language": "en-AU",
                "ttsname": "Karen",
                "ttsengine": "NuanceTTS",
                "displayName": "Karen"
            }, {
                "name": "amelie",
                "language": "fr-CA",
                "ttsname": "Amelie",
                "ttsengine": "NuanceTTS",
                "displayName": "Amelie"
            }, {
                "name": "paulina",
                "language": "es-MX",
                "ttsname": "Paulina",
                "ttsengine": "NuanceTTS",
                "displayName": "Paulina"
            }
        ],
        "digital": {},
        "email": {},
        "chat": {},
        "web": {}
    },
    {
        "id": "2",
        "name": "Tom",
        "gender": "male",
        "tags": ["male", "middle-age"],
        "displayPersona": "male, 30-40s, polite, professional",
        "voice": [{
                "name": "tom",
                "language": "en-US",
                "ttsname": "Tom",
                "ttsengine": "NuanceTTS",
                "displayName": "Tom"
            }, {
                "name": "lee",
                "language": "en-AU",
                "ttsname": "Lee",
                "ttsengine": "NuanceTTS",
                "displayName": "Lee"
            }, {
                "name": "felix",
                "language": "fr-CA",
                "ttsname": "Felix",
                "ttsengine": "NuanceTTS",
                "displayName": "Felix"
            }, {
                "name": "javier",
                "language": "es-MX",
                "ttsname": "Javier",
                "ttsengine": "NuanceTTS",
                "displayName": "Javier"
            }
        ],
        "digital": {},
        "email": {},
        "chat": {},
        "web": {}
    },
    {
        "id": "3",
        "name": "Gabriela",
        "gender": "female",
        "tags": ["female", "young", "engaging"],
        "displayPersona": "female, 20-30s, engaging",
        "voice": [{
                "name": "gabriela",
                "language": "en-US",
                "ttsname": "en-US-Standard-E",
                "ttsengine": "GTTS",
                "displayName": "Gabriela"
            }, {
                "name": "sheila",
                "language": "en-AU",
                "ttsname": "en-AU-Standard-A",
                "ttsengine": "GTTS",
                "displayName": "Sheila"
            }, {
                "name": "lili",
                "language": "fr-CA",
                "ttsname": "fr-CA-Standard-A",
                "ttsengine": "GTTS",
                "displayName": "Lili"
            }
        ],
        "digital": {},
        "email": {},
        "chat": {},
        "web": {}
    },
    {
        "id": "4",
        "name": "Michael",
        "gender": "male",
        "tags": ["male", "young"],
        "displayPersona": "male, 20-30s, curious, geeky",
        "voice": [{
                "name": "michael",
                "language": "en-US",
                "ttsname": "en-US-Standard-B",
                "ttsengine": "GTTS",
                "displayName": "Michael"
            }, {
                "name": "royce",
                "language": "en-AU",
                "ttsname": "en-AU-Standard-B",
                "ttsengine": "GTTS",
                "displayName": "Royce"
            }, {
                "name": "alexandre",
                "language": "fr-CA",
                "ttsname": "fr-CA-Standard-B",
                "ttsengine": "GTTS",
                "displayName": "Alexandre"
            }
        ],
        "digital": {},
        "email": {},
        "chat": {},
        "web": {}
    },
    {
        "id": "5",
        "name": "Diane",
        "gender": "female",
        "tags": ["female", "mature"],
        "displayPersona": "female, 40-50s, soothing, silky",
        "voice": [{
                "name": "diane",
                "language": "en-US",
                "ttsname": "en-US-Standard-C",
                "ttsengine": "GTTS",
                "displayName": "Diane"
            }, {
                "name": "muriel",
                "language": "en-AU",
                "ttsname": "en-AU-Standard-C",
                "ttsengine": "GTTS",
                "displayName": "Muriel"
            }, {
                "name": "chloe",
                "language": "fr-CA",
                "ttsname": "fr-CA-Standard-C",
                "ttsengine": "GTTS",
                "displayName": "Chloe"
            }
        ],
        "digital": {},
        "email": {},
        "chat": {},
        "web": {}
    },
    {
        "id": "6",
        "name": "David",
        "gender": "male",
        "tags": ["male", "mature"],
        "displayPersona": "male, 40-50s, professional, confident",
        "voice": [{
                "name": "david",
                "language": "en-US",
                "ttsname": "en-US-Standard-D",
                "ttsengine": "GTTS",
                "displayName": "David"
            }, {
                "name": "austin",
                "language": "en-AU",
                "ttsname": "en-AU-Standard-D",
                "ttsengine": "GTTS",
                "displayName": "Austin"
            }, {
                "name": "pierre",
                "language": "fr-CA",
                "ttsname": "fr-CA-Standard-D",
                "ttsengine": "GTTS",
                "displayName": "Pierre"
            }
        ],
        "digital": {},
        "email": {},
        "chat": {},
        "web": {}
    }
]
10.2.2 Update Designer flowsettings.json
- Enable the persona
featureflag in the flowsettings.json override file.
"features": {
  "persona": true
Update application settings
Perform the following steps to enable the persona in the required Designer application:
- Open the required Designer application and navigate to the Settings tab.
- In Application Settings, select the Enable Persona checkbox in the Persona tab.
- Re-publish the application and create a new build.
11. Cleanup
11.1 Elasticsearch maintenance recommendations
To help you better manage your indexes and snapshots, and to prevent too many indexes from creating an overflow of shards, Genesys recommends that you set up a scheduled execution of Elasticsearch Curator with the following two actions:
- Delete indexes older than the given threshold according to the index name and mask.
sdr-*(3 months)audit-*(12 months)
- Make a snapshot of each index:
sdr-*(yesterday and older)audit-*kibana-int-*
12. Limitations
Designer currently supports multi-tenancy provided by the tenant Configuration Server. That is, each tenant should have a dedicated Configuration Server, and Designer can be shared across the multiple tenants.