Altocloud with advanced chat routing
Contents
- 1 Solution overview
- 2 How it works
- 3 Stage 1 - The customer visits the website
- 4 Stage 2 - The customer receives a chat offer
- 5 Stage 3 - The customer accepts the chat offer and receives a welcome message.
- 6 Stage 4 - The customer interacts with a chatbot
- 7 Stage 5 - The customer escalates to an agent
PureCloud and Altocloud offer advanced routing, auto-response, and AI capabilities that provide customized chat solutions to customers.
Solution overview
The advanced chat solution is a fully customizable and flexible solution that enables you to send targeted and tailored chat offers to your customers.
Highlights:
- Advanced routing capabilities
- Make routing decisions based on the needs and profile of the customer.
- Update routing decisions dynamically, even within a chat flow.
- Define the circumstances, such as business hours and schedules, in which a chat is routed to either a chatbot or to a human agent.
- Auto-response capabilities
- Send an automatic notification to the customer - Thanks for contacting us; we will be with you shortly.
- Send a standard bot-generated message - Thanks for waiting. How can we help you today?
- Powered by AI
- Call on a chatbot to handle interactions.
- Use Altocloud's predictive engagement features to monitor engagements, predict behavior, and respond according to configured action maps.
How it works
To illustrate how these advanced chat features can enhance the customer journey, we'll walk through a typical customer journey. For the purposes of this article, let's say the customer is shopping online. We'll break the journey down into five stages:
- Stage 1 - The customer visits a website configured with Altocloud
- Tasks - Add the Altocloud snippet to your website and configure web tracking in Altocloud.
- Stage 2 - The customer receives a chat offer.
- Tasks - Add a web chat widget to your website and configure Altocloud.
- Stage 3 - The customer accepts the chat offer and receives a welcome message.
- Tasks - Configure auto-responses.
- Stage 4 - The customer interacts with a chatbot.
- Tasks - Configure the chat flow, link a chat flow to a web chat widget, and call on a chatbot.
- Stage 5 - The customer escalates to an agent.
- Tasks - Define the routing strategy.
Stage 1 - The customer visits the website
In the first stage of the customer journey, the customer visits the website, which is configured with Altocloud for predictive engagement. Altocloud monitors the customer's engagement and decides how and when to engage the customer to achieve a defined desired outcome.
To enable Altocloud to monitor the customer journey, follow the instructions in the table below.
Important: First ensure you meet all Altocloud prerequisites, as described here.
| Task |
Notes |
| Add the Altocloud snippet to your website |
|
| Configure web tracking in Altocloud |
Stage 2 - The customer receives a chat offer
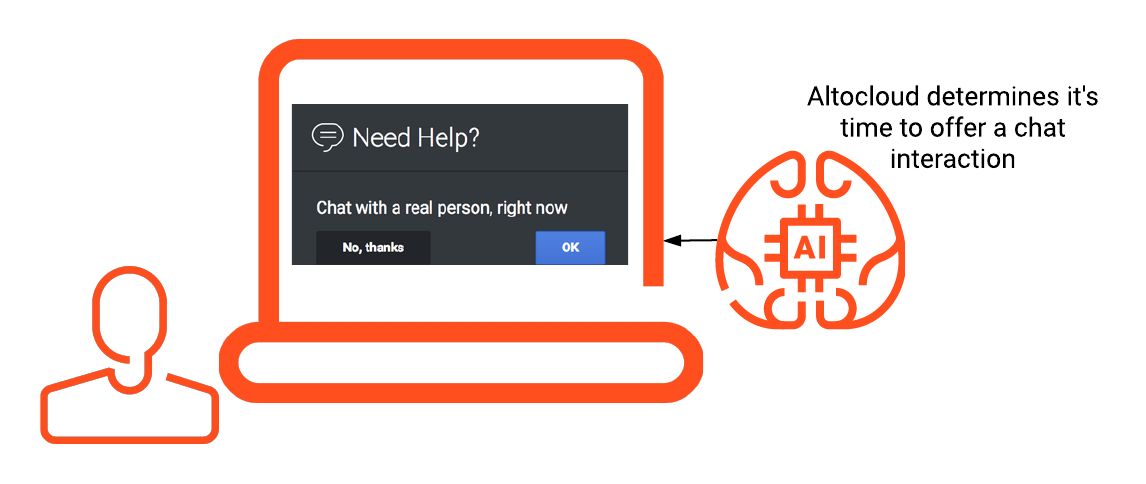
For this example, let's say your customer browses through the promotional offers on your website and eventually adds items to the cart. The customer then leaves the shopping cart and continues to browse the website. The browsing continues for several minutes, but nothing new is added to the shopping cart. The likelihood that the customer will abandon the shopping cart and leave the website increases, so a popup window appears on-screen, inviting the customer to chat with an agent.
For this scenario to happen, create a widget (Version 2) for web chat and configure Altocloud, as outlined in the tables below.Widget configuration
To add the widget for web chat (Version 2) to your website, follow the instructions below. Click the links to see detailed procedures and samples.
| Task |
Notes |
| Create the widget and route it to a chat flow |
Follow the Version 2 widget procedures to complete this task. |
| Add the deployment key to your website |
Altocloud configuration
To configure Altocloud, follow the instructions below. Pay attention to the Notes column for special instructions or configuration notes. The links take you to the documented procedures in the Altocloud documentation.
| Task |
Notes |
| Create a segment in Altocloud |
|
| Create an outcome in Altocloud |
|
| Configure user engagement in Altocloud |
Important: Make sure to select web chat as the engagement method. |
| Build an action map in Altocloud |
|
| Apply an action map to your website |
|
| Route to a target queue |
Important: If chatbots will handle interactions, do not enable Route if agents available. |
| Design the chat offer and chat window |
Resources
Stage 3 - The customer accepts the chat offer and receives a welcome message.
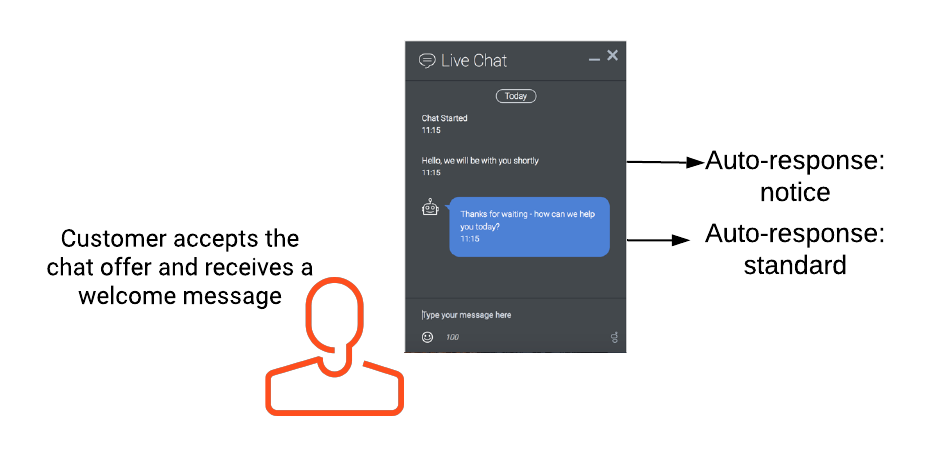
The customer accepts the chat offer, the chat window opens, and the customer sees the following message: Hello, we will be with you shortly. This is an example of an auto-response notice. This type of response appears as a system message to the customer.
A few seconds later, the following message appears: Thanks for waiting - how can we help you today? This time, a bot avatar appears next to the message. This is a standard auto-response and is bot-generated. The purpose is to extract preliminary information from the customer.Refer to the Resources section below to learn more about these options and their associated procedures.
Resources
Stage 4 - The customer interacts with a chatbot
In this stage of the journey, the customer begins interacting with a chatbot.
- Chatbot: Thanks for waiting - how can we help you today?
- Customer: I'm wondering about the return policy on these shoes in my shopping cart. I can't find the information on your website.
- Chatbot: You have 30 days from the purchase date to return any item purchased on our website.
- Customer: OK. Thanks. One more question - I want to purchase a loyalty card. Can you help me with that?
- Chatbot: Please hold while I transfer you to an agent.
To enable this type of interaction, complete tasks outlined in the table below.
| Task |
Notes |
| Create a flow in Architect |
Ensure the flow is linked to the widget for web chat. See Stage 2. |
| Call on a chatbot for a supported chatbot integration |
Resources
Stage 5 - The customer escalates to an agent
The chatbot explained the return policy and then asked the customer if there were any more questions:
- Chatbot: Do you have any further questions?
- Customer: Yes, I want to speak to an adviser about purchasing a loyalty card.
- Chatbot: Please hold for a customer service associate.
At this point, you can decide which queue you want to route the customer to. You have two general options: use the suggested queue or define a queue.
Use suggested queue
For this option, you can use the queue defined in the Altocloud Route to a target option. If no queue is specified in Altocloud, you can use the default queue specified in the website configuration.
Define a queue
If you don't want to use the suggested queue, you can use data actions to do the following:
- Perform a detail visitor lookup in Altocloud and then suggest a queue based on the search results. For example, if the lookup shows the customer is likely ready to buy something, then it would suggest you route to a live agent in a sales queue.
- Choose a queue based on some other pre-defined criteria:
- Data dips allow customers to gather specific metrics about a given queue before making a decision.
- Use schedules to determine which queue to route to.
The tasks required to complete this section depend on your routing choices. See the Resources section below to learn more about routing and queue configuration.


