Running Containers
Instructions to run the Docker containers.
The following content has been deprecated and is maintained for reference only.
Running Containers
| Note: At the end of this topic, you will be provided with a terminal to an environment that has all the prerequisites (such as Docker and Kubernetes) up and running. You can practice your commands in this tutorial without any need to setup your own environment. |
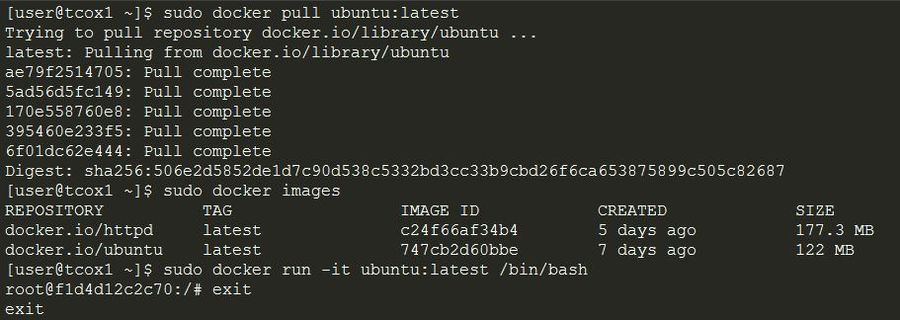
Containers are running instances of an Image. To run containers, follow these steps:
- Create a container from the base image for the latest version of the Ubuntu that is available.
- Important
- If you do not have an Ubuntu base image installed locally, extract the latest one for your local repository.
- You must start the container in interactive mode attached to the current terminal and running the bash shell.
- After running, make sure you shut down the container by running 'exit'.
Lifecycle
The following commands illustrate the Docker Lifecycle:
docker createcreates a container but does not start the container.docker renameallows the container to be renamed.docker runcreates and starts a container in a single operation.docker rmdeletes a container.docker updateupdates a container's resource limits.
Usually, when you run a container without options, it will start and stop immediately. If you want the container to keep running, you can use the command, docker run -td container_ID. This command uses the option-t to allocate a pseudo-TTY session and option-d to detach the container automatically (you can run container in background and print the container ID).
To have a transient container, use the command docker run –rm. This command will remove the container after it stops.
To map a directory on the host to a docker container, use the command docker run -v $HOSTDIR:$DOCKERDIR<.
To remove the volumes associated with the container, the deletion of the container must include the option-vswitch like in docker rm -v.
There is also a logging driver available for individual containers in docker 1.10. To run docker with a custom log driver (that is syslog), use the command docker run --log-driver=syslog.
docker run --name yourname docker_image is a useful command because when you specify --name inside the run command, you can start and stop a container by calling it with the name that you specified when you created it.
Starting and Stopping a Container
Commands to start and stop a container:
docker startstarts a container so it is running.docker stopstops a running container.docker restartstops and starts a container.docker pausepauses a running container, "freezing" it in place.docker unpauseunpauses a running container.docker waitblocks until running container stops.docker killsends a SIGKILL signal to a running container.docker attachconnects to a running container.
To integrate a container with a host process manager, start the daemon with the commands -r=false and then use docker start -a.
You can practice the above-mentioned commands using the following widget:


