How to create a chatbot
Contents
Create your first chatbot in Genesys Multicloud CX—or configure Genesys Multicloud CX to use a third-party bot
Before you get started, read the Customer Service Automation Solution Guide to understand what Designer and Dialog Engine are, and how they work together to help your bots discover and satisfy customer intent.
As you saw in the Customer Service Automation Solution Guide, even though people tend to think of a bot as a standalone component, the bots you create in Dialog Engine detect the customer's intent and fill in any associated slots, while the conversation itself is actually controlled by Designer, which also handles the workflow for the entire journey.
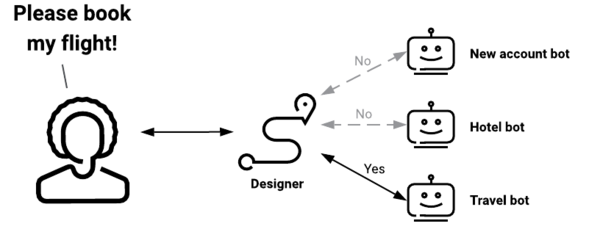
In this article, you will use Dialog Engine to write a bot that books a flight for people traveling on an airline. But just like the windshield claim bot in the Solution Guide, Designer has to select this specific bot from among the ones that are available:
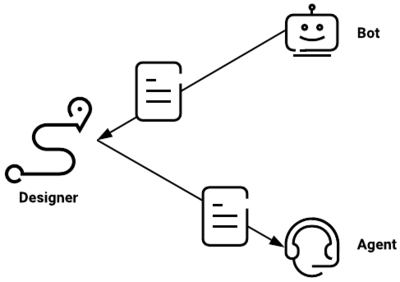
And once the bot has collected the necessary flight information from the customer, Designer takes control again, either booking the ticket on its own or, as shown here, transferring the customer—and all relevant information—to an agent:
Prerequisites
Here's what you'll need before you proceed:
- Access to Genesys Cloud CX, with permissions for Dialog Engine
- Make sure you understand the key terms used with Dialog Engine
- An admin who understands how to work with Designer
- A Designer application to add your bot to
If you need to learn more about Designer, follow the above links. Once you have your Designer application ready, you can continue with this article.
If you're using a third-party bot...
Also, if you're going to use a third-party bot from Amazon Lex, Google Dialogflow or Microsoft Luis, have the bot ready before you continue, read the overview, and then skip ahead to the section that shows how to add a bot resource in Designer.
Create the bot in Dialog Engine
The first bot is for practice, just to give you a feel for what you'll need to do for your own bot.
Do the following things now:
- Access Dialog Engine
- Follow the instructions on Create your first chat bot
After you're done, create your own bot—with your own slots and utterances—using the same method you used to create the TravelBot.
Add a bot resource in Designer
- Add a bot resource to Designer's Bot Registry
Add a bot block to your application
Your Designer application needs a Bot block to handle your bot's portion of the customer journey.
- Add a bot block to your Designer application
You're done!
Your Designer application can now use your new bot to collect natural language input from a customer—and take appropriate action based on that conversation.


